Alleen voor gebruik binnenshuis For indoor use only Nur für Innen gebrauch Pour l'usage d'intérieur seulement Do użytku wewnątrz pomieszczeń
|
|
|
- Agata Michalik
- 6 lat temu
- Przeglądów:
Transkrypt
1


2 Alleen voor gebruik binnenshuis For indoor use only Nur für Innen gebrauch Pour l'usage d'intérieur seulement Do użytku wewnątrz pomieszczeń Bewaar deze handleiding bij het apparaat Keep these instructions with this appliance Halten Sie diese Anweisungen mit diesem Gerät Gardez ces instructions avec cet appareil Zachowaj instrukcję urządzenia 320 W 2

3 GEBRUIKSAANWIJZING USER INSTRUCTIONS GEBRAUCHSANWEISUNG MODE D EMPLOI INSTRUKCJA OBSŁUGI 3
4 Geachte klant, Leest u deze gebruiksaanwijzing zorgvuldig helemaal door voordat u het apparaat aansluit, om schade door verkeerd gebruik te voorkomen. Lees vooral de veiligheidsvoorschriften aandachtig door. Veiligheidsvoorschriften Onjuiste bediening en verkeerd gebruik van het apparaat kan ernstige schade aan het apparaat en verwonding van personen tot gevolg hebben. Het apparaat mag alleen worden gebruikt voor het doel waarvoor het werd ontworpen. De fabrikant aanvaardt geen enkele aansprakelijkheid voor schade als gevolg van onjuiste bediening en verkeerd gebruik. Zorg dat het apparaat en de stekker niet met water of een andere vloeistof in aanraking komen. Mocht het apparaat onverhoopt in het water vallen, trek dan onmiddellijk de stekker uit het stopcontact en laat het apparaat controleren door een erkend vakman. Niet-naleving hiervan kan levensgevaar opleveren. Probeer nooit zelf de behuizing van het apparaat te openen. Steek geen voorwerpen in de behuizing van het apparaat. Raak de stekker niet met natte of vochtige handen aan. Controleer stekker en snoer regelmatig op eventuele beschadiging. Indien stekker of snoer beschadigd is, laat het bij een erkend reparatiebedrijf repareren. Gebruik het apparaat niet nadat het is gevallen of op andere wijze beschadigd is. Laat het bij een erkend reparatiebedrijf controleren en zo nodig repareren. Probeer het apparaat niet zelf te repareren. Dit kan levensgevaar opleveren. Zorg dat het snoer niet met scherpe of hete voorwerpen in aanraking komt en houdt het uit de buurt van open vuur. Als u de stekker uit het stopcontact wilt trekken, pak dan altijd de stekker zelf beet en trek nooit aan het snoer. Zorg dat niemand het snoer (of verlengsnoer) abusievelijk kan lostrekken of erover kan struikelen. Dit apparaat is uitsluitend bedoeld voor het snijden van voedsel. Houd het apparaat als u het gebruikt steeds in de gaten. Kinderen zien de gevaren van onjuist gebruik van elektrische apparaten niet. Laat kinderen daarom nooit zonder toezicht met huishoudelijke apparatuur werken. Trek altijd de stekker uit het stopcontact als het apparaat niet wordt gebruikt en telkens voordat het wordt schoongemaakt. Gevaar! Zo lang de stekker in het stopcontact zit, staat het apparaat onder de netspanning. Schakel het apparaat uit voordat u de stekker uit het stopcontact trekt. Draag het apparaat nooit aan het snoer. Speciale veiligheidsvoorschriften Gebruik geen extra hulpmiddelen die niet bij het apparaat zijn meegeleverd. Attentie! Zorg dat het elektriciteitssnoer tijdens het gebruik van het apparaat niet in aanraking komt met hete onderdelen of met het mes. Gebruik de machine niet om bevroren voedsel, vlees dat niet is uitgebeend, vis of andere dingen dan voedsel te snijden. De machine is voorzien van beveiligingen, toch dient u te allen tijde bij het mes en de bewegende delen vandaan te blijven. Gebruik de machine niet, zodra de diameter van het mes 6 millimeter kleiner is geworden. Vervang het mes. 4
5 Voorbereiding voor eerste ingebruikname Controleer of alle onderdelen inbegrepen zijn. Indien u onderdelen mist, neem contact op met uw leverancier. Verwijder al het verpakkingsmateriaal. Reinig de machine met handwarm water en een zachte doek. Reinig het mes. Wees zeer voorzichtig, mes is zeer scherp. Wanneer de slijpvoorziening niet gemonteerd is, ga dan als volgt te werk: 1 Bovenaanzicht van de machine 3 Borg de slijpvoorziening aan de machine door de borging aan te draaien. Controleer of de slijpvoorziening vast zit voordat u de machine in gebruik neemt. 2 Plaats de slijpmodule zo dat het mes niet tussen de slijpwieltjes door loopt LET OP! De slijpvoorziening is voorzien van een veiligheidsschakelaar. Indien de slijpvoorziening niet is gemonteerd, kunt u de machine niet inschakelen Monteer de handafschermer 1 Plaats de beide schroeven in de slede 3 Plaats de twee sluitringen 2 Plaats de handbeschermer 4 Draai de twee dopmoeren aan LET OP: het gebruiken van de machine zonder de voorgeschreven montage van de handbeschermer wordt afgeraden! Dit zijn veiligeheidsvoorzieningen die mogelijk verwondingsgevaar uitsluiten. Indien u deze voorzieningen niet monteert, bestaat het risico op verwondingen. Zorg ervoor dat er rondom de machine minstens 10cm vrij blijft, Dit in verband met de ventilatie van de machine Plaats de machine zo dat de stekker te allen tijde bereikbaar is. 5
6 Gebruiksaanwijzing Plaats de machine dusdanig, dat de aan/uit schakelaar naar de gebruiker toegekeerd is. Wanneer de slijpvoorziening niet gemonteerd is, ga dan als volgt te werk: o Plaats de slijpvoorziening in zijn steun zodat het mes niet tussen wieltjes doorloopt. o Draai de veiligheidsschroef op de slijpvoorziening aan. o LET OP! De slijpvoorziening is voorzien van een veiligheidsschakelaar. De machine kan niet worden ingeschakeld indien de slijpvoorziening niet is gemonteerd. Steek de stekker in de wandcontactdoos. Stel de gewenste dikte in door aan de knop met de schaalverdeling te draaien. Zet het apparaat aan met de aan/uit schakelaar. Het mes gaat nu draaien. Plaats het te snijden product op de wagen. Klem het product met de hiervoor aanwezige klem. Zorg ervoor dat het product tegen de aanslag aan ligt. Zet na het snijden de machine uit met de aan/uit schakelaar. Het mes stopt met draaien. Draai de knop voor de instelling van de dikte terug naar 0. Reiniging en onderhoud Draai de dikte-instelknop tegen de klok in naar "0", Voordat u het apparaat schoonmaakt altijd eerst de stekker uit het stopcontact. Let op: Nooit het apparaat in water of een andere vloeistof onderdompelen! De buitenkant maakt u schoon met een vochtig doekje (water met mild reinigingsmiddel). Gebruik nooit agressieve schoonmaakmiddelen of schuurmiddelen. Geen scherpe en puntige voorwerpen gebruiken. Geen benzine of oplosmiddelen gebruiken! Schoonmaken met een vochtige doek en eventueel afwasmiddel, geen schurende middelen gebruiken. Reinig het mes met alcohol. LET OP! Het mes is zeer scherp. Wanneer de wagen niet meer soepel beweegt, leg de machine dan op de zijkant. Maak de glijstang zorgvuldig schoon en smeer deze in met vaseline Probleem Mogelijke oorzaak Oplossing Machine snijdt niet Mes bot Slijp het mes goed Machine is vuil Reinig de machine Machine stopt met Laat de machine geruime tijd afkoelen. De thermisch Motor te warm snijden beveiliging van de motor schakelt vanzelf weer in. Wagen glijdt niet soepel Glijstang vuil Reinig de glijstang en smeer met vaseline Neem in geval van twijfel altijd contact op met uw leverancier! 6
7 Slijpen van het mes Uitvoeren wanneer het mes bot geworden is. Wij wijzen u erop dat het mes zeer slijtvast is en dus slechts een keer per jaar geslepen hoef te worden bij regelmatig en juist gebruik. Zet de machine uit (de machine is voorzien van een veiligheidsschakelaar en schakelt vanzelf uit indien de slijpvoorziening wordt verwijderd) Zet de knop van de dikte-instelling op 0 Reinig het mes. Draai de borgknop van de slijper los. Trek de slijper omhoog en draai hem 180. Laat de slijper zakken totdat deze weer in de vergrendeling valt. Zet de slijper vast door de borgknop weer aan te draaien. Zet de machine aan. Het mes begint nu te draaien. Druk met de knop de schuinstaande slijpsteen tegen het mes en houd de slijpsteen 2 minuten tegen het mes aan. De slijpsteen moet nu met het mes mee gaan draaien. Druk met de knop de rechtopstaande slijpsteen korte tijd tegen het mes om de bramen van het slijpen van het mes te verwijderen. De slijpsteen moet nu met het mes mee gaan draaien. Zet de machine uit en trek de stekker uit het wandcontact. Draai de borgknop van de slijper los en reinig de slijpstenen met alcohol. Zet de slijper weer in de oorspronkelijke wijze op de machine en draai de borgknop aan. Het mes moet niet tussen de slijpstenen doorlopen. Reinig het mes met alcohol. LET OP! Het mes is zeer scherp. Steek de stekker in het wandcontact. De machine is nu weer klaar voor gebruik. Technische gegevens Voedingsspanning Stroomverbruik Diameter mes Garantie Slicer 220mm 230~240 VAC/50 Hz 210 W 220 mm Elk defect, met uitzondering van normale slijtage en de lampjes, waardoor de werking van het apparaat nadelig wordt beïnvloed dat zich binnen één jaar na aankoop van het apparaat voordoet, wordt gratis hersteld door reparatie of vervanging, mits het apparaat conform de instructies is gebruikt en onderhouden en niet op enigerlei wijze verkeerd is behandeld of misbruikt. Dit laat onverlet uw bij wet bepaalde rechten. Als de garantie van kracht is, vermeld dan waar en wanneer u het apparaat hebt gekocht en sluit een koopbewijs bij (bijv. kassabon). Gezien ons streven naar voortdurende verdere productontwikkeling behouden wij ons het recht voor, zonder voorafgaande kennisgeving wijzigingen aan te brengen aan product, verpakking en documentatie. Afdanken Aan het einde van de levensduur, het apparaat afdanken volgens de op dat moment geldende voorschriften en richtlijnen. 7
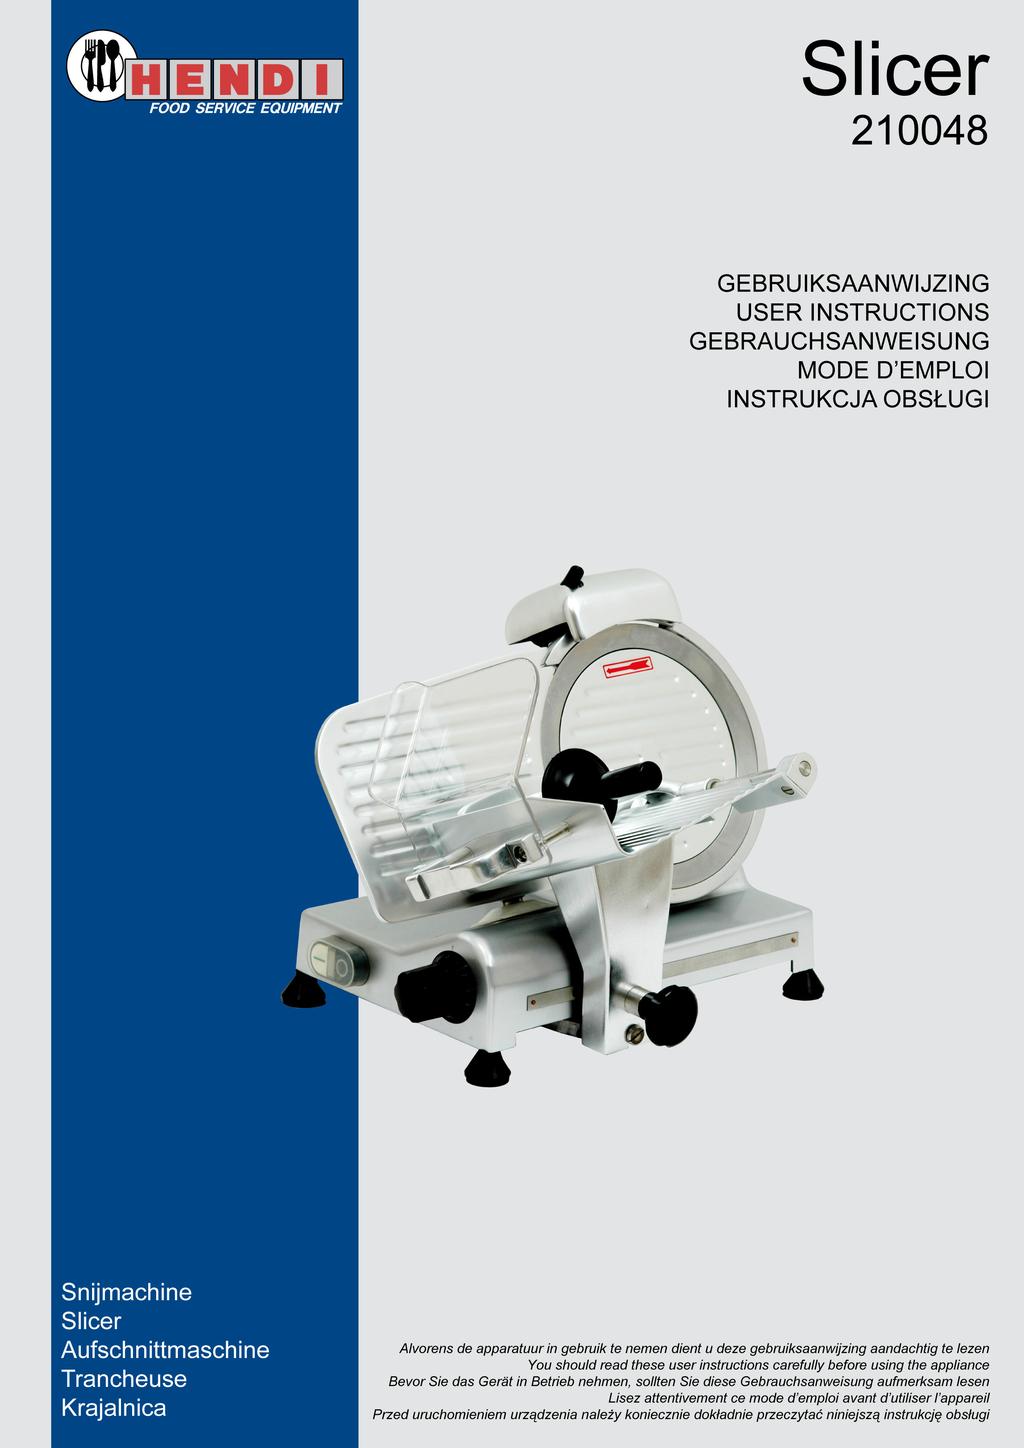
8 Onderdelen diagram 1 Slijper voor mes 2 Aanslag 3 Wagen 4 Aan/uit schakelaar 5 Knop voor instellen snijdikte 6 Producthouderarm 7 Mesafscherming 8 Mes 8
9 Dear customer, Please read these user instructions carefully before connecting the appliance to prevent damage due to improper use. Please pay special attention to the safety regulations. Safety regulations Incorrect operation and improper use of the appliance can seriously damage the appliance and injure users. The appliance may only be used for the purpose for which it was intended and designed. The manufacturer is not liable for any damage caused by incorrect operation and improper use. Keep the appliance and the plug away from water and any other liquids. In the unlikely event that the appliance should fall into water, immediately pull the plug out of the socket and have the appliance checked by a certified technician. Not following these instructions could give rise to life-threatening situations. Never try to open the casing of the appliance yourself. Do not insert any objects in the casing of the appliance. Do not touch the plug with wet or damp hands. Regularly check the plug and cord for any damage. Should the plug or cord be damaged have it/them repaired by a certified repair company. Do not use the appliance after it has fallen or is damaged in any other way. Have it checked and repaired, if necessary, by a certified repair company. Do not try to repair the appliance yourself. This could give rise to life-threatening situations. Make sure the cord does not come in contact with sharp or hot objects and keep it away from open fire. To pull the plug out of the socket, always pull on the plug and not on the cord. Make sure that no one can accidentally pull the cord (or extension cord) loose or trip over the cord. This appliance is intended exclusively for slicing food. Always keep an eye on the appliance when in use. Children do not understand that incorrect use of electrical appliances can be dangerous. Therefore, never let children use home appliances without supervision. Always pull the plug out of the socket when the appliance is not being used and always before cleaning. Warning! As long as the plug is in the socket the appliance is connected to the power source. Turn off the appliance before pulling the plug out of the socket. Never carry the appliance by the cord. Special safety regulations Do not use any extra devices that are not supplied along with the appliance. Warning! Make sure the electricity cord does not come in contact with hot parts or the blade while the appliance is in use. Do not use the appliance to slice frozen food, meat that has not been deboned, fish or any nonfood products. Though the appliance has built-in safety features, keep away from the blade and moving parts at all times. Stop using the appliance as soon as the blade's diameter has become thinner than 6 mm. Replace the blade. 9
10 Preparations before using for the first time Check to make sure no parts are missing. If any parts are missing, contact your supplier. Remove all the packing material. Clean the appliance with lukewarm water and a soft cloth. Clean the blade. Be careful: the blade is very sharp. If the sharpening device is not attached, proceed as follows: 1 Top view of the appliance 3 Secure the sharpening device to the machine by tightening the holder. Check to make sure that the sharpening device is well secured before using the machine. 2 Attach the sharpening module in such a way that the blade does not move between the wheels. NOTE! The sharpening device is equipped with a safety switch. If the sharpening device is not properly attached, you will not be able to use the appliance. Attach the hand guard. 1 Place both screws in the carriage. 3 Place the two washers over the bolts. 2 Attach the hand guard. 4 Screw on the two dome nuts. NOTE! You are advised not to use the appliance if the hand guard are not attached as instructed! These are safety features that will prevent possible injury. If you do not attach these features, there will be a risk of injury. Keep open a space of at least 10 cm around the appliance to allow for adequate ventilation. Position the appliance in such a way that the plug is always accessible. 10
11 Instructions for use Position the appliance so that the on/off switch is facing the user. If the blade sharpener has not been installed, proceed as follows: o Position the blade sharpener in its support so that the blade does not extend between the gears. o Tighten the safety screw on the blade sharpener. Turn the appliance off (the appliance is equipped with a safety switch and will turn off automatically if the sharpening device is removed) Push the plug in the wall socket. Turn the dial with the graduated scale to the desired slice thickness. Switch on the appliance using the on/off switch. The blade will start to turn. Put the food product on the carriage and adjust the clamp to hold the product firmly in place. Make sure the product is positioned against the stop plate. Once the product has been sliced, switch off the appliance with the on/off switch. The blade will stop turning. Turn the thickness dial back to 0. Cleaning and maintenance Turn the slice thickness dial in counterclockwise direction to the "0" position, Always pull the plug from the socket before cleaning the appliance. Warning: Never submerge the appliance in water or other liquids! Use a damp cloth to clean surfaces (solution of water and a mild cleaning agent). Never use corrosive or abrasive cleaning agents. Do not use sharp or pointed objects for cleaning. Do not use benzene or solvents! Clean with a damp cloth. Use washing-up liquid if needed, but never abrasive cleaning agents. Clean the blade with alcohol. WARNING! The blade is extremely sharp. If the food carriage stops sliding smoothly, lay the machine on its side. Clean the slide bar carefully and lubricate it with Vaseline 11
12 Problem Possible cause Solution Blunt blade Sharpen blade Appliance does not slice well Dirty appliance Clean the appliance Appliance stops slicing Overheated motor Let the machine cool off for an extended period. The motor s safety thermostat will reset itself automatically. Carriage does not slide Dirty slide bar Clean the slide bar and lubricate with Vaseline When in doubt, always contact your supplier! Sharpening the blade Sharpen the blade when it becomes blunt. The blade is extremely resistant to wear. If used regularly and properly, it should only need to be sharpened once a year. Pull the plug from the wall socket. Turn the thickness dial to 0. Clean the blade. Unscrew the sharpener s locking knob. Lift the sharpener from the locking device and turn it 180. Lower the sharpener until it slips back into the locking device. Fix the sharpener in place by tightening the locking knob. Switch on the appliance. The blade will start to turn. Use the button to press the tilted sharpening stone against the blade and keep it there for 2 minutes. The sharpening stone should turn along with the blade. Use the button to press the vertical sharpening stone briefly against the blade to remove burrs. The sharpening stone should turn along with the blade. Switch off the appliance and pull the plug from the wall socket. Unscrew the sharpener s locking knob and clean the sharpening stones with alcohol. Replace the sharpener in its original position on the appliance and tighten the locking knob to fix it in place. The blade must not extend between the sharpening stones. Clean the blade with alcohol. WARNING! The blade is extremely sharp. Push the plug in the wall socket. The appliance is ready for use. Technical data AC power supply Power consumption Blade diameter Guarantee Slicer 220mm 230~240 VAC/50 Hz 210 W 220 mm Any defect, with the exception of normal wear and failure of the lights, affecting the functionality of the appliance which becomes apparent within one year of its purchase will be corrected by free repair or replacement provided that it has been used and maintained in accordance with the instructions and has not been abused or misused in any way. Your statutory rights are not affected. If it s under guarantee, state where and when it was bought, and include proof of purchase (e.g. bill receipt). In line with our policy of continuous product development we reserve the right to change product, packaging and documentation specifications without notice. Discard At the end of the life of the appliance, please cast of the appliance according to the regulations and guidelines applying on that moment. 12
13 Slicer parts 1 Blade sharpener 2 Stop plate 3 Carriage 4 On/off switch 5 Slice thickness dial 6 Product clamp 7 Blade guard 8 Blade 13
14 Sehr geehrte(r) Kunde/in! Diese Bedienungsanleitung bitte vor dem Anschluss des Geräts gründlich lesen, um durch unsachgemäße Bedienung entstandene Schäden zu verhindern. Die Sicherheitsvorschriften besonders sorgfältig lesen. Sicherheitsvorschriften Die unsachgemäße Bedienung des Geräts kann zur schweren Beschädigung des Geräts sowie zu Verletzungen führen. Das Gerät ist ausschließlich zu dem Zweck zu benutzen, zu dem es hergestellt wurde. Der Hersteller haftet nicht für Schäden, die auf unsachgemäße Bedienung des Geräts zurückzuführen sind. Den Kontakt des Gerätes und des Steckers mit Wasser oder einer anderen Flüssigkeit vermeiden. Den Stecker unverzüglich abziehen und das Gerät von einem anerkannten Fachmann prüfen lassen, wenn das Gerät unbeabsichtigterweise ins Wasser fällt. Bei Nichteinhaltung dieser Sicherheitsvorschriften besteht Lebensgefahr. Nie eigenständig das Gehäuse des Geräts zu öffnen versuchen. In das Gehäuse des Geräts keine Gegenstände einführen. Den Stecker nicht mit nassen oder feuchten Händen berühren. Den Stecker regelmäßig auf eventuelle Schäden hin prüfen. Beschädigte Stecker oder Kabel von einem anerkannten Reparateur reparieren lassen. Das Gerät nicht mehr benutzen, wenn es herunterfiel oder sonstwie beschädigt wurde. Das Gerät von einer zugelassenen Reparaturwerkstatt prüfen und erforderlichenfalls reparieren lassen. Nicht versuchen, das Gerät eigenständig zu reparieren. Dann kann Lebensgefahr entstehen. Das Kabel von scharfen und heißen Gegenständen sowie von offenem Feuer fernhalten. Beim Abziehen des Steckers stets am Stecker und nicht an dem Kabel ziehen. Tragen Sie dafür Sorge, dass das (Verlängerungs-) Kabel nicht irrtümlicherweise gelöst werden kann und dass man nicht darüber stolpern kann. Dieses Gerät dient ausschließlich zum Schneiden von Nahrungsmitteln. Das Gerät bei Bedienung stets überwachen. Kinder kennen die Gefahr der unsachgemäßen Bedienung elektrischen Geräts nicht. Kinder daher niemals unbeaufsichtigt Haushaltsgerät bedienen lassen. Den Stecker stets abziehen, wenn das Gerät nicht benutzt wird und auch vor jeder Reinigung. Gefahr! Befindet sich der Stecker in der Steckdose, so wird das Gerät mit Netzspannung versorgt. Das Gerät ausschalten, bevor Sie den Stecker abziehen. Das Gerät nie am Kabel tragen. Spezielle Sicherheitsvorschriften Keine zusätzlichen Hilfsmittel benutzen, die nicht mit dem Gerät mitgeliefert wurden. Achtung! Tragen Sie dafür Sorge, dass das Stromkabel bei eingeschaltetem Gerät nicht mit heißen Teilen oder mit dem Messer in Kontakt kommt. Mit der Maschine kein Gefriergut, unverarbeitetes Fleisch, Fisch oder Nichtnahrungsmitteln schneiden. Obwohl die Maschine Schutzvorrichtungen hat, sollten Sie sich jederzeit von dem Messer und den beweglichen Teilen fernhalten. Die Maschine nicht mehr benutzen, wenn der Messerdurchmesser um 6 mm geringer wurde. Das Messer wechseln. 14
15 Vorbereitung der erstmaligen Inbetriebnahme Prüfen Sie, ob alle Teile geliefert wurden. Bitte setzen Sie sich mit Ihrem Lieferanten in Verbindung, wenn Teile fehlen. Die gesamte Verpackung entfernen. Das Gerät mit handwarmem Wasser und einem weichen Tuch reinigen. Das Messer reinigen. Vorsicht! Das Messer ist sehr scharf. Wurde die Schleifvorrichtung nicht montiert, bitte folgendermaßen vorgehen: 1 Draufsicht der Maschine 3 Die Schleifvorrichtung der Maschine sichern, indem Sie den Haltering anziehen. Vor der Inbetriebnahme der Maschine die Festigkeit der Schleifvorrichtung prüfen. 2 Das Schleifmodul so einbauen, dass das Messer nicht durch die Schleifrädchen läuft. ACHTUNG! Aus Sicherhetsgründen kann dass Gerät nur nach Montage der Schleifvorrichtung in Betrieb genommen werden Den Handschutz einbauen. 1 Beide Schrauben in den Schlitten stecken. 3 Die beiden Unterlegscheiben platzieren. 2 Den Handschutz platzieren. 4 Die beiden Kapselmuttern anziehen. ACHTUNG: Vom Gebrauch der Maschine ohne den vorgeschriebenen Einbau des Handschutzes wird abgeraten! Dabei handelt es sich um Sicherheitsvorrichtungen, die den Bediener vor möglichen Verletzungen schützen. Bauen Sie diese Vorrichtungen nicht ein, besteht Verletzungsgefahr. Die Maschine sollte für die Ventilation einen Freiraum von mindestens 10 cm haben. Die Maschine dermaßen aufstellen, dass der Stecker jederzeit zu erreichen ist. 15
16 Bedienungsanleitung Die Maschine so aufstellen, dass der Benutzer den Ein-/Ausschalter betätigen kann. Folgendermaßen vorgehen, wenn die Schleifvorrichtung nicht eingebaut wurde: o Die Schleifvorrichtung in die Halterung stecken, damit das Messer nicht durch die Räder läuft. o Die Sicherungsschraube der Schleifvorrichtung anziehen. Die Maschine ausschalten (Die Maschine hat einen Sicherheitsschalter und schaltet sich selbsttätig aus, wenn die Schleifvorrichtung entfernt wird.). Den Stecker in die Steckdose stecken. Die erwünschte Dicke einstellen, indem Sie den Knopf mit der Skala drehen. Das Gerät mit dem Ein-/Ausschalter einschalten. Das Messer dreht sich nun. Das Schneidgut auf den Wagen legen. Das Produkt mit der dazu dienenden Klemme einklemmen. Das Produkt sollte sich am Anschlag befinden. Die Maschine nach dem Schneidvorgang mit dem Ein-/Ausschalter ausschalten. Das Messer hört zu drehen auf. Den Knopf der Dickeneinstellung wieder auf 0 schalten. Reinigung und Wartung Knopf gegen die Uhrzeit auf "0" drehen Vor jeder Reinigung stets den Stecker abziehen. Achtung: Tauchen Sie das Gerät nicht in Wasser oder andere Flüssigkeiten ein! Das Gehäuse mit einem feuchten Tuch (Wasser mit einem milden Reinigungsmittel) reinigen. Keine aggressiven Reinigungs- oder Scheuermittel benutzen. Keine scharfen, spitzen Gegenstände benutzen. Kein Benzin und keine Lösungsmittel benutzen! Das Gerät mit einem feuchten Tuch und eventuell Spülmittel reinigen. Keine Scheuermittel benutzen. Das Messer mit Alkohol reinigen. ACHTUNG! Das Messer ist sehr scharf. Bewegt sich der Wagen nur noch ruckartig, die Maschine seitlich ablegen. Die Gleitstange gründlich reinigen und mit Vaselin schmieren. 16
17 Problem Mögliche Ursache Lösung Schneidevorgang Messer stumpf Messer schleifen ruckartig Maschine schmutzig Maschine reinigen Schneidevorgang unterbrochen Motor zu heiß Die Maschine lange abkühlen lassen. Temperatursicherung des Motors schaltet sich selbsttätig wieder ein. Wagen holpert Gleitstange schmutzig Die Gleitstange reinigen und mit Vaselin schmieren Setzen Sie sich im Zweifelsfall mit Ihrem Lieferanten in Verbindung! Schleifvorgang Durchzuführen, wenn das Messer stumpf ist. Wir machen Sie darauf aufmerksam, dass das Messer besonders abnutzungsfest ist und man es daher bei regelmäßigem, sachgemäßem Gebrauch nur einmal im Jahr zu schleifen braucht. Den Stecker abziehen. Den Knopf der Dickeneinstellung auf 0 schalten. Das Messer reinigen. Den Sicherungsknopf der Schleifvorrichtung lösen. Die Schleifvorrichtung hochziehen und 180 wenden. Die Schleifvorrichtung herabsenken bis sie einrastet. Die Schleifvorrichtung befestigen, indem Sie den Sicherungsknopf anziehen. Die Maschine einschalten. Das Messer dreht sich nun. Mit dem Knopf den schrägen Schleifstein zum Messer drücken und den Schleifstein zwei Minuten lang an das Messer halten. Der Schleifstein sollte sich nun mit dem Messer mitbewegen. Mit dem Knopf den senkrechten Schleifstein kurz an das Messer halten, um die Grate, die durch den Schleifvorgang entstehen, zu beseitigen. Der Schleifstein sollte sich nun mit dem Messer mitbewegen. Die Maschine ausschalten und den Stecker abziehen. Den Sicherungsknopf der Schleifvorrichtung lösen und die Schleifsteine mit Alkohol reinigen. Die Schleifvorrichtung wieder in ihre ursprüngliche Lage versetzen und den Sicherungsknopf anziehen. Das Messer sollte sich nicht zwischen den Schleifsteinen bewegen. Das Messer mit Alkohol reinigen. ACHTUNG! Das Messer ist sehr scharf. Den Stecker in die Steckdose stecken. Die Maschine ist nun wieder betriebsbereit. Technische Daten Versorgungsspannung Stromverbrauch Messerdurchmesser Garantie Slicer 220mm 230~240 VAC/50 Hz 210 W 220 mm Jeder Defekt, bis auf den normalen Verschleiß und die Leuchten, auf Grund dessen die Funktion des Geräts nachteilig beeinflusst wird und der sich innerhalb eines Jahres nach Ankauf des Geräts zeigt, wird durch Reparatur oder Auswechslung kostenlos behoben, falls das Gerät den Anleitungen entsprechend gebraucht und gewartet wurde und nicht in irgendeiner Weise verkehrt behandelt oder unzweckmäßig benutzt worden ist. Letzteres lässt Ihre auf Grund des Gesetzes bestimmten Rechte unberührt. Wenn die Garantie wirksam ist, erwähnen Sie bitte, wo und wann Sie das Gerät gekauft haben und fügen Sie einen Kaufbeleg (z.b. den Kassenzettel) bei. Da wir danach streben, unsere Produkte ständig weiterzuentwickeln, behalten wir uns das Recht vor, ohne vorhergehende Bekanntgabe Änderungen am Produkt, der Verpackung und Dokumentation vorzunehmen. Entsorgung Am Ende der Lebensdauer des Geräts den zu diesem Zeitpunkt geltenden Vorschriften und Richtlinien entsprechend entsorgen. 17
18 Teilediagramm 1 Schleifvorrichtung für Messer 2 Anschlag 3 Wagen 4 Ein-/Ausschalter 5 Dickeneinstellungsknopf 6 Fingerschutz 7 Messerschutz 8 Messer 18
19 Cher client, Veuillez lire attentivement et intégralement ce mode d emploi avant de brancher l appareil afin d éviter tout endommagement pour cause d usage abusif. Veuillez notamment lire les consignes de sécurité avec la plus grande attention. Consignes de sécurité L utilisation abusive et le maniement incorrect de l appareil peuvent entraîner une grave détérioration de l appareil ou provoquer des blessures. L appareil doit être exclusivement utilisé dans le but pour lequel il a été conçu. Le fabricant décline toute responsabilité en cas de dommage consécutif à un usage abusif ou un maniement incorrect. Veillez à tenir l appareil et la prise électrique hors de portée de l eau ou de tout autre liquide. Si malencontreusement l appareil tombe dans l eau, débranchez immédiatement la prise électrique et faites contrôler l appareil par un réparateur agréé. La non-observation de cette consigne entraîne un risque d accident mortel. Ne tentez jamais de démonter vous-même le bâti de l appareil. N enfoncez aucun objet dans la carcasse de l appareil. Ne touchez pas la prise avec les mains mouillées ou humides. Contrôlez régulièrement la prise électrique et le cordon pour détecter toute éventuelle détérioration. Si la prise ou le cordon est endommagé, confiez la réparation à un réparateur agréé. N utilisez pas l appareil si celui-ci est tombé ou s il a subi un choc pour toute autre raison. Dans ce cas, faites contrôler l appareil par un réparateur agréé à qui vous confierez la réparation le cas échéant. Ne tentez pas de réparer vous-même l appareil. Cela présente un risque d accident mortel. Veillez à tenir le cordon électrique éloigné de tout objet coupant ou chaud et à l écart des flammes. Pour débrancher la prise électrique, saisissez toujours la prise et ne tirez jamais directement sur le cordon. Veillez à disposer le cordon électrique (ou la rallonge) de sorte que l appareil ne puisse pas être débranché accidentellement et que personne ne trébuche sur le cordon. Cet appareil a été conçu exclusivement pour trancher des aliments. Surveillez continuellement l appareil lorsqu il est en cours de fonctionnement. Les enfants n ont pas conscience de l usage incorrect des appareils électriques. Pour cette raison, ne laissez jamais les enfants utiliser des appareils ménagers sans surveillance. Débranchez toujours la prise électrique lorsque l appareil n est pas utilisé et lors de son nettoyage. Danger! Tant que la prise électrique est branchée, l appareil demeure sous tension. Arrêtez l appareil avant de débrancher la prise électrique. Ne portez jamais l appareil par le cordon électrique. Consignes particulières de sécurité N utilisez pas d accessoires qui n ont pas été livrés avec l appareil. Attention! Pendant le fonctionnement de l appareil, assurez-vous que le cordon électrique n entre pas au contact d éléments chauds ou de la lame. N utilisez pas la machine pour trancher des aliments congelés, de la viande non désossée, du poisson ou autre chose que des aliments. La machine est équipée de dispositifs de sécurité, mais vous devez veiller à rester constamment à l écart de la lame et des pièces en mouvement. N utilisez pas la machine à partir du moment où le diamètre de la lame a diminué de 6 millimètres. Il faut alors remplacer la lame. 19
20 Préparation avant la première utilisation Vérifiez que toutes les pièces sont livrées avec l appareil. S il vous manque un élément, prenez contact avec votre fournisseur. Enlevez tout le matériel d emballage. Nettoyez l appareil à l eau tiède et avec un chiffon doux. Nettoyez la lame. Soyez très prudent : la lame est très tranchante. Si le dispositif d aiguisage n est pas monté, procédez de la façon suivante : 1 Vue de dessus de l appareil 2 Positionnez le module d aiguisage de sorte que la lame ne soit pas placée entre les petites meules Montez la plaque de protection 3 Fixez le dispositif d aiguisage sur l appareil en serrant la molette de fixation. Contrôlez que le dispositif d aiguisage est bien fixé avant d utiliser l appareil. ATTENTION! Le dispositif d aiguisage est équipé d un interrupteur de sécurité. Si le dispositif d aiguisage n est pas installé, vous ne pourrez pas mettre l appareil en marche 1 Insérez les deux vis dans le chariot 3 Placez les deux rondelles de blocage 2 Placez la plaque de protection 4 Serrez les deux écrous à chapeau ATTENTION: il est déconseillé d utiliser l appareil si celui-ci n est pas équipé de la plaque de protection montés correctement! Ce sont des accessoires de sécurité qui protègent contre les blessures possibles. Si vous ne montez pas ces accessoires, il existe un risque de blessure pour l utilisateur. Veillez à ce qu un espace libre d au moins 10 cm demeure autour de l appareil pour des raisons de ventilation. Installez l appareil en veillant à ce que la prise de courant demeure accessible à tout moment. 20
21 Mode d emploi Placez la machine de façon à ce que le bouton marche/arrêt soit face à l utilisateur. Si l affûteuse n est pas installée, procéder de la façon suivante : o Placez l affûteuse dans son support en veillant à ce que la lame ne tourne pas entre les affiloirs. o Serrez la vis de sécurité de l affûteuse. ATTENTION! Utilisation sans l équipement de meulage est dangereux! HENDI vous conseille que vous utilisez la machine seulement avec équipement monté Branchez la fiche dans la prise murale. Ajustez l épaisseur de tranche désirée en tournant le bouton gradué. Mettez l appareil en marche en tournant le bouton marche/arrêt. La lame se met à tourner. Placez l aliment à trancher sur le chariot. Bloquez le produit avec l équerre de maintien. Veillez à ce que le produit repose sur la plaque d appui. Après avoir tranché l aliment, arrêtez la machine en tournant le bouton marche/arrêt. La lame s arrête. Remettez le bouton de réglage d épaisseur en position 0. Nettoyage et entretien Tournez le bouton pour régler l épaisseur dans le sens contraire des aiguilles d une montre á 0 Débranchez toujours la prise électrique avant de nettoyer l appareil. Attention : Ne plongez jamais l appareil dans l eau ou dans tout autre liquide! Nettoyez l extérieur de la machine avec un chiffon humide (eau avec détergent doux). N utilisez jamais de détergent agressif ni de poudre à récurer. N utilisez jamais d objet tranchant ou pointu. N utilisez jamais d essence ou de solvant! Nettoyez toujours avec un chiffon humide et éventuellement un peu de liquide vaisselle, mais n employez jamais de produit abrasif. Nettoyez la lame avec de l alcool. ATTENTION! La lame est très tranchante. Si le chariot se déplace avec difficulté, couchez la trancheuse sur le flanc. Nettoyez avec précaution la barre coulissante et lubrifiez-la avec de la vaseline. Problème Cause possible Solution La machine tranche mal Lame émoussée Affûtez la lame Machine encrassée Nettoyez la machine La machine interrompt Laissez la machine refroidir suffisamment. La protection Moteur trop chaud le tranchage thermique du moteur se réenclenche automatiquement. Le chariot ne coulisse pas souplement Barre coulissante encrassée Nettoyez la barre coulissante et lubrifiez-la avec de la vaseline En cas de doute, prenez toujours contact avec votre fournisseur! 21
22 Affûtage de la lame À effectuer lorsque la lame est émoussée. Il faut noter que la lame est en matériau à très haute résistance. Lorsqu elle est utilisée régulièrement et correctement, elle ne nécessite donc d être affûtée qu une fois par an. Débranchez la fiche de la prise murale. Mettez le bouton de réglage d épaisseur sur 0 Nettoyez la lame. Desserrez le bouton de sûreté de l affûteuse. Tirez l affûteuse vers le haut et faites-la pivoter à 180. Laissez redescendre l affûteuse jusqu à ce le dispositif de verrouillage s enclenche. Fixez l affûteuse en serrant le bouton de sûreté. Mettez la machine en marche. La lame se met à tourner. Appuyez sur le bouton pour que l affiloir incliné vienne au contact de la lame et maintenez l affiloir dans cette position pendant 2 minutes. L affiloir doit tourner avec la lame. Appuyez sur le bouton pour que l affiloir vertical vienne au contact de la lame un court instant afin d enlever les bavures produites par l affûtage. L affiloir doit tourner avec la lame. Arrêtez la machine et débranchez la prise électrique. Desserrez le bouton de sûreté de l affûteuse et nettoyez les affiloirs avec de l alcool. Remettez l affûteuse dans sa position d origine sur la machine et serrez le bouton de sûreté. La lame ne doit pas tourner entre les affiloirs. Nettoyez la lame avec de l alcool. ATTENTION! La lame est très tranchante. Branchez la prise électrique. La machine est de nouveau prête à l emploi. Caractéristiques techniques Slicer 220mm Tension d alimentation 230~240 VAC/50 Hz Consommation électrique 210 W Diamètre de la lame 220 mm Garantie Tout défaut, à l exception de l usure normale et de la longévité des ampoules, entraînant le mauvais fonctionnement de l appareil dans l année qui suit l achat fait l objet d une réparation ou d un remplacement gratuit de l appareil à condition que l appareil ait été utilisé et entretenu conformément aux instructions, sans mauvaise application ou abus, ceci sans préjudice des droits que la loi vous accorde. Si vous voulez bénéficier de la garantie, veuillez indiquer le lieu et la date de l achat de l appareil et joindre une preuve d achat (par ex. bon d achat). Nous visons constamment à améliorer nos produits et nous nous réservons le droit d apporter des modifications au produit, à l emballage et à la documentation sans avertissement préalable. Mise au rebut En fin d utilisation, quand vous voudrez mettre votre l appareil au rebut, respectez les prescriptions et directives en vigueur à cette date. 22
23 Représentation des pièces Trancheuse mm 1 Affûteuse de lame 2 Plaque d appui 3 Chariot 4 Bouton marche/arrêt 5 Bouton de réglage d épaisseur de tranche 6 Equerre de maintien du produit 7 Plaque couvre-lame 8 Lame 23
24 Szanowny Kliencie Przed podłączeniem urządzenia dokładnie przeczytaj całą instrukcję obsługi, aby niewłaściwym użytkowaniem nie spowodować żadnej szkody. Przede wszystkim zapoznaj się z przepisami dotyczącymi bezpieczeństwa użytkowania. Przepisy bezpieczeństwa Nieprawidłowa obsługa i niewłaściwe użytkowanie może spowodować poważne uszkodzenie urządzenia lub zranienie osób. Urządzenie może być stosowane wyłącznie w celu, do którego zostało zaprojektowane. Producent nie ponosi żadnej odpowiedzialności za szkody spowodowane nieprawidłową obsługą i niewłaściwym użytkowaniem urządzenia. W czasie użytkowania zabezpiecz urządzenie i wtyczkę kabla zasilającego przed kontaktem z wodą lub innymi płynami. W przypadku, gdyby przez nieuwagę urządzenie wpadło do wody, należy natychmiast wyciągnąć wtyczkę z kontaktu, a następnie zlecić kontrolę urządzenia specjaliście. Nieprzestrzeganie tej instrukcji może spowodować zagrożenie życia. Nigdy nie otwieraj samodzielnie obudowy urządzenia. Nie wtykaj żadnych przedmiotów w obudowę urządzenia. Nie dotykaj wtyczki kabla zasilającego wilgotnymi rękami. Regularnie kontroluj stan wtyczki i kabla. W przypadku wykrycia uszkodzenia wtyczki lub kabla, zleć naprawę w wyspecjalizowanym punkcie naprawczym. W przypadku, gdy urządzenie spadnie lub ulegnie uszkodzeniu w inny sposób, przed dalszym użytkowaniem zawsze zleć przeprowadzenie kontroli i ewentualną naprawę w wyspecjalizowanym punkcie naprawczym. Nigdy nie naprawiaj urządzenia samodzielnie - może to spowodować zagrożenie życia. Chroń kabel zasilający przed kontaktem z ostrymi lub gorącymi przedmiotami i chroń go z dala od otwartego ognia. Jeżeli chcesz odłączyć urządzenie z kontaktu, zawsze chwytaj za wtyczkę, nigdy nie ciągnij za kabel. Zabezpiecz kabel (lub przedłużacz), aby nikt przez omyłkę nie wyciągnął go z kontaktu lub aby się o niego nie potknął. Urządzenie jest przeznaczone wyłącznie do krojenia żywności. Kontroluj funkcjonowanie urządzenia w czasie użytkowania. Dzieci nie uświadamiają sobie zagrożeń, jakie może spowodować użytkowanie urządzeń elektrycznych. Nigdy nie pozwalaj dzieciom posługiwać się elektrycznymi urządzeniami gospodarstwa domowego bez nadzoru. Jeżeli urządzenie nie jest w danej chwili użytkowane lub jest właśnie czyszczone, zawsze odłącz je od źródła zasilania, wyciągając wtyczkę z kontaktu. Uwaga niebezpieczeństwo! Jeżeli wtyczka kabla zasilającego jest podłączona do kontaktu, urządzenie cały czas pozostaje pod napięciem. Wyłącz urządzenie, zanim wyciągniesz wtyczkę z kontaktu. Nigdy nie ciągnij urządzenia za kabel zasilający. Specjalne przepisy bezpieczeństwa Nie stosuj żadnych dodatkowych środków oprócz tych, które zostały dostarczone wraz z urządzeniem. Uwaga! Zadbaj o to, by podczas używania urządzenia kabel elektryczny nie stykał się z gorącymi elementami lub nożem. Krajalnicy nie należy używać do krojenia mrożonek, mięsa z kością, ryb ani niczego poza artykułami żywnościowymi. Choć urządzenie jest wyposażone w zabezpieczenia, należy trzymać się z dala od noża i ruchomych części. Nie używać krajalnicy do produktów spożywczych, jeśli średnica noża zmalała o 6 mm. W tym wypadku należy wymienić nóż. 24
25 Przygotowanie do użytkowania Należy skontrolować, czy w opakowaniu znajdują się wszystkie części. Jeśli brakuje jakiejś części należy skontaktować się z dostawcą. Usunąć całe opakowanie. Wyczyścić urządzenie miękką szmatką zwilżoną w letniej wodzie. Wyczyścić ostrze. Należy zachować dużą ostrożność, ponieważ ostrze jest bardzo ostre. Jeśli ostrzałka nie jest zamontowana, należy postępować według poniższych kroków: 1 Widok urządzenia z góry 3 Przekręcając śrubę przymocować ostrzałkę do urządzenia. Przed włączeniem urządzenia skontrolować, czy ostrzałka jest dobrze zamocowana. 2 Ustawić moduł do ostrzenia tak, aby ostrze nie znajdowało się pomiędzy kółeczkami. UWAGA! Ostrzałka posiada włącznik bezpieczeństwa. Jeśli ostrzałka nie jest zamontowana, urządzenia nie można włączyć. Zamontować ochraniacz na dłonie 1 Zamocować obie śruby w suwaku. 3 Zamocować obie podkładki. 2 Zamontować ochraniacz na dłonie. 4 Dokręcić obie nakrętki. UWAGA! Odradza się korzystanie z urządzenia bez dokonania wyżej opisanego montażu nóżek i ochraniaczy na dłonie! Są to elementy bezpieczeństwa, które wykluczą możliwe ryzyko zranienia. Jeśli elementy bezpieczeństwa nie zostaną zamontowane, wówczas zachodzi ryzyko odniesienia ran. Należy zadbać o to, aby urządzenie było odsunięte od ściany co najmniej 10 cm. Ma to związek z właściwą wentylacją urządzenia. Ustawić urządzenie tak, aby wtyczka była zawsze łatwo dostępna Instrukcja obsługi Ustaw urządzenie włącznikiem od strony operatora. Jeśli ostrzałka nie jest zamontowana, wykonaj następujące czynności: o Umieść ostrzałkę na wsporniku tak, by nóż nie przechodził pomiędzy kółkami. o Dokręć śrubę zabezpieczającą. 25
26 Wyłączyć urządzenie (urządzenie posiada wyłącznik bezpieczeństwa i wyłącza się samo, jeśli ostrzałka zostanie usunięta) Włącz wtyczkę do kontaktu. Ustaw żądaną grubość plastrów za pomocą stopniowanego pokrętła. Włącz krajalnicę, nóż zacznie się obracać. Umieść krojony produkt na platformie przesuwnej (dociskając go uchwytem), pamiętając, aby produkt dotykał ruchomej ścianki. Po zakończeniu krojenia wyłącz urządzenie. Nóż przestanie się obracać. Obróć stopniowane pokrętło z powrotem do pozycji 0. Czyszczenie i konserwacja Przekręć pokrętło zgodnie z ruchem wskazówek zegara do pozycji 0. Przed czyszczeniem zawsze należy najpierw odłączyć kabel urządzenia. Uwaga: Nigdy nie zanurzaj urządzenia w wodzie lub w innym płynie! Umyj zewnętrzną stronę przy pomocy wilgotnej szmatki (roztwór wody i łagodnego środka czyszczącego) Do czyszczenia krajalnicy nigdy nie używaj środków żrących lub ściernych. Nie używaj przedmiotów ostrych lub ostro zakończonych. Nie używaj benzyny lub rozpuszczalników! Czyść przy pomocy wilgotnej szmatki i ewentualnie płynu do mycia naczyń, nie stosuj środków ściernych. Wyczyść nóż alkoholem. UWAGA! Nóż jest bardzo ostry. Jeśli platforma produktu przesuwa się z oporem, unieś krajalnicę i połóż ją na boku. Ostrożnie wyczyść pręt przesuwny i nasmaruj go wazeliną 26
27 Problem Możliwa przyczyna Rozwiązanie Urządzenie źle kroi Nóż jest tępy Naostrz nóż Urządzenie jest brudne Wyczyść urządzenie Urządzenie przestaje kroić Przegrzany silnik Poczekaj, aż urządzenie ostygnie. Zabezpieczenie termiczne silnika samo ponownie się włączy. Platforma nie przesuwa się Wyczyść pręt przesuwny i nasmaruj go Pręt przesuwny jest brudny w sposób płynny wazeliną W razie wątpliwości zawsze skontaktuj się z dostawcą! Ostrzenie noża Czynność należy przeprowadzić, kiedy nóż się stępi. Pamiętaj, że nóż jest bardzo wytrzymały i w przypadku regularnego i prawidłowego używania, zwykle wymaga ostrzenia raz w roku. Odłącz kabel urządzenia. Obróć stopniowane pokrętło do pozycji 0. Wyczyść nóż. Poluzuj pokrętło ostrzałki. Unieś ostrzałkę, obracając ją o 180, Opuszczaj ostrzałkę, aż się zablokuje. Przymocuj ostrzałkę, obracając pokrętło ustalające. Włącz urządzenie. Nóż zaczyna się obracać. Naciśnij przycisk, aby dosunąć ustawioną ukośnie tarczę cierną do ostrza noża i przez 2 minuty dociskaj tarczę do noża. Tarcza cierna powinna się obracać zgodnie z ruchem noża. Naciśnij przycisk, aby dosunąć ustawioną poziomo tarczę cierną do ostrza noża i usunąć zadziory na nożu. Tarcza cierna powinna się obracać zgodnie z ruchem noża. Wyłącz urządzenie i odłącz kabel z gniazdka. Poluzuj pokrętło ostrzałki i wyczyść tarcze cierne alkoholem. Ustaw ostrzałkę w pozycji wyjściowej w urządzeniu i dokręć pokrętło. Nóż nie powinien znajdować się pomiędzy tarczami ciernymi. Wyczyść nóż alkoholem. UWAGA! Nóż jest bardzo ostry. Włącz wtyczkę do kontaktu. Urządzenie jest gotowe do pracy. Dane techniczne Napięcie Zużycie prądu Średnica noża Slicer 220mm 230~240 VAC/50 Hz 210 W 220 mm Gwarancja Każda usterka, z wyjątkiem normalnego ścierania się i uszkodzeń lampek, powodująca złe funkcjonowanie urządzenia, która ujawni się w ciągu jednego roku od zakupu, zostanie bezpłatnie usunięta lub urządzenie zostanie wymienione na inne, pod warunkiem, że było użytkowane i konserwowane zgodnie z instrukcją obsługi i nie było wykorzystywane do innych celów lub w jakikolwiek inny niewłaściwy sposób. Nie narusza to Państwa innych praw, wynikających z przepisów prawa. W przypadku korzystania z gwarancji, należy podać miejsce i czas zakupu urządzenia, dołączając do niego dowód zakupu (np. paragon). Usuwanie zużytych urządzeń Po zakończeniu okresu użytkowania urządzenie należy usunąć zgodnie z obowiązującymi w tym czasie przepisami i wytycznymi. 27
łącznik 5 Pokrętło do ustawiania grubości krojenia 6 Ramię uchwytu produktu 7 Osłona noża 8 Nóż")
28 Opis części Krajalnica Slicer 250 mm 1 Ostrzałka 2 Ruchoma ścianka 3 Platforma przesuwna 4 W(y)łącznik 5 Pokrętło do ustawiania grubości krojenia 6 Ramię uchwytu produktu 7 Osłona noża 8 Nóż 28
29 29
30 30
31 31
 Gewerbegebiet Ehring 5112 Lamprechtshausen Austria Tel: +43 (0) 6274 200 10 Fax: +43 (0) 6274 200 10 20 www.hendi-austria.com office@hendi-austria.")
32 Hendi B.V. (The Netherlands) Steenoven TX Rhenen Nederland Tel: +31 (0) Fax: +31 (0) Hendi Austria GmbH (Austria) Gewerbegebiet Ehring 5112 Lamprechtshausen Austria Tel: +43 (0) Fax: +43 (0) Hendi Polska Spolka z.o.o. (Polska) Ul. Kopanina 28/ Poznań Polska Tel. +48 (0) Fax. +48 (0) Ver
Alleen voor gebruik binnenshuis For indoor use only Nur für Innen gebrauch Pour l'usage d'intérieur seulement Do użytku wewnątrz pomieszczeń
 Alleen voor gebruik binnenshuis For indoor use only Nur für Innen gebrauch Pour l'usage d'intérieur seulement Do użytku wewnątrz pomieszczeń Bewaar deze handleiding bij het apparaat Keep these instructions
MASZYNA DO CZYSZCZENIA BUTÓW
 Instrukcja instalowania, obsługi i konserwacji MASZYNA DO CZYSZCZENIA BUTÓW Szanowny Kliencie Przed podłączeniem urządzenia dokładnie przeczytaj całą instrukcję obsługi, aby niewłaściwym użytkowaniem nie
INSTRUKCJA OBSŁUGI Krajalnica do mięsa
 STALGAST Sp. z o.o. ul. Łubinowa 4a, 03-878 Warszawa tel. 022 517 15 75; fax 022 517 15 77 www.stalgast.com; e-mail:stalgast@stalgast.com INSTRUKCJA OBSŁUGI Krajalnica do mięsa MODEL: 722250, 722300 UWAGA:
KOTLECIARKA ELEKTRYCZNA
 Instrukcja instalowania, obsługi i konserwacji KOTLECIARKA ELEKTRYCZNA Szanowny Kliencie Przed podłączeniem urządzenia dokładnie przeczytaj całą instrukcję obsługi, aby niewłaściwym użytkowaniem nie spowodować
Alleen voor gebruik binnenshuis For indoor use only Nur für Innen gebrauch Pour l'usage d'intérieur seulement Do uŝytku wewnątrz pomieszczeń
 Alleen voor gebruik binnenshuis For indoor use only Nur für Innen gebrauch Pour l'usage d'intérieur seulement Do uŝytku wewnątrz pomieszczeń Bewaar deze handleiding bij het apparaat Keep these instructions
Alleen voor gebruik binnenshuis For indoor use only Nur für Innen gebrauch Pour l'usage d'intérieur seulement Do użytku wewnątrz pomieszczeń
 Alleen voor gebruik binnenshuis For indoor use only Nur für Innen gebrauch Pour l'usage d'intérieur seulement Do użytku wewnątrz pomieszczeń Bewaar deze handleiding bij het apparaat Keep these instructions
Instrukcja instalowania, obsługi i konserwacji. BEMAR Kitchen Line. Kod produktu: ,
 Instrukcja instalowania, obsługi i konserwacji BEMAR Kitchen Line Kod produktu: 238905, 238912 Przed uruchomieniem urządzenia należy uważnie przeczytać niniejszą instrukcję obsługi. 1 Szanowny Kliencie,
GEBRUIKSAANWIJZING USER INSTRUCTIONS GEBRAUCHSANWEISUNG MODE D EMPLOI INSTRUKCJA OBSŁUGI
 Alleen voor gebruik binnenshuis For indoor use only Nur für Innen gebrauch Pour l'usage d'intérieur seulement Per uso interno Do użytku wewnątrz pomieszczeń Bewaar deze handleiding bij het apparaat Keep
Alleen voor gebruik binnenshuis For indoor use only Nur für Innen gebrauch Pour l'usage d'intérieur seulement Do użytku wewnątrz pomieszczeń
 Alleen voor gebruik binnenshuis For indoor use only Nur für Innen gebrauch Pour l'usage d'intérieur seulement Do użytku wewnątrz pomieszczeń Bewaar deze handleiding bij het apparaat Keep these instructions
www.food-service.com.ua
 Bewaar deze handleiding bij het apparaat Keep these instructions with this appliance Diese Gebrauchsanweisung bitte beim Gerät aufbewahren Gardez ces instructions avec cet appareil Zachowaj instrukcję
INSTRUKCJA OBSŁUGI. Sterylizator do noży UVA MODEL: 200001
 INSTRUKCJA OBSŁUGI Sterylizator do noży UVA MODEL: 200001 v2.0-03.2009 Stalgast sp. z o.o. ul. Staniewicka 5 03-310 Warszawa tel.: 022 517 15 75 fax: 022 517 15 77 www.stalgast.com email: stalgast@stalgast.com
INSTRUKCJA OBSŁUGI. Krajalnica do mięsa MODEL:
 INSTRUKCJA OBSŁUGI Krajalnica do mięsa v2-12.2009 MODEL: 722250 Stalgast sp. z o.o. ul. Saniewicka 5 03-310 Warszawa tel.: 022 517 15 75 fax: 022 517 15 77 www.stalgast.com email: stalgast@stalgast.com
INSTRUKCJA OBSŁUGI. Krajalnica
 INSTRUKCJA OBSŁUGI Krajalnica v1-08.2016 MODEL: 722221, 722252, 722255 Stalgast sp. z o.o. ul. Saniewicka 5 03-310 Warszawa tel.: 22 517 15 75 fax: 22 517 15 77 www.stalgast.com email: stalgast@stalgast.com
INSTRUKCJA OBSŁUGI. Wyciskarka do cytrusów MODEL:
 INSTRUKCJA OBSŁUGI Wyciskarka do cytrusów MODEL: 480012 v1.0-09.2010 Stalgast sp. z o.o. ul. Staniewicka 5 03-310 Warszawa tel.: 22 517 15 75 fax: 22 517 15 77 www.stalgast.com email: stalgast@stalgast.com
INSTRUKCJA OBSŁUGI. Mikser do koktaili MODEL:
 INSTRUKCJA OBSŁUGI Mikser do koktaili MODEL: 485020 v1.0-03.2010 Stalgast sp. z o.o. ul. Staniewicka 5 03-310 Warszawa tel.: 022 517 15 75 fax: 022 517 15 77 www.stalgast.com email: stalgast@stalgast.com
INSTRUKCJA OBSŁUGI. Kruszarka do lodu MODEL:
 INSTRUKCJA OBSŁUGI Kruszarka do lodu MODEL: 471700 v1.0-01.2010 Stalgast sp. z o.o. ul. Staniewicka 5 03-310 Warszawa tel.: 022 517 15 75 fax: 022 517 15 77 www.stalgast.com email: stalgast@stalgast.com
INSTRUKCJA OBSŁUGI GRZAŁKA DO PODGRZEWACZY
 INSTRUKCJA OBSŁUGI GRZAŁKA DO PODGRZEWACZY v1.0 -.12.2009 MODEL: 430700 Stalgast sp. z o.o. ul. Staniewicka 5 03-310 Warszawa tel.: 022 517 15 75 fax: 022 517 15 77 www.stalgast.com email: stalgast@stalgast.com
Bewaar deze handleiding bij het apparaat Keep these instructions with this appliance Diese Gebrauchsanweisung bitte beim Gerät aufbewahren Gardez ces
 Bewaar deze handleiding bij het apparaat Keep these instructions with this appliance Diese Gebrauchsanweisung bitte beim Gerät aufbewahren Gardez ces instructions avec cet appareil Zachowaj instrukcję
WYŁĄCZNIK CZASOWY OUTDOOR TIMER
 003-582 PL WYŁĄCZNIK CZASOWY Instrukcja obsługi (Tłumaczenie oryginalnej instrukcji) Ważny! Przed użyciem uważnie przeczytaj instrukcję obsługi! Zachowaj ją na przyszłość. EN OUTDOOR TIMER Operating instructions
INSTRUKCJA OBSŁUGI KUCHENKA MIKROFALOWA MODEL:
 INSTRUKCJA OBSŁUGI KUCHENKA MIKROFALOWA MODEL: 775010 v2-02.2010 Stalgast sp. z o.o. ul. Staniewicka 5 03-310 Warszawa tel.: 022 517 15 75 fax: 022 517 15 77 www.stalgast.com email: stalgast@stalgast.com
INSTRUKCJA OBSŁUGI. Lampy grzewcze. Model: , , , , , , , ,
 INSTRUKCJA OBSŁUGI Lampy grzewcze v1.0-08.2015 Model: 692400, 692410, 692500, 692600, 692601, 692602, 692610, 692611, 692612 Stalgast sp. z o.o. ul. Staniewicka 5 03-310 Warszawa tel.: 22 517 15 75 fax:
INSTRUKCJA OBSŁUGI. Urządzenie do Hot-Dogów MODEL:
 INSTRUKCJA OBSŁUGI Urządzenie do Hot-Dogów MODEL: 777290 v1.0-02.2010 Stalgast sp. z o.o. ul. Staniewicka 5 03-310 Warszawa tel.: 022 517 15 75 fax: 022 517 15 77 www.stalgast.com email: stalgast@stalgast.com
INSTRUKCJA OBSŁUGI. Gyros elektryczny MODEL: , ,
 INSTRUKCJA OBSŁUGI Gyros elektryczny MODEL: 777370, 777371, 777372 v1.0-09.2009 Stalgast sp. z o.o. ul. Staniewicka 5 03-310 Warszawa tel.: 022 517 15 75 fax: 022 517 15 77 www.stalgast.com email: stalgast@stalgast.com
Bewaar deze handleiding bij het apparaat Keep these instructions with this appliance Diese Gebrauchsanweisung bitte beim Gerät aufbewahren Gardez ces
 Bewaar deze handleiding bij het apparaat Keep these instructions with this appliance Diese Gebrauchsanweisung bitte beim Gerät aufbewahren Gardez ces instructions avec cet appareil Zachowaj instrukcję
INSTRUKCJA OBSŁUGI. Miesiarka spiralna MODEL: ,
 INSTRUKCJA OBSŁUGI Miesiarka spiralna MODEL: 786200, 786350 v1.0-12.2009 Stalgast sp. z o.o. ul. Staniewicka 5 03-310 Warszawa tel.: 022 517 15 75 fax: 022 517 15 77 www.stalgast.com email: stalgast@stalgast.com
INSTRUKCJA OBSŁUGI. Podgrzewacz elektryczny GN 1/1 MODEL:
 INSTRUKCJA OBSŁUGI Podgrzewacz elektryczny GN 1/1 MODEL: 435130 v2.0-12.2009 Stalgast sp. z o.o. ul. Staniewicka 5 03-310 Warszawa tel.: 022 517 15 75 fax: 022 517 15 77 www.stalgast.com email: stalgast@stalgast.com
Multifunctional sterilizer
 Multifunctional sterilizer 281208 GEBRUIKSAANWIJZING USER INSTRUCTIONS GEBRAUCHSANWEISUNG MODE D EMPLOI INSTRUKCJA OBSŁUGI Multifunctionele sterilisator Multifunctional sterilizer Multifunktioneller Sterilisator
INSTRUKCJA OBSŁUGI. Nóż do kebaba MODEL:
 INSTRUKCJA OBSŁUGI Nóż do kebaba MODEL: 774901 v2.0-01.2013 Stalgast sp. z o.o. ul. Staniewicka 5 03-310 Warszawa tel.: 22 517 15 75 fax: 22 517 15 77 www.stalgast.com email: stalgast@stalgast.com SPIS
HAPPY ANIMALS L01 HAPPY ANIMALS L03 HAPPY ANIMALS L05 HAPPY ANIMALS L07
 HAPPY ANIMALS L0 HAPPY ANIMALS L0 HAPPY ANIMALS L0 HAPPY ANIMALS L07 INSTRUKCJA MONTAŻU ASSEMBLY INSTRUCTIONS Akcesoria / Fittings K ZW W8 W7 Ø x 6 szt. / pcs Ø7 x 70 Narzędzia / Tools DO MONTAŻU POTRZEBNE
HAPPY ANIMALS L02 HAPPY ANIMALS L04 HAPPY ANIMALS L06 HAPPY ANIMALS L08
 HAPPY ANIMALS L02 HAPPY ANIMALS L04 HAPPY ANIMALS L06 HAPPY ANIMALS L08 INSTRUKCJA MONTAŻU ASSEMBLY INSTRUCTIONS Akcesoria / Fittings K O G ZW W8 W4 20 szt. / pcs 4 szt. / pcs 4 szt. / pcs 4 szt. / pcs
INSTRUKCJA OBSŁUGI. Warnik do wody MODEL: ,
 INSTRUKCJA OBSŁUGI Warnik do wody MODEL: 751102, 751192 v1.0-02.2010 Stalgast sp. z o.o. ul. Staniewicka 5 03-310 Warszawa tel.: 022 517 15 75 fax: 022 517 15 77 www.stalgast.com email: stalgast@stalgast.com
DO MONTAŻU POTRZEBNE SĄ DWIE OSOBY! INSTALLATION REQUIRES TWO PEOPLE!
 1 HAPPY ANIMALS B09 INSTRUKCJA MONTAŻU ASSEMBLY INSTRUCTIONS Akcesoria / Fittings K1 M M1 ZM1 Z T G1 17 szt. / pcs 13 szt. / pcs B1 13 szt. / pcs W4 13 szt. / pcs W6 14 szt. / pcs U1 1 szt. / pcs U N1
Bewaar deze handleiding bij het apparaat Keep these instructions with this appliance Diese Gebrauchsanweisung bitte beim Gerät aufbewahren Gardez ces
 Bewaar deze handleiding bij het apparaat Keep these instructions with this appliance Diese Gebrauchsanweisung bitte beim Gerät aufbewahren Gardez ces instructions avec cet appareil Zachowaj instrukcję
DO MONTAŻU POTRZEBNE SĄ DWIE OSOBY! INSTALLATION REQUIRES TWO PEOPLE!
 HAPPY ANIMALS RW08 INSTRUKCJA MONTAŻU ASSEMBLY INSTRUCTIONS Akcesoria / Fittings K M M ZM ZW G 0 szt. / pcs W szt. / pcs B szt. / pcs szt. / pcs W U 8 szt. / pcs 4 szt. / pcs U N szt. / pcs Ø3 x szt. /
Alleen voor gebruik binnenshuis. For indoor use only. Nur für Innen gebrauch. Pour l'usage d'intérieur seulement. Do użytku wewnątrz pomieszczeń
 Alleen voor gebruik binnenshuis For indoor use only Nur für Innen gebrauch Pour l'usage d'intérieur seulement Do użytku wewnątrz pomieszczeń Bewaar deze handleiding bij het apparaat Keep these instructions
Instrukcja Montażu. Zawór pilotowy. Zawór przełączający 3-drogowy. Zawór odcinający. Wkład filtrujący. Zawór iglicowy EB-FD300=A
 FD 300 Einbau-Anleitung Installation Instructions Instrukcja Montażu E1 Bauteile Components Części =Pilotventil Pilot valve Zawór pilotowy =3-Wege-Umschaltventil 3-Way manual selector Zawór przełączający
HAPPY K04 INSTRUKCJA MONTAŻU ASSEMBLY INSTRUCTIONS DO MONTAŻU POTRZEBNE SĄ DWIE OSOBY! INSTALLATION REQUIRES TWO PEOPLE! W5 W6 G1 T2 U1 U2 TZ1
 HAPPY K0 INSTRUKCJA MONTAŻU ASSEMBLY INSTRUCTIONS W Akcesoria / Fittings W W G K szt. / pcs M Ø Ø 0 Ø, Ø Ø. 0 ø8 M 8 szt. / pcs 0 szt. / pcs szt. / pcs T U U szt. / pcs szt. / pcs szt. / pcs S TZ szt.
Zasady bezpieczeństwa
 2 3 Zasady bezpieczeństwa GB The door and the feeding flap must be closed when operating the machine! PL Drzwiczki i klapka szczeliny podawczej muszą być zamknięte w trakcie używania urządzenia! GB Ensure
DO MONTAŻU POTRZEBNE SĄ DWIE OSOBY! INSTALLATION REQUIRES TWO PEOPLE!
 1 HAPPY ANIMALS SZ11 A INSTRUKCJA MONTAŻU ASSEMBLY INSTRUCTIONS Akcesoria / Fittings K1 M M1 ZM1 Z G1 szt. / pcs 0 szt. / pcs B1 6 szt. / pcs 6 szt. / pcs W6 0 szt. / pcs U1 19 szt. / pcs U 50 szt. / pcs
INSTRUKCJA OBSŁUGI. Miesiarka spiralna MODEL: , ,
 INSTRUKCJA OBSŁUGI Miesiarka spiralna MODEL: 786100, 786200, 786350 v3.0-07.2013 Stalgast sp. z o.o. ul. Staniewicka 5 03-310 Warszawa tel.: 22 517 15 75 fax: 22 517 15 77 www.stalgast.com email: stalgast@stalgast.com
BLACKLIGHT SPOT 400W F
 BLACKLIGHT SPOT 400W F2000339 USER MANUAL / INSTRUKCJA OBSŁUGI BLACKLIGHT SPOT 400W F2000339 Table of Contents 1 Introduction... 2 2 Safety information... 2 3 Product information... 2 3.1 Specification...
INSTRUKCJA OBSŁUGI. Kociołek do zup i sosów MODEL:
 INSTRUKCJA OBSŁUGI v2-12.2009 Kociołek do zup i sosów MODEL: 432100 Stalgast sp. z o.o. ul. Staniewicka 5 03-310 Warszawa tel.: 022 517 15 75 fax: 022 517 15 77 www.stalgast.com email: stalgast@stalgast.com
INSTRUKCJA OBSŁUGI ZAPARZACZE MODEL: , ,
 INSTRUKCJA OBSŁUGI v2.0-12.2009 ZAPARZACZE MODEL: 752060, 752120, 752150 Stalgast Sp. z o.o. ul. Staniewicka 5 03-310 Warszawa tel.: 022 517 15 75 fax: 022 517 15 77 www.stalgast.com email: stalgast@stalgast.com
INSTRUKCJA OBSŁUGI. Ekspres do kawy
 INSTRUKCJA OBSŁUGI Ekspres do kawy MODEL: 752286 v2.0-03.2014 Stalgast sp. z o.o. ul. Staniewicka 5 03-310 Warszawa tel.: 22 517 15 75 fax: 22 517 15 77 www.stalgast.com email: stalgast@stalgast.com SPIS
INSTRUKCJA OBSŁUGI. Kociołek do zup i sosów MODEL:
 INSTRUKCJA OBSŁUGI Kociołek do zup i sosów v2-08.2013 MODEL: 432100 Stalgast sp. z o.o. ul. Staniewicka 5 03-310 Warszawa tel.: 022 517 15 75 fax: 022 517 15 77 www.stalgast.com email: stalgast@stalgast.com
099 Łóżko półpiętrowe 2080x1010(1109)x Bunk bed 2080x1010(1109)x1600 W15 INSTRUKCJA MONTAŻU ASSEMBLY INSTRUCTION
x Bunk bed 2080x1010(1109)x1600 W15 INSTRUKCJA MONTAŻU ASSEMBLY INSTRUCTION") INSTRUKCJA MONTAŻU ASSEMBLY INSTRUCTION 2 WAŻNE, ZACHOWAĆ DO PÓŹNIEJSZEGO STOSOWANIA- UWAŻNIE PRZECZYTAĆ IMPORTANT, SAVE FOR FURTHER USAGE- READ CAREFULLY INSTRUKCJA UZYTKOWANIA USER S MANUAL. Aby uniknąć
INSTRUKCJA MONTAŻU ASSEMBLY INSTRUCTION 2 WAŻNE, ZACHOWAĆ DO PÓŹNIEJSZEGO STOSOWANIA- UWAŻNIE PRZECZYTAĆ IMPORTANT, SAVE FOR FURTHER USAGE- READ CAREFULLY INSTRUKCJA UZYTKOWANIA USER S MANUAL. Aby uniknąć
Wilk do mięsa HENDI 12, HENDI 22 Kitchen Line
 Wilk do mięsa HENDI 12, HENDI 22 Kitchen Line 282199, 282007 Instrukcja obsługi Przed uruchomieniem urządzenia należy koniecznie dokładnie przeczytać niniejszą instrukcję obsługi. Szanowny Kliencie, Przed
INSTRUKCJA OBSŁUGI. Salamander Numer katalogowy: ,
 INSTRUKCJA OBSŁUGI Salamander Numer katalogowy: 744000, 744020 v2.0-04.2013 Stalgast sp. z o.o. ul. Staniewicka 5 03-310 Warszawa tel.: 22 517 15 75 fax: 22 517 15 77 www.stalgast.com email: stalgast@stalgast.com
INSTRUKCJA OBSŁUGI LAMPA OWADOBÓJCZA
 INSTRUKCJA OBSŁUGI LAMPA OWADOBÓJCZA v3.0-06.2013 MODEL: 692211, 692216, 692221 Stalgast Sp. z o.o. ul. Staniewicka 5 03-310 Warszawa tel.: 22 517 15 75 fax: 22 517 15 77 www.stalgast.com email: stalgast@stalgast.com
TR18 INSTALATION MANUAL / INSTRUKCJA MONTAŻU. cart for flat displays
 INSTLTION NUL / INSTRUKCJ ONTŻU cart for flat displays WRNING: Please read this manual before the installation to ensure proper assembly. The assembly should be carried out in accordance with this manual
INSTRUKCJA OBSŁUGI. Szafa chłodnicza/ mroźnicza MODEL: ,
 INSTRUKCJA OBSŁUGI Szafa chłodnicza/ mroźnicza MODEL: 880600, 880601 v2.0-06.2009 Stalgast sp. z o.o. ul. Staniewicka 5 03-310 Warszawa tel.: 022 517 15 75 fax: 022 517 15 77 www.stalgast.com email: stalgast@stalgast.com
LED WASHER 30x3W WHITE IP65 F
 USER MANUAL / INSTRUKCJA OBSŁUGI LED WASHER 30x3W WHITE IP65 F7200171 LED WASHER 30x3W WHITE IP65 F7200171 Table of contents 1 Introduction... 2 2 Safety information... 2 3 Product information... 2 3.1
Selfie Monopod MA426. Instrukcja obsługi User s Manual
 Selfie Monopod MA426 Instrukcja obsługi User s Manual PL Selfie Monopod Przeczytaj wszystkie instrukcje przed użyciem oraz zachowaj te informacje do wykorzystania w przyszłości. Zestaw: 1x mobile phone
Tuber radio BT MA407. Instrukcja obsługi User s Manual
 Tuber radio BT MA407 Instrukcja obsługi User s Manual User s Manual MA407 INSTRUCTIONS...4 BASIC...4 TROUBLESHOOTING...5 DATA TRANSFERRING / CHARGING VIA USB CABLE...5 INTERFACES...5 SPECIFICATIONS...6
INSTRUKCJA OBSŁUGI SZATKOWNICA MODEL: ,713001
 INSTRUKCJA OBSŁUGI SZATKOWNICA MODEL: 713000,713001 v3.0-02.2011 Stalgast Sp. z o.o. ul. Staniewicka 5 03-310 Warszawa tel.: 22 517 15 75 fax: 22 517 15 77 www.stalgast.com email: stalgast@stalgast.com
INSTRUKCJA MONTAŻU MARBO E SPORT LISTA CZĘŚCI (PARTS LIST) (ASSEMBLY INSTRUCTION) MH-W102 NR CZĘŚCI (PART NO.) ILOŚĆ (QUANTITY) OPIS (DESCRIPTION)
 (ASSEMBLY INSTRUCTION) MH-W102 NR CZĘŚCI (PART NO.) ILOŚĆ (QUANTITY) OPIS (DESCRIPTION)") LISTA CZĘŚCI (PARTS LIST) NR CZĘŚCI (PART NO.) ILOŚĆ (QUANTITY) OPIS (DESCRIPTION) 1 ŚRUBA (HEX BOLT) x70 6 ŚRUBA (HEX BOLT) 0 3 ŚRUBA (CARRIAGE BOLT) 5 INSTRUKCJA MONTAŻU (ASSEMBLY INSTRUCTION) MH-W10
LISTA CZĘŚCI (PARTS LIST) NR CZĘŚCI (PART NO.) ILOŚĆ (QUANTITY) OPIS (DESCRIPTION) 1 ŚRUBA (HEX BOLT) x70 6 ŚRUBA (HEX BOLT) 0 3 ŚRUBA (CARRIAGE BOLT) 5 INSTRUKCJA MONTAŻU (ASSEMBLY INSTRUCTION) MH-W10
Ice Cube Ice Cube 15
 271568 Ice Cube 12 271551 Ice Cube 15 Alleen voor gebruik binnenshuis For indoor use only Nur für Innen gebrauch Pour l'usage d'intérieur seulement Do użytku wewnątrz pomieszczeń Bewaar deze handleiding
KWS. Instrukcja obsługi User's manual Manuel d utilisation Руководство по эксплуатации RMSI25, RMSI63
 1 Instrukcja obsługi User's manual Manuel d utilisation Руководство по эксплуатации RMSI25, RMSI63 Uwaga! Niebezpieczne napięcie może spowodować porażenie lub pożar. W związku z prowadzoną polityką ciągłego
Bfl. Bfr FR. Instrukcja wymiany płyty regulacyjnej CGB / TGC / MGK Nr artykułu 27 99 250 Strony 2-3
 D Instrukcja wymiany płyty regulacyjnej CGB / TGC / MGK Nr artykułu 27 99 250 Strony 2-3 Bfl Handleiding voor het vervangen van de regelingsplatine CGB / TGC / MGK Art.-Nr. 27 99 250 Pagina 4-5 Bfr FR
A500Flash. Skrócona instrukcja instalacji... 2 Quick Guide... 5 A500Flash Kurzanleitung... 8
 A500Flash Skrócona instrukcja instalacji... 2 Quick Guide... 5 A500Flash Kurzanleitung... 8 1 Skrócona instrukcja instalacji Proces podłączenia adaptera dokonujemy zawsze przy wyłączonym zasilaniu Amigi.
LED PAR 56 7*10W RGBW 4in1 SLIM
 LED PAR 56 7*10W RGBW 4in1 SLIM USER MANUAL Attention: www.flash-butrym.pl Strona 1 1. Please read this specification carefully before installment and operation. 2. Please do not transmit this specification
Instrukcja obsługi. ibind A8/A12/A15/A20. instruction manual. 80-393 GDAŃSK ul. Krynicka 1 tel.: (058) 55 43 555 fax: (058) 55 43 500
 55 43 555 fax: (058) 55 43 500") Instrukcja obsługi instruction manual 80-9 GDAŃSK ul. Krynicka tel.: (08) fax: (08) 00 ODDZIAŁ: 0-78 WARSZAWA ul. Janowskiego 9 tel.: (0) 8 0 8..9 fax: (0) 8 0 0 BindownicE ibind A8/A/A/A0 BINDING MACHINEs
Instrukcja obsługi instruction manual 80-9 GDAŃSK ul. Krynicka tel.: (08) fax: (08) 00 ODDZIAŁ: 0-78 WARSZAWA ul. Janowskiego 9 tel.: (0) 8 0 8..9 fax: (0) 8 0 0 BindownicE ibind A8/A/A/A0 BINDING MACHINEs
Instrukcja obsługi. Trymer ROTARY ROTARY TRIMMER. instruction manual GDAŃSK ul. Krynicka 1 tel.: (058) fax: (058)
 fax: (058)") Instrukcja obsługi instruction manual 80-9 GDAŃSK ul. Krynicka 1 tel.: (058) 55 4 555 fax: (058) 55 4 500 Trymer ROTARY ROTARY TRIMMER ODDZIAŁ: 02-784 WARSZAWA ul. Janowskiego 9 tel.: (022) 648 0 48..49
Instrukcja obsługi instruction manual 80-9 GDAŃSK ul. Krynicka 1 tel.: (058) 55 4 555 fax: (058) 55 4 500 Trymer ROTARY ROTARY TRIMMER ODDZIAŁ: 02-784 WARSZAWA ul. Janowskiego 9 tel.: (022) 648 0 48..49
T I R O L 163/01 01,03,04,05,06, 07,09,10,11,12, 13,14,15,16,17, 18,19,20,21,25, 26,27,31,71,72 22,23 A A. ø4x20
 T I R O L 1 2 ø4x20 163/01 1. A A 01,03,04,05,06, 07,09,10,11,12, 13,14,15,16,17, 18,19,20,21,25, 26,27,31,71,72 10 20 22,23 32 01 2. 3 4 M4x23 :7 B.1 B 96 B.2 (4) Nawierca się zawsze w wewnętrznej powoerzchni
11/ RENAULT MEGANE II 3/5 d. R/030. Cat. No. e20. e20*94/20*0375*00 D = 7,56kN. 1350Kg 75Kg. D (kn) = x 0, MAX kg.
 = x 0, MAX kg.") RENULT MEGNE II 3/5 d. 11/2002 - Cat. No. R/030 e20 e20*94/20*0375*00 1350Kg 75Kg D = 7,56kN D (kn) = MX kg x MX kg x 0,00981 MX kg + MX kg PRZEKRÓJ - 75 min. 75 min. 30 o max. R 14,5 max. R40 max. 140
RENULT MEGNE II 3/5 d. 11/2002 - Cat. No. R/030 e20 e20*94/20*0375*00 1350Kg 75Kg D = 7,56kN D (kn) = MX kg x MX kg x 0,00981 MX kg + MX kg PRZEKRÓJ - 75 min. 75 min. 30 o max. R 14,5 max. R40 max. 140
02/02-05/ VOLKSWAGEN POLO htb. (9N) SEAT IBIZA W/022. Cat. No. E20 55R e20. 6,90 kn Kg 50 Kg
 SEAT IBIZA W/022. Cat. No. E20 55R e20. 6,90 kn Kg 50 Kg") VOLKSWAGEN POLO htb. (9N) SEAT IBIZA 02/02-05/09 05-08 at. No. W/022 e20 E20 55R-01-1045 1200 Kg 50 Kg 6,90 kn Moment skręcający dla śrub i nakrętek (8.8) Torgue settings for nuts and bolts (8.8) M8 25Nm
VOLKSWAGEN POLO htb. (9N) SEAT IBIZA 02/02-05/09 05-08 at. No. W/022 e20 E20 55R-01-1045 1200 Kg 50 Kg 6,90 kn Moment skręcający dla śrub i nakrętek (8.8) Torgue settings for nuts and bolts (8.8) M8 25Nm
/2004 RENAULT MEGAN SCENIC I R/011. Cat. No. e20. e20*94/20*0680*00 D = 7,72kN. 1400Kg 75Kg. D (kn) = x 0, MAX kg.
 = x 0, MAX kg.") RENAULT MEGAN SCENIC I 1998-09/2004 Cat. No. R/011 e20 e20*94/20*0680*00 1400Kg 75Kg D = 7,72kN D (kn) = MAX kg x MAX kg x 0,00981 MAX kg + MAX kg PRZEKRÓJ A-A 75 min. 75 min. 30 o max. A R 14,5 max. R40
RENAULT MEGAN SCENIC I 1998-09/2004 Cat. No. R/011 e20 e20*94/20*0680*00 1400Kg 75Kg D = 7,72kN D (kn) = MAX kg x MAX kg x 0,00981 MAX kg + MAX kg PRZEKRÓJ A-A 75 min. 75 min. 30 o max. A R 14,5 max. R40
SSW1.1, HFW Fry #20, Zeno #25 Benchmark: Qtr.1. Fry #65, Zeno #67. like
 SSW1.1, HFW Fry #20, Zeno #25 Benchmark: Qtr.1 I SSW1.1, HFW Fry #65, Zeno #67 Benchmark: Qtr.1 like SSW1.2, HFW Fry #47, Zeno #59 Benchmark: Qtr.1 do SSW1.2, HFW Fry #5, Zeno #4 Benchmark: Qtr.1 to SSW1.2,
GB 320 GB 460. Instrukcja obsługi. Instruction manual GDAŃSK ul. Krynicka 1 tel.: fax:
 80-393 GDAŃSK ul. Krynicka 1 tel.: 58 55 43 555 fax: 58 55 43 500 ODDZIAŁ: 02-784 WARSZAWA ul. Janowskiego 9 tel.: 22 648 03 48..49 fax: 22 648 03 50 Instrukcja obsługi Instruction manual Gilotyny / guillotines
PRZEKRÓJ A-A. The clearance specified in appendix VII, diagram 25a/b of Regulation No UN EU must be guaranteed at laden weight of the vehicle.
 PRZEKRÓJ - 75 min. 75 min. 30 o max. R 14,5 max. R40 max. 140 min. 55 min. 100 max. 32 min. 30 o max. 350-420 PL Należy zagwarantować przestrzeń swobodną według załącznika VII, rysunek 25a/b Regulaminu
300.143. Chariot à casiers, chariot de transport pour paniers à vaisselle de page 5 à page 6
 300.143 Bedienungsanleitung Geschirrkorbwagen Seite 1 bis 2 Instruction manual Dishwasher rack trolley from page 3 to 4 Mode d emploi Chariot à casiers, chariot de transport pour paniers à vaisselle de
TPO-700. Instrukcja obsługi. Trymer. instruction manual GDAŃSK ul. Krynicka 1 tel.: fax:
 Instrukcja obsługi instruction manual 80-393 GDAŃSK ul. Krynicka 1 tel.: 58 55 43 555 fax: 58 55 43 500 ODDZIAŁ: 02-784 WARSZAWA ul. Janowskiego 9 tel.: 22 648 03 48..49 fax: 22 648 03 50 Trymer TRIMMER
INSTRUKCJA OBSŁUGI. Kuchenka indukcyjna MODEL:
 INSTRUKCJA OBSŁUGI Kuchenka indukcyjna MODEL: 770351 v1.0-03.2010 Stalgast sp. z o.o. ul. Staniewicka 5 03-310 Warszawa tel.: 022 517 15 75 fax: 022 517 15 77 www.stalgast.com email: stalgast@stalgast.com
098 Łóżko piętrowe 2080x1010(1109)x Double bunk bed 2080x1010(1109)x1600 W15 MONTAGEANLEITUNG ASSEMBLY INSTRUCTION
x Double bunk bed 2080x1010(1109)x1600 W15 MONTAGEANLEITUNG ASSEMBLY INSTRUCTION") 098 Double bunk bed 2080x(9)x600 W5 MONTAGEANLEITUNG ASSEMBLY INSTRUCTION 2 WAŻNE, ZACHOWAĆ DO PÓŹNIEJSZEGO STOSOWANIA- UWAŻNIE PRZECZYTAĆ IMPORTANT, SAVE FOR FURTHER USAGE- READ CAREFULLY INSTRUKCJA UZYTKOWANIA
098 Double bunk bed 2080x(9)x600 W5 MONTAGEANLEITUNG ASSEMBLY INSTRUCTION 2 WAŻNE, ZACHOWAĆ DO PÓŹNIEJSZEGO STOSOWANIA- UWAŻNIE PRZECZYTAĆ IMPORTANT, SAVE FOR FURTHER USAGE- READ CAREFULLY INSTRUKCJA UZYTKOWANIA
FREZARKA DO PAZNOKCI
 FREZARKA DO PAZNOKCI NAIL DRILL NAGELFRÄSER ФРЕЗЕР ДЛЯ НОГТЕЙ 3829 INSTRUKCJA OBSŁUGI USER MANUAL DESCRIPTION BEDIENUNGSANLEITUNG ИНСТРУКЦЯ ПО ЭКСПЛУАТАЦИИ 2. SKŁAD ZESTAWU rączka frez/ trzpień frez/ trzpień
06/ / MERCEDES C-KLASA (W-203) sed. MERCEDES C-KLASA (W-203) com. M/032. Cat. No. e20*94/20*0513*00. 10,00kN.
 sed. MERCEDES C-KLASA (W-203) com. M/032. Cat. No. e20*94/20*0513*00. 10,00kN.") MERCEDES C-KLASA (W-203) sed. MERCEDES C-KLASA (W-203) com. 06/2000-2007 04/2001-2007 Cat. No. M/032 e20*94/20*0513*00 1500Kg 75Kg 10,00kN Moment skręcający dla śrub i nakrętek (8.8) Torgue settings for
MERCEDES C-KLASA (W-203) sed. MERCEDES C-KLASA (W-203) com. 06/2000-2007 04/2001-2007 Cat. No. M/032 e20*94/20*0513*00 1500Kg 75Kg 10,00kN Moment skręcający dla śrub i nakrętek (8.8) Torgue settings for
INSTRUKCJA OBSŁUGI. Kociołek do zup i sosów MODEL:
 INSTRUKCJA OBSŁUGI Kociołek do zup i sosów v1-07.2013 MODEL: 432104 Stalgast sp. z o.o. ul. Staniewicka 5 03-310 Warszawa tel.: 22 517 15 75 fax: 22 517 15 77 www.stalgast.com email: stalgast@stalgast.com
DC UPS. User Manual. Page 1
 DC UPS User Manual Page 1 1. Specyfikacja 1.1 Zasilacz PowerWalker DC UPS 12V jest innowacyjnym rozwiązaniem do zasilania prądem stałym o napięciu 12 VDC urządzeń do max 30W (2,5 A) obciążenia. W urządzeniu
ES 80. Handleiding Instrukcja obsługi. Nederlands Polski
 Nederlands Polski Handleiding Instrukcja obsługi ES 80 Lees alvorens het apparaat te gebruiken de handleiding en veiligheidsvoorschriften! Przed użyciem przeczytaj instrukcję obsługi i uwagi dotyczące
Chafing Dish Matterhorn
 Chafing Dish Matterhorn GEBRUIKSAANWIJZING USER INSTRUCTIONS GEBRAUCHSANWEISUNG MODE D EMPLOI INSTRUKCJA OBSŁUGI Alvorens de apparatuur in gebruik te nemen dient u deze gebruiksaanwijzing aandachtig te
RENAULT GRAND SCENIC II
 RENAULT GRAND SCENIC II 04.2004 - Cat. No. R/029 e20*94/20*0372*00 1350Kg 75Kg 8,02kN PRZEKRÓJ A-A 75 min. 75 min. 30 o max. A R 14,5 max. R40 max. A 140 min. 55 min. 100 max. 32 min. 30 o max. 350-420
 Podłączyć do gniazda Przykręcić nakrętkę radełkowaną Sposób montażu akcesoriów Wszystkie trzy akcesoria (tj. lusterko, haczyk i magnes) są mocowane do kamery ten sam sposób, co poniżej. Sposób montażu:
Montageanleitung Automatische Verriegelung Assembly Instructions - Automatic Locking Instrukcja Montażu - Zamknięcie Automatyczne
 Montageanleitung Automatische Verriegelung Assembly Instructions - Automatic Locking Instrukcja Montażu - Zamknięcie Automatyczne Container & Compactor Components Übersicht Overview Orientacja Schritt
Zwora Yale US06. Yale seria US kg. Zastosowanie. Właściwości. Parametry techniczne
 Zwora Yale US06 Yale seria US06 270 kg Zastosowanie Zwory serii US06 przeznaczone są do realizowania kontroli dostępu w pomieszczeniach wymagających podstawowej ochrony np. drzwi wewnętrzne. Właściwości
Instrukcja obsługi TOSTER MODEL: BH-8863
 Instrukcja obsługi TOSTER MODEL: BH-8863 3. Nie używaj do czyszczenia silnych środków czyszczących, acetonu, alkoholu, ostrych materiałów, itp. 4. Należy regularnie usuwać okruchy pieczywa wewnątrz tostera,
INSTRUKCJA MONTAŻU MARBO E SPORT (ASSEMBLY INSTRUCTION) P R O F E S S I O N A L F I T N E S S E Q U I P M E N T
 P R O F E S S I O N A L F I T N E S S E Q U I P M E N T") INSTRUKCJA MONTAŻU (ASSEMBLY INSTRUCTION) MARBO E SPORT P R O F E S S I O N A L F I T N E S S E Q U I P M E N T www.marbo-sport.pl PRZED MONTAŻEM Przeczytaj to zanim rozpoczniesz montaż urządzenia Podczas
INSTRUKCJA MONTAŻU (ASSEMBLY INSTRUCTION) MARBO E SPORT P R O F E S S I O N A L F I T N E S S E Q U I P M E N T www.marbo-sport.pl PRZED MONTAŻEM Przeczytaj to zanim rozpoczniesz montaż urządzenia Podczas
Oprawa / Fixture BOXSET. miejsce na aranżację lub grafike z zastosowaniem, Podstawowe elementy oprawy / Basic fixture components. www.klusdesign.
 Oprawa / Fixture BOXSET miejsce na aranżację lub grafike z zastosowaniem, Podstawowe elementy oprawy / Basic fixture components 9 1 8 2 3a 4a 5 6 4b 3b 7 1. Profil BOX-Z / BOX-Z Extrusion 2. Klucz imbusowy
RENAULT LAGUNA com. R/018. Cat. No. e20. e20*94/20*0132*00 D = 8,50kN. 1500Kg 75Kg. D (kn) = x 0, MAX kg. MAX kg
 = x 0, MAX kg. MAX kg") RENAULT LAGUNA com. 2001 - Cat. No. R/018 e20 e20*94/20*0132*00 1500Kg 75Kg D = 8,50kN D (kn) = x x 0,00981 + PRZEKRÓJ A-A 75 min. 75 min. 30 o max. A R 14,5 max. R40 max. A 140 min. 55 min. 100 max. 32
RENAULT LAGUNA com. 2001 - Cat. No. R/018 e20 e20*94/20*0132*00 1500Kg 75Kg D = 8,50kN D (kn) = x x 0,00981 + PRZEKRÓJ A-A 75 min. 75 min. 30 o max. A R 14,5 max. R40 max. A 140 min. 55 min. 100 max. 32
GA 310 GA 448. Instrukcja obsługi. Gilotyny Guillotines. instruction manual GDAŃSK ul. Krynicka 1 tel.: (058) fax: (058)
 fax: (058)") Instrukcja obsługi instruction manual 80-393 GDAŃSK ul. Krynicka 1 tel.: (058) 55 43 555 fax: (058) 55 43 500 ODDZIAŁ: 02-784 WARSZAWA ul. Janowskiego 9 tel.: (022) 648 03 48..49 fax: (022) 648 03 50 Gilotyny
Instrukcja obsługi instruction manual 80-393 GDAŃSK ul. Krynicka 1 tel.: (058) 55 43 555 fax: (058) 55 43 500 ODDZIAŁ: 02-784 WARSZAWA ul. Janowskiego 9 tel.: (022) 648 03 48..49 fax: (022) 648 03 50 Gilotyny
PAPER CUTTER A4/A3 GUILLOTINES
 Instrukcja obsługi instruction manual 80-393 GDAŃSK ul. Krynicka 1 tel.: (058) 55 43 555 fax: (058) 55 43 500 ODDZIAŁ: 02-784 WARSZAWA ul. Janowskiego 9 tel.: (022) 648 03 48..49 fax: (022) 648 03 50 GILOTYNY
Elektryczny młynek do kawy
 Elektryczny młynek do kawy Szanowny Kliencie, dziękujemy za elektrycznego młynka do kawy. Prosimy o przeczytanie instrukcji i przestrzeganie podanych wskazówek i porad, abyście mogli Państwo optymalnie
INSTRUKCJA OBSŁUGI (PL) Mill HT1500
 Mill HT1500") Instrukcja obsługi (PL) INSTRUKCJA OBSŁUGI (PL) Mill HT1500 Prosimy o dokładne zapoznanie się z instrukcją i zachowanie jej na przyszłość. Zasady bezpieczeństwa Należy przestrzegać zasad bezpieczeństwa
Instrukcja obsługi (PL) INSTRUKCJA OBSŁUGI (PL) Mill HT1500 Prosimy o dokładne zapoznanie się z instrukcją i zachowanie jej na przyszłość. Zasady bezpieczeństwa Należy przestrzegać zasad bezpieczeństwa
PŁYTA GRILLOWA REVOLUTION ELEKTRYCZNA, GŁADKA GRIDDLE REVOLUTION ELECTRIC, FLAT
 Instrukcja obsługi User manual PŁYTA GRILLOWA REVOLUTION ELEKTRYCZNA, GŁADKA GRIDDLE REVOLUTION ELECTRIC, FLAT Kod: 203361 Przed uruchomieniem urządzenia należy koniecznie dokładnie przeczytać niniejszą
Instrukcja Montażu. Zawór elektromagnetyczny. Zawór kontrolny. Zawór odcinający. Krańcówka. Wkład filtracyjny EB-PS300=A
 PS300 Einbau-Anleitung Installation Instructions Instrukcja Montażu E1 Bauteile Components Części =Magnetventil Solenoid valve Zawór elektromagnetyczny =Regulierventil Check valve Zawór kontrolny ƒ=absperr-kugelhahn
TOYOTA LAND CRUISER V8 T/039. Cat. No. E20-55R-01 D = 17,4kN. 140Kg. 3500Kg. D (kn) = x 0, MAX kg. MAX kg
 = x 0, MAX kg. MAX kg") TOYOTA LAND CRUISER V8 2007 - Cat. No. T/039 e20 E20 E20-55R-01 3500Kg 140Kg D = 17,4kN D (kn) = MAX kg x MAX kg x 0,00981 MAX kg + MAX kg PRZEKRÓJ A-A 75 min. 75 min. 30 o max. A R 14,5 max. R40 max.
TOYOTA LAND CRUISER V8 2007 - Cat. No. T/039 e20 E20 E20-55R-01 3500Kg 140Kg D = 17,4kN D (kn) = MAX kg x MAX kg x 0,00981 MAX kg + MAX kg PRZEKRÓJ A-A 75 min. 75 min. 30 o max. A R 14,5 max. R40 max.
FOREST DIAMOND Pilot radiowy X460
 FOREST DIAMOND Pilot radiowy - 520109X460 SPECYFIKACJA TECHNICZNA: 3V bateria typu: CR2450 zasięg nadajnika maks. 30 m żywotność baterii do 3 lat zakres temp. pracy:-10 C - +50 C częstotliwość 433.92MHz
KRAJALNICE GRAWITACYJNE CELME
 KRAJALNICE GRAWITACYJNE CELME INSTRUKCJA OBSŁUGI 2 WSTĘP Niniejszy podręcznik został stworzony w celu dostarczenia klientom wszystkich informacji o maszynie i standardach bezpieczeństwa z nią związanych.