Bewaar deze handleiding bij het apparaat Keep these instructions with this appliance Halten Sie diese Anweisungen mit diesem Gerät Gardez ces
|
|
|
- Franciszek Kozak
- 6 lat temu
- Przeglądów:
Transkrypt
1

2 Bewaar deze handleiding bij het apparaat Keep these instructions with this appliance Halten Sie diese Anweisungen mit diesem Gerät Gardez ces instructions avec cet appareil Zachowaj instrukcję urządzenia

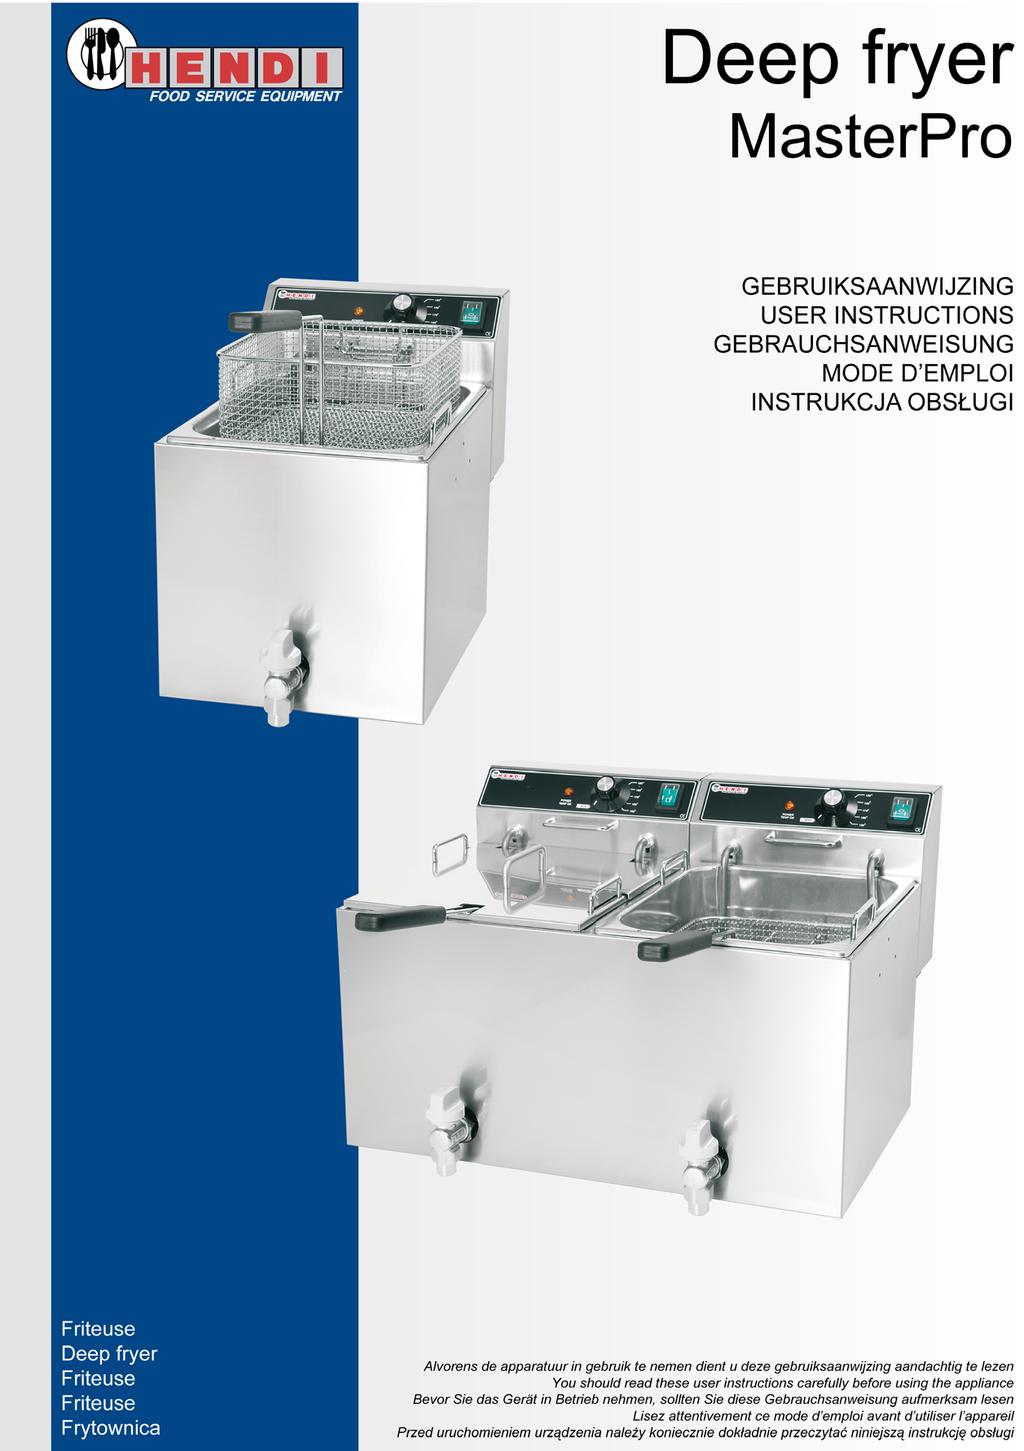
3 GEBRUIKSAANWIJZING USER INSTRUCTIONS GEBRAUCHSANWEISUNG MODE D EMPLOI INSTRUKCJA OBSŁUGI
4 Functie: Deze friteuse is voorzien van een unieke koude zone waardoor het vet aanzienlijk langer mee zal gaan. Veiligheidsvoorschriften: Sluit apparaat alleen aan op een geaard stopcontact 230 VAC. Vermijdt overbelasting. Schakel de apparatuur na gebruik uit met behulp van de schakelaar. Tijdens het bijvullen of schoonmaken altijd de stekker uit het stopcontact verwijderen. De elektrische installatie dient te voldoen aan de nationale en plaatselijk geldende voorschriften. Technische gegevens Friteuse 1x8l Friteuse 2x8l Model Aansluitspanning [U] 230 VAC 230 VAC Vermogen [P] 3320 W 2 x 3250 W Afmetingen (B x D x H) 420 x 270 x 360 mm 420 x 550 x 360 mm Installeren Verwijder de witte beschermfolie van de roestvrijstalen delen. Plaats de elementhouder op de steun. Gebruik: Let op : Sluit het apparaat aan op een aparte groep van 16 Ampère. Dit is een dubbele friteuse hiervoor heeft u 2 aparte groepen nodig. Schakel het apparaat uit met de schakelaar. Vul de bak met olie of vet tot de MAX streep. LET OP! Het gebruik van vast vet is niet toegestaan. Stop de randaarde stekker in een geaard stopcontact 230V, het groene lampje gaat nu branden Stel met de thermostaat de gewenste temperatuur in. Het oranje lampje gaat branden. Als de ingestelde temperatuur bereikt is gaat het oranje lampje uit. U kunt nu frituren. De friteuse is voorzien van een unieke koude zone waardoor het vet aanzienlijk langer mee zal gaan. Controleer regelmatig of voldoende olie of vet in de bak. Het niveau mag nooit onder de MIN indicatie komen. Bij intensief gebruik regelmatig het vet zeven. Indien het vet of olie gaat schuimen dient u dit te vervangen. Na gebruik Schakel de apparatuur uit met de schakelaar. Plaats de deksel op de friteuse, zodat het vet niet veroudert.
5 Olie of vet aftappen LET OP! Vloeibaar vet is heet en kan ernstige brandwonden veroorzaken. De kraan kan erg heet worden tijdens het aftappen. Indien vet in aanraking komt met lichaamsdelen, koelen met lauw water. Vervolgens contact opnemen met een arts Zet een opvangbak onder de uitloop ( wacht tot het vet / olie is afgekoeld tot ± 50 º C) Til de vergrendeling op en trek de hendel naar voren. Het vet loopt uit de bak. Als het vet uit de bak is gelopen duw de hendel weer naar links. Controleer of de hendel weer is vergrendeld. Onderhoud Verwijder voor het reinigen altijd de stekker uit het stopcontact. De friteuse nooit in water of andere reinigingsvloeistoffen dompelen. De friteuse met een licht vochtige doek reinigen. Gebruik geen agressieve of bijtende reinigingsmiddelen. Vermijd voorzover mogelijk contact met water bij de elektrische componenten. Storingen: Storing Verschijnsel Mogelijke oorzaak Mogelijke oplossing Geen netspanning Controleer de elektrische installatie/ controleer of de schakelaar uit of defect is Oranje lamp brandt niet Maximaalbeveiliging aangesproken. Reset de maximaal- beveiliging. (Zie noot 1) Groene lamp brandt niet Maximaalbeveiliging defect Vervang de maximaalbeveiliging. Apparaat doet het helemaal niet Microswitch defect Vervang de microswitch / of verkeerde plaatsing van het element op de bak. Oranje en groene lamp branden, maar apparaat wordt niet warm Element defect Vervang het element. Apparaat bereikt de ingestelde temperatuur niet. Lange baktijd. Thermostaat defect Element defect Vervang de thermostaat. Vervang het element. 1) Reset maximaalbeveiliging Laat de friteuse afkoelen. Druk de reset-knop in van de maximaalbeveiliging aan de achterzijde van het toestel. U moet een duidelijke klik horen. Neem bij twijfel contact op met Uw leverancier.
6 Garantie Elk defect waardoor de werking van het apparaat nadelig wordt beïnvloed dat zich binnen één jaar na aankoop van het apparaat voordoet, wordt gratis hersteld door reparatie of vervanging, mits het apparaat conform de instructies is gebruikt en onderhouden en niet op enigerlei wijze verkeerd is behandeld of misbruikt. Dit laat onverlet uw bij wet bepaalde rechten. Als de garantie van kracht is, vermeld dan waar en wanneer u het apparaat hebt gekocht en sluit een koopbewijs bij (bijv. kassabon). Gezien ons streven naar voortdurende verdere productontwikkeling behouden wij ons het recht voor, zonder voorafgaande kennisgeving wijzigingen aan te brengen aan product, verpakking en documentatie. Afdanken Aan het einde van de levensduur, het apparaat afdanken volgens de op dat moment geldende voorschriften en richtlijnen.
7 Function: This deep fryer is designed with a unique cold zone, this extends the usable life of the fat considerably. Safety instructions: Only connect the appliance to an earthed 230 VAC electrical socket. Avoid overloading. Turn off the appliance after use with help of the switch. Always remove the plug from the socket when filling or cleaning the deep fryer. The electrical installation must satisfy the applicable national and local regulations. Technical details deep fryer 1x8l deep fryer 2x8l Model Supply voltage [U] 230 VAC 230 VAC Power [P] 3320 W 2 x 3250 W Dimensions (W x D x H) 420 x 270 x 360 mm 420 x 550 x 360 mm Installation Remove the white protective foil from the stainless steel parts. Install the element holder on the support. Use Attention : Plug the appliance on a separate group of 16 ampere This is a double deep fryer, you need 2 separate groups. Turn off the appliance with help of the switch. Fill the container with oil or hydrogenated oil until the MAX line. NOTE! The use of solidified fat is not allowed. Plug the earthed plug into an earthed 230V socket, the green lamp will light now. Set the thermostat to the desired temperature. The orange lamp will light. When the set temperature is reached, the orange lamp goes out. You can now use the deep fryer. This deep fryer is designed with a unique cold zone, this extends the usable life of the oil considerably. Regularly check if there is sufficient oil or hydrogenated oil in the container. The level should never fall below the MIN line. When used intensively, the fat must be strained regularly. You must replace the fat or oil if it starts to foam. After use Turn off the appliance with help of the switch. Put the lid on the deep fryer, so that the fat does not age.
8 Draining oil or fat CAUTION! Liquefied fat is hot and can cause serious burns. The tap can become very hot during tapping. If fat comes in contact with the skin, cool with lukewarm water. After which contact a doctor Place a tank under the drain ( wait till the fat / oil is could down till ± 50º C) Lift the lock and turn the handle to the right. The fat will drain from the container. When the fat has drained from the container, turn the handle to the left again. Check if the handle is once more locked. Maintenance Before cleaning, always switch the switch to the off position. Clean the deep fryer with a damp cloth. Do not use aggressive or caustic cleansing agents. Wherever possible, avoid water coming into contact with electrical components. Before cleaning the container, turn the element holder to the raised position. Faults: Fault Symptom Cause Possible solution No mains voltage Check the electrical Installation/ check if the switch is off or defect Orange lamp does Overload circuit breaker Reset the overload circuit not light tripped. breaker.(see note 1) Appliance does not Green lamp does not light Overload circuit breaker defective Replace the overload circuit breaker. do anything Micro switch defective Replace the micro switch / or wrong placement of the element in the tank Appliance does not reach the set temperature. Orange and green lamp light, but the appliance doesn t become hot Long frying time. 1) Reset overload circuit breaker Element defective Thermostat defective Element defective Replace the element Replace the thermostat. Replace the element. Allow the deep fryer to cool down. Press the reset button of the overload circuit breaker at the back of the appliance. You should hear a clear click. If in doubt, contact your supplier.
9 Guarantee Any defect affecting the functionality of the appliance that becomes apparent within one year of purchase will be corrected by free repair or replacement provided the appliance has been used and maintained in accordance with the instructions and has not been abused or misused in any way. Your statutory rights are not affected. If the appliance is under guarantee, state where and when it was bought and include proof of purchase (e.g. till receipt). In line with our policy of continuous product development we reserve the right to change the product, packaging and documentation specifications without notice. Discard At the end of the life of the appliance, please dispose of the appliance according to the regulations and guidelines applicable at the time.
10 Verwendungszweck: Diese Friteuse ist mit einer einzigartigen Kältezone versehen, sodass das Fett wesentlich länger verwendet werden kann. Sicherheitsvorschriften: Das Gerät darf nur an eine geerdete 230 V Steckdose angeschlossen werden. Überlastung ist zu vermeiden. Das Gerät ist nach dem Gebrauch auszuschalten, indem am Poler-schalte ausschalten. Vor dem Nachfüllen oder Reinigen ist immer der Stecker aus der Steckdose herauszuziehen. Die elektrische Anlage hat den nationalen und regionalen Vorschriften zu entsprechen. Technische Angaben Friteuse 1x8l Friteuse 2x8l Model Anschlussspannung [U] 230 VAC 230 VAC Leistung [P] 3320 W 2 x 3250 W Größe (B x T x H) 420 x 270 x 360 mm 420 x 550 x 360 mm Installation Entfernen Sie die Schutzfolie von den Edelstahlteilen. Hängen Sie den Elementhalter in die Halterung. Gebrauch: Aufmerksamkeit : Darf das Gerät auf einer getrennten Gruppe von 16 Ampere. Dies ist eine doppelte Friteuse, brauchen Sie 2 getrennte Gruppen. Schalten Sie das Gerät mit Hilfe vom die Schalter aus. Füllen Sie den Behälter bis zum MAX-Strich mit Öl oder Fett. ACHTUNG! Gebrauch von nicht flüssige Fettarten ist nicht erlaubt. Stecken Sie den Schukostecker in eine geerdete 230-Volt-Steckdose. Die Grüne Leuchte brennt. Stellen Sie am Thermostat die gewünschte Temperatur ein. Die orangefarbene Leuchte brennt. Wenn die eingestellte Temperatur erreicht ist, erlischt die orangefarbene Lampe. Sie können jetzt frittieren. Die Friteuse ist mit einer einzigartigen Kältezone versehen, so dass das Fett wesentlich länger verwendet werden kann. Kontrollieren Sie regelmäßig, ob sich ausreichend Öl oder Fett im Behälter befindet. Der Füllstand darf nie unter die MIN-Anzeige kommen. Das Fett bei intensivem Gebrauch regelmäßig sieben. Wenn das Fett oder das Öl schäumt, muss es ausgewechselt werden. Nach dem Gebrauch Schalten Sie das Gerät aus mit Hilfe von die Schalter. Legen Sie den Deckel auf die Friteuse, sodass das Fett frisch bleibt.
11 Öl oder Fett ablassen ACHTUNG! Flüssiges Fett ist heiß und kann ernsthafte Verbrennungen verursachen. Der Ablauthahn kann bei ablassen des Fettes sehr Heiß werden! Wenn das Fett mit Körperteilen in Berührung kommt, mit lauwarmem Wasser kühlen. Anschließend sofort einen Arzt aufsuchen. Stellen Sie einen Auffangbehälter unter das Ablauf (warten Sie bis das Fett / Öl ist hinunter bis ± 50º C) Heben Sie die Verriegelung an und Ziehen Sie den Hebel nach vorne. Das Fett läuft aus dem Behälter. Wenn das Fett aus dem Behälter gelaufen ist, schieben Sie den Hebel wieder nach links. Kontrollieren Sie, ob der Hebel wieder verriegelt ist. Pflege Vor dem Reinigen ist immer der Stecker aus der Steckdose herauszuziehen. Die Friteuse nie in Wasser oder andere Reinigungsflüssigkeiten eintauchen. Die Friteuse ist mit einem leicht feuchten Tuch zu reinigen. Keine aggressiven oder ätzenden Reinigungsflüssigkeiten verwenden. Die elektrischen Teile, sofern möglich, nicht mit Wasser in Berührung kommen lassen. Störungen: Störung Phänomen Evt. Ursache evt. Lösung Das Gerät funktioniert nicht. Das Gerät erreicht die eingestellte Temperatur nicht. Orangefarbene Lampe brennt nicht. Grüne Lampe brennt nicht. Orangefarbene und Grüne Lampe brennt. Aber das Gerät Heizt nicht Lange Frittierdauer. 1) Maximalsicherung zurückstellen Keine Netzspannung. Maximalsicherung wird aktiviert. Maximalsicherung defekt. Microswitch defekt. Element defekt. Thermostat defekt. Element defekt. Kontrollieren Sie die elektrische Anlage/ kontrollieren Sie ob die Schalter ist Defekt oder ob das Gerät eingeschaltet ist Maximalsicherung rücksetzen, siehe auch (Anmerkung 1) Maximalsicherung austauschen. Microswitch austauschen / Oder falsche Unterbringung vom Element im Behälter Element austauschen. Thermostat austauschen. Element austauschen. Lassen Sie die Friteuse abkühlen. Drücken Sie die Rückstelltaste (Reset-Taste) der Maximalsicherung ein an der Ruckseite des Gerät. Es ist ein deutliches Klicken zu hören. Wenden Sie sich im Zweifelsfall an Ihren Lieferanten.
12 Garantie Jeder Defekt, auf Grund dessen die Funktion des Geräts nachteilig beeinflusst wird und der sich innerhalb eines Jahres nach Ankauf des Geräts zeigt, wird durch Reparatur oder Auswechslung kostenlos behoben, falls das Gerät den Anleitungen entsprechend gebraucht und gewartet wurde und nicht in irgendeiner Weise verkehrt behandelt oder unzweckmäßig benutzt worden ist. Letzteres lässt Ihre auf Grund des Gesetzes bestimmten Rechte unberührt. Wenn die Garantie wirksam ist, erwähnen Sie bitte, wo und wann Sie das Gerät gekauft haben und fügen Sie einen Kaufbeleg (z.b. den Kassenzettel) bei. Da wir danach streben, unsere Produkte ständig weiterzuentwickeln, behalten wir uns das Recht vor, ohne vorhergehende Bekanntgabe Änderungen am Produkt, der Verpackung und Dokumentation vorzunehmen. Entsorgung Am Ende der Lebensdauer des Geräts den zu diesem Zeitpunkt geltenden Vorschriften und Richtlinien entsprechend entsorgen.
13 Fonction Cette friteuse est équipée d une zone froide unique, ce qui permet d utiliser la graisse bien plus longtemps. Prescriptions de sécurité Ne branchez l appareil que sur une prise de courant à la terre 230 VAC. Evitez toute surcharge. Après utilisation, débranchez l appareil avec l aide du interrupteur. Débranchez aussi toujours l appareil quand vous le remplissez ou le nettoyez. L installation électrique doit satisfaire aux règles nationales et locales en vigueur. Données techniques Friteuse 1x8l Friteuse 2x8l Model Voltage [U] 230 VAC 230 VAC Puissance [P] 3320 W 2 x 3250 W Dimensions (l x p x h) 420 x 270 x 360 mm 420 x 550 x 360 mm Installation Retirez la pellicule qui protège les parties en inox. Placez le porte-élément sur le support. Utilisation Attention : Mettez l applicateur dans un group différent de 16 ampères Cette Friteuse est un Friteuse double, vous-prenez deux groupe différente. Débranchez l appareil avec l aide de l interrupteur. Remplissez le récipient avec de l huile ou de la graisse jusqu à l indication MAX. ATTENTION! Il est interdit utilisez une graisse consistante Mettez l interrupteur marche/arrêt en position on, le voyant vert s allume. Réglez la température à l aide du thermostat. Le voyant orange reste allumé et l huile ou la graisse chauffe. Quand l huile ou la graisse est à la température désirée, le voyant orange sort. Maintenant vous pouvez utiliser la friteuse. La friteuse est équipée d une zone froide unique, ce qui permet d utiliser la graisse bien plus longtemps. Contrôlez régulièrement s il y a assez d huile ou de graisse dans la friteuse. Le niveau ne doit jamais se trouver au-dessous de l indication MIN. Dans le cas d utilisation intensive, filtrez régulièrement la graisse. Si l huile ou la graisse commence à écumer, vous devez la changer. Après utilisation Débranchez l appareil avec l aide de l interrupteur. Placez le couvercle sur la friteuse pour mieux conserver la graisse.
14 Vider l huile ou la graisse ATTENTION! La graisse liquide est brûlante et peut provoquer de graves brûlures. Le robinet peut devenir très chaud pendant taper. Si vous vous brûlez avec de la graisse, refroidissez la brûlure avec de l eau tiède, puis contactez votre médecin. Placez un bac sous le tuyau (attendez vous jusqu'à graisse / pétrole est pourrait en ±50º C) Soulevez le verrouillage et tirez le levier a la devant. La graisse s écoule. Quand toute la graisse est écoulée, replacez le levier à gauche et contrôlez s il est de nouveau bloqué. Entretien Débranchez toujours l appareil avant de le nettoyer. Ne plongez jamais la friteuse dans l eau aux autres liquides de nettoyage. Nettoyez la friteuse avec un chiffon légèrement humide. N utilisez pas de nettoyants agressifs ou corrosifs. Evitez que les composants électriques entrent en contact avec l eau. Problèmes Panne Description Cause possible Solution possible Pas de tension Contrôlez l installation électrique/ contrôlez quand l interrupteur est sortir ou défectueux Voyant orange ne s allume pas Sécurité maximale enclenchée. Réinitialisez la sécurité maximale (voir remarque 1) Voyant vert ne Sécurité maximale Remplacez la sécurité L appareil ne s allume pas défectueuse maximale fonctionne pas du Remplacez la micro tout. Micro interrupteur interrupteur / ou le mauvais défectueux placement de l'élément dans le réservoir L appareil ne fournit pas la température désirée. Voyant orange et vert s allume, mais l appareil ne pas devenir chaud Cuisson longue Réinitialisation de la sécurité maximale Elément défectueux Thermostat défectueux Elément défectueux Remplacez l élément Remplacez le thermostat Remplacez l élément. Laissez refroidir la friteuse. Appuyez sur le «bouton de réinitialisation» de la sécurité maximale au debout de l appareil. Vous devez entendre clairement un clic. En cas de doute, contactez votre fournisseur.
15 Garantie Tout défaut entraînant le mauvais fonctionnement de l appareil dans l année qui suit l achat fait l objet d une réparation ou d un remplacement gratuit de l appareil à condition que l appareil ait été utilisé et entretenu conformément aux instructions, sans mauvaise application ou abus, ceci sans préjudice des droits que la loi vous accorde. Si vous voulez bénéficier de la garantie, veuillez indiquer le lieu et la date de l achat de l appareil et joindre une preuve d achat (par ex. bon d achat). Nous visons constamment à améliorer nos produits et nous nous réservons le droit d apporter des modifications au produit, à l emballage et à la documentation sans avertissement préalable. Mise au rebut En fin d utilisation, quand vous voudrez mettre votre l appareil au rebut, respectez les prescriptions et directives en vigueur à cette date.
16 Przeznaczenie : Frytownica posiada specyficzny zakres schładzający przedłużający świeżość tłuszczu. Wskazówki bezpieczeństwa: Urządzenie można podłączać wyłącznie do uziemionego gniazda 230 V. Unikać przeciążenia. Po użyciu wyłączyć urządzenie wyjmując wtyczkę z gniazda. Przed napełnieniem lub czyszczeniem zawsze należy wyjmować wtyczkę z gniazda. Instalacja elektryczna musi odpowiadać krajowym i lokalnym przepisom. Dane techniczne Frytownica 1x8l Frytownica 2x8l Model Napięcie przyłączeniowe [U] 230 VAC 230 VAC Moc [P] 3320 W 2 x 3250 W Wielkość (szer. x gł. x wys.) 420 x 270 x 360 mm 420 x 550 x 360 mm Instalacja Usunąć folię ochronną z części ze stali szlachetnej. Uchwyt elementu grzewczego zawiesić w przytrzymującej części. Użycie: Uwaga: Urządzenie należy podłączyć do oddzielnego gniazda 16 amperowego To jest frytownica podwójna, potrzebne są dwa odrębne gniazda. Wyłączyć urządzenie poprzez wyjęcie wtyczki z gniazda. Napełnić zbiornik olejem lub tłuszczem do poziomu oznaczonego kreską MAX. UWAGA! Nie wolno stosować nie płynnych rodzajów tłuszczy. Do uziemionego gniazdka 230 Volt wsadzić wtyczkę ze stykiem uziemiającym. Zapala się zielona lampka. Na termostacie nastawić żądaną temperaturę. Zapala się pomarańczowa lampka. Pomarańczowa lampka gaśnie po osiągnięciu nastawionej temperatury. Teraz można smażyć frytki. Frytownica posiada specyficzny zakres schładzający przedłużający świeżość tłuszczu. Należy regularnie sprawdzać, czy w pojemniku jest wystarczająca ilość tłuszczu lub oleju. Poziom wypełnienia nie może zejść poniżej oznakowania MIN. Przy intensywnym użytkowaniu należy systematycznie filtrować tłuszcz. Gdy olej lub tłuszcz zacznie się pienić, należy wymienić go na nowy. Po użyciu Wyłączyć urządzenie wyjmując wtyczkę z gniazda. Frytownicę przykryć pokrywą, wtedy tłuszcz się nie zestarzeje. Usuwanie oleju lub tłuszczu
17 UWAGA: Płynny tłuszcz jest gorący i może powodować poważne oparzenia. Podczas opróżniania tłuszczu kurek spustowy może być bardzo gorący! Części ciała oparzone tłuszczem należy schłodzić letnią wodą. Następnie należy natychmiast udać się do lekarza. Pod odpływem umieścić pojemnik (odczekać aż tłuszcz / olej osiągnie temperaturę ± 50 C). Podnieść blokadę i przesunąć dźwignię do przodu. Tłuszcz zaczyna wypływać z pojemnika. Po usunięciu tłuszczu z pojemnika ponownie przesunąć dźwignię na lewo. Sprawdzić, czy dźwignia jest zablokowana. Pielęgnacja Przed czyszczeniem zawsze wyjmować wtyczkę z gniazda. Nigdy nie zanurzać frytownicy w wodzie lub innych płynach myjących. Frytownicę czyścić przy pomocy lekko wilgotnej szmatki. Nie stosować żadnych agresywnych środków lub ostrych przedmiotów. W miarę możliwości nie dopuścić, aby części elektryczne miały kontakt z wodą. Uszkodzenia: Uszkodzenie Objawy Ewent. przyczyna Ewent. usunięcie Urządzenie nie działa. Nie pali się pomarańczowa lampka. Nie pali się zielona lampka Palą się lampki pomarańczowa i zielona. Urządzenie jednak nie działa Brak napięcia w sieci Zadziałał bezpiecznik zabezpieczający - Sprawdzić instalację elektryczną/ sprawdzić, czy wtyczka nie jest uszkodzona oraz czy urządzenie jest włączone. Ponownie uruchomić bezpiecznik, patrz też uwagę 1) Wymienić bezpiecznik zabezpieczający Uszkodzony bezpiecznik zabezpieczający Uszkodzony Mikroswitch. Wymienić Mikroswitch. Uszkodzony element grzewczy Wymienić element grzewczy. Urządzenie nie osiąga nastawionej temperatury Długi czas smażenia frytek Uszkodzony termostat. Uszkodzony element grzewczy Wymienić termostat. Wymienić element grzewczy. 1) Ponowne uruchomienie bezpiecznika Schłodzić frytownicę. Wcisnąć przycisk resetujący bezpiecznika zabezpieczającego, który znajduje się z tyłu urządzenia. Powinno zabrzmieć wyraźne kliknięcie. W przypadku wątpliwości należy zwrócić się do dostawcy.
18 Gwarancja Każda usterka powodująca złe funkcjonowanie urządzenia, która ujawni się w ciągu jednego roku od zakupu, zostanie bezpłatnie usunięta lub zaparzacz zostanie wymieniony na inny, pod warunkiem, że był użytkowany i konserwowany zgodnie z instrukcją obsługi i nie był wykorzystywany do innych celów lub w jakikolwiek inny niewłaściwy sposób. Nie narusza to Państwa innych praw, wynikających z przepisów prawa. W przypadku korzystania z gwarancji, należy podać miejsce i czas zakupu urządzenia, dołączając do niego dowód zakupu (np. kwit kasowy). Usuwanie zużytych urządzeń Po zakończeniu okresu użytkowania zaparzacz do kawy należy usunąć zgodnie z obowiązującymi w tym czasie przepisami i wytycznymi.
19
20 Hendi B.V. (The Netherlands) Steenoven TX Rhenen Nederland Tel: +31 (0) Fax: +31 (0) Hendi Austria GmbH (Austria) Gewerbegebiet Ehring 5112 Lamprechtshausen Austria Tel: +43 (0) Fax: +43 (0) office@hendi-austria.com Hendi Polska Spolka z.o.o. (Polska) Ul. Kopanina 28/ Poznań Polska Tel. +48 (0) Fax. +48 (0) info@hendi-polska.pl Ver
FRYTOWNIAC FRY SYSTEM
 Instrukcja instalowania, obsługi i konserwacji FRYTOWNIAC FRY SYSTEM 205105 205112 WYSOKA JAKOŚĆ, NISKA CENA Przepisy bezpieczeństwa Podłączać urządzenie tylko do gniazdka elektrycznego 230V z uziemieniem.
Alleen voor gebruik binnenshuis For indoor use only Nur für Innen gebrauch Pour l'usage d'intérieur seulement Do użytku wewnątrz pomieszczeń
 Alleen voor gebruik binnenshuis For indoor use only Nur für Innen gebrauch Pour l'usage d'intérieur seulement Do użytku wewnątrz pomieszczeń Bewaar deze handleiding bij het apparaat Keep these instructions
Bewaar deze handleiding bij het apparaat Keep these instructions with this appliance Halten Sie diese Anweisungen mit diesem Gerät Gardez ces
 Bewaar deze handleiding bij het apparaat Keep these instructions with this appliance Halten Sie diese Anweisungen mit diesem Gerät Gardez ces instructions avec cet appareil Zachowaj instrukcję urządzenia
WYŁĄCZNIK CZASOWY OUTDOOR TIMER
 003-582 PL WYŁĄCZNIK CZASOWY Instrukcja obsługi (Tłumaczenie oryginalnej instrukcji) Ważny! Przed użyciem uważnie przeczytaj instrukcję obsługi! Zachowaj ją na przyszłość. EN OUTDOOR TIMER Operating instructions
Alleen voor gebruik binnenshuis For indoor use only Nur für Innen gebrauch Pour l'usage d'intérieur seulement Do użytku wewnątrz pomieszczeń
 Alleen voor gebruik binnenshuis For indoor use only Nur für Innen gebrauch Pour l'usage d'intérieur seulement Do użytku wewnątrz pomieszczeń Bewaar deze handleiding bij het apparaat Keep these instructions
Instrukcja Montażu. Zawór pilotowy. Zawór przełączający 3-drogowy. Zawór odcinający. Wkład filtrujący. Zawór iglicowy EB-FD300=A
 FD 300 Einbau-Anleitung Installation Instructions Instrukcja Montażu E1 Bauteile Components Części =Pilotventil Pilot valve Zawór pilotowy =3-Wege-Umschaltventil 3-Way manual selector Zawór przełączający
LED PAR 56 7*10W RGBW 4in1 SLIM
 LED PAR 56 7*10W RGBW 4in1 SLIM USER MANUAL Attention: www.flash-butrym.pl Strona 1 1. Please read this specification carefully before installment and operation. 2. Please do not transmit this specification
Alleen voor gebruik binnenshuis For indoor use only Nur für Innen gebrauch Pour l'usage d'intérieur seulement Do użytku wewnątrz pomieszczeń
 Alleen voor gebruik binnenshuis For indoor use only Nur für Innen gebrauch Pour l'usage d'intérieur seulement Do użytku wewnątrz pomieszczeń Bewaar deze handleiding bij het apparaat Keep these instructions
KWS. Instrukcja obsługi User's manual Manuel d utilisation Руководство по эксплуатации RMSI25, RMSI63
 1 Instrukcja obsługi User's manual Manuel d utilisation Руководство по эксплуатации RMSI25, RMSI63 Uwaga! Niebezpieczne napięcie może spowodować porażenie lub pożar. W związku z prowadzoną polityką ciągłego
Instrukcja instalowania, obsługi i konserwacji. BEMAR Kitchen Line. Kod produktu: ,
 Instrukcja instalowania, obsługi i konserwacji BEMAR Kitchen Line Kod produktu: 238905, 238912 Przed uruchomieniem urządzenia należy uważnie przeczytać niniejszą instrukcję obsługi. 1 Szanowny Kliencie,
Alleen voor gebruik binnenshuis For indoor use only Nur für Innen gebrauch Pour l'usage d'intérieur seulement Do użytku wewnątrz pomieszczeń
 Alleen voor gebruik binnenshuis For indoor use only Nur für Innen gebrauch Pour l'usage d'intérieur seulement Do użytku wewnątrz pomieszczeń Bewaar deze handleiding bij het apparaat Keep these instructions
Alleen voor gebruik binnenshuis. For indoor use only. Nur für Innen gebrauch. Pour l'usage d'intérieur seulement. Do użytku wewnątrz pomieszczeń
 Alleen voor gebruik binnenshuis For indoor use only Nur für Innen gebrauch Pour l'usage d'intérieur seulement Do użytku wewnątrz pomieszczeń Bewaar deze handleiding bij het apparaat Keep these instructions
Manual Call Point FMC-210-DM-G-B FMC-210-DM-H-B FMC-210-DM-G-Y FMC-210-DM-G-GR. Installation Guide. deutsch english nederlands polski
 Manual Call Point FMC-20-DM-G-B FMC-20-DM-H-B FMC-20-DM-G-Y FMC-20-DM-G-GR Installation Guide deutsch english nederlands polski 06 0786 Bosch Sicherheitssysteme GmbH Robert-Bosch-Platz, D-70839 Gerlingen
Instrukcja Montażu. Zawór elektromagnetyczny. Zawór kontrolny. Zawór odcinający. Krańcówka. Wkład filtracyjny EB-PS300=A
 PS300 Einbau-Anleitung Installation Instructions Instrukcja Montażu E1 Bauteile Components Części =Magnetventil Solenoid valve Zawór elektromagnetyczny =Regulierventil Check valve Zawór kontrolny ƒ=absperr-kugelhahn
Zasady bezpieczeństwa
 2 3 Zasady bezpieczeństwa GB The door and the feeding flap must be closed when operating the machine! PL Drzwiczki i klapka szczeliny podawczej muszą być zamknięte w trakcie używania urządzenia! GB Ensure
www.food-service.com.ua
 Bewaar deze handleiding bij het apparaat Keep these instructions with this appliance Diese Gebrauchsanweisung bitte beim Gerät aufbewahren Gardez ces instructions avec cet appareil Zachowaj instrukcję
GEBRUIKSAANWIJZING USER INSTRUCTIONS GEBRAUCHSANWEISUNG MODE D EMPLOI INSTRUKCJA OBSŁUGI
 Alleen voor gebruik binnenshuis For indoor use only Nur für Innen gebrauch Pour l'usage d'intérieur seulement Per uso interno Do użytku wewnątrz pomieszczeń Bewaar deze handleiding bij het apparaat Keep
FREZARKA DO PAZNOKCI
 FREZARKA DO PAZNOKCI NAIL DRILL NAGELFRÄSER ФРЕЗЕР ДЛЯ НОГТЕЙ 3829 INSTRUKCJA OBSŁUGI USER MANUAL DESCRIPTION BEDIENUNGSANLEITUNG ИНСТРУКЦЯ ПО ЭКСПЛУАТАЦИИ 2. SKŁAD ZESTAWU rączka frez/ trzpień frez/ trzpień
GEBRUIKSAANWIJZING Pag 3. USER INSTRUCTIONS Pag 6. GEBRAUCHSANWEISUNG Pag 9. MODE D EMPLOI Pag 12. INSTRUKCJA OBSŁUGI Pag 15
 GEBRUIKSAANWIJZING Pag 3 USER INSTRUCTIONS Pag 6 GEBRAUCHSANWEISUNG Pag 9 MODE D EMPLOI Pag 12 INSTRUKCJA OBSŁUGI Pag 15 2 INHOUDSOPGAVE 1. Veiligheidsvoorschriften 2. Functies en Doel 3. Parameter 4.
BLACKLIGHT SPOT 400W F
 BLACKLIGHT SPOT 400W F2000339 USER MANUAL / INSTRUKCJA OBSŁUGI BLACKLIGHT SPOT 400W F2000339 Table of Contents 1 Introduction... 2 2 Safety information... 2 3 Product information... 2 3.1 Specification...
Wyroby medyczne Systemy zarządzania jakością Wymagania do celów przepisów prawnych
 POPRAWKA do POLSKIEJ NORMY ICS 03.120.10; 11.040.01 PN-EN ISO 13485:2012/AC Wprowadza EN ISO 13485:2012/AC:2012, IDT Wyroby medyczne Systemy zarządzania jakością Wymagania do celów przepisów prawnych Poprawka
Chafing Dish Matterhorn
 Chafing Dish Matterhorn GEBRUIKSAANWIJZING USER INSTRUCTIONS GEBRAUCHSANWEISUNG MODE D EMPLOI INSTRUKCJA OBSŁUGI Alvorens de apparatuur in gebruik te nemen dient u deze gebruiksaanwijzing aandachtig te
Montageanleitung Automatische Verriegelung Assembly Instructions - Automatic Locking Instrukcja Montażu - Zamknięcie Automatyczne
 Montageanleitung Automatische Verriegelung Assembly Instructions - Automatic Locking Instrukcja Montażu - Zamknięcie Automatyczne Container & Compactor Components Übersicht Overview Orientacja Schritt
Wyroby medyczne Systemy zarządzania jakością Wymagania do celów przepisów prawnych
 POPRAWKA do POLSKIEJ NORMY ICS 03.120.10; 11.040.01 PN-EN ISO 13485:2012/AC Wprowadza EN ISO 13485:2012/AC:2012, IDT Wyroby medyczne Systemy zarządzania jakością Wymagania do celów przepisów prawnych Poprawka
Bewaar deze handleiding bij het apparaat Keep these instructions with this appliance Diese Gebrauchsanweisung bitte beim Gerät aufbewahren Gardez ces
 Bewaar deze handleiding bij het apparaat Keep these instructions with this appliance Diese Gebrauchsanweisung bitte beim Gerät aufbewahren Gardez ces instructions avec cet appareil Zachowaj instrukcję
TORBY PAPIEROWE / OPAKOWANIA
 TORBY PAPIEROWE / OPAKOWANIA Papierowe torby skrojone na miarę! W produkowanych przez nas torbach stosujemy nowatorskie rozwiązania i wysokiej jakości materiały. Przywiązujemy ogromna uwagę do detali.
B IURO B ADAWCZE DS. J AKOŚCI
 ISO 9001 Q Ref. Certif. No. PL 2 IEC SYSTEM FOR MUTUAL RECOGNITION OF TEST CERTIFICATES FOR ELECTRICAL EQUIPMENT (IECEE) CB SCHEME SYSTEME CEI D ACCEPTATION MUTUELLE DE CERTIFICATS D ESSAIS DES EQUIPEMENTS
A500Flash. Skrócona instrukcja instalacji... 2 Quick Guide... 5 A500Flash Kurzanleitung... 8
 A500Flash Skrócona instrukcja instalacji... 2 Quick Guide... 5 A500Flash Kurzanleitung... 8 1 Skrócona instrukcja instalacji Proces podłączenia adaptera dokonujemy zawsze przy wyłączonym zasilaniu Amigi.
Deklaracja Zgodności WE
 Deklaracja Zgodności WE (EC Declaration of Conformity, EG - Konformitätsklärung, Déclaration de conformité) My (We, Wirr, Nous) LUG Light Factory Spółka z o. o. 65-127 Zielona Góra, ul. Gorzowska 11 deklarujemy
Selfie Monopod MA426. Instrukcja obsługi User s Manual
 Selfie Monopod MA426 Instrukcja obsługi User s Manual PL Selfie Monopod Przeczytaj wszystkie instrukcje przed użyciem oraz zachowaj te informacje do wykorzystania w przyszłości. Zestaw: 1x mobile phone
11/ RENAULT MEGANE II 3/5 d. R/030. Cat. No. e20. e20*94/20*0375*00 D = 7,56kN. 1350Kg 75Kg. D (kn) = x 0, MAX kg.
 = x 0, MAX kg.") RENULT MEGNE II 3/5 d. 11/2002 - Cat. No. R/030 e20 e20*94/20*0375*00 1350Kg 75Kg D = 7,56kN D (kn) = MX kg x MX kg x 0,00981 MX kg + MX kg PRZEKRÓJ - 75 min. 75 min. 30 o max. R 14,5 max. R40 max. 140
RENULT MEGNE II 3/5 d. 11/2002 - Cat. No. R/030 e20 e20*94/20*0375*00 1350Kg 75Kg D = 7,56kN D (kn) = MX kg x MX kg x 0,00981 MX kg + MX kg PRZEKRÓJ - 75 min. 75 min. 30 o max. R 14,5 max. R40 max. 140
HAPPY ANIMALS L01 HAPPY ANIMALS L03 HAPPY ANIMALS L05 HAPPY ANIMALS L07
 HAPPY ANIMALS L0 HAPPY ANIMALS L0 HAPPY ANIMALS L0 HAPPY ANIMALS L07 INSTRUKCJA MONTAŻU ASSEMBLY INSTRUCTIONS Akcesoria / Fittings K ZW W8 W7 Ø x 6 szt. / pcs Ø7 x 70 Narzędzia / Tools DO MONTAŻU POTRZEBNE
Deklaracja Zgodności WE
 Deklaracja Zgodności WE (EC Declaration of Conformity, EG - Konformitätsklärung, Déclaration de conformité) My (We, Wirr, Nous) LUG Light Factory Spółka z o. o. 65-127 Zielona Góra, ul. Gorzowska 11 deklarujemy
HAPPY ANIMALS L02 HAPPY ANIMALS L04 HAPPY ANIMALS L06 HAPPY ANIMALS L08
 HAPPY ANIMALS L02 HAPPY ANIMALS L04 HAPPY ANIMALS L06 HAPPY ANIMALS L08 INSTRUKCJA MONTAŻU ASSEMBLY INSTRUCTIONS Akcesoria / Fittings K O G ZW W8 W4 20 szt. / pcs 4 szt. / pcs 4 szt. / pcs 4 szt. / pcs
PRZEKRÓJ A-A. The clearance specified in appendix VII, diagram 25a/b of Regulation No UN EU must be guaranteed at laden weight of the vehicle.
 PRZEKRÓJ - 75 min. 75 min. 30 o max. R 14,5 max. R40 max. 140 min. 55 min. 100 max. 32 min. 30 o max. 350-420 PL Należy zagwarantować przestrzeń swobodną według załącznika VII, rysunek 25a/b Regulaminu
Multifunctional sterilizer
 Multifunctional sterilizer 281208 GEBRUIKSAANWIJZING USER INSTRUCTIONS GEBRAUCHSANWEISUNG MODE D EMPLOI INSTRUKCJA OBSŁUGI Multifunctionele sterilisator Multifunctional sterilizer Multifunktioneller Sterilisator
Tuber radio BT MA407. Instrukcja obsługi User s Manual
 Tuber radio BT MA407 Instrukcja obsługi User s Manual User s Manual MA407 INSTRUCTIONS...4 BASIC...4 TROUBLESHOOTING...5 DATA TRANSFERRING / CHARGING VIA USB CABLE...5 INTERFACES...5 SPECIFICATIONS...6
Installation of EuroCert software for qualified electronic signature
 Installation of EuroCert software for qualified electronic signature for Microsoft Windows systems Warsaw 28.08.2019 Content 1. Downloading and running the software for the e-signature... 3 a) Installer
FRYTOWNICA FT-2503 INSTRUKCJA OBSŁUGI GWARANCJA
 FRYTOWNICA FT-2503 INSTRUKCJA OBSŁUGI GWARANCJA FRYTOWNICA FT-2503 INSTRUKCJA OBSŁUGI Przed użyciem frytownicy! 1. Zapoznaj się ze wszystkimi zaleceniami instrukcji. 2. Dla ochrony przed porażeniem elektrycznym
Instrukcja obsługi. binding machine KRIS. instruction manual. 80-393 GDAŃSK ul. Krynicka 1 tel.: (058) 55 43 555 fax: (058) 55 43 500 ODDZIAŁ:
 55 43 555 fax: (058) 55 43 500 ODDZIAŁ:") Instrukcja obsługi instruction manual 80-393 GDAŃSK ul. Krynicka 1 tel.: (058) 55 43 555 fax: (058) 55 43 500 ODDZIAŁ: 02-784 WARSZAWA ul. Janowskiego 9 tel.: (022) 648 03 48..49 fax: (022) 648 03 50 bindownica
Instrukcja obsługi instruction manual 80-393 GDAŃSK ul. Krynicka 1 tel.: (058) 55 43 555 fax: (058) 55 43 500 ODDZIAŁ: 02-784 WARSZAWA ul. Janowskiego 9 tel.: (022) 648 03 48..49 fax: (022) 648 03 50 bindownica
AC 600 AUTOMATYCZNA STACJA DO OBSŁUGI UKŁADU KLIMATYZACJI SAMOCHODOWEJ
 AC 600 AUTOMATYCZNA STACJA DO OBSŁUGI UKŁADU KLIMATYZACJI SAMOCHODOWEJ INSTRUKCJA OBSŁUGI Spis treści 1 Ostrzeżenia..... 2 2 Informacje ogólne. 2 3 Parametry techniczne.... 3 4 Funkcje..... 3 4.1 Funkcja..
FOREST DIAMOND Pilot radiowy X460
 FOREST DIAMOND Pilot radiowy - 520109X460 SPECYFIKACJA TECHNICZNA: 3V bateria typu: CR2450 zasięg nadajnika maks. 30 m żywotność baterii do 3 lat zakres temp. pracy:-10 C - +50 C częstotliwość 433.92MHz
CERTIFICAT. SOTRALENTZ Espana S.A Pol Ind Lantaron Parcelas COMUNION Espagne ISO 9001:2015
 CERTIFICAT L'organisme de certification de la société certifie que la société Espagne a établi et entretient un système de management de la qualité dans le domaine d application suivant: Conception et
T I R O L 163/01 01,03,04,05,06, 07,09,10,11,12, 13,14,15,16,17, 18,19,20,21,25, 26,27,31,71,72 22,23 A A. ø4x20
 T I R O L 1 2 ø4x20 163/01 1. A A 01,03,04,05,06, 07,09,10,11,12, 13,14,15,16,17, 18,19,20,21,25, 26,27,31,71,72 10 20 22,23 32 01 2. 3 4 M4x23 :7 B.1 B 96 B.2 (4) Nawierca się zawsze w wewnętrznej powoerzchni
DO MONTAŻU POTRZEBNE SĄ DWIE OSOBY! INSTALLATION REQUIRES TWO PEOPLE!
 1 HAPPY ANIMALS B09 INSTRUKCJA MONTAŻU ASSEMBLY INSTRUCTIONS Akcesoria / Fittings K1 M M1 ZM1 Z T G1 17 szt. / pcs 13 szt. / pcs B1 13 szt. / pcs W4 13 szt. / pcs W6 14 szt. / pcs U1 1 szt. / pcs U N1
USB firmware changing guide. Zmiana oprogramowania za przy użyciu połączenia USB. Changelog / Lista Zmian
 1 / 9 Content list / Spis Treści 1. Hardware and software requirements, preparing device to upgrade Wymagania sprzętowe i programowe, przygotowanie urządzenia do aktualizacji 2. Installing drivers and
DC UPS. User Manual. Page 1
 DC UPS User Manual Page 1 1. Specyfikacja 1.1 Zasilacz PowerWalker DC UPS 12V jest innowacyjnym rozwiązaniem do zasilania prądem stałym o napięciu 12 VDC urządzeń do max 30W (2,5 A) obciążenia. W urządzeniu
USB firmware changing guide. Zmiana oprogramowania za przy użyciu połączenia USB. Changelog / Lista Zmian
 1 / 12 Content list / Spis Treści 1. Hardware and software requirements, preparing device to upgrade Wymagania sprzętowe i programowe, przygotowanie urządzenia do aktualizacji 2. Installing drivers needed
Z E R T I F I K A T. H. Büteführ u. Sohn GmbH & Co. KG
 Z E R T I F I K A T bescheinigt hiermit, dass das Unternehmen Verwaltung, Tank- und Silospedition, Reparaturwerkstatt Reinigungsanlage, Reparaturwerkstatt, Kundendienst und Ersatzteile Tank- und Silospedition
Instrukcja obsługi TOSTER MODEL: BH-8863
 Instrukcja obsługi TOSTER MODEL: BH-8863 3. Nie używaj do czyszczenia silnych środków czyszczących, acetonu, alkoholu, ostrych materiałów, itp. 4. Należy regularnie usuwać okruchy pieczywa wewnątrz tostera,
/2004 RENAULT MEGAN SCENIC I R/011. Cat. No. e20. e20*94/20*0680*00 D = 7,72kN. 1400Kg 75Kg. D (kn) = x 0, MAX kg.
 = x 0, MAX kg.") RENAULT MEGAN SCENIC I 1998-09/2004 Cat. No. R/011 e20 e20*94/20*0680*00 1400Kg 75Kg D = 7,72kN D (kn) = MAX kg x MAX kg x 0,00981 MAX kg + MAX kg PRZEKRÓJ A-A 75 min. 75 min. 30 o max. A R 14,5 max. R40
RENAULT MEGAN SCENIC I 1998-09/2004 Cat. No. R/011 e20 e20*94/20*0680*00 1400Kg 75Kg D = 7,72kN D (kn) = MAX kg x MAX kg x 0,00981 MAX kg + MAX kg PRZEKRÓJ A-A 75 min. 75 min. 30 o max. A R 14,5 max. R40
Camspot 4.4 Camspot 4.5
 User manual (addition) Dodatek do instrukcji obsługi Camspot 4.4 Camspot 4.5 1. WiFi configuration 2. Configuration of sending pictures to e-mail/ftp after motion detection 1. Konfiguracja WiFi 2. Konfiguracja
USB firmware changing guide. Zmiana oprogramowania za przy użyciu połączenia USB. Changelog / Lista Zmian
 1 / 8 Content list / Spis Treści 1. Hardware and software requirements, preparing device to upgrade Wymagania sprzętowe i programowe, przygotowanie urządzenia do aktualizacji 2. Installing drivers and
Standmixer der 908 Serie Bedienungsanleitung (12) 908 Series Bar blender Operation Manual (2) Mélangeur de bar série 908 Manuel d utilisation (4)
 908 Series Bar blender Operation Manual (2) Mélangeur de bar série 908 Manuel d utilisation (4)") DE GB FR NL PL Standmixer der 908 Serie Bedienungsanleitung (1) 908 Series Bar blender Operation Manual () Mélangeur de bar série 908 Manuel d utilisation () 908 Serie Barmixer Gebruiksaanwijzing (1) Mikser
DE GB FR NL PL Standmixer der 908 Serie Bedienungsanleitung (1) 908 Series Bar blender Operation Manual () Mélangeur de bar série 908 Manuel d utilisation () 908 Serie Barmixer Gebruiksaanwijzing (1) Mikser
Wymagania bezpieczeństwa dotyczące elektrycznych przyrządów pomiarowych, automatyki i urządzeń laboratoryjnych Część 1: Wymagania ogólne
 POPRAWKA do POLSKIEJ NORMY ICS 19.080; 71.040.10 PN-EN 61010-1:2011/AC Wprowadza EN 61010-1:2010/A1:2019/AC:2019-04, IDT IEC 61010-1:2010/A1:2016/AC1:2019, IDT Wymagania bezpieczeństwa dotyczące elektrycznych
LED WASHER 30x3W WHITE IP65 F
 USER MANUAL / INSTRUKCJA OBSŁUGI LED WASHER 30x3W WHITE IP65 F7200171 LED WASHER 30x3W WHITE IP65 F7200171 Table of contents 1 Introduction... 2 2 Safety information... 2 3 Product information... 2 3.1
06/ / MERCEDES C-KLASA (W-203) sed. MERCEDES C-KLASA (W-203) com. M/032. Cat. No. e20*94/20*0513*00. 10,00kN.
 sed. MERCEDES C-KLASA (W-203) com. M/032. Cat. No. e20*94/20*0513*00. 10,00kN.") MERCEDES C-KLASA (W-203) sed. MERCEDES C-KLASA (W-203) com. 06/2000-2007 04/2001-2007 Cat. No. M/032 e20*94/20*0513*00 1500Kg 75Kg 10,00kN Moment skręcający dla śrub i nakrętek (8.8) Torgue settings for
MERCEDES C-KLASA (W-203) sed. MERCEDES C-KLASA (W-203) com. 06/2000-2007 04/2001-2007 Cat. No. M/032 e20*94/20*0513*00 1500Kg 75Kg 10,00kN Moment skręcający dla śrub i nakrętek (8.8) Torgue settings for
ES 80. Handleiding Instrukcja obsługi. Nederlands Polski
 Nederlands Polski Handleiding Instrukcja obsługi ES 80 Lees alvorens het apparaat te gebruiken de handleiding en veiligheidsvoorschriften! Przed użyciem przeczytaj instrukcję obsługi i uwagi dotyczące
PŁYTA GRILLOWA REVOLUTION ELEKTRYCZNA, GŁADKA GRIDDLE REVOLUTION ELECTRIC, FLAT
 Instrukcja obsługi User manual PŁYTA GRILLOWA REVOLUTION ELEKTRYCZNA, GŁADKA GRIDDLE REVOLUTION ELECTRIC, FLAT Kod: 203361 Przed uruchomieniem urządzenia należy koniecznie dokładnie przeczytać niniejszą
SSW1.1, HFW Fry #20, Zeno #25 Benchmark: Qtr.1. Fry #65, Zeno #67. like
 SSW1.1, HFW Fry #20, Zeno #25 Benchmark: Qtr.1 I SSW1.1, HFW Fry #65, Zeno #67 Benchmark: Qtr.1 like SSW1.2, HFW Fry #47, Zeno #59 Benchmark: Qtr.1 do SSW1.2, HFW Fry #5, Zeno #4 Benchmark: Qtr.1 to SSW1.2,
PRZEDSIEBIORSTWO ŚLUSARSKO BUDOWLANE LESZEK PLUTA
 L Entreprise de Serrurerie et de Construction a été fondée en 1992 en Pologne en tant qu entreprise privée. Aujourd hui, nous sommes un fabricant reconnu de constructions métallique et de verre dans le
Bfl. Bfr FR. Instrukcja wymiany płyty regulacyjnej CGB / TGC / MGK Nr artykułu 27 99 250 Strony 2-3
 D Instrukcja wymiany płyty regulacyjnej CGB / TGC / MGK Nr artykułu 27 99 250 Strony 2-3 Bfl Handleiding voor het vervangen van de regelingsplatine CGB / TGC / MGK Art.-Nr. 27 99 250 Pagina 4-5 Bfr FR
Indoor wireless headphones
 Register your product and get support at www.philips.com/welcome Indoor wireless headphones SHC8535 SHC8575 PL Instrukcja obsługi SHC8535 SHC8535 A a b B a c d b e f c C D E F a G b H I 1 Zawartość opakowania
Installation Guide Einbauanleitung Guide d'installation Guida all installazione Guía de instalación Instrukcja montażu
 Installation Guide Einbauanleitung Guide d'installation Guida all installazione Guía de instalación Instrukcja montażu DBHAND-2/DBHANL-2 DYHAN4-5 DSHAN3-0xxx-2 Accuride International Ltd. Liliput Road,
Instrukcja obsługi. ibind A8/A12/A15/A20. instruction manual. 80-393 GDAŃSK ul. Krynicka 1 tel.: (058) 55 43 555 fax: (058) 55 43 500
 55 43 555 fax: (058) 55 43 500") Instrukcja obsługi instruction manual 80-9 GDAŃSK ul. Krynicka tel.: (08) fax: (08) 00 ODDZIAŁ: 0-78 WARSZAWA ul. Janowskiego 9 tel.: (0) 8 0 8..9 fax: (0) 8 0 0 BindownicE ibind A8/A/A/A0 BINDING MACHINEs
Instrukcja obsługi instruction manual 80-9 GDAŃSK ul. Krynicka tel.: (08) fax: (08) 00 ODDZIAŁ: 0-78 WARSZAWA ul. Janowskiego 9 tel.: (0) 8 0 8..9 fax: (0) 8 0 0 BindownicE ibind A8/A/A/A0 BINDING MACHINEs
Zehnder ComfoCool. Karta katalogowa - informacje techniczne. Ogrzewanie Chłodzenie Świeże powietrze Czyste powietrze
 ComfoCool Karta katalogowa - informacje techniczne Ogrzewanie Chłodzenie Świeże powietrze Czyste powietrze Opis Jednostka chłodząca ComfoCool zaprojektowana w celu zapewnienia schładzania oraz osuszania
Oxford. wolnostojący 470. grzejnik odlewany (żeliwny) Fotografie przedstawiają grzejnik w wykończeniu Full Burnish. Podłączenia: Dostępne rozmiary:
 Fotografie przedstawiają grzejnik w wykończeniu Full Burnish. Podłączenia: Dostępne rozmiary:") wolnostojący 470 max. 95 Fotografie przedstawiają grzejnik w wykończeniu Full Burnish. 1 Podłączenia: Dostępne rozmiary: 1 3 470 x 80 4 470 x 278 5 470 x 360 10 470 x 770 470 x 524 470 x 442 8 470 x 606
wolnostojący 470 max. 95 Fotografie przedstawiają grzejnik w wykończeniu Full Burnish. 1 Podłączenia: Dostępne rozmiary: 1 3 470 x 80 4 470 x 278 5 470 x 360 10 470 x 770 470 x 524 470 x 442 8 470 x 606
Gruntowa Pompa Ciepła Bezpośredniego Odparowania DXW
 Gruntowa Pompa Ciepła Bezpośredniego Odparowania DXW Direct Expansion Earth Coupled Heat Pump DXW Pompe a Chaleur Geotermique a Evaporation Directe DXW MODEL ZH3 DXW65 Wydajność grzewcza Pobór mocy elektrycznej
Installez un certificat ssl par l'intermédiaire du CLI sur un ESA
 Installez un certificat ssl par l'intermédiaire du CLI sur un ESA Contenu Introduction Prerequistes Installez un certificat ssl Informations connexes Introduction Ce document décrit comment installer un
MASZYNA DO CZYSZCZENIA BUTÓW
 Instrukcja instalowania, obsługi i konserwacji MASZYNA DO CZYSZCZENIA BUTÓW Szanowny Kliencie Przed podłączeniem urządzenia dokładnie przeczytaj całą instrukcję obsługi, aby niewłaściwym użytkowaniem nie
DO MONTAŻU POTRZEBNE SĄ DWIE OSOBY! INSTALLATION REQUIRES TWO PEOPLE!
 1 HAPPY ANIMALS SZ11 A INSTRUKCJA MONTAŻU ASSEMBLY INSTRUCTIONS Akcesoria / Fittings K1 M M1 ZM1 Z G1 szt. / pcs 0 szt. / pcs B1 6 szt. / pcs 6 szt. / pcs W6 0 szt. / pcs U1 19 szt. / pcs U 50 szt. / pcs
USB firmware changing guide. Zmiana oprogramowania za przy użyciu połączenia USB. Changelog / Lista Zmian
 1 / 14 Content list / Spis Treści 1. Hardware and software requirements, preparing device to upgrade Wymagania sprzętowe i programowe, przygotowanie urządzenia do aktualizacji 2. Installing drivers and
DVD MAKER USB2.0 Instrukcja instalacji
 DVD MAKER USB2.0 Instrukcja instalacji Spis treści V1.0 Rozdział1: Instalacja karty telewizyjnej DVD MAKER USB2.0...2 1.1. Zawartość opakowania...2 1.2. Wymagania systemowe...2 1.3. Instalacja sprzętu...2
WAŻNE: Instrukcja przedstawia podstawową formę montażu. Więcej metod i powiązanych akcesoriów znajdziesz na stronie klusdesign.pl
 Montaż oprawy na bazie profilu KOZUS Części niezbędne do skonstruowania oprawy na bazie profilu KOZUS. Profil () Zaślepka (B) Osłona (C) Taśma LED (D) Osłona techniczna (E) Elementy niezbędne przy czynnościach
01/ KIA SPORTAGE HYUNDAY TUCSON K/020. Cat. No. e20. e20*94/20*0371*00 D = 10,30kN. 2000Kg 80Kg. D (kn) = x 0, MAX kg.
 = x 0, MAX kg.") KIA SPORTAGE HYUNDAY TUCSON 01/2005-2004 - Cat. No. K/020 e20 e20*94/20*0371*00 2000Kg 80Kg D = 10,30kN D (kn) = MAX kg x MAX kg x 0,00981 MAX kg + MAX kg PRZEKRÓJ A-A 75 min. 75 min. 30 o max. A R 14,5
KIA SPORTAGE HYUNDAY TUCSON 01/2005-2004 - Cat. No. K/020 e20 e20*94/20*0371*00 2000Kg 80Kg D = 10,30kN D (kn) = MAX kg x MAX kg x 0,00981 MAX kg + MAX kg PRZEKRÓJ A-A 75 min. 75 min. 30 o max. A R 14,5
MULTIMEDIA INTERFACE MOST AUDI MMI 2G 3G
 MULTIMEDIA INTERFACE MOST AUDI MMI 2G 3G MA-40AV SW-VER.: 2.2.4 08.04.2010 PL UWAGA!! Koniecznie przeczytaj!! 1. Adapter ten odczytuje i konwertuje dane z magistrali pojazdu. Nie gwarantujemy iż wysyłane
POPRAWKA do POLSKIEJ NORMY PN-EN 16005: /AC. Drzwi z napędem Bezpieczeństwo użytkowania Wymagania i metody badań
 POPRAWKA do POLSKIEJ NORMY ICS 91.190 PN-EN 16005:2013-04/AC Wprowadza EN 16005:2012/AC:2015, IDT Drzwi z napędem Bezpieczeństwo użytkowania Wymagania i metody badań Poprawka do Normy Europejskiej EN 16005:2012/AC:2015
Bewaar deze handleiding bij het apparaat Keep these instructions with this appliance Diese Gebrauchsanweisung bitte beim Gerät aufbewahren Gardez ces
 Bewaar deze handleiding bij het apparaat Keep these instructions with this appliance Diese Gebrauchsanweisung bitte beim Gerät aufbewahren Gardez ces instructions avec cet appareil Zachowaj instrukcję
NAIL LAMP CCFL LED 36 W
 NAIL LAMP CCFL LED 36 W QUICK START GUIDE INSTRUKCJA OBSŁUGI MODEL: HLHYBR36 About device GOCLEVER NAIL LAMP CCFL LED 36 W is a professional device that helps with nail conditioning it strengthens nail
Céliane TM Vac 50-60Hz. 1 x 2.5 mm 2 2 x 1.5 mm 2. Max. 400 W 400 W 400 VA 400 VA. 240 Vac. Min. 40 W 40 W 40 VA 40 VA
 Céliane TM instrukcja Remotelycontrollable ściemniacza dimmer 067087 switch for all incandescent loads 670 87 ( *) 100240 Vac 5060Hz 1 x 2.5 mm 2 2 x 1.5 mm 2 240 Vac Max. 400 W 400 W 400 VA 400 VA Min.
RENAULT GRAND SCENIC II
 RENAULT GRAND SCENIC II 04.2004 - Cat. No. R/029 e20*94/20*0372*00 1350Kg 75Kg 8,02kN PRZEKRÓJ A-A 75 min. 75 min. 30 o max. A R 14,5 max. R40 max. A 140 min. 55 min. 100 max. 32 min. 30 o max. 350-420
RENAULT LAGUNA com. R/018. Cat. No. e20. e20*94/20*0132*00 D = 8,50kN. 1500Kg 75Kg. D (kn) = x 0, MAX kg. MAX kg
 = x 0, MAX kg. MAX kg") RENAULT LAGUNA com. 2001 - Cat. No. R/018 e20 e20*94/20*0132*00 1500Kg 75Kg D = 8,50kN D (kn) = x x 0,00981 + PRZEKRÓJ A-A 75 min. 75 min. 30 o max. A R 14,5 max. R40 max. A 140 min. 55 min. 100 max. 32
RENAULT LAGUNA com. 2001 - Cat. No. R/018 e20 e20*94/20*0132*00 1500Kg 75Kg D = 8,50kN D (kn) = x x 0,00981 + PRZEKRÓJ A-A 75 min. 75 min. 30 o max. A R 14,5 max. R40 max. A 140 min. 55 min. 100 max. 32
SPINNER High reliability RF Power Loads
 D 5 W, 10 W OADS VSWR 0 f 1 GHz 1 f 2 GHz 2 f 5 GHz 5 f 7 GHz Effektive eistung BN 53 17 27 BN 53 17 12 BN 53 12 21 BN 53 12 25 0 f 7 GHz 1.06 1.11 1.17 1.22 5 W 2. 10 W 2. 1000 V N Stecker N male 7-16
INSTRUKCJA OBSŁUGI ELEKTRONICZNA WAGA ŁAZIENKOWA
 No 320211 INSTRUKCJA OBSŁUGI ELEKTRONICZNA WAGA ŁAZIENKOWA Technologia bezbateryjna, przyjazna dla środowiska. Dziękujemy za wybranie tej wagi elektronicznej z naszej serii produktów. Aby zapewnić prawidłowe,
WAŻNE: Instrukcja przedstawia podstawową formę montażu. Więcej metod i powiązanych akcesoriów znajdziesz na stronie klusdesign.pl
 Montaż oprawy na bazie profilu KOZEL Części niezbędne do skonstruowania oprawy na bazie profilu KOZEL Profil () Zaślepka (B) Osłona (C) Taśma LED (D) Osłona techniczna (E) Elementy niezbędne przy czynnościach
02/02-05/ VOLKSWAGEN POLO htb. (9N) SEAT IBIZA W/022. Cat. No. E20 55R e20. 6,90 kn Kg 50 Kg
 SEAT IBIZA W/022. Cat. No. E20 55R e20. 6,90 kn Kg 50 Kg") VOLKSWAGEN POLO htb. (9N) SEAT IBIZA 02/02-05/09 05-08 at. No. W/022 e20 E20 55R-01-1045 1200 Kg 50 Kg 6,90 kn Moment skręcający dla śrub i nakrętek (8.8) Torgue settings for nuts and bolts (8.8) M8 25Nm
VOLKSWAGEN POLO htb. (9N) SEAT IBIZA 02/02-05/09 05-08 at. No. W/022 e20 E20 55R-01-1045 1200 Kg 50 Kg 6,90 kn Moment skręcający dla śrub i nakrętek (8.8) Torgue settings for nuts and bolts (8.8) M8 25Nm
Bewaar deze handleiding bij het apparaat Keep these instructions with this appliance Diese Gebrauchsanweisung bitte beim Gerät aufbewahren Gardez ces
 Bewaar deze handleiding bij het apparaat Keep these instructions with this appliance Diese Gebrauchsanweisung bitte beim Gerät aufbewahren Gardez ces instructions avec cet appareil Zachowaj instrukcję
ART: 335755 / 335756. Sac isotherme Notice d emploi. Bolsa nevera. Borsa termica. Instrucciones de us. Istruzioni per l uso
 ART: 335755 / 335756 FR Sac isotherme Notice d emploi ES Bolsa nevera IT Borsa termica Instrucciones de us 2 8 Istruzioni per l uso 14 NL Koeltas Gebruiksaanwijzingen 20 PL Torba izotermiczna Instrukcja
Bodentreppe Designo Seite 1 von 12
 Einbauanleitung / Bedienungsanleitung EN Installation manual FR Instructions de montage PL Instrukcja montazu EN Operating instructions FR Mode d emploi PL instrukcja obsługi Bodentreppe Designo DE Hinweise/Sicherheitshinweise
CAB 110 R02. 10kg A. B. C. 400mm 670mm 670mm 740mm 700mm 1500mm 500mm 500mm 400mm 400mm 440mm 650mm
 A. WC7600 WC7600 WC760 WC7760 WC7660 WC79600 WC8600 WC8600 WC8600 WC8600 WC8660 WC8700 A. B. C. 00mm 670mm 670mm 70mm 700mm 00mm 00mm 0mm 60mm 00mm 80mm 0mm 00mm 0mm 0mm 00mm 0mm 0mm 70mm 60mm 00mm 0mm
Ice Cube Ice Cube 15
 271568 Ice Cube 12 271551 Ice Cube 15 Alleen voor gebruik binnenshuis For indoor use only Nur für Innen gebrauch Pour l'usage d'intérieur seulement Do użytku wewnątrz pomieszczeń Bewaar deze handleiding
EK1301/1302/1303 CZAJNIK BEZPRZEWODOWY INSTRUKCJA OBSŁUGI KETTLE - INSTRUCTION MANUAL POLSKI... STR. 2 ENGLISH... P. 5
 EK1301/1302/1303 CZAJNIK BEZPRZEWODOWY INSTRUKCJA OBSŁUGI KETTLE - INSTRUCTION MANUAL 1 POLSKI... STR. 2 ENGLISH... P. 5 POLSKI PL ŚRODKI BEZPIECZEŃSTWA Przed uruchomieniem urządzenia należy uważnie przeczytać
Język akademicki Wstęp
 - Rozpoczęcie W mojej pracy zbadam/rozważę/będę oceniać/przeanalizuję... Ogólny wstęp do wypracowania/pracy Aby móc odpowiedzieć na to pytanie, musimy przyjrzeć się bliżej... Przybliżenie przedmiotu swoich
Mouse Tracer Fiorano RF
 Mysz Tracer Fiorano RF Instrukcja obsługi Mouse Tracer Fiorano RF User s Manual Mysz Tracer Fiorano RF 2 www.tracer.eu Mysz Tracer Fiorano RF www.tracer.eu 3 Mysz Tracer Fiorano RF Uwaga Uwaga: 4 www.tracer.eu
 www.irs.gov/form990. If "Yes," complete Schedule A Schedule B, Schedule of Contributors If "Yes," complete Schedule C, Part I If "Yes," complete Schedule C, Part II If "Yes," complete Schedule C, Part
Oprawa / Fixture GIZA
 Oprawa / Fixture GIZA Podstawowe elementy oprawy / Basic fixture components 1 2 4 3 1. profil GIZA / GIZA profile 2. zaślepka / end cap 24007 GIL 24029 GIL-MET 24035 GIZAT 24030 GIZAT-MET 24036 3. osłonka
DO MONTAŻU POTRZEBNE SĄ DWIE OSOBY! INSTALLATION REQUIRES TWO PEOPLE!
 HAPPY ANIMALS RW08 INSTRUKCJA MONTAŻU ASSEMBLY INSTRUCTIONS Akcesoria / Fittings K M M ZM ZW G 0 szt. / pcs W szt. / pcs B szt. / pcs szt. / pcs W U 8 szt. / pcs 4 szt. / pcs U N szt. / pcs Ø3 x szt. /