Instruction manual. Instrukcja obsługi. Refrigerated and freezer counters Pages Stoły chłodnicze i mroźne Strony 19 19
|
|
|
- Adrian Małecki
- 8 lat temu
- Przeglądów:
Transkrypt
1 Instruction manual Refrigerated and freezer counters Pages 3-18 Instrukcja obsługi Stoły chłodnicze i mroźne Strony 19 19

2 CONTENTS 1. General Information Information about the instruction manual Symbol explanation Liability and Warrantees Copyright protection Declaration of conformity 4 2. Safety General information Safety instructions Proper use General risks 6 3. Delivery, packaging and storage Delivery check Packaging Storage 7 4. Technical data 8 5. Installation and operation Safety instructions Installation and connection Minimum requirements on site Positioning Connections Operating Prior to first use Display description Button functions Cleaning and maintenance Safety advice Cleaning the device Safety instructions for maintenance Repair and claim notification Waste disposal 18 2

3 1. General Information DEAR CUSTOMER, We would like to thank you for your confidence in us for having purchased this refrigerated unit. We recommended to read this user manual carefully before starting up your unit, in order to enjoy the product in a safe way and with the best features. 1.1 Information about the instruction manual This manual contains information about the installation, operation and maintenance of the device and has been prepared in order to safeguard the security of the user and ensure the correct use and maintenance of the device. This manual is considered to be an integral part of the purchased unit and as such, should be kept in a safe place, easily accessible for anyone carrying out the installation, servicing, maintenance or cleaning. 1.2 Symbol explanation Following symbols are used in this manual in order to highlight important safety instructions and advice relating to the device.: WARNING! This symbol highlights risks, which could lead to injury. Please follow the instructions very carefully and proceed with particular attention in these cases. NOTE! This symbol highlights information and tips, which have to be followed for an efficient and trouble-free operation of the device. CAUTION! This symbol indicates information that, if ignored, could result possibly in personal injury or physical damage due to incorrect handling. 1.3 Liability and Warrantees The guarantee is granted for a period of 12 months from the date of purchase. The warranty covers repairs of the equipment, purchased in one of the authorized points of sale, under following conditions: 1. Warranty provides free replacement of spare parts. Warranty will not be recognized, if the purchase of the product cannot be confirmed with an invoice or due to: a. Unauthorized interference or negligence. b. Damage caused by use of the device in the improper environment or an impact of harmful factors (fluctuation in voltage and frequency in the power supply). c. Carrying out repairs by persons or companies not authorized by the manufacturer. 2. Any repair or service under warranty can be conducted only by authorized dealers or authorized technical services. 3. In case of repairs made by the manufacturer, the device should be properly packaged and sent to the correct address. 4. The period of the warranty does not extend due to repair time. 5. The manufacturer is not liable for direct or indirect personal injury or material damages, caused by improper use of the device by the user or unauthorized service. 3

4 The warranty does not cover: light bulbs, rubber elements, heating components damaged by boiler scale, glass panes, as well as any mechanical damage or damage resulting from improper use of the equipment and disregarding instructions included in this manual. In case of the machine breakdown, products kept inside should be protected from getting spoiled. ASBER PROFESSIONAL shall not be held liable for goods damaged due to the failure of the equipment. 1.4 Copyright protection This instruction manual is protected by copyright, owned by ASBER PROFESSIONAL. Without the prior written permission in writing from the manufacturer, no part of this publication may be reproduced, transmitted or used in any form or by any means. All rights reserved. 1.5 Declaration of conformity Our products fulfill the present EU rules, including the CE mark of the European official approval. The applied rules are: U.N.E U.N.E U.N.E U.N.E (1) U.N.E (2) U.N.E (3) U.N.E (4) U.N.E (5) U.N.E (6) 73/23/EWG 89/336/EWG 2004/108/WE 2006/95/WE 89/392/EWG 1935/2004/WE 2023/2006/WE 2002/72/WE with 2007/19/WE Quality systems Quality insurance in production and installation Quality management Test methods Test conditions Temperature test Frost test Water vapour condensation test Electrical energy consumption test Electrical security Electromagnetic compatibility Electromagnetic compatibility Low Voltage Directive Machinery Directive Regulation on food contact material Regulation on good manufacturing practice for materials and articles intended to come into contact with food Regulation to plastic materials and articles intended to come into contact with foodstuffs 2. Safety This manual has been prepared in order to safeguard the security of the user and ensure the correct use and maintenance of the device. Become familiar with the instructions provided in this manual before starting any work with the unit. In case of selling / passing the device to a third party, make sure that this manual is attached to the device, in order to ensure the correct installation, use and maintenance of the machine. 4

5 2.1 General information With the exception of clearly defined situations, personnel responsible for the installation, connection, maintenance, search of errors and defects, repair and start-up of the device, must have the appropriate qualifications and training and be familiar with the existing threats and safety regulations. Regarding security regulations the user should have knowledge and experience at the level of service technicians. The device is not intended for use by individuals (including children) with physical or mental disabilities, insufficient experience, and/or insufficient knowledge unless such persons are under the care of a person responsible for their safety or have received instructions regarding appropriate use of the device. In any case, the user should not open, remove or manipulate the protection elements of the device. Become familiar with the instructions provided in this manual before starting any installation or work with device. 2.2 Safety instructions Incorrect operation and improper use can cause serious damage to equipment or personal injuries. When working with the equipment follow general occupational health and safety principles and regulations. 1. Become familiar with the instructions provided in this manual. 2. Do not use the equipment if any traces of damage are visible. 3. Do not use the machine for purposes other than it was designed for. 4. Do not use the device with the damaged power cord. 5. Do not move the device when it is powered. 6. We recommend using only original spare parts. The use of accessories other than those recommended by the manufacturer may cause damage to the unit, result in fire or electric shock and expose you to injury. ASBER PROFESSIONAL shall not bear any responsibility in cases, where unoriginal spare parts have been used. 7. Before connecting the device to the plug, make sure that the voltage and power line frequency coincide with those indicated on the specification plate of the appliance. 8. Do not expose the unit to weather conditions 9. While using the unit always follow and comply with general safety and accident prevention regulations, as well as environment protection regulations. 10. In case of any disturbances in the operation of the equipment or problems with its use, contact an authorized service provider. The manufacturer is not liable for any damage caused by improper handling or improper use of the machine. Exchange of any working parts of the equipment, that may influence the safety of its user, should be carried out each time by service staff with proper technical qualifications. In case of exchanging any working parts make sure that the machine has been disconnected from the source of electricity. Any cases of failures, defective operation or breakdowns in the functioning of the equipment, as well as any complaints must be reported to the seller's address which is provided on the Warranty Card. 5
 with physical or mental disabilities, insufficient experience, and/or insufficient knowledge unless such persons are under the")
6 2.3 Proper use Our refrigerated and freezer counters are designed for food and beverages storage. Do not use the refrigerated counter for storing pharmaceutical products or blood. In order to obtain better performance, avoid the introduction of hot foods as well as drinks that are not in sealed packages. It is forbidden to place chemical substances or corrosive agents inside the device. Any use going beyond the intended purpose and/or any different use of the device is forbidden and is not considered as conventional. To avoid IMPROPER USE of the machine follow the instructions below: The device is not intended for home use This device may not work with technical parameters different from those indicated on the machine rating plate. Do not remove, change, damage or cover labels and markings placed by the manufacturer on the device. The manufacturer is not liable for any damage caused by improper use of the machine and unauthorized modifications or interventions to the unit. The operator is liable for all damages resulting from inappropriate use. PROHIBITED USE: It is forbidden to use the unit in an improper way, which may cause danger to health or life of the user or other people. In particular: Do not pull the cable to unplug the unit. Do not place any heavy items on the device or power cord. Do not place the power cord over sharp objects (edges) or items which can cause danger of ignition / explosion. It is forbidden to use the device with the damaged power cord. Do not insert any objects into motor air vents. It is forbidden to clean the unit with flammable, corrosive and harmful substances or hazardous to human health. The user is liable for all damages resulting from non-compliance with the instructions. In the event of any doubt over the content of this manual, please contact the distributor or the manufacturer The manufacturer disclaims all liability for damages resulting from unconventional use General risks 1. To assure safety while cleaning or performing maintenance operations do not take off the elements shielding the moveable parts of the equipment, unless the machine has been disconnected from the mains previously. 2. Take the necessary precautions before having access to the condenser unit zone, due to the high temperature in some elements and thus a great risk of burns. 3. Electrical discharges risks have been diminished by applying the Low Tension Regulations. 4. The machines are equipped with a drainage pipe to facilitate cleaning and for the outflow of residual liquids that may come from food products. When cleaning the equipment, it is necessary to take out the plug in the upper end of the drainage pipe to avoid liquids accumulating inside the equipment. 5. Unexpected interruption of power supply. In case of an unexpected power outage lasting longer than 20 minutes, make sure that the temperature of the product has not exceeded the upper permissible limit and avoid opening of the unit s doors. 6

7 The minimum temperature values at which the products do not begin to spoil are as follows: General refrigeration Frozen products Stored fish C C C 6. Protect food products by means of watertight containers or sealing system and store them on the shelves in such a manner as to allow for proper circulation of air in the whole unit s chamber. Avoid frequent opening of counter s doors or drawers and do not leave them open. Remember the cool down the product, before inserting it into the device. Remember to periodically clean the evaporator. 7. Do not touch the unit with wet or damp hands. 8. Do not touch the unit when barefoot. 3. Delivery, packaging and storage 3.1 Delivery check The customer is obliged to check carefully the goods upon completeness and transport damage at the time of unloading. In case of visible damage a written report about it should be made at the presence of the courier / driver. Note the extent of damage on the carrier s bill of delivery. Only such a protocol signed by the carrier is the basis for the complaint. Any comments on the quality of ASBER PROFESSIONAL products, order handling or discrepancies between the actual state and the invoice, should be reported in writing within 24 hours from the delivery. Any possible return of damaged machines to of ASBER PROFESSIONAL must be agreed prior to shipment. Any equipment sent to of ASBER PROFESSIONAL without authorization will not be accepted. 3.2 Packaging It is recommended to unpack the equipment immediately after its delivery and checked for any damage that may have occurred during transport. Please do not throw away the covering carton of your device as it might be useful for storage purposes, when moving or, in case of damages, when the device is to be sent back for repair. Proper care must be taken during unpacking of the device in order to avoid injury and to avoid damage to the machine. The outer and inner packing material should be removed completely from the device before installation. 3.3 Storage The unit can be stored before installation under following conditions: Do not store outdoors. Do not expose it to direct sunlight. Keep in dry and dust-free area. Do not expose it to aggressive media. Avoid mechanical shocks and vibration. 7

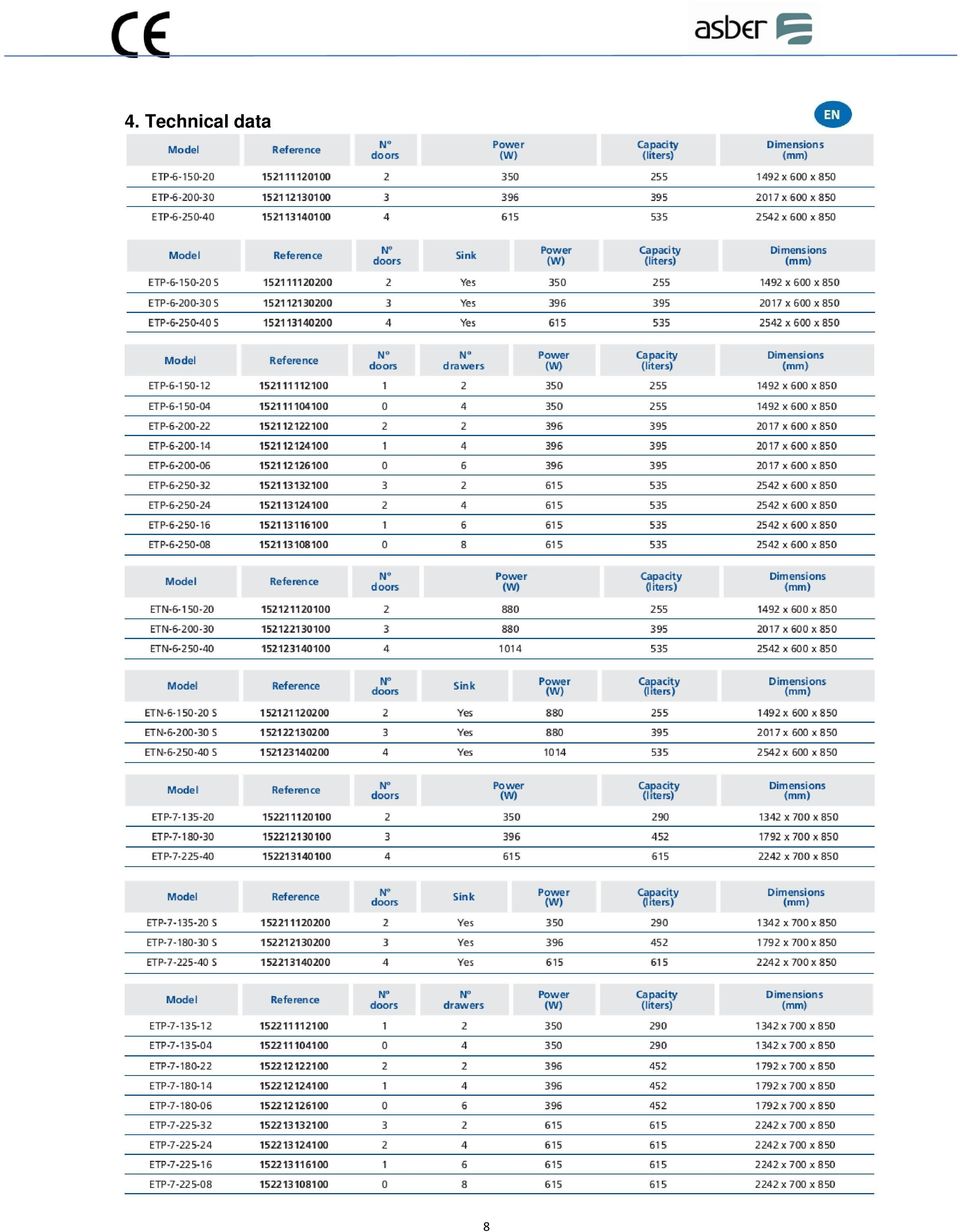
8 4. Technical data 8
9 Stainless steel construction. 50 mm thick worktop with 100 mm height sanitary splash back Available with a smooth counter worktop or with an integral sink located over the refrigerating unit. Refrigerating unit factory-mounted on the right side. The whole inside, where the products are being stored, is made from non-hazardous and certified materials (approved by the Spanish Food Code). Forced air circulation system, which guarantees the uniform temperature distribution in the whole chamber. High-class controller with a digital temperature display. Illuminated main switch and compressor operation control light. The 60 mm thick filling of polyurethane foam with the density of 40 kg/m³, injected at high pressure into the walls of the equipment, assures good insulation and energy savings.. The refrigerating unit works with refrigerating gas approved by the CE present rules. Self-closing doors. 9

10 An automatic system for evaporation of defrost water. Height-adjustable legs. Equipped with sliding guides for food containers GN 1/1. Shelves are height-adjustable. The temperature range of the refrigerated tables is controlled electronically between -2 C and 8 C. The temperature range of the freezer tables is controlled electronically between -18 C and -22 C. Suitable for operation in ambient temperatures up to max. 32 C Power supply: 230V, 50Hz. We reserve the right to make technical changes. 5. Installation and operation 5.1 Safety instructions WARNING! Electrical hazard! The electric system must be secured with a ground fault circuit interrupter and include a socket with a grounding pin. Do not pull the cable to unplug the unit. Do not place any heavy items on the device or power cord. Do not place the power cord over sharp objects (edges) or items which can cause danger of ignition / explosion. It is forbidden to use the device with the damaged power cord. Do not use the device in case it does not function properly, has been damaged or dropped. Avoid contact between the device and water. Do not expose the unit to the rain, dripping water or other forms of moisture. This may lead to damage to the device or electric shock. Do not move or tilt the device when in operation. Do not keep heavy, poisonous or rusty objects in the unit. Take caution not to damage any part of the cooling system (compressor, etc.) to avoid a coolant leak. In case of a coolant leak, unplug the device from the power source and call service. In the counters equipped with drawers the maximum load per drawer is 40 kg; overloading a drawer is not allowed. In each drawer the load must be distributed uniformly. It is advisable not to open more than one drawer at the same time to avoid overturning of the machine. For the same reason don t rest or sit on the drawers. Before connecting the unit to the plug, make sure that the voltage and the mains frequency coincide with those specified on the machine rating plate. 5.2 Installation and connection The installation and the maintenance operations must be conducted by qualified technical personnel Minimum requirements on site The electric system must be secured with a ground fault circuit interrupter and include a socket with a grounding pin. The premises where the equipment is to be installed must be properly ventilated. Install the device on the perfectly level, solid, flat and stable surface, that will support its weight. DO NOT place the device on a flammable surface. In order to ensure proper air circulation, once placed in its final location, the device should be pulled away from the wall or other objects, so that there is a space of 10 cm between them. Maintain a distance of at least 30 cm from shelves. Do not block or cover the ventilation holes. 10

11 Do not place the device where humidity or temperature are high as the device may be damaged. DO NOT place the device near to open sources of fire, electric cookers, furnaces or other sources of heat such as direct exposure to sunlight. The heat can have a negative effect on the cooling power and increase the energy consumption. Installation of the machines with a controlled humidity or condensation by water (or mixed) requires a source of water supply. A drainage channel connected to the drains must be also provided. OPERATION CONDITIONS The established working limits concerning environmental conditions for the refrigerated tables, class N: Ambient temperature: + 32 C Condensation temperature: + 54 C Relative humidity: 60% NOISE LEVEL Noise tests are being conducted in a room without noise absorbing elements and without any significant obstacles near the device. Noise levels registered in acoustic tests have been measured in accordance with the rules ISO230 to the 235. Leq (continuous level) is less than 70 db. (A) Lp (sonorous pressure level) is less than 130 db. (C) NOTE: (A) (C) Frequency weighing Positioning Remove the packing except the pallet support. Lift the unit up with a forklift, making sure not to damage the equipment and checking for its stability so as to prevent any loss of balance, and move it to the place where it is to be installed. DO NOT push or drag the unit because of risk of damaging its legs or causing it to tip over. Once the machine is placed on the appropriate place, the pallet support can be taken out. Be careful not to damage the machine. In order to level the device, rotate the adjustable legs in either a clockwise or counterclockwise direction. At last, the factory-applied rust protective film should be removed Connections 1. Before the first use the device should stand for at least 2 hours before it is connected to the power source. 2. Before connecting the unit to the power supply, check that the voltage and the power line frequency coincide with those indicated on the specification plate of the appliance. 3. The electric system, in the place where the refrigerating unit is to be installed, must have a grounding wire and a ground fault circuit interrupter. 4. Check if the cross-section of the supply wires is appropriate for the consumption it is going to resist. 5. Do not insert any objects through the protection grilles of the fan or the refrigerating unit. 6. Due to the danger of electrical discharges, do not come close to the device shoeless if the ground is wet or if you have wet hands 7. Before starting any cleaning or conducting maintenance operations on the equipment, make sure to put the main power switch in 0 position and unplug the machine. 8. It is necessary that the device runs until it reaches the operating temperature, before loading it with goods. 11
 requires a source of water supply. A drainage channel connected to the drains must be also provided.")
12 9. It is recommended to preserve the products with a food-grade plastic film in order to avoid transmission of scents. 10. For the correct operation of the cooling system, it is essential not to block the air intake of the refrigerating unit or of the inside fan, if the machine is equipped with it. 11. The installation and the maintenance operations must be conducted by qualified technical personnel. 12. The supply wire can be replaced without using special tools. It is H05 VV-F type. The inside wiring consists of three wires of 1 mm². Electrical connections are made by means of fasten terminals 6.35 protected with covers. 13. For proper use of the device and to assure long-term exploitation of the equipment, the user must receive the appropriate training and conservation instructions from a qualified technician. 14. Before servicing the refrigeration equipment: Switch off the mains tension. Protect your hands because many elements have high temperature, which can produce burns. 5.3 Operating Prior to first use First cleaning must be done after unpacking and before the machine is connected to the means. The device should be washed with water and mild detergent. When the equipment is clean and dry, insert the accessories in the appropriate places. Connect the device to a single, grounded socket. Turn the device on using the ON/OFF switch at the front. Before placing food products and beverages inside the device, allow the unit to reach the desired temperature. ON / OFF SETTINGS The equipment is provided with an illuminated main power switch. - I position ON - 0 position OFF Approximately 1 minute after the power switch is set in the "I" position, the compressor will be activated, which will be indicated by the control light. The equipment will then start the refrigerating process. The refrigerating unit can be deactivated by setting the power switch in the 0 position. Countertop ON/OFF switch with power control light Legs Drawers Digital temperature regulator Housing Door Ventilation openings 12

13 Digital display LED Funcion Normal mode ON OFF Flash 1 Compressor ON OFF. Call ON when the compressor starts. Flashes when the activation of the compressor is delayed by safety times. Flashes in cycle: two flashes - pause when continuous mode is running. 2 Fan ON OFF. Call ON when the fan starts. Flashes when the activation of the fan is prevented due to external disabling or procedures in progress. 3 Defrost ON OFF Call ON when the defrost is activated. Flashes when the activation of the defrost is prevented due to external disabling or procedures in progress. 4 Auxiliary output (AUX) Output active Output not active - ON when the auxiliary output (1 and/or 2) selected as AUX is activated. 5 RTC timer RTC available, enabled (ten=1) and at least one time band has been set RTC not available or not enabled (ten=0) or no time band set ON if at least one timed defrost has been set. At start-up, comes ON for a few seconds to indicate that the Real Time Clock is present. 6 Alarm Alarm in progress No alarm in progress - ON when alarm is active. 7 Digital display Red LED-type display with three digits and 6 symbols (compressor, fan, defrost, AUX, alarm and clock). 13

14 Button functions Normal mode Press once 1 Over 3 seconds: ON/OFF Press together Together with 3: Activate/deactivate constant running mode Start-up sec.: display/ setting desired values - Over 3 sec.: access to parameter settings (enter 22 ) - stop alarm (buzzing) - Pressed for 1 sec.: RESET EZY Pressed together (2 and 3): RESET parameters 3 Over 3 sec.: Start/stop defrost Together with 1: Start/stop constant running mode Pressed for 1 sec. : Information about product Setting desired values To regulate and set desired values: 1. Press for one second: set value will begin flashing; 2. To raise or lower value, press or ; 3. Confirm new value by pressing. Manual defrost Besides automatic defrost, manual defrost is available to be activated by pressing for over 3 seconds. NOTE! To gain access to additional settings or to change parameters contact the authorised service. 14

15 Tips for the user For optimum performance of the equipment, avoid putting hot food products or not closed beverage bottles in the inside of the device. Keep food products and beverages in hermetically-sealed containers in order to protect their aroma and prevent mixing of scents in the refrigerating unit. When placing articles inside the unit, remember to keep sufficient distance between food products and the device s internal walls to allow sufficient air circulation. To reduce loss of cold, keep the door open for as short a time as possible. Also, do not open the door / drawer too frequently. It is necessary that the device is running until it reaches the operating temperature, before loading it with food products. Remember to cool food products and beverages to the appropriate storage temperature prior to putting in the machine. Storage of warm food products reduces the device s effectiveness and may cause faster deterioration of food. In case of an unexpected power outage lasting up to 20 minutes, avoid opening of the unit s doors and drawers, in order to reduce loss of cold. If the power outage lasts longer than 20 minutes, make sure that the temperature of products has not exceeded the upper permissible limit. The minimum temperature at which the products do not begin to spoil values as follows: general refrigeration: + 10 C, frozen products: -15 C, stored fish: +2 C. After a power outage or after removing the plug from its socket, do not connect the device to an outlet for a minimum of 5 minutes. In the counters equipped with drawers the maximum load per drawer is 40 kg; overloading a drawer is not allowed. In each drawer the load must be distributed uniformly. It is advisable not to open more than one drawer at the same time to avoid overturning of the machine. For the same reason don t rest or sit on the drawers. 6. Cleaning and maintenance 6.1 Safety advice Before beginning with cleaning / repairing of the device make sure that it has been disconnected from power socket. Let the device cool down. The equipment must be rinsed with clean water, without soaking it, since water may damage the electrical parts of the device. It is prohibited to wash the device under pressure with water jets! The area where the machine is being placed must be open and clean in order to avoid materials being absorbed by the unit s fan. They can be further deposited into the condenser blades and as a result produce failures. 6.2 Cleaning the device First cleaning must be done after unpacking and before the machine is connected to the means. The device should be washed with water and mild detergent. When the equipment is clean and dry, insert the accessories in the appropriate places. The external and the internal parts of the equipment must be washed with a damp sponge or cloth. DO NOT use harsh cleaning chemicals such as scouring powder, substances containing alcohol or alkalides, thinners, petrol, or other similar substances which may damage elements made of artificial substances and/or paint. If the unit is to be unused for a longer period of time: Disconnect the plug from the socket; Remove all food products from the device; Wash the interior and exterior of the device. Leave the device s door open to allow it to dry thoroughly. 15

16 Cleaning the condensor: Clean the condenser at least once a month, because its dirt has a negative impact on the device s functioning and increases energy use! Disconnect the device prior to cleaning (remove plug!) Use a vaccum or hard-bristle brush for cleaning Wear protective gloves while cleaning due to the high temperature in some elements and a great risk of burns. 6.3 Safety instructions for maintenance Maintenance has to be conducted by qualified technical personnel using only original spare parts. Do not attempt to repair the device yourself. Before calling a qualified technician, check the power supply to the machine and make sure that there is no heat source nearby. 7. Repair and claim notification IMPORTANT!!!: Exchange of any working parts of the equipment that may influence the safety of its user should be carried out each time by service staff with proper technical qualifications. In case of exchanging any working parts make sure that the machine has been disconnected from the mains. Any cases of failures, defective operation or breakdowns in the functioning of the equipment, as well as any complaints must be reported to the seller's address which is provided on the Warranty Card. The warranty does not cover: light bulbs, rubber elements, heating components damaged by boiler scale, glass panes, as well as any mechanical damage or damage resulting from improper use of the equipment and disregarding instructions included in this manual. Operations such as descaling and cleaning are not performed by the service under the warranty. Before asking for the supervision of a technician Sometimes the cause of incorrect operation of the equipment is simple and can easily be eliminated by the user. Before requesting the assistance of a service technician, please verify the following: The device does not work Check if the unit is plugged in and if there is power supply in the network to which the machine is connected (if so, the control lamp should light up). Insufficient cooling Check if there is a heat source near the equipment (direct sun, heating device). Check if door / drawer is not open or held open for too long. Check if the thermostat regulator is not in OFF position. Check if the room temperature does not exceed +32 C, which is the highest operational ambient temperature for the unit. Check if the products inside the device are distributed evenly and the fan air intake openings are not blocked. Furthermore make sure that enough time has passed for the 16

17 Odd or loud noises products to cool down. Check if the evaporator inside the equipment is not covered with excessive ice; this may prevent the equipment from reaching the set temperatures. The most frequent cause of the presence of excessive ice on the evaporator is lack of preliminary cooling of products before placing them inside the unit. Check the machine levelling and if the doors are closed properly. Check if there are any objects touching the dynamic parts of the refrigerating unit. Table of signals and alerts In case an alert is activated, the controller will display an appropriate alert code in the screen, blinking alternatively with the current temperature value. Pressing SET will mute the sound signal; the alert code and relay will remain switched on until the cause of alert has disappeared. The table below specifies alert codes with descriptions. BLINKING E0 BLINKING E1 Defect of the ambient temperature sensor. Defect of the evaporator or the product temperature sensor The sensor is not compatible with the regulating device, a short-circuit occurred in the sensor s circuit, other defects. The sensor is not compatible with the regulating device, a short-circuit occurred in the sensor s circuit, other defects. BLINKING dor Open door alarm The alarm will disappear after a short-circuit of digital input / closing doors BLINKING L0 Low temperature alarm The alarm will be deactivated once a temperature between the maximum and minimum permissible value is restored. BLINKING HI High temperature alarm The alarm will be deactivated once a temperature between the maximum and minimum permissible value is restored BLINKING Ed Maximum defrosting time exceeded Check the efficiency of the defrosting process. BLINKING df Defrosting ongoing It is not an alarm sign but gives the information about the ongoing defrosting process. Maintenance has to be conducted by qualified technical personnel. Maintenance of the device consist in particular in cleaning the condenser blades, which are located by the compressor. The frequency of cleaning depends on the local conditions Periodically clean the pipe for draining liquids to assure that it is not clogged. We recommend using only original spare parts. ASBER PROFESSIONAL shall not bear any responsibility in cases where unoriginal spare parts have been used. 17

18 8. Waste disposal At the end of its service life the device has to be disposed in accordance with the national regulations. It is advisable to contact a company which is specialized in waste disposal, or just contact the local disposal service in your community. Contact: 18

19 SPIS TREŚCI 1. Informacje ogólne Informacje dotyczące instrukcji obsługi Wyjaśnienie symboli Odpowiedzialność producenta i gwarancja Ochrona praw autorskich Deklaracja Zgodności Bezpieczeństwo Informacje ogólne Wskazówki dotyczące bezpieczeństwa Użytkowanie zgodnie z przeznaczeniem Główne niebezpieczeństwa Transport, opakowanie i magazynowanie Kontrola dostawy Opakowanie Magazynowanie Parametry techniczne Instalacja i obsługa urządzenia Wskazówki dotyczące bezpieczeństwa Ustawienie i podłączenie urządzenia Minimalne wymagania dotyczące miejsca instalacji Pozycjonowanie Podłączanie Obsługa Przed pierwszym użyciem Opis wyświetlacza cyfrowego Funkcje przycisków Czyszczenie i konserwacja Wskazówki dotyczące bezpieczeństwa Czyszczenie Wskazówki dotyczące bezpieczeństwa podczas konserwacji Naprawy i zgłoszenia reklamacji Utylizacja 36 19

20 1. Informacje ogólne SZANOWNY KLIENCIE, Gratulujemy wyboru jednego z produkowanych przez nas urządzeń, spełniających wysokie wymagania techniczne i jakościowe. Uwaga: Przed przystąpieniem do instalacji oraz eksploatacji urządzenia prosimy o dokładne zapoznanie się z treścią niniejszej instrukcji. Życzymy Państwu satysfakcji z użytkowania naszego wyrobu. 1.1 Informacje dotyczące instrukcji obsługi Niniejsza instrukcja obsługi zawiera opis instalacji urządzenia, jego obsługi oraz konserwacji. Znajomość oraz przestrzeganie wszystkich zawartych w niej wskazań dotyczących obsługi i bezpieczeństwa stanowi warunek bezpiecznej i prawidłowej pracy z urządzeniem. Instrukcja obsługi stanowi integralny element urządzenia i należy ją przechowywać w pobliżu urządzenia, tak, aby osoby instalujące, obsługujące lub czyszczące urządzenie miały do niej stały dostęp. Zawarte w niniejszej dokumentacji informacje, dane liczbowe, wskazówki i oceny odpowiadają uzyskanemu na podstawie rzetelnych badań, obecnemu stanowi wiedzy i techniki. 1.2 Wyjaśnienie symboli Poniższe symbole użyte są w instrukcji obsługi dla podkreślenia znaczenia określonych partii tekstu: NIEBEZPIECZEŃSTWO Wskazuje na możliwe zagrożenie bezpieczeństwa osób pracujących z urządzeniem lub osób znajdujących się w pobliżu oraz zwraca uwagę na konieczność zastosowania się do przepisów bezpieczeństwa i wskazówek podanych w niniejszej instrukcji w trakcie wykonywania danej czynności. WSKAZÓWKA Wskazuje na przydatne oraz/lub dodatkowe zalecenia, a także/lub szczególne środki dotyczące danej czynności (związanej z użytkowaniem urządzenia). OSTRZEŻENIE Wskazuje na czynność niezbędną do wykonania w celu uniknięcia uszkodzenia urządzenia. 1.3 Odpowiedzialność producenta i gwarancja Gwarancja na urządzenie udzielana jest na okres 12 miesięcy licząc od daty zakupu. Gwarancją objęte są naprawy urządzenia, zakupionego w jednym z autoryzowanych punktów sprzedaży, jeżeli zostało dowiedzione, że urządzenie posiada wady materiałowe lub konstrukcyjne oraz spełnione są następujące warunki: 1. Gwarancja zapewnia bezpłatną wymianę części urządzenia, zawierających wady konstrukcyjne. Gwarancja nie zostanie uznana, jeżeli zakup produktu nie może zostać potwierdzony przy pomocy rachunku lub faktury lub ze względu na: a. Dokonywanie nieautoryzowanych ingerencji w urządzenie lub niedbalstwo. b. Użytkowanie urządzenia w warunkach pracy niezgodnych ze wskazówkami podanymi w niniejszej instrukcji obsługi. c. Uszkodzenia spowodowane użytkowaniem urządzenia w nieodpowiednim dla niego środowisku lub w wyniku wpływu czynników szkodliwych dla prawidłowej pracy urządzenia (wahania wartości napięcia i frekwencji w sieci zasilającej). 20

21 d. Przeprowadzanie napraw urządzenia przez osoby lub firmy, nieposiadające autoryzacji producenta. 2. Naprawy i inne ingerencje w urządzenie w ramach gwarancji mogą być przeprowadzane wyłącznie w autoryzowanych punktach sprzedaży lub autoryzowanych serwisach technicznych. 3. W celu dokonania naprawy przez producenta urządzenie powinno być odpowiednio opakowane i wysłane na właściwy adres. 4. Nie jest możliwe przedłużenie okresu obowiązywania gwarancji na skutek dokonanej naprawy. 5. Producent nie ponosi odpowiedzialności za pośrednie i bezpośrednie szkody ludzkie lub straty materialne powstałe na skutek niewłaściwego użytkowania lub ingerencji użytkownika w urządzenie. Gwarancji nie podlegają: Żarówki, elementy gumowe, elementy grzewcze zniszczone poprzez działanie kamienia kotłowego, szyby oraz wszelkiego rodzaju uszkodzenia mechaniczne, jak również uszkodzenia wynikłe z nieprawidłowego użytkowania urządzenia, niezgodnie z powyższą instrukcją. W razie wystąpienia awarii, należy przechowywane w urządzeniu produkty zabezpieczyć przed zniszczeniem. Firma ASBER PROFESSIONAL nie ponosi odpowiedzialności za towar zniszczony w wyniku awarii urządzenia. 1.4 Ochrona praw autorskich Niniejsza instrukcja obsługi urządzenia chroniona jest prawami autorskimi. Wszystkie prawa autorskie związane z niniejszą instrukcją obsługi są w posiadaniu firmy ASBER PROFESSIONAL. Bez uzyskania pisemnej zgody producenta, zabrania się powielania treści instrukcji obsługi w jakiejkolwiek formie i w jakikolwiek sposób. 1.5 Deklaracja Zgodności Nasze wyroby spełniają aktualne regulacje Unii Europejskiej, włącznie ze znakiem oficjalnego atestu CE. Urządzenia spełniają wymagania następujących norm: U.N.E U.N.E U.N.E U.N.E (1) U.N.E (2) U.N.E (3) U.N.E (4) U.N.E (5) U.N.E (6) 73/23/EWG 89/336/EWG 2004/108/WE 2006/95/WE 89/392/EWG 1935/2004/WE 2023/2006/WE 2002/72/WE wraz z modyfikacją 2007/19/WE Systemy wysokiej jakości Zabezpieczenie jakości przy produkcji i instalacji Zarządzanie jakością Metody badania Warunki badania Badania temperaturowe Badanie odporności na zimno Badanie odporności na kondensację pary wodnej Badanie poboru energii elektrycznej Zalecenie dotyczące bezpieczeństwa elektrycznego Zalecenie dotyczące kompatybilności elektromagnetycznej Kompatybilność elektromagnetyczna Niskonapięciowy sprzęt elektryczny Dyrektywa maszynowa Materiały i wyroby przeznaczone do kontaktu z żywnością Dobra praktyka produkcji dla materiałów i wyrobów przeznaczonych do kontaktu z żywnością Materiały i wyroby z tworzyw sztucznych przeznaczone do kontaktu ze środkami spożywczymi 21
22 2. Bezpieczeństwo Niniejsza instrukcja przygotowana została w celu zapewnienia poprawnej i bezpiecznej eksploatacji urządzenia. Przed rozpoczęciem instalacji i eksploatacji urządzenia należy uważnie przeczytać niniejszą instrukcję obsługi. Instrukcja powinna być przechowywana w bezpiecznym miejscu, by w razie potrzeby mogła być użyta przez osoby obsługujące urządzenie. W przypadku sprzedaży lub przekazania urządzenia innemu właścicielowi, a także w razie pozostawienia urządzenia w pomieszczeniu opuszczonym przez dotychczasowego właściciela, należy upewnić się, że niniejsza instrukcja zostanie dołączona do urządzenia, aby mogła być użyta przez nowego właściciela lub osobę odpowiedzialną za przeprowadzenie instalacji. 2.1 Informacje ogólne Z wyjątkiem wyraźnie sprecyzowanych sytuacji, personel odpowiedzialny za instalację, podłączenie, konserwację, kolejne instalacje i użytkowanie, wyszukiwanie błędów i uszkodzeń, naprawy oraz unieruchomienie urządzenia, musi posiadać odpowiednie kwalifikacje i trening oraz być zaznajomiony z istniejącymi zagrożeniami i regulacjami w zakresie bezpieczeństwa. W sprawach dotyczących bezpieczeństwa personel powinien posiadać wiedzę i doświadczenie na poziomie techników serwisu urządzenia. Urządzenie nie jest przeznaczone do użytku przez dzieci i osoby o fizycznej, zmysłowej lub psychicznej ułomności, bez nadzoru osoby odpowiedzialnej za ich bezpieczeństwo. W żadnym wypadku użytkownik urządzenia nie powinien otwierać lub usuwać stałych lub ruchomych elementów ochronnych lub manipulować przy mechanizmach bezpieczeństwa urządzenia. Przed przystąpieniem do instalacji oraz eksploatacji urządzenia prosimy o dokładne zapoznanie się z treścią niniejszej instrukcji, co pozwoli na bezpieczne i bezawaryjne użytkowanie urządzenia. 2.2 Wskazówki dotyczące bezpieczeństwa Nieprawidłowa obsługa i niewłaściwe użytkowanie może spowodować poważne uszkodzenie urządzenia lub zranienie osób. Używając urządzeń elektrycznych należy zawsze przestrzegać podstawowych warunków bezpieczeństwa. 1. Dokładnie zapoznaj się z całością instrukcji obsługi 2. Nie używaj urządzenia, jeśli widoczne są ślady uszkodzenia 3. Nie używaj urządzenia do czynności innych niż zgodnych z jego przeznaczeniem 4. Nie używaj urządzenia, jeśli uszkodzony jest jego przewód zasilający 5. Nie przemieszczaj urządzenia, gdy jest włączone 6. Używanie akcesoriów innych niż zalecane przez producenta może spowodować uszkodzenie urządzenia lub doprowadzić do pożaru lub porażania prądem oraz narazić użytkownika na obrażenia 7. Przed włączeniem upewnij się czy napięcie na tabliczce znamionowej jest identyczne z napięciem w gniazdku, do którego zostanie podłączone urządzenie 8. Nie należy wystawiać urządzenia na działanie warunków atmosferycznych 9. Podczas pracy z urządzeniem należy dodatkowo przestrzegać ogólnych zasad i przepisów BHP 10. W razie zakłóceń pracy lub problemów z użytkowaniem urządzenia należy zwrócić się do autoryzowanego serwisu 22
23 Producent nie ponosi żadnej odpowiedzialności za szkody spowodowane nieprawidłową obsługą i niewłaściwym użytkowaniem urządzenia. Wymiana jakichkolwiek części roboczych urządzenia, które mogłyby wpłynąć na bezpieczeństwo jego użytkowania, powinna być każdorazowo przeprowadzana przez pracowników serwisu mających odpowiednie uprawnienia techniczne. W przypadku wymiany części roboczych należy sprawdzić, czy urządzenie zostało odłączone od źródła zasilania. Zgłoszenia wszelkich usterek w działaniu urządzeń i awarii oraz wszelkie reklamacje należy niezwłocznie zgłaszać na adres sprzedawcy, którego dane znajdują się na Karcie Gwarancyjnej. 2.3 Użytkowanie zgodnie z przeznaczeniem Nasze stoły chłodnicze i mroźne przeznaczone są wyłącznie do chłodzenia artykułów spożywczych i napojów. Nie należy przechowywać w nim produktów farmaceutycznych ani krwi konserwowanej. Dla zachowania optymalnego działania urządzenia unikaj wkładania gorących pokarmów do urządzenia, a także napojów, jeśli butelki nie są zamknięte. Zabrania się przechowywania w urządzeniu substancji chemicznych lub środków powodujących korozję. Urządzenie nie powinno być używane do celów innych, niż przewidziane przez producenta. Aby uniknąć NIEWŁAŚCIWEGO UŻYTKOWANIA urządzenia zastosuj się do poniższych instrukcji: Urządzenie nie jest przeznaczone do użytku domowego. Urządzenie nie może pracować przy parametrach technicznych instalacji/sieci różnych od wskazanych na tabliczce znamionowej urządzenia. Producent nie ponosi odpowiedzialności w przypadku użycia urządzenia do celów innych niż przewidziane (jako prawidłowe użytkowanie) w niniejszej instrukcji obsługi. Użytkownik jest odpowiedzialny za szkody spowodowane wskutek nieprzestrzegania wskazówek zawartych w instrukcji obsługi oraz niezapewnienie odpowiednich warunków do pracy urządzenia, dostosowanych do specyfikacji technicznej urządzenia. Nie należy umyślnie usuwać, zmieniać, uszkadzać lub zakrywać etykiet i oznaczeń umieszczonych przez producenta na urządzeniu. UŻYTKOWANIE NIEDOZWOLONE: Zabrania się użytkowania urządzenia w nieprawidłowy sposób, mogący spowodować zagrożenie dla zdrowia lub życia użytkownika (operatora) lub innych osób. W szczególności: Niedozwolone jest pociąganie za kabel w celu odłączenia wtyczki kabla zasilającego od sieci elektrycznej. Niedozwolone jest umieszczanie ciężarów na urządzeniu lub kablu zasilającym. Zabrania się umieszczania kabla zasilającego na ostrych przedmiotach (krawędziach) lub przedmiotach, co do których istnieje niebezpieczeństwo zapalenia się / wybuchu. Niedozwolone jest użytkowanie urządzenia, gdy kabel zasilający lub przyrządy kontrolne są zniszczone lub uszkodzone. Zabrania się wkładania jakichkolwiek przedmiotów w otwory wentylacyjne agregatu. Zabrania się używania do czyszczenia urządzenia substancji łatwopalnych, powodujących korozję lub środków szkodliwych i niebezpiecznych dla zdrowia. Użytkownik ponosi odpowiedzialność za szkody powstałe na skutek niezachowania odpowiednich warunków użytkowania produktu, sprecyzowanych w niniejszej instrukcji obsługi. W razie wątpliwości skontaktuj się z autoryzowanym serwisem obsługi klienta. 23
24 2.4. Główne niebezpieczeństwa 1) Nie zdejmuj elementów osłaniających ruchome części urządzenia, bez uprzedniego odłączenia go od źródła zasilania. 2) Zachowaj konieczne środki ostrożności podczas dostępu do zespołu kondensatora, ze względu na wysoką temperaturę pewnych elementów i duże ryzyko oparzenia. 3) Niebezpieczeństwo porażenia elektrycznego zostało zmniejszone dzięki zastosowaniu elementów regulacyjnych pracujących przy niskim napięciu. 4) Nagły zanik napięcia w sieci elektrycznej. Jeżeli przerwa w zasilaniu trwa dłużej niż 20 minut, musisz sprawdzić czy temperatura produktów nie przekroczyła dopuszczalnej wartości; sprawdź, czy nie nastąpiły zmiany i unikaj otwierania drzwi chłodziarki. Tabela poniżej przedstawia graniczne wartości temperatur, które nie powodują psucia się produktów: Chłodzenie Przechowywanie zamrożonych produktów Przechowywanie ryb C C C 5) Dla zachowania optymalnego działania urządzenia unikaj wkładania gorących pokarmów do chłodziarki, a także napojów, jeśli butelki nie są zamknięte. Zabezpieczaj produkty za pomocą wodoszczelnych pojemników i wkładaj je tak, aby zapewnić dobry przepływ powietrza. Unikaj częstego otwierania drzwi i nie zostawiaj drzwi otwartych. Pamiętaj o wstępnym schłodzeniu produktu, przed włożeniem go do urządzenia. Pamiętaj o okresowym czyszczeniu parownika (chłodnica znajdująca się przy agregacie). 6) Nie dotykaj urządzenia mokrymi lub wilgotnymi rękami 7) Nie dotykaj urządzenia chodząc boso. 3. Transport, opakowanie i magazynowanie 3.1 Kontrola dostawy Klient jest zobowiązany dokładnie sprawdzić towar w czasie rozładunku. Jeżeli przesyłka dotarła do Kupującego w stanie wskazującym na uszkodzenie mechaniczne podczas transportu, należy w obecności kuriera / kierowcy dokonać jej sprawdzenia i spisać protokół opisujący zniszczenia. Wyłącznie taki protokół podpisany przez przewoźnika stanowi podstawę reklamacji. Wszelkie uwagi dotyczące jakości sprzedawanych przez ASBER PROFESSIONAL produktów, sposobu obsługi i niezgodności między stanem faktycznym a fakturą, Kupujący powinien zgłosić w formie pisemnej w ciągu 24 godzin od dostawy. Uszkodzone urządzenia, zwrócone firmie ASBER PROFESSIONAL bez wcześniejszego uzgodnienia, nie zostaną przyjęte. 3.2 Opakowanie Zaleca się rozpakowanie urządzenia natychmiast po dostarczeniu i sprawdzenie, czy urządzenie nie doznało uszkodzeń transportowych. Nie zaleca się wyrzucania opakowania urządzenia (karton, paleta), ponieważ może okazać się potrzebne w czasie przeprowadzki lub wysyłki do punktu serwisowego. Zachowaj ostrożność podczas rozpakowywania urządzenia, aby uniknąć jego zniszczenia lub uszkodzenia ciała. Przed uruchomieniem urządzenia należy całkowicie usunąć z niego zewnętrzną i wewnętrzną folię ochronną. 24
25 3.3 Magazynowanie Opakowane urządzenie można magazynować zgodnie z poniższymi warunkami: Nie przechowywać na wolnym powietrzu, Chronić przed działaniem promieni słonecznych, Składować w suchym pomieszczeniu, chroniąc przed kurzem, Nie wystawiać na działanie agresywnych środków, Unikać wstrząsów mechanicznych. 3. Parametry techniczne Model Nr ref. Liczba drzwi Moc (W) Pojemność (l) Wymiary (mm) Model Nr ref. Liczba drzwi Zlew Pojemność (l) Moc (W) Wymiary (mm) Model Nr ref. Liczba drzwi Liczba szuflad Moc (W) Pojemność (l) Wymiary (mm) Model Nr ref. Liczba drzwi Moc (W) Pojemność (l) Wymiary (mm) Model Nr ref. Liczba drzwi Zlew Pojemność (l) Moc (W) Wymiary (mm) Model Nr ref. Liczba drzwi Moc (W) Pojemność (l) Wymiary (mm) Model Nr ref. Liczba drzwi Zlew Pojemność (l) Moc (W) Wymiary (mm) 25
26 Model Nr ref. Liczba drzwi Liczba szuflad Moc (W) Pojemność (l) Wymiary (mm) Model Nr ref. Liczba drzwi Zlew Pojemność (l) Moc (W) Wymiary (mm) Model Nr ref. Liczba drzwi Pojemność (l) Moc (W) Moc chłodnicza (W) Wymiary (mm) Model Nr ref. Liczba drzwi Pojemność (l) Moc (W) Wymiary (mm) Model Nr ref. Liczba drzwi Moc (W) Pojemność (l) Wymiary (mm) Model Nr ref. Liczba drzwi Liczba szuflad Moc (W) Pojemność (l) Wymiary (mm) 26
27 Wykonane ze stali nierdzewnej. Blat o grubości 50 mm z rantem tylnym o wysokości 100 mm. Dostępne w wersji z blatem gładkim oraz ze zlewem. W wersji ze zlewem otwór pod baterię w standardzie. Wymuszony system chłodzenia komory. Wysokiej klasy sterownik z cyfrowym wyświetlaczem temperatury. Agregat chłodniczy montowany fabrycznie po prawej stronie. Poliuretanowa, wtryskiwana pod wysokim ciśnieniem izolacja termiczna ścian o grubości 60 mm i gęstości 40 kg/m3, wolna od CFC. Samoczynnie zamykające się drzwi. Odparowanie wody pochodzącej z rozmrażania parownika. Wyposażone w 1 półkę rusztową na każde drzwi. Regulowana wysokość półek w szafkach. Zasilanie 230 V 50 Hz. Temperatura pracy dla stołów chłodniczych kontrolowana elektronicznie w zakresie: -2 C do +8 C Temperatura pracy dla stołów mroźnych kontrolowana elektronicznie w zakresie:-18 C do -22 C Przystosowane do pracy w temp. otoczenia: do max. 32 C Zastrzegamy sobie prawo do dokonywania zmian technicznych. 5. Instalacja i obsługa urządzenia 5.1 Wskazówki dotyczące bezpieczeństwa NIEBEZPIECZEŃSTWO PORAŻENIA PRĄDEM! Instalacja powinna być zabezpieczona wyłącznikiem różnicowo-prądowym oraz wyposażona w gniazda sieciowe z końcówką uziemiającą. NIE wyjmować wtyczki z gniazdka ciągnąc za przewód. Niedozwolone jest umieszczanie ciężarów na urządzeniu lub kablu zasilającym. Zabrania się umieszczania kabla zasilającego na ostrych przedmiotach (krawędziach) lub przedmiotach, co do których istnieje niebezpieczeństwo zapalenia się / wybuchu. Niedozwolone jest użytkowanie urządzenia, gdy kabel zasilający lub przyrządy kontrolne są zniszczone lub uszkodzone. Nie należy używać urządzenia, jeśli jest ono niesprawne lub uszkodzone albo spadło na podłogę. Należy unikać kontaktu urządzenia z wodą, nie wystawiać urządzenia na kontakt z deszczem, kapiącą wodą lub innym rodzajem wilgoci. Może to doprowadzić do uszkodzenia urządzenia lub porażenia prądem. W czasie pracy urządzenia nie należy go przesuwać ani obracać. Nie przechowywać w urządzeniu żadnych ciężkich, toksycznych lub rdzewiejących przedmiotów. Zachować ostrożność, aby nie uszkodzić żadnej części obiegu chłodniczego (parownik, kompresor itd.) i zapobiec wydostaniu się środka chłodniczego. W przypadku wycieku środka chłodniczego należy wyłączyć urządzenie z gniazda zasilającego i wezwać serwis techniczny. W przypadku urządzeń zaopatrzonych w szuflady zabrania się ładowania więcej niż 40 kg produktów na jedną szufladę; w każdej szufladzie obciążenie musi być równomiernie rozłożone. Zaleca się nie otwierać jednocześnie więcej niż jedną szufladę, aby uniknąć przewrócenia się urządzenia. Z tych samych powodów nie opieraj się i nie siadaj na szufladach. Przed podłączeniem u należy sprawdzić, czy napięcie i częstotliwość sieci energetycznej są zgodne z wartościami podanymi na tabliczce znamionowej urządzenia (patrz tabliczka znamionowa). 27
BLACKLIGHT SPOT 400W F
 BLACKLIGHT SPOT 400W F2000339 USER MANUAL / INSTRUKCJA OBSŁUGI BLACKLIGHT SPOT 400W F2000339 Table of Contents 1 Introduction... 2 2 Safety information... 2 3 Product information... 2 3.1 Specification...
LED WASHER 30x3W WHITE IP65 F
 USER MANUAL / INSTRUKCJA OBSŁUGI LED WASHER 30x3W WHITE IP65 F7200171 LED WASHER 30x3W WHITE IP65 F7200171 Table of contents 1 Introduction... 2 2 Safety information... 2 3 Product information... 2 3.1
LED MAGIC BALL MP3 F
 USER MANUAL / INSTRUKCJA OBSŁUGI LED MAGIC BALL MP3 F7000623 LED MAGIC BALL MP3 F7000623 Table of contents 1 Introduction... 2 2 Safety information... 2 3 Product information... 2 3.1 Specification...
WYŁĄCZNIK CZASOWY OUTDOOR TIMER
 003-582 PL WYŁĄCZNIK CZASOWY Instrukcja obsługi (Tłumaczenie oryginalnej instrukcji) Ważny! Przed użyciem uważnie przeczytaj instrukcję obsługi! Zachowaj ją na przyszłość. EN OUTDOOR TIMER Operating instructions
LED PAR 56 7x10 4in1 RGBW F
 USER MANUAL / INSTRUKCJA OBSŁUGI LED PAR 56 7x10 4in1 RGBW F7100311 LED PAR 56 7x10W 4in1 RGBW F7100311 Table of Contents 1 Introduction... 2 2 Safety information... 2 3 Product information... 2 3.1 Specification...
INSTRUCTION MANUAL. Strona 1
 INSTRUCTION MANUAL www.flash-butrym.pl Strona 1 LED SPOT LIGHT INSTRUCTION MANUAL Thank you for purchasing the LEDSPOT10W Spot light. It is a small and easy to carry unit that is simple to install. Features:
DO MONTAŻU POTRZEBNE SĄ DWIE OSOBY! INSTALLATION REQUIRES TWO PEOPLE!
 1 HAPPY ANIMALS B09 INSTRUKCJA MONTAŻU ASSEMBLY INSTRUCTIONS Akcesoria / Fittings K1 M M1 ZM1 Z T G1 17 szt. / pcs 13 szt. / pcs B1 13 szt. / pcs W4 13 szt. / pcs W6 14 szt. / pcs U1 1 szt. / pcs U N1
HAPPY ANIMALS L01 HAPPY ANIMALS L03 HAPPY ANIMALS L05 HAPPY ANIMALS L07
 HAPPY ANIMALS L0 HAPPY ANIMALS L0 HAPPY ANIMALS L0 HAPPY ANIMALS L07 INSTRUKCJA MONTAŻU ASSEMBLY INSTRUCTIONS Akcesoria / Fittings K ZW W8 W7 Ø x 6 szt. / pcs Ø7 x 70 Narzędzia / Tools DO MONTAŻU POTRZEBNE
HAPPY ANIMALS L02 HAPPY ANIMALS L04 HAPPY ANIMALS L06 HAPPY ANIMALS L08
 HAPPY ANIMALS L02 HAPPY ANIMALS L04 HAPPY ANIMALS L06 HAPPY ANIMALS L08 INSTRUKCJA MONTAŻU ASSEMBLY INSTRUCTIONS Akcesoria / Fittings K O G ZW W8 W4 20 szt. / pcs 4 szt. / pcs 4 szt. / pcs 4 szt. / pcs
HAPPY K04 INSTRUKCJA MONTAŻU ASSEMBLY INSTRUCTIONS DO MONTAŻU POTRZEBNE SĄ DWIE OSOBY! INSTALLATION REQUIRES TWO PEOPLE! W5 W6 G1 T2 U1 U2 TZ1
 HAPPY K0 INSTRUKCJA MONTAŻU ASSEMBLY INSTRUCTIONS W Akcesoria / Fittings W W G K szt. / pcs M Ø Ø 0 Ø, Ø Ø. 0 ø8 M 8 szt. / pcs 0 szt. / pcs szt. / pcs T U U szt. / pcs szt. / pcs szt. / pcs S TZ szt.
DO MONTAŻU POTRZEBNE SĄ DWIE OSOBY! INSTALLATION REQUIRES TWO PEOPLE!
 HAPPY ANIMALS RW08 INSTRUKCJA MONTAŻU ASSEMBLY INSTRUCTIONS Akcesoria / Fittings K M M ZM ZW G 0 szt. / pcs W szt. / pcs B szt. / pcs szt. / pcs W U 8 szt. / pcs 4 szt. / pcs U N szt. / pcs Ø3 x szt. /
LED PAR 64 18x10W 4in1 CLASSIC F
 LED PAR 64 18x10W 4in1 CLASSIC F7100309 USER MANUAL / INSTRUKCJA OBSŁUGI LED PAR 64 18x10W 4in1 CLASSIC F7100309 Table of Contents 1 Introduction... 2 2 Safety information... 2 3 Product information...
LED MINI DERBY 4x3W RGBW F
 USER MANUAL / INSTRUKCJA OBSŁUGI LED MINI DERBY 4x3W RGBW F7000598 LED MINI DERBY 4x3W RGBW F7000598 Table of contents 1 Introduction... 2 2 Safety information... 2 3 Product information... 2 3.1 Specification...
LED PAR 18x10W RGBW 4in1 Aluminum single cast II ver. F
 LED PAR 18x10W RGBW 4in1 Aluminum single cast II ver. F71000269 USER MANUAL / INSTRUKCJA OBSŁUGI LED PAR 18x 10W RGBW 4in1 Aluminium single cast II ver. F71000269 Table of Contents 1 Introduction... 2
DO MONTAŻU POTRZEBNE SĄ DWIE OSOBY! INSTALLATION REQUIRES TWO PEOPLE!
 1 HAPPY ANIMALS SZ11 A INSTRUKCJA MONTAŻU ASSEMBLY INSTRUCTIONS Akcesoria / Fittings K1 M M1 ZM1 Z G1 szt. / pcs 0 szt. / pcs B1 6 szt. / pcs 6 szt. / pcs W6 0 szt. / pcs U1 19 szt. / pcs U 50 szt. / pcs
FOG MACHINE FLZ-1500 DMX+ RE F
 FOG MACHINE FLZ-1500 DMX+ RE F5100336 USER MANUAL / INSTRUKCJA OBSŁUGI FOG MACHINE FLZ-1500 DMX+ RE F5100336 Table of Contents 1 Introduction... 2 2 Safety information... 2 3 Product information... 3 3.1
LED WALL WASHER 36x3W RGBW 3SC IP65 F
 USER MANUAL / INSTRUKCJA OBSŁUGI LED WALL WASHER 36x3W RGBW 3SC IP65 F7200168 LED WALL WASHER 36x3W RGBW 3SC IP65 F7200168 Table of contents 1 Introduction... 2 2 Safety information... 2 3 Product information...
LED PAR 18x10W RGBW 4in1 IP65 F
 LED PAR 18x10W RGBW 4in1 IP65 F7100310 USER MANUAL / INSTRUKCJA OBSŁUGI LED PAR 18x10W RGBW 4in1 IP65 F7100310 Table of contents 1 Introduction... 2 2 Safety information... 2 2.1 Specification... 2 3 Installation...
LED PAR 18x 10W RGBW 4in1 Aluminium single cast v.iii F B
 LED PAR 18x 10W RGBW 4in1 Aluminium single cast v.iii F7000048B USER MANUAL / INSTRUKCJA OBSŁUGI LED PAR 18x 10W RGBW 4in1 Aluminium single cast v.iii F7000048B Table of Contents 1 Introduction... 2 2
LED WASHER RGB IP34 F
 USER MANUAL / INSTRUKCJA OBSŁUGI LED WASHER RGB IP34 F7200182 LED WASHER RGB IP34 F7200182 Table of contents 1 Introduction... 2 2 Safety information... 2 3 Product information... 2 3.1 Specification...
LED PAR 56 7*10W RGBW 4in1 SLIM
 LED PAR 56 7*10W RGBW 4in1 SLIM USER MANUAL Attention: www.flash-butrym.pl Strona 1 1. Please read this specification carefully before installment and operation. 2. Please do not transmit this specification
LED PAR 56 Slim 18X3W RGB Aura F7000253a
 USER MANUAL / INSTRUKCJA OBSŁUGI LED PAR 56 Slim 8XW RGB Aura F700025a LED PAR 56 Slim 8XW RGB Aura F700025a Table of contents Introduction... 2 2 Safety information... 2 Product information... 2. Specification...
LED PAR 64 18x10W RGBW 4in1 IP64 PFC F
 LED PAR 64 18x10W RGBW 4in1 IP64 PFC F7100305 USER MANUAL / INSTRUKCJA OBSŁUGI LED PAR 64 18x10W RGBW 4in1 IP65 PFC F7100305 Table of Contents 1 Introduction... 2 2 Safety information... 2 3 Product information...
Zasady bezpieczeństwa
 2 3 Zasady bezpieczeństwa GB The door and the feeding flap must be closed when operating the machine! PL Drzwiczki i klapka szczeliny podawczej muszą być zamknięte w trakcie używania urządzenia! GB Ensure
LED MOVING HEAD 60W F
 USER MANUAL / INSTRUKCJA OBSŁUGI LED MOVING HEAD 60W F1700044 LED MOVING HEAD 60W F1700044 Table of Contents 1 Introduction... 2 2 Safety information... 2 3 Product information... 2 3.1 Specification...
LED PAR 36 12x3W RGBW F
 USER MANUAL / INSTRUKCJA OBSŁUGI LED PAR 36 12x3W RGBW F7000251 LED PAR 36 12x3W RGBW F7000251 Table of contents 1 Introduction... 2 2 Safety information... 2 3 Product information... 2 3.1 Specification...
099 Łóżko półpiętrowe 2080x1010(1109)x Bunk bed 2080x1010(1109)x1600 W15 INSTRUKCJA MONTAŻU ASSEMBLY INSTRUCTION
x Bunk bed 2080x1010(1109)x1600 W15 INSTRUKCJA MONTAŻU ASSEMBLY INSTRUCTION") INSTRUKCJA MONTAŻU ASSEMBLY INSTRUCTION 2 WAŻNE, ZACHOWAĆ DO PÓŹNIEJSZEGO STOSOWANIA- UWAŻNIE PRZECZYTAĆ IMPORTANT, SAVE FOR FURTHER USAGE- READ CAREFULLY INSTRUKCJA UZYTKOWANIA USER S MANUAL. Aby uniknąć
INSTRUKCJA MONTAŻU ASSEMBLY INSTRUCTION 2 WAŻNE, ZACHOWAĆ DO PÓŹNIEJSZEGO STOSOWANIA- UWAŻNIE PRZECZYTAĆ IMPORTANT, SAVE FOR FURTHER USAGE- READ CAREFULLY INSTRUKCJA UZYTKOWANIA USER S MANUAL. Aby uniknąć
LED PAR 64 18x12W RGBW 4in1 ZOOM IP65 F
 LED PAR 64 18x12W RGBW 4in1 ZOOM IP65 F7100250 USER MANUAL / INSTRUKCJA OBSŁUGI LED PAR 64 18x12W RGBW 4in1 ZOOM IP65 F7100250 Table of contents 1 Introduction... 2 2 Safety information... 2 2.1 Specification...
LED PAR Set 4x PAR 36 12x3W F
 USER MANUAL / INSTRUKCJA OBSŁUGI LED PAR Set 4x PAR 36 12x3W F7100306 Table of contents 1 Introduction... 2 2 Safety information... 2 3 Specification... 2 4 Installation... 3 5 Connections... 3 5.1 Connecting
LED PAR 64 7x10W RGBW 4in1 ABS Remote Control F
 LED PAR 64 7x10W RGBW 4in1 ABS Remote Control F7100303 USER MANUAL / INSTRUKCJA OBSŁUGI LED PAR 64 7x10W RGBW 4in1 ABS Remote Control F7100303 Table of Contents 1 Introduction... 2 2 Safety information...
FOG MACHINE FLM RE II ver. F
 FOG MACHINE FLM -1500+ RE II ver. F5100333 USER MANUAL / INSTRUKCJA OBSŁUGI FOG MACHINE FLM-1500+ RE II ver. F5100333 Table of Contents 1 Introduction... 2 2 Safety information... 2 3 Product information...
TR18 INSTALATION MANUAL / INSTRUKCJA MONTAŻU. cart for flat displays
 INSTLTION NUL / INSTRUKCJ ONTŻU cart for flat displays WRNING: Please read this manual before the installation to ensure proper assembly. The assembly should be carried out in accordance with this manual
USER MANUAL / INSTRUKCJA OBSŁUGI. LED Double Derby 2x10W 4in1 F
 USER MANUAL / INSTRUKCJA OBSŁUGI LED Double Derby 2x10W 4in1 F7300228 LED Double Derby 2x10W RGBW 4in1 F7300228 Table of contents 1 Introduction... 2 2 Safety information... 2 3 Specification... 2 4 Installation...
FOG MACHINES User manual. FLM-600 Maszyna do dymu Instrukcja obsługi
 FLM-600 FOG MACHINES User manual FLM-600 Maszyna do dymu Instrukcja obsługi The guarantee for appropriate operation of the smoke machines is the using of the Flash-Butrym smoke liquid. www.flash-butrym.pl
098 Łóżko piętrowe 2080x1010(1109)x Double bunk bed 2080x1010(1109)x1600 W15 MONTAGEANLEITUNG ASSEMBLY INSTRUCTION
x Double bunk bed 2080x1010(1109)x1600 W15 MONTAGEANLEITUNG ASSEMBLY INSTRUCTION") 098 Double bunk bed 2080x(9)x600 W5 MONTAGEANLEITUNG ASSEMBLY INSTRUCTION 2 WAŻNE, ZACHOWAĆ DO PÓŹNIEJSZEGO STOSOWANIA- UWAŻNIE PRZECZYTAĆ IMPORTANT, SAVE FOR FURTHER USAGE- READ CAREFULLY INSTRUKCJA UZYTKOWANIA
098 Double bunk bed 2080x(9)x600 W5 MONTAGEANLEITUNG ASSEMBLY INSTRUCTION 2 WAŻNE, ZACHOWAĆ DO PÓŹNIEJSZEGO STOSOWANIA- UWAŻNIE PRZECZYTAĆ IMPORTANT, SAVE FOR FURTHER USAGE- READ CAREFULLY INSTRUKCJA UZYTKOWANIA
FOG MACHINE FLZ-2000 DMX + LED 3in1 RGB F
 FOG MACHINE FLZ-2000 DMX + LED 3in1 RGB F5100331 USER MANUAL / INSTRUKCJA OBSŁUGI FOG MACHINE FLZ-2000 DMX + LED 3in1 RGB F5100331 Table of Contents 1 Introduction... 2 2 Safety information... 2 3 Product
Mouse Tracer Fiorano RF
 Mysz Tracer Fiorano RF Instrukcja obsługi Mouse Tracer Fiorano RF User s Manual Mysz Tracer Fiorano RF 2 www.tracer.eu Mysz Tracer Fiorano RF www.tracer.eu 3 Mysz Tracer Fiorano RF Uwaga Uwaga: 4 www.tracer.eu
LED Spyder Mini 8x3W 4in1 RGBW F
 USER MANUAL / INSTRUKCJA OBSŁUGI LED Spyder Mini 8x3W 4in1 RGBW F7300226 LED Spyder Mini 8x3W 4in1 RGBW F7300226 Table of Contents 1 Introduction... 2 2 Safety information... 2 3 Product information...
LED Spyder 8x10 CREE 4in1 F
 USER MANUAL / INSTRUKCJA OBSŁUGI LED Spyder 8x10 CREE 4in1 F7300215 LED Spyder 8x10 CREE 4in1 F7300215 Table of contents 1 Introduction... 2 2 Safety information... 2 3 Product information... 2 3.1 Specification...
DC UPS. User Manual. Page 1
 DC UPS User Manual Page 1 1. Specyfikacja 1.1 Zasilacz PowerWalker DC UPS 12V jest innowacyjnym rozwiązaniem do zasilania prądem stałym o napięciu 12 VDC urządzeń do max 30W (2,5 A) obciążenia. W urządzeniu
Hippo Boombox MM209N CD. Instrukcja obsługi User s Manual
 Hippo Boombox Instrukcja obsługi User s Manual OPIS PRZYCISKÓW: PL ON-OFF/MODE: 1. Włącz on/off: Naciśnij przycisk, aby włączyć urządzenie. Przytrzymaj dłużej, aby wyłączyć. 2. MODE: Wybierz źródło sygnału:
Selfie Monopod MA426. Instrukcja obsługi User s Manual
 Selfie Monopod MA426 Instrukcja obsługi User s Manual PL Selfie Monopod Przeczytaj wszystkie instrukcje przed użyciem oraz zachowaj te informacje do wykorzystania w przyszłości. Zestaw: 1x mobile phone
LED PAR 64 7x10W RGBW 4in1 ABS F
 USER MANUAL / INSTRUKCJA OBSŁUGI LED PAR 64 7x10W RGBW 4in1 ABS F7000300 LED PAR 64 7x10W RGBW 4in1 ABS F7000300 Table of Contents 1 Introduction... 2 2 Safety information... 2 3 Product information...
LED WALL WASHER 9x10W RGBW 4in1 DMX WIFI + ACU IP65 F a
 LED WALL WASHER 9x10W RGBW 4in1 DMX WIFI + ACU IP65 F7001013a USER MANUAL / INSTRUKCJA OBSŁUGI LED WALL WASHER 9x10W RGBW 4in1 DMX WIFI + ACU IP65 F7001013a Table of contents 1 Introduction... 2 2 Safety
POWER BANK KM0209-KM0211
 Bedienungsanleitung POWER BANK KM0209-KM0211 OWNER S MANUAL INSTRUKCJA OBSŁUGI PL EN Owner s manual SAFETY INFORMATION Before use, read this manual carefully and follow its instructions. Producer does
WAŻNE: Instrukcja przedstawia podstawową formę montażu. Więcej metod i powiązanych akcesoriów znajdziesz na stronie klusdesign.pl
 Montaż oprawy na bazie profilu LARKO Części niezbędne do skonstruowania oprawy na bazie profilu LARKO Profil (A) Zaślepki (B) Osłona (C) Taśma LED (D) Sprężyny (E) Elementy niezbędne przy czynnościach
Instrukcja obsługi. binding machine KRIS. instruction manual. 80-393 GDAŃSK ul. Krynicka 1 tel.: (058) 55 43 555 fax: (058) 55 43 500 ODDZIAŁ:
 55 43 555 fax: (058) 55 43 500 ODDZIAŁ:") Instrukcja obsługi instruction manual 80-393 GDAŃSK ul. Krynicka 1 tel.: (058) 55 43 555 fax: (058) 55 43 500 ODDZIAŁ: 02-784 WARSZAWA ul. Janowskiego 9 tel.: (022) 648 03 48..49 fax: (022) 648 03 50 bindownica
Instrukcja obsługi instruction manual 80-393 GDAŃSK ul. Krynicka 1 tel.: (058) 55 43 555 fax: (058) 55 43 500 ODDZIAŁ: 02-784 WARSZAWA ul. Janowskiego 9 tel.: (022) 648 03 48..49 fax: (022) 648 03 50 bindownica
Installation of EuroCert software for qualified electronic signature
 Installation of EuroCert software for qualified electronic signature for Microsoft Windows systems Warsaw 28.08.2019 Content 1. Downloading and running the software for the e-signature... 3 a) Installer
VW3A7703 Akcesoria VW3A Rezystor hamowania IP20 28 Ohm 200W
 Dane produktu Charakterystyki Uzupełnienie Przyłącza elektryczne VW3A7703 Akcesoria VW3A Rezystor hamowania IP20 28 Ohm 200W Główne Gama produktów Typ produktu Altivar ATV61 rezystor hamujący ATV71 rezystor
Céliane TM Vac 50-60Hz. 1 x 2.5 mm 2 2 x 1.5 mm 2. Max. 400 W 400 W 400 VA 400 VA. 240 Vac. Min. 40 W 40 W 40 VA 40 VA
 Céliane TM instrukcja Remotelycontrollable ściemniacza dimmer 067087 switch for all incandescent loads 670 87 ( *) 100240 Vac 5060Hz 1 x 2.5 mm 2 2 x 1.5 mm 2 240 Vac Max. 400 W 400 W 400 VA 400 VA Min.
[ROBOKIDS MANUAL] ROBOROBO
![[ROBOKIDS MANUAL] ROBOROBO](/thumbs/24/4313056.jpg "[ROBOKIDS MANUAL] ROBOROBO") 1 2 When you plug in or unplug the cable, be sure to insert pressing the hook of the connection cable. If you want to input the program to your robot, you should first connect the Card reader with the
1 2 When you plug in or unplug the cable, be sure to insert pressing the hook of the connection cable. If you want to input the program to your robot, you should first connect the Card reader with the
DM-ML, DM-FL. Auxiliary Equipment and Accessories. Damper Drives. Dimensions. Descritpion
 DM-ML, DM-FL Descritpion DM-ML and DM-FL actuators are designed for driving round dampers and square multi-blade dampers. Example identification Product code: DM-FL-5-2 voltage Dimensions DM-ML-6 DM-ML-8
MM210. Instrukcja obsługi User s Manual
 Chilli Boombox Instrukcja obsługi User s Manual OPIS PRZYCISKÓW: PL ON-OFF/MODE: 1. Włącz on/off: Naciśnij przycisk, aby włączyć urządzenie. Przytrzymaj dłużej, aby wyłączyć. 2. MODE: Wybierz źródło sygnału:
LED MOVING HEAD STRONG 108x3W RGBW WASH III F7000579c
 LED MOVING HEAD STRONG 108x3W RGBW WASH III F7000579c USER MANUAL / INSTRUKCJA OBSŁUGI LED MOVING HEAD STRONG 108x3W RGBW WASH III F7000579c Table of contents 1 Introduction... 2 2 Safety information...
WAŻNE: Instrukcja przedstawia podstawową formę montażu. Więcej metod i powiązanych akcesoriów znajdziesz na stronie klusdesign.pl
 Montaż oprawy na bazie profilu KOZUS Części niezbędne do skonstruowania oprawy na bazie profilu KOZUS. Profil () Zaślepka (B) Osłona (C) Taśma LED (D) Osłona techniczna (E) Elementy niezbędne przy czynnościach
INSTRUKCJA OBSŁUGI OPERATIONAL MANUAL KRZESEŁKO / HIGH CHAIR MINI WYPRODUKOWANO ZGODNIE Z NORMĄ PN-EN 14988
 PL INSTRUKCJA OBSŁUGI OPERATIONAL AL MANUAL KRZESEŁKO / HIGH CHAIR MINI WYPRODUKOWANO ZGODNIE Z NORMĄ PN-EN 14988 A B C D E F G PL WAŻNE! ZACHOWAĆ W CELU POWOŁANIA SIĘ W PRZYSZŁOŚCI! OSTRZEŻENIA Nieprzestrzeganie
Kruszarka do lodu TRHB-12
 Kruszarka do lodu TRHB-12 Instrukcja obsługi i instalacji Niniejsza instrukcja przygotowana została w celu zapewnienia poprawnej i bezpiecznej eksploatacji urządzenia. WARUNKI BEZPIECZNEJ PRACY Używając
OT 180/ /700 P5
 OT 180/120 277/700 P5 OPTOTRONIC Outdoor Constant current LED drivers Obszar zastosowań _ Oświetlenie ulic i przestrzeni miejskich _ Przemysł _ Przeznaczony do opraw o klasie ochronności I Korzyści ze
SSW1.1, HFW Fry #20, Zeno #25 Benchmark: Qtr.1. Fry #65, Zeno #67. like
 SSW1.1, HFW Fry #20, Zeno #25 Benchmark: Qtr.1 I SSW1.1, HFW Fry #65, Zeno #67 Benchmark: Qtr.1 like SSW1.2, HFW Fry #47, Zeno #59 Benchmark: Qtr.1 do SSW1.2, HFW Fry #5, Zeno #4 Benchmark: Qtr.1 to SSW1.2,
Oprawa / Fixture GIZA
 Oprawa / Fixture GIZA Podstawowe elementy oprawy / Basic fixture components 1 2 4 3 1. profil GIZA / GIZA profile 2. zaślepka / end cap 24007 GIL 24029 GIL-MET 24035 GIZAT 24030 GIZAT-MET 24036 3. osłonka
Instrukcja obsługi TOSTER MODEL: BH-8863
 Instrukcja obsługi TOSTER MODEL: BH-8863 3. Nie używaj do czyszczenia silnych środków czyszczących, acetonu, alkoholu, ostrych materiałów, itp. 4. Należy regularnie usuwać okruchy pieczywa wewnątrz tostera,
Oprawa / Fixture GIP. Podstawowe elementy oprawy / Basic fixture components
 Oprawa / Fixture GIP Podstawowe elementy oprawy / Basic fixture components 1 2 4 3 1. profil GIP-ALU / GIP-ALU profile 2. zaślepka / end cap GIP-L 00306 GIP-K 00307 3. osłonka / cover G-L 00413 G-L 17006
Camspot 4.4 Camspot 4.5
 User manual (addition) Dodatek do instrukcji obsługi Camspot 4.4 Camspot 4.5 1. WiFi configuration 2. Configuration of sending pictures to e-mail/ftp after motion detection 1. Konfiguracja WiFi 2. Konfiguracja
KARTA KATALOGOWA RODZINY PRODUKTÓW PrevaLED Flat AC HF
 PrevaLED Flat AC HF Systemy oświetleniowe i moduły Spot-, Down- oraz Wallmount OBSZAR ZASTOSOWAŃ Korytarze Schody Lotniska Korytarze KORZYŚCI ZE STOSOWANIA PRODUKTU Akcesoria zabezpieczające przed dotykaniem
Obudowa betonowa do wkładu kominkowego Blanka 8 kw. Instrukcja obsługi i karta gwarancyjna ver. 2
 Obudowa betonowa do wkładu kominkowego Blanka 8 kw Instrukcja obsługi i karta gwarancyjna ver. 2 (PL) The concrete casing for fireplace insert Blanka 8 kw User Manual and Warranty Card (EN) Obudowa betonowa
SZAFY CHŁODNICZE I MROŹNE
 SZAFY CHŁODNICZE I MROŹNE APS-201, APS-401, APS-601, ANS-401, ANS-601 APS-401-I, APS-601-I, ANS-401-I, ANS-601-I APS-201-C, APS-401-C, APS-601-C, ANS-401-C, ANS-601-C Instrukcja obsługi i instalacji Niniejsza
4 BEAM 4x10W LUMILUX LED RGBW 4in1 F
 USER MANUAL / INSTRUKCJA OBSŁUGI 4 BEAM 4x10W LUMILUX LED RGBW 4in1 F7000491 4 BEAM 4x10W LUMILUX LED RGBW 4in1 F7000491 Table of Contents 1 Introduction... 2 2 Safety information... 2 3 Product information...
user s manual NV-002MIC
 user s manual NV-002MIC NV-002MIC - user's manual, ver. 1.0 INFORMATION EMC (2004/108/EC) and LVD (2006/95/EC ) Directives CE Marking Our products are manufactured to comply with requirements of following
Jazz EB207S is a slim, compact and outstanding looking SATA to USB 2.0 HDD enclosure. The case is
 1. Introduction Jazz EB207S is a slim, compact and outstanding looking SATA to USB 2.0 HDD enclosure. The case is made of aluminum and steel mesh as one of the coolest enclosures available. It s also small
INSTRUKCJA OBSŁUGI ELEKTRONICZNA WAGA ŁAZIENKOWA
 No 320211 INSTRUKCJA OBSŁUGI ELEKTRONICZNA WAGA ŁAZIENKOWA Technologia bezbateryjna, przyjazna dla środowiska. Dziękujemy za wybranie tej wagi elektronicznej z naszej serii produktów. Aby zapewnić prawidłowe,
WAŻNE: Instrukcja przedstawia podstawową formę montażu. Więcej metod i powiązanych akcesoriów znajdziesz na stronie klusdesign.pl
 Montaż oprawy na bazie profilu KOZEL Części niezbędne do skonstruowania oprawy na bazie profilu KOZEL Profil () Zaślepka (B) Osłona (C) Taśma LED (D) Osłona techniczna (E) Elementy niezbędne przy czynnościach
USB firmware changing guide. Zmiana oprogramowania za przy użyciu połączenia USB. Changelog / Lista Zmian
 1 / 12 Content list / Spis Treści 1. Hardware and software requirements, preparing device to upgrade Wymagania sprzętowe i programowe, przygotowanie urządzenia do aktualizacji 2. Installing drivers needed
Instrukcja obsługi. ibind A8/A12/A15/A20. instruction manual. 80-393 GDAŃSK ul. Krynicka 1 tel.: (058) 55 43 555 fax: (058) 55 43 500
 55 43 555 fax: (058) 55 43 500") Instrukcja obsługi instruction manual 80-9 GDAŃSK ul. Krynicka tel.: (08) fax: (08) 00 ODDZIAŁ: 0-78 WARSZAWA ul. Janowskiego 9 tel.: (0) 8 0 8..9 fax: (0) 8 0 0 BindownicE ibind A8/A/A/A0 BINDING MACHINEs
Instrukcja obsługi instruction manual 80-9 GDAŃSK ul. Krynicka tel.: (08) fax: (08) 00 ODDZIAŁ: 0-78 WARSZAWA ul. Janowskiego 9 tel.: (0) 8 0 8..9 fax: (0) 8 0 0 BindownicE ibind A8/A/A/A0 BINDING MACHINEs
FOG MACHINE FLZ-1500 DMX LED+RE F
 FOG MACHINE FLZ-1500 DMX LED+RE F7100334 USER MANUAL / INSTRUKCJA OBSŁUGI FOG MACHINE FLZ-1500 DMX LED+RE 7100334 Table of Contents 1 Introduction... 2 2 Safety information... 2 3 Product information...
POWER BANK. Owner s manual Instrukcja obsługi EN PL
 POWER BANK Owner s manual Instrukcja obsługi EN PL Safety instructions Owner s manual 1. Read this instruction manual before first use, and keep it for future reference. Producer is not responsible for
USB firmware changing guide. Zmiana oprogramowania za przy użyciu połączenia USB. Changelog / Lista Zmian
 1 / 9 Content list / Spis Treści 1. Hardware and software requirements, preparing device to upgrade Wymagania sprzętowe i programowe, przygotowanie urządzenia do aktualizacji 2. Installing drivers and
WAŻNE: Instrukcja przedstawia podstawową formę montażu. Więcej metod i powiązanych akcesoriów znajdziesz na stronie klusdesign.pl
 Montaż oprawy na bazie profilu LOKOM Części niezbędne do skonstruowania oprawy na bazie profilu LOKOM Profil () Taśma LED (E) Zaślepka (B) Osłona (F) Listwa montażowa (C) Zaślepka techniczna (D) Zatrzask
TYRE PYROLYSIS. REDUXCO GENERAL DISTRIBUTOR :: ::
 TYRE PYROLYSIS Installation for rubber waste pyrolysis designed for processing of used tyres and plastic waste (polyethylene, polypropylene, polystyrene), where the final product could be electricity,
Przeciwpożarowe sterowniki dla bram zwijanych, sekcyjnych i przesuwnych. Fire-proof controls for roller shutters, sectional doors and sliding gates
 Przeciwpożarowe napędy bram Charakterystyka Characteristics Fire-proof door drives 36 Przeciwpożarowe sterowniki dla bram zwijanych, sekcyjnych i przesuwnych Fire-proof controls for roller shutters, sectional
DMX SPLITTER 8 Users Manual
 DMX SPLITTER 8 Users Manual www.flash-butrym.pl Strona 1 Thank you for choosing one of our DMX splitters. Please read this user manual carefully and follow the instructions to avoid danger or damage to
2x Moving Head 15R BEAM FL Case F
 USER MANUAL / INSTRUKCJA OBSŁUGI 2x Moving Head 15R BEAM FL-330 + Case F7100106 2x Moving Head 15R BEAM FL-330 + Case F7100106 Table of contents 1 Introduction... 2 2 Safety information... 2 3 Maintenance...
SNP SNP Business Partner Data Checker. Prezentacja produktu
 SNP SNP Business Partner Data Checker Prezentacja produktu Istota rozwiązania SNP SNP Business Partner Data Checker Celem produktu SNP SNP Business Partner Data Checker jest umożliwienie sprawdzania nazwy
TACHOGRAPH SIMULATOR DTCOSIM
 TACHOGRAPH SIMULATOR DTCOSIM Service Manual USB-KSIM interface General description The simulator is a device that is used as a replacement for tachograph in the vehicle where the tachograph is not mandatory,
PRODUCENT URZĄDZEŃ I MEBLI GASTRONOMICZNYCH
 PRODUCENT URZĄDZEŃ I MEBLI GASTRONOMICZNYCH INSTRUKCJA OBSŁUGI INSTRUCTION MANUAL Instrukcja obsługi Szafy chłodnicze i mroźne GN 2/1 Strony 4 18 Instruction manual Refrigerators and freezers for GN 2/1
LED MATRIX Moving Head 25x12W 4in1 NO LIMIT F
 USER MANUAL / INSTRUKCJA OBSŁUGI LED MATRIX Moving Head 25x12W 4in1 NO LIMIT F7000685 LED MATRIX Moving Head 25x12W 4in1 NO LIMIT F7000685 Table of contents 1 Introduction... 2 2 Safety information...
Power cables with XLPE insulation
 Przewody elektroenergetyczne z izolacją XLPE Power cables with XLPE insulation Norma PN HD 626 4F Standard 2 1 Konstrukcja: Construction: 1. Żyła przewodząca aluminiowa Aluminium 2. Izolacja XLPE XLPE
 www.irs.gov/form990. If "Yes," complete Schedule A Schedule B, Schedule of Contributors If "Yes," complete Schedule C, Part I If "Yes," complete Schedule C, Part II If "Yes," complete Schedule C, Part
Instrukcja obsługi miernika zużycia energii. Operating Instructions for Power Meter
 POL SKI Instrukcja obsługi miernika zużycia energii Operating Instructions for Power Meter 406-074 PL EN Instrukcja obsługi w oryginale Operating instructions in original 20.06.2011 Jula AB POLSKI ZASADY
Szafa mroźnicza Freezing cabinet. Typ Type. Dane techniczne Technical data. Model Model SMI 04. SMI 04 Indus. www.essystemk.com Strona 1/9 Page 1/9
 Indus www.essystemk.com Strona 1/9 Page 1/9 SPIS TREŚCI: 1. Informacje ogólne...3 General information 2. Informacje elektryczne...4 Electrical information 3. Informacje chłodnicze...5 Cooling information
2x Moving Head 7R FL-233 BEAM+ Case F
 USER MANUAL / INSTRUKCJA OBSŁUGI 2x Moving Head 7R FL-233 BEAM+ Case F7100093 2x Moving Head 7R FL-233 BEAM + Case F7100093 Table of contents 1 Introduction... 2 2 Safety information... 2 3 Maintenance...
311186J. Copyright 2004, Graco Inc. is registered to I.S. EN ISO 9001
 311186J Copyright 2004, Graco Inc. is registered to I.S. EN ISO 9001 2 3 4 5 6 7 8 9 10 11 12 13 14 15 16 17 18 19 20 21 Graco warrants all equipment referenced in this document which is manufactured by
BELLISSIMA. Pastry counters /Lady cukiernicze
 Pastry counters /Lady cukiernicze BELLISSIMA UNIT DESCRIPTION /OPIS URZĄDZENIA: Made of wood /Obudowa drewniana Air circulation cooling /Chłodzenie nawiewowe Glass shelves, highlighted /Półki szklane,
POLITYKA PRYWATNOŚCI / PRIVACY POLICY
 POLITYKA PRYWATNOŚCI / PRIVACY POLICY TeleTrade DJ International Consulting Ltd Sierpień 2013 2011-2014 TeleTrade-DJ International Consulting Ltd. 1 Polityka Prywatności Privacy Policy Niniejsza Polityka
Zakopane, plan miasta: Skala ok. 1: = City map (Polish Edition)
") Zakopane, plan miasta: Skala ok. 1:15 000 = City map (Polish Edition) Click here if your download doesn"t start automatically Zakopane, plan miasta: Skala ok. 1:15 000 = City map (Polish Edition) Zakopane,
Zakopane, plan miasta: Skala ok. 1:15 000 = City map (Polish Edition) Click here if your download doesn"t start automatically Zakopane, plan miasta: Skala ok. 1:15 000 = City map (Polish Edition) Zakopane,
LED Double-sided WASH-BEAM Moving Head 4x10W + 1x10W F
 LED Double-sided WASH-BEAM Moving Head 4x10W + 1x10W F7000543 USER MANUAL / INSTRUKCJA OBSŁUGI LED Double-sided WASH-BEAM Moving Head 4x10W + 1x10W F7000543 Table of Contents 1 Introduction... 2 2 Safety
Przewody elektroenergetyczne z izolacją XLPE
 Przewody elektroenergetyczne z izolacją XLPE Power cables with XLPE insulation AsXSn 0,6/1 kv Norma Standard PN HD 626 4F 2 1 Konstrukcja Construction Żyła przewodząca aluminiowa Aluminium 1 2 Izolacja
Power cables with XLPE insulation
 Kable elektroenergetyczne z izolacją XLPE Power cables with XLPE insulation Norma IEC - 60502-1:2004 Standard Konstrukcja: Construction: 3 2 1 1. Żyła przewodząca aluminiowa luminium 3. Powłoka zewnętrzna
Zwora Yale US06. Yale seria US kg. Zastosowanie. Właściwości. Parametry techniczne
 Zwora Yale US06 Yale seria US06 270 kg Zastosowanie Zwory serii US06 przeznaczone są do realizowania kontroli dostępu w pomieszczeniach wymagających podstawowej ochrony np. drzwi wewnętrzne. Właściwości
Instrukcja obsługi SKY PHOTO 230 SKY PHOTO 330. instruction manual. 80-393 GDAŃSK ul. Krynicka 1 tel.: (058) 55 43 555 fax: (058) 55 43 500
 55 43 555 fax: (058) 55 43 500") Instrukcja obsługi instruction manual 80-393 GDAŃSK ul. Krynicka 1 tel.: (058) 55 43 555 fax: (058) 55 43 500 ODDZIAŁ: 02-784 WARSZAWA ul. Janowskiego 9 tel.: (022) 648 03 48..49 fax: (022) 648 03 50 LAminator
Instrukcja obsługi instruction manual 80-393 GDAŃSK ul. Krynicka 1 tel.: (058) 55 43 555 fax: (058) 55 43 500 ODDZIAŁ: 02-784 WARSZAWA ul. Janowskiego 9 tel.: (022) 648 03 48..49 fax: (022) 648 03 50 LAminator
LED STROBE COB White 200W P
 USER MANUAL / INSTRUKCJA OBSŁUGI LED STROBE COB White 200W P9700001 LED STROBE COB White 200W P9700001 Table of contents 1 Introduction... 2 2 Safety information... 2 3 Product information... 2 3.1 Features...