10-in-1 Remote Control
|
|
|
- Liliana Czarnecka
- 10 lat temu
- Przeglądów:
Transkrypt
1 H O M E T E C H 10-in-1 Remote Control SFB 10.1 A1 10-in-1 Remote Control Operating manual Pilot uniwersalny Instrukcja obsługi Univerzális távirányító Használati utasítás KOMPERNASS GMBH BURGSTRASSE 21 D BOCHUM ID-Nr.: SFB 10.1 A1-10/10-V2


2 SFB 10.1 A1
3 INDEX PAGE Important safety instructions 2 Device summary 3 Initial use 4 Unpacking the device/checking the package contents 4 Inserting the batteries 4 Operating components 5 LCD display 5 Buttons 6 SETUP - System settings 9 Code Setup (Programming the remote control) 11 Programming by brand code search 11 Programming by manual code input 12 Programming by automatic code search 12 System-Setup 14 Setting the time 14 Setting the date 14 Adjust contrast 15 Background Illumination 15 Setting the global volume/mute switching 15 Setting the lock function 16 System reset 17 Timer Setup 17 Sleep timer 17 Event timer 17 Learn Setup 18 Code learn function 19 Macro Setup 20 Favourites channel 21 Volume control 23 Vol +/, (Mute switching) 23 For operation 23 All OFF 23 Cleaning and storage 24 Faults / Remedies 24 Disposal 25 Technical data 25 Note regarding conformity 26 Importer 26 Warranty & Service 26
 23 For operation 23 All OFF 23 Cleaning")
4 UNIVERSAL REMOTE CONTROL SFB 10.1 A1 This documentation is copyright protected. All rights including those of photographic reproduction, duplication and distribution by means of particular methods (for example data processing, data carriers and data networks), wholly or partially as well as substantive and technical changes are reserved. Read the operating instructions carefully before using the device for the first time and preserve this booklet for later reference. Pass this manual on to whoever might acquire the device at a future date. Important safety instructions Proper use Children may only operate the remote control under adult supervision. The universal remote control can replace a maximum of ten remote controls. It can only be used for entertainment electronics with infrared receivers. The functions of the Universal remote control essentially correspond to those of the original remote control. The universal remote control is intended for private use. It is not suitable for commercial use. Any other use is considered improper use. The manufacturer accepts no responsibility for damage caused by improper handling or unauthorized reconstruction. Warning A warning of this danger level signifies a possible dangerous situation. If the dangerous situation is not avoided it can lead to injuries. The directives in this warning are there to avoid personal injuries. Important A warning of this danger level signifies possible property damage. If the situation is not avoided it can lead to property damage. The directives in this warning are there to avoid property damage. Note A note signifies additional information that assists in the handling of the device. Warning of injury danger as a result of improper handling of batteries! Batteries must be handled with special care. Take note of the following safety instructions: Keep batteries well away from children. Children can put batteries into their mouths and swallow them. If a battery is swallowed medical assistance must be sought IM- MEDIATELY. Do not throw batteries into a fire. Never subject batteries to high temperatures

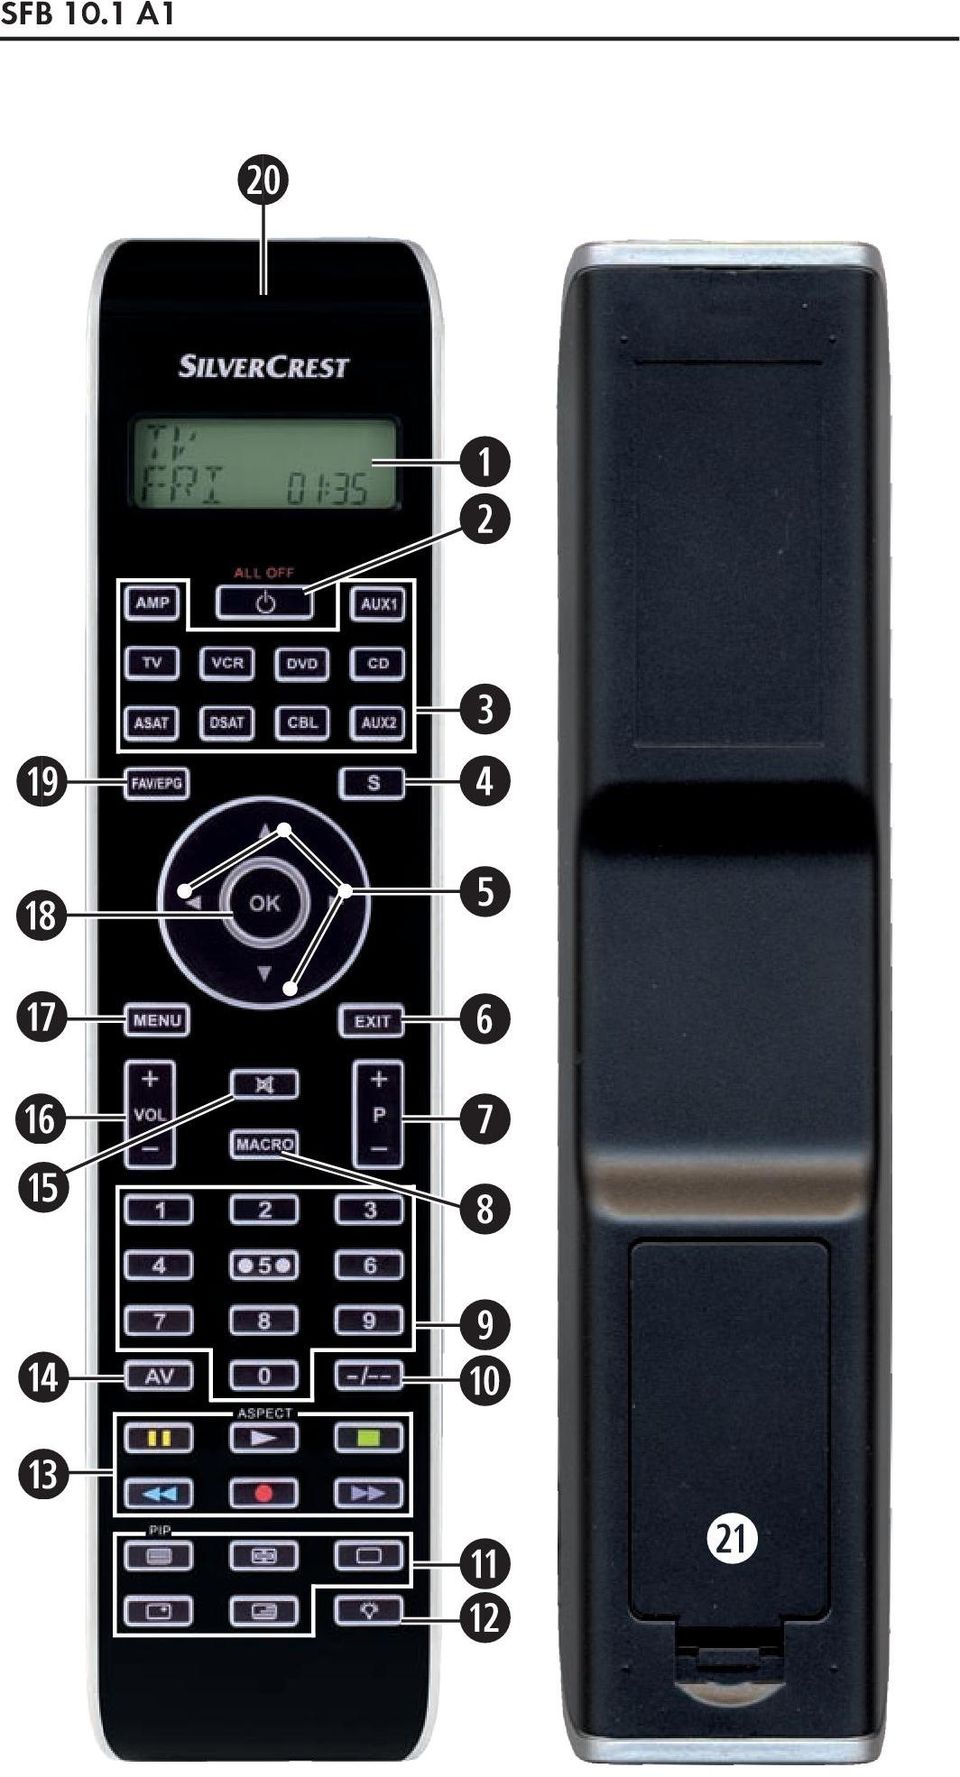
5 Explosion hazard! Non-rechargeable batteries must never be recharged. Do not open the batteries or short-circuit them. Battery acid leaking from a battery can cause inflammation of the skin. In event of contact with the skin, rinse with large amounts of water. If the liquid comes into contact with your eyes, rinse thoroughly with water, do not rub and immediately consult a doctor. Attention! The Universal remote control contains an infrared diode of laser class 1. In order to avoid eye injuries do not look at the diode with optical devices. Damage to the device If the device is defective, do not attempt to repair it yourself. In case of damage, contact the manufacturer or the manufacturer's service hotline (see Warranty information). If liquid escapes from the device or if the device has been otherwise damaged, it must be inspected by the manufacturer or the manufacturer's service hotline. Contact the manufacturer or the manufacturer's service hotline (see Warranty information). Take the batteries out of the battery compartment as soon as they are depleted. If you will not be using the device for a long period of time, remove the batteries to prevent them from discharging. Always change all batteries at the same time and always use batteries of the same type. Device summary q LCD display w /ALL OFF button e Device buttons r S button t Arrow buttons y EXIT button u P +/ buttons i MACRO button o Number buttons a Button for one or two digit programme numbers s Teletext function buttons d Illumination button f AV button g Record/Playback buttons h Mute switching j VOL +/ buttons k MENU button l OK button 1( FAV / EPG button 2) Infrared sender/receiver 2! Battery compartment cover - 3 -
.")
6 Tips: The functions described here pertain to the theoretically ideal circumstance that the button structure of the respective original remote control is identical to this universal remote control. This only occurs, however, in rare cases. If, therefore, not all of the original remote control's functions can be reproduced it is not due to a dificiency in the Universal remote control. All the brand names used in these instructions or in the accompanying code list are trademarks of the corresponding companies. Initial use Unpacking the device/checking the package contents Warning! Keep the plastic packaging well away from small children. There is a risk of suffocation! Unpack the device and accessories. Check the package contents - Universal remote control (URC), - Operating instructions, - Manufacturers directory with device code list: - 2 x 1,5 V Batteries, type AAA/LR03 (Micro) Note: Transport damage If you notice any transport damage contact the manufacturer or the manufacturer's Service-Hotline (see warranty information). Inserting the batteries Attention! The Universal remote control must only be operated with 1.5 Volt batteries (Type AAA, LR03). Carry out the battery change as quickly as possible. Preset settings will remain saved for approx. 1 minute. If new batteries have not been installed within this time all of the settings will have to be carried out again. The time of day and date will, however, be lost in either case

7 1. Open the battery compartment cover 2! in the direction of the arrow. 2. Insert the batteries as shown in the diagram and close the battery compartment. The LCD display q is activated as long as batteries are installed. The following diagram shows the LCD display q after the batteries have been installed or changed. Note: If no LCD display q is visible check the polarity of the batteries or install new ones. Operating components LCD display The LCD display q is divided into fields. Text field 2@ Here is shown the currently selected device, for example DVD, TV VCR etc. Infrared symbol 2# Every time a button is pressed, with which an infrared signal is to be sent the Infrared symbol illuminates. Code/Time field 2$ Here is shown the device code of the relevent selected device or the time of day. With the time of day indicator ":" the numbers blink in the middle. Day of the week field 2% Here you can read the English shortened form of the current day of the week after you have entered the date

8 MON Tue WED THU FRI SAT SUN = Monday = Tuesday = Wednesday = Thursday = Friday = Saturday = Sunday Standard display: The standard readout of the LCD display q consists of the details for the relevent device, for example, "TV", the initial for the day of the week and the time of day indicator. Buttons Note: All the functions described here can, of course, only be used if they are supported by the device being controlled. /ALL OFF button. w Switch device on/off. hold down for approx. 5 seconds to switch all devices on/off. Device buttons e The device buttons are used to select the device that should be operated. Television Video recorder Accessory unit 1 Cable receiver CD player Analogue satellite receiver Audio amplifier DVD player Digital satellite receiver Accessory unit 2 The mentioned button allocation is not compulsory. You can, for example, also save the code for the video recorder on the TV slot

9 "S" button r Hold down for 3 seconds to access the SETUP menu, press briefly to superimpose the date and/or to open access to additional functions such as EPG or PIP. Arrow buttons t Move up, right, left and down in menus. EXIT button y Move a level backward in the menu. P +/ buttons u Change the reception channel. MACRO button i MACRO button i followed by a number button o 1-6 activates a previously saved chain of commands. Number buttons o Enter programme and device code numbers. Button for one/two digit programme numbers a For two digit programme numbers (depending on the device type) first press the a button then via the number buttons o enter the programme number. When pressed again the display becomes single digit once more. Teletext function buttons s In teletext operation the buttons have the following functions: Access the teletext function. In normal TV operation first press the S button r followed by the button to control the PIP function (picture in picture) of your television set. Stop automatic paging forward for multi-page teletexts. Enlarge page presentation Screen text and TV image one upon the other To end the teletext function
 first press the a button then via the number buttons o enter the programme number.")
10 Note: The teletext function is only available in the European TV mode and your TV device must have a teletext module. In addition the P +/- buttons u control the following teletext functions: P + Leaf one page forward P Leaf one page backwards Record/playback buttons f The playback buttons f control devices such as DVD/CD players and video recorders: ASPECT Start playback Image format switching with TV operation. Record Stop Playback/Record/Wind Pause playback Rewind Wind forward AV button g Switch to the AV input. Mute switching h Switch sound on/off. VOL+/ buttons j Set volume (Volume). MENU button k Access the menu of the controlled device. OK button l You can confirm a menu selection with the OK button. FAV/EPG button 1( Press the FAV/EPG button to access your previously programmed favourite station. To access the electronic programme guide of the target device first press briefly the S button r and then the FAV/EPG button
.")
11 SETUP - System settings In the system settings you undertake the following: Programming the remote control to the devices to be controlled Setting the time of day, date, display contrast, background illumination, volume, lock function as well as system reset. Timer settings The "learning" of designated button commands Setting up Macros Assigning favourites On the following page you can see a summary of the menu structure

12 - 10 -
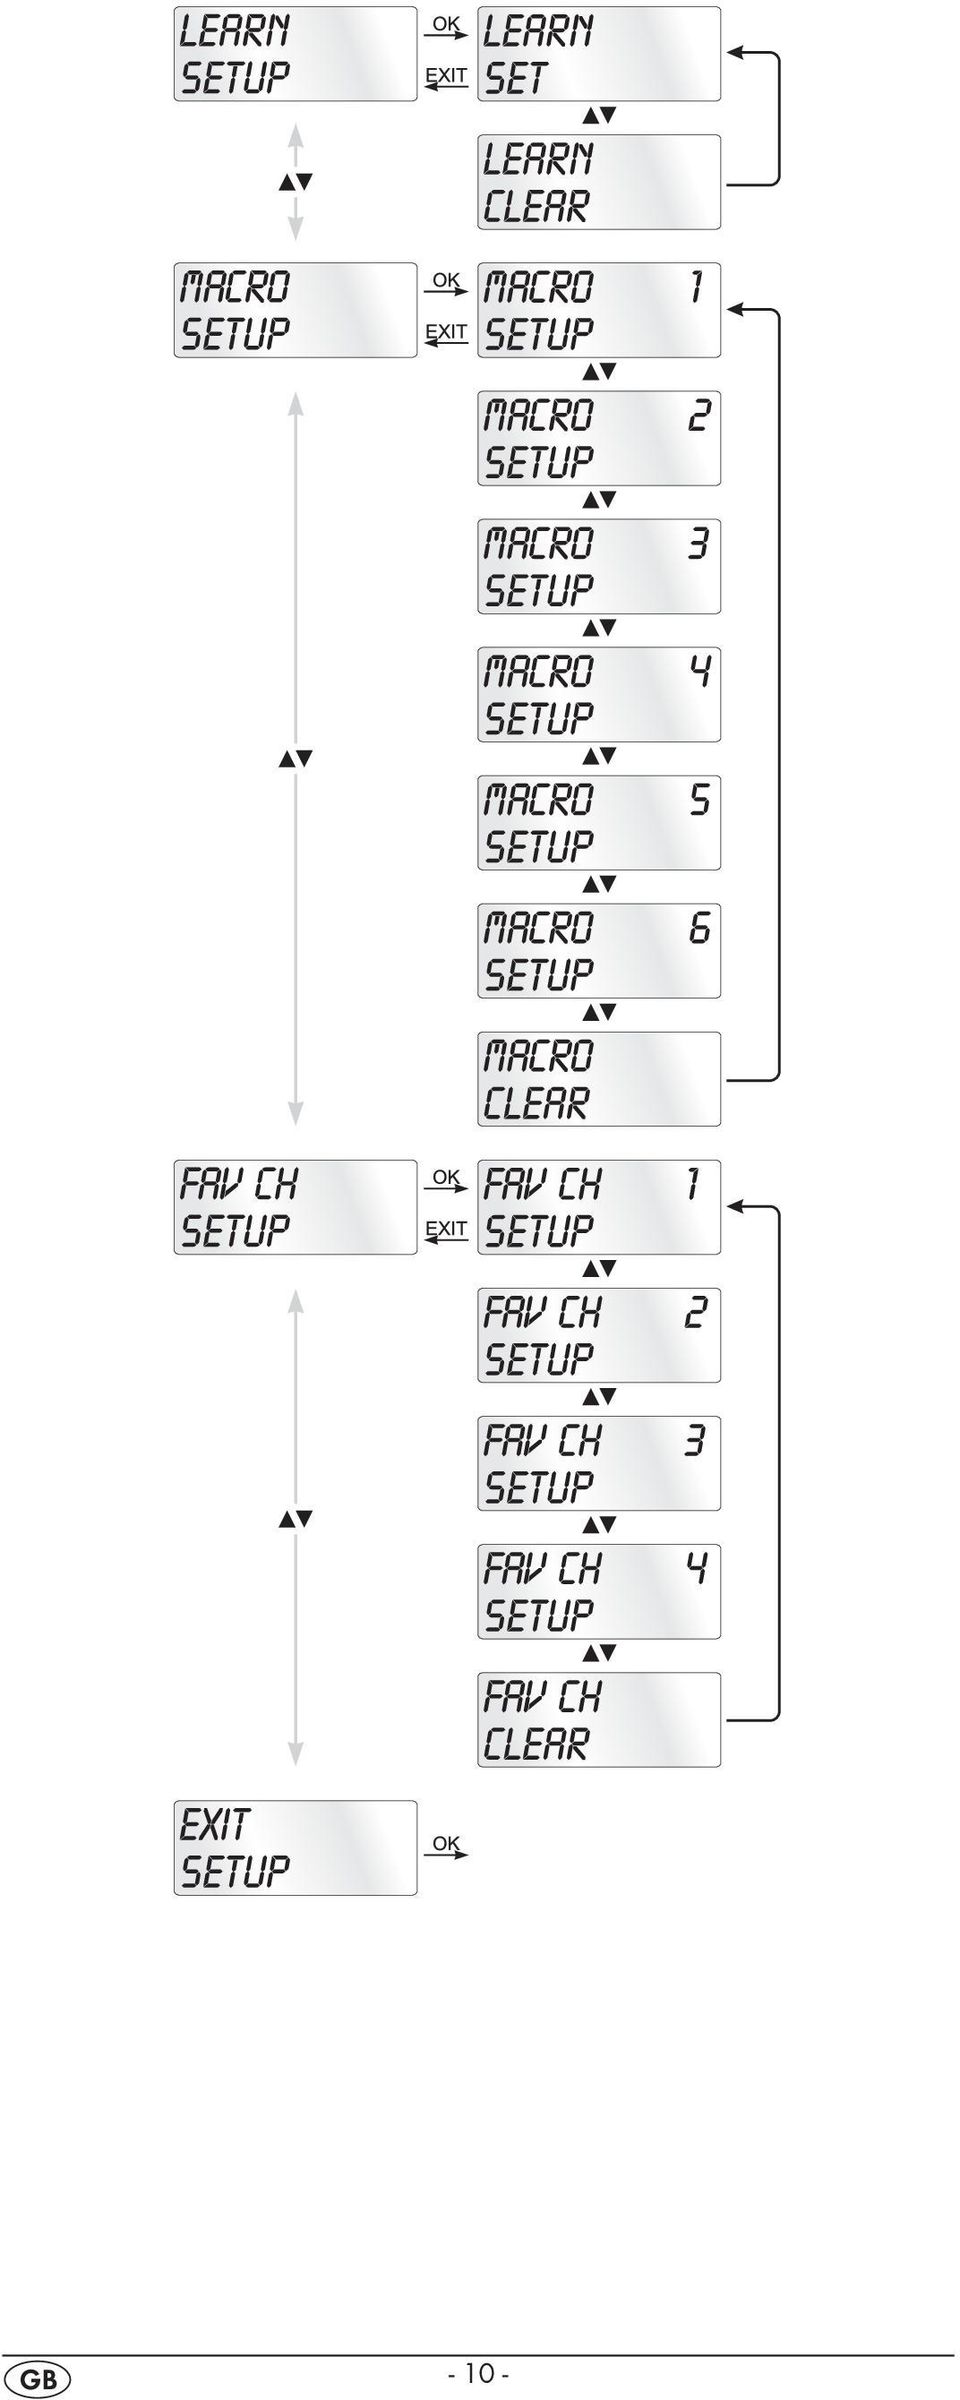
13 Code Setup (Programming the remote control) 3 Programming methods are available for the remote control: Programming by brand code search, by automatic code search and by direct code input (manual). First you should use the brand code search since this method is the fastest way of programming if the manufacturer of your device is itemized in the code list. As second is recommended the direct code input followed by the automatic code search. Programming by brand code search With this method you select the brand and code direct via the LCD display q. Observe the following operational references to programme the remote control: 1. Press the device button e for the device that you want to programme the remote control. 2. Hold down the S button r for a little longer than 3 seconds. Carry out entries in the menu quickly because after approx. 15 seconds without an entry the menu will be ended. 3. In the LCD display q "CODE SETUP" appears. Press the OK button l. "ENTER CODE" now appears in the LCD display q. With the buttons t select "BRAND CODE" and confirm with the OK button l. 4. Now appears the alphabetical first brand name from the list of pre-programmed devices. 5. With the 34 buttons t select the various brand names. 6. To make access easier you can skip directly to specific letters of the alphabet with the number buttons o: 2 => A 3 => D 4 => G 5 => J 6 => M 7 => P 8 => T 9 => W Example With button number 5 the display skips to the letter "J". The first brand is "JVC"*. If, for example, you own a "Kenwood"* brand device, continue leafing with the 4 button t until this brand name appears. (* All brand names used here are trademarks of the corresponding manufacturer.) 7. The majority of manufacturers use several different codes for the remote control. You must now ascertain which of the available codes is best suited to your device. On the right underneath the brand name the relevent code will be shown in the LCD display q. 8. Point the remote control to the relevent device and press the function buttons to test the code (except 34t, OK l, EXIT y, or the number buttons o)

14 9. If most of the buttons function press the OK button l to save the setting. In the LCD display q "OK" appears. Subsequently the menu will close automatically. 10. If, however, none or only a few of the buttons function select with the 5 or 6 button t the next code and test again as described in step With the EXIT button y you will move one level upwards in the menu. Repeat these operational steps for all devices that you would like to control with the remote control. Programming by manual code input In this mode the remote control can be programmed by direct input of a code number. You can obtain the necessary code number from the enclosed manufacturers directory with device code list. In the event that the new code is invalid the last valid programmed code will be restored. 1. Press the device button e for the device that you want to programme the remote control. 2. Hold down the S button r for a little longer than 3 seconds. 3. In the LCD display q "CODE SETUP" appears. Press the OK button l. "ENTER CODE" now appears in the LCD display q. To access this function press the OK button l. 4. In the LCD display q appears the presently used code for the selected device. Now the first digit of the code blinks and waits for your code input. Enter the new four digit code via the number buttons o. 5. If the entered CODE is valid the code will be saved. In the LCD display q "OK" appears briefly. Subsequently the menu will close automatically. In the event of failure the LCD display q shows briefly "ERROR" and waits for a new code entry. Then you repeat step With the EXIT button y you will move one level upwards in the menu. Programming by automatic code search This process can take several minutes per device since all codes for the selected device have to be gone through. Therefore this method should only be used when the device cannot be programmed via brand code search or direct code input or if your device is not listed at all in the manufacturers directory with device code list. Follow the steps listed below to carry out programming by means of the automatic code search

15 1. Press the device button e for the device that is to be controlled (i.e. VCR). 2. Switch the device that is to be controlled with the remote control on. With VCR/DVD/CD devices please insert a tape and/or disc. 3. Hold down the S button r for a little longer than 3 seconds. 4. In the LCD display q "CODE SETUP" appears. Press the OK button l. "ENTER CODE" now appears in the LCD display q. Press the or button t until "SEARCH CODE" is shown in the LCD display q. Point the remote control to the device and then press the OK button l to access the mode "automatic code search". 5. The search begins. Thereby the device sends, one after the other, the code numbers in ascending order. The infrared symbol 2# indicates this. 6. When the device reacts by switching off press immediately the OK button l to save the relevent code. The LCD display q shows briefly "OK". 7. Check to see if the majority of your device's functions can now be controlled with the remote contol. If yes you have most probably found the correct code. In the event that a few functions are not working you can start the automatic code search again beginning with step 1. Note: However, with a renewed code search, point the URC first to the target device after the previously found inadequate code has run its course. 8. However if the device does not react any more you probably did not press the OK button l quick enough in step 6. Then press repeatedly the EXIT button y to exit the menu and return to the standard display. 9. Now hold down the device button e of the device for which you have just sought the relevent code. Below on the right in the LCD display q will thereby be shown the relevent code. Make a note of this number. 10. Then proceed as described in the preceding chapter "Programming by manual code entry" and check to see if the code with the next lowest number combination will function. Tips: 1. When code search is activated all buttons except OK l and EXIT y are ignored. 2. If the automatic search has reached the end of the code list it stops there. The display then returns to "SEARCH CODE"

16 System-Setup Setting the time The LCD display q shows you the time of day. You set this as follows: 1. Hold down the S button r for a little longer than 3 seconds. The notice "CODE SETUP" appears. If appox. 15 seconds passes without an entry the device exits the menu and returns to the standard display. 2. With the or button t select "SYSTEM SETUP" and confirm with the OK button l. 3. In the LCD display q "TIME SETUP" appears. Confirm with the OK button l. The LCD display q now shows "TIME" and the time format (24 HR) blinks. 4. With the or button t you can switch to the other time format (12 HR). After which the time display for the time of day will show an A or P before the time. A stands fpr AM = ante meridium (Morning, 0:00 o clock midnight to 12:00 o clock midday). P stands for PM = post meridium (Afternoon and evening, 12:00 o clock midday to 0:00 o clock midnight). Press the OK button l to confirm. 5. Now the hour indicator blinks. With the or button t select the hour number for the present time of day and press the OK button l. 6. Now the minute indicator blinks. With the or button t select the minute number for the present time of day and press the OK button l to save. The "TIME SETUP" notice appears again. 7. To exit this or the following menus press repeatedly the EXIT button y until the standard display appears in the LCD display q. Setting the date The LCD display q shows you the date when you press the S button r. You set the date in this way: 1. Hold down the S button r for a little longer than 3 seconds. The notice "CODE SETUP" appears. 2. With the or button t select "SYSTEM SETUP" and confirm with the OK button l. 3. In the LCD display q "TIME SETUP" appears. Press the button t to change to "DATE SETUP". Confirm with the OK button l. 4. In the display the year "2010" blinks. With the or button t you can change the year and confirm with the OK button l. With the or button t you can change the now blinking month and confirm with the OK button l. Now the day indicator blinks which you can also change with the or button t. 5. To save press the OK button l. The "DATE SETUP" notice appears again
. After which the time display for the time of day will show an A or P before the time.")
17 Adjust contrast You can set the display's contrast as follows: 1. Hold down the S button r for a little longer than 3 seconds. The notice "CODE SETUP" appears. 2. With the or button t select "SYSTEM SETUP" and confirm with the OK button l. 3. With the or button t select "CONTRAST SETUP" and confirm with the OK button l. 4. In the LCD display q the contrast value now blinks which you can set with the or button t. Display readout: 0 = highest contrast: 15 = lowest contrast 5. With the OK button l you can save the desired setting. The notice "CONTRAST SETUP" appears again. Background Illumination You can set how long the LCD display s q background and the button illuminations remain alight after completion of the operation.. Thereby taking into account that the longer the illumination remains lit the shorter the battery life will be. 1. Hold down the S button r for a little longer than 3 seconds. The notice "CODE SETUP" appears. 2. With the or button t select "SYSTEM SETUP" and confirm with the OK button l. 3. With the or button t select "BACKLIT SETUP" and confirm with the OK button l. 4. In the LCD display q now blinks the second count for the length of time that the light is to be left on which you can set with the buttons t from 0 to 60. If you select "0" the background illumination will shut off completely. 5. With the OK button l you can save the desired setting. The notice "BACKLIT SETUP" appears again. Setting the global volume/mute switching So that you don t always have to first press a device button for the volume control and mute switching, for these functions the URC always only responds to an individual device, by default the television set. You can determine this target device yourself. 1. Hold the S button r down for a little longer than 3 seconds. The notice CODE SETUP appears. 2. With the or button t select SYSTEM SETUP and confirm with the OK button l. 3. With the or button t select VOL/MUTE SETUP and confirm with the OK button l. 4. The LCD display q shows ALL VOL SET. Press the OK button l, the display changes to ALL VOL MODE. 5. Now press the device button e for the device that is to be controlled by the global volume control

18 6. If the specified device is equipped with a volume control, SUCCESS will be displayed briefly and the menu will close. From now on the volume control functions on the device just specified. 7. If this device is not equipped with its own volume control the URC will not allow this selection and shows VOLUME ERROR. Even then the menu will close. The volume control will then continue to function on the former device. You can also deactivate the global volume control for specific devices. 1. For this purpose select in the VOL/MUTE SETUP with the or button t the function MODE VOL SET and confirm with the OK button l. 2. Now press the device button e for the device that is to be excluded from the global volume control. The LCD display q shows SUCCESS and the global volume control is deactivated if the URC is working in the operational mode of one of the selected devices. You can also cancel the settings again in VOL/MUTE SETUP. 1. For this purpose select in the VOL/MUTE SETUP with the or button t the function VOL/MUTE RESET and confirm with the OK button l. 2. The LCD display q prompts you, with CONFIRM RESET, to a confirmation which is done by pressing the OK button l. Press the OK button l If you want to delete the settings, the SUCCESS indicator then confirms the deletion. Otherwise you press the EXIT button y to abort the deletion. Note: If you press, in this menu, the EXIT button y the entire menu will close immediately. Setting the lock function With the lock function you can block access to all setup menus. 1. Hold down the S button r for a little longer than 3 seconds. 2. With the or button t select SYSTEM SETUP and confirm with the OK button l. 3. With the or button t select LOCK SETUP and confirm with the OK button l. The LCD display q shows the current settings. 4. With the or button t now select between LOCK (Block) or UNLOCK (Unblock). 5. With the OK button l you save the setting. In the LCD display q LOCK SETUP then appears again

19 System reset Via this function you can reset the URC to its factory default settings. Thereby all settings made by you will be deleted. 1. Hold down the S button r for a little longer than 3 seconds. The notice "CODE SETUP" appears. 2. With the or button t select "SYSTEM SETUP" and confirm with the OK button l. 3. With the or button t select "SYSTEM RESET" and confirm with the OK button l. 4. In the LCD display q now appears "CONFIRM RESET". Confirm the reset with the OK button l. Then the LCD display q shows SUCCESS RESET. All settings are now deleted and the menu is closed. Otherwise you can exit the menu by pressing the EXIT button y. Then the settings remain preserved. Timer Setup The URC offers 2 timer modes, sleep timer and event timer. Sleep timer 1. Press the device button e for the device that is to be controlled (i.e. VCR). 2. Hold down the S button r for a little longer than 3 seconds. The notice "CODE SETUP" appears. 3. Press the or button t until "TIMER SETUP" is shown. Press the OK button l "TIMER SLEEP" appears in the LCD display q. Confirm the selection of this function with the OK button l. 4. Now, below to the right in the LCD display q blinks the minutes for the remaining time of the selected device. Set with the or button t the desired value from 1 to 99 minutes. Press the OK button l to confirm. With programmed sleep-timer the LCD display q shows zz on the right next to the time. 5. Position the remote control in such a way that your infrared signal can reach the device to be switched off. After expiration of the set time the remote control will switch the device off. 6. If you now press the S button r SL is shown in the display q below on the left. Event timer The remote control has 4 event timers available via which you are allowed to send out specific series of button combinations at designated times. 1. Hold down the S button r for a little longer than 3 seconds. The notice "CODE SETUP" appears. 2. With the or button t select "TIMER SETUP" and confirm with the OK button l. "TIMER SLEEP" appears in the LCD display q. With the or button t select the desired memory slot "TIMER SETUP 1" to "TIMER SETUP 4" and confirm with the OK button l

20 3. Now the hour of the time of day, to which the desired button combinations are to be carried out, blinks. Set with the or button t the desired hour and press for confirmation the OK button l. 4. Now the minutes of the time of day, to which the desired button combinations are to be carried out, blinks. Set with the or button t the desired minutes and press for confirmation the OK button l. 5. In the LCD display q you will see "TIMER X KEY" (X stands for the desired timer). Now press the desired device button e followed by the desired sequence of the button commands. 6. Press the S button r to save your entry and to return to the timer menu. 7. Procede in a similar manner in order to, if required, programme the other timer memory slots also. 8. With programmed event timer the LCD display q shows the timer symbol on the right next to the time. Tips: 1. Per timer memory slot a maximum of 14 buttons can be programmed. After entry of the 14th button the sequence will be automatically saved and "FULL" is shown in the LCD display q. 2. In this menu also the device will return to the standard display after approx. 15 seconds without an entry. Learn Setup The Universal remote control (URC) can learn and save button signals of an original remote control. If the URC does not work after applying the programming methods already described or cannot carry out all commands please attempt to teach the URC with the help of the original remote control. Use new batteries for the URC and the original remote control. Maintain a distance of at least one metre from other light sources. The light sources could disrupt the infrared transmission. Place the URC and the original remote control at a distance of 20 to 50 mm from each other on an even surface so that the infrared diodes 2) are facing each other. Tips: 1. Do not use the following buttons for the learn function: all device buttons e, MACRO i, S button r, EXIT y. 2. Press briefly the button of the original RC. When SUC- CESS appears in the LCD display q the button command has been successfully learnt. However, if LEARN ERROR (Failure) appears you must repeat the procedure. 3. If when teaching, during the notice "LEARNING", no button is pressed on the original RC after 25 seconds the learn menu will end. This mode can not be ended by pressing a button on the URC

21 4. The memory can accommodate 150 button commands. If the memory is full the LCD display q shows "LEARN FULL" and the learn mode will end. 5. With the EXIT button y you return to the previous status (except with a notice of "LEARN KEY" and/or "LEARN- ING"). Code learn function 1. Press the device button e for the device that the URC should learn a button code. 2. Hold down the S button r for a little longer than 3 seconds. The notice "CODE SETUP" appears. 3. With the or button t select the menu "LEARN SETUP" and then press the OK button l. 4. In the LCD display q "LEARN SET" appears. Then press the OK button l. In the LCD display q "LEARN KEY" appears. 5. First press the button on the URC that is to be taught. In the LCD display q "LEARNING" appears. The URC now waits for the infrared signal from the original remote control. Note: Should the notice not change to "LEARNING" you have selected a button for which no button code can be taught. 6. Point the infrared sensors 2) of both remote controls towards each other. 7. Now hold down the desired button of the original remote control until "SUCCESS" or "LEARN ERROR" appears in the display q of the URC. 8. If in the LCD display q "SUCCESS" appears (process successful), you can teach further buttons begining with step 5. If "LEARN ERROR" appears (process unsuccessful) repeat the process in any case from step To cancel/terminate the learning process, during the display LEARN SET, repeatedly the EXIT button y until the standard display is show in the LCD display q. During the notice "LEARN KEY" and/or "LEARNING" simply allow 30 seconds to pass without any operation then the device will end the menu. Delete all programmed buttons of all devices 1. Hold down the S button r for a little longer than 3 seconds. The notice "CODE SETUP" appears. 2. With the or button t select the menu "LEARN SETUP" and then press the OK button l. In the LCD display q "LEARN SET" appears. 3. With the or button t select "LEARN CLEAR" (taught delete) and confirm with the OK button l. In the LCD display q "CONFIRM CLEAR" (confirm delete) appears. 4. Confirm with the OK button l. In the LCD display q "SUCCESS" appears. All programmed buttons are deleted. Finally the menu will automatically end
INSTRUKCJA OBSŁUGI CMM-10
 INSTRUKCJA OBSŁUGI MULTIMETR Z AUTOMATYCZNYM PRZEŁĄCZANIEM ZAKRESU CMM-10 Wersja 1.7 Multimetr CMM-10 przeznaczony jest do pomiaru napięcia stałego i zmiennego, prądu stałego i zmiennego, rezystancji,
Integrated Stereo Amplifier
 2-688-078-12(1) Integrated Stereo Amplifier Operating Instructions GB Manual de instrucciones ES Bruksanvisning SE PL TA-FA1200ES Sony Corporation Printed in Malaysia 2006 Sony Corporation WARNING To reduce
System zarządzania magazynem LFS
 System zarządzania magazynem LFS Zintegrowane całościowe rozwiązanie Warehouse Management System LFS The integrated total solution Warehouse Management by E+P Wiodący międzynarodowy ekspert w logistyce
Dyrektor Departamentu Badań Demograficznych
 Opracowanie publikacji Preparation of the publication GUS, Departament Badań Demograficznych i Rynku Pracy CSO, Demographic and Labour Market Surveys Department kierujący supervisor Agnieszka Zgierska
LS-14/LS-12 SZCZEGÓŁOWA INSTRUKCJA OBSŁUGI REJESTRATOR DŹWIĘKU PCM
 REJESTRATOR DŹWIĘKU PCM LS-4/LS- Rejestrator dźwięku PCM Rejestrator dźwięku PCM SZCZEGÓŁOWA INSTRUKCJA OBSŁUGI Zahvaljujemo na kupnji Olympus digitalnog diktafona. Prosimy o przeczytanie niniejszej instrukcji
Glosariusz ITIL wraz ze skrótami. Polski
 Polski glosariusz ITIL, wersja 1.0, z dnia 15 grudnia 2011 oparty na angielskim glosariuszu, wersja 1.0, z dnia 29 lipca 2011 Glosariusz ITIL wraz ze skrótami Polski Niniejszy glosariusz można pobierać
Arkusz zawiera informacje prawnie chronione do momentu rozpoczęcia egzaminu.
 Układ graficzny CKE 2013 Arkusz zawiera informacje prawnie chronione do momentu rozpoczęcia egzaminu. KOD WPISUJE ZDAJĄCY PESEL Miejsce na naklejkę z kodem dysleksja EGZAMIN MATURALNY Z JĘZYKA ANGIELSKIEGO
ARKUSZ PRÓBNEJ MATURY Z OPERONEM
 Miejsce na identyfikację szkoły ARKUSZ PRÓBNEJ MATURY Z OPERONEM JĘZYK ANGIELSKI POZIOM PODSTAWOWY LISTOPAD 2013 Czas pracy: 120 minut Instrukcja dla zdającego 1. Sprawdź, czy arkusz egzaminacyjny zawiera
ISSN 1232-9541. Zima Winter 2013. Zima w kuchni. Karnawałowy smakołyk. Eksport rośnie w miarę jedzenia
 ISSN 1232-9541 Zima Winter 2013 Zima w kuchni Karnawałowy smakołyk Eksport rośnie w miarę jedzenia ZDJĘCIA PHOTOS BY: PANTHERSTOCK/PHOTOGENICA I STR. OKŁADKI I COVER BY: PANTHERSTOCK/PHOTOGENICA ZDJĘCIE
Instrukcja obsługi rejestratora TruVision DVR 11
 Instrukcja obsługi rejestratora TruVision DVR 11 P/N 1072595C-PL REV 1.0 ISS 07MAY13 Copyright Znaki towarowe i patenty Producent Certyfikaty Zgodność z przepisami FCC Dyrektywy Unii Europejskiej 2013
OSTRZEŻENIE!!! PAMIĘTAJ, ŻE: UWAGA
 OSTRZEŻENIE!!! Odbiorniki kablowe Ferguson umożliwiają nagrywanie na zewnętrznych dyskach twardych HDD oraz pamięciach flash (pendrive). Jakkolwiek prawidłowe działanie nagrywania uzależnione jest od rodzaju
System alarmowy OLYMPIA Protect 9061 GSM
 INSTRUKCJA OBSŁUGI System alarmowy OLYMPIA Protect 9061 GSM Produkt nr: 791567 Strona 1 z 40 Wprowadzenie Informacje o użytkowniku Zakupiony system alarmowy jest pasywnym systemem bezpieczeństwa i został
PRÓBNY EGZAMIN GIMNAZJALNY Z OPERONEM JĘZYK ANGIELSKI
 WPISUJE UCZEŃ KOD UCZNIA PESEL PRÓBNY EGZAMIN GIMNAZJALNY Z OPERONEM JĘZYK ANGIELSKI POZIOM PODSTAWOWY Instrukcja dla ucznia 1. Sprawdź, czy zestaw egzaminacyjny zawiera 11 stron (zadania 1. 11.). Ewentualny
Polar RS300X INSTRUKCJA OBSŁUGI
 Polar RS300X INSTRUKCJA OBSŁUGI Środki ostrożności... 41 Problemy... 44 Dane techniczne... 45 Gwarancja i zastrzeżenia prawne... 47 POLSKI 1. ROZPOCZĘCIE Poznaj swojego Polara RS300X Polar RS300X wyświetla
ZACHOWANIA ZDROWOTNE OSÓB W OKRESIE PÓŹNEJ DOROSŁOŚCI SOCJODEMOGRAFICZNE KORELATY I RÓŻNICE MIĘDZY ŚRODOWISKAMI SPOŁECZNYMI
 ANNALES ACADEMIAE MEDICAE STETINENSIS ROCZNIKI POMORSKIEJ AKADEMII MEDYCZNEJ W SZCZECINIE 2013, 59, 1, 103 113 EWA SYGIT KOWALKOWSKA ZACHOWANIA ZDROWOTNE OSÓB W OKRESIE PÓŹNEJ DOROSŁOŚCI SOCJODEMOGRAFICZNE
11. lekcja jedenasta. jedenasście eleven. jedenasty eleventh. Strzelec - lca Sagitarius, archer
 11. lekcja jedenasta jedenasście eleven. jedenasty eleventh WEATHER, TIMES OF THE YEAR COMPASS DIRECTIONS MONTHS THE IMPERATIVE CONDITIONAL MOOD EXPRESSIONS OF OBLIGATION MINI- LESSON: ORDINAL NUMBERS
EGZAMIN W KLASIE TRZECIEJ GIMNAZJUM CZĘŚĆ 3. JĘZYK ANGIELSKI POZIOM PODSTAWOWY
 Arkusz zawiera informacje prawnie chronione do momentu rozpoczęcia egzaminu. KOD UCZNIA UZUPEŁNIA UCZEŃ PESEL miejsce na naklejkę EGZAMIN W KLASIE TRZECIEJ GIMNAZJUM CZĘŚĆ 3. JĘZYK ANGIELSKI POZIOM PODSTAWOWY
EGZAMIN W KLASIE TRZECIEJ GIMNAZJUM CZĘŚĆ 3. JĘZYK ANGIELSKI POZIOM PODSTAWOWY
 Arkusz zawiera informacje prawnie chronione do momentu rozpoczęcia egzaminu. KOD UCZNIA UZUPEŁNIA UCZEŃ PESEL miejsce na naklejkę EGZAMIN W KLASIE TRZECIEJ GIMNAZJUM CZĘŚĆ 3. JĘZYK ANGIELSKI POZIOM PODSTAWOWY
Studia Medyczne Tom 11
 Studia Medyczne Tom 11 MEDICAL STUDIES Edited by Stanis³aw G³uszek Vol. 11 Q U A R T E R LY july september Publikacja indeksowana w Index Copernicus 2008: ICV=3,80 Studia Medyczne Pod redakcj¹ Stanis³awa
Wiosenna moc wydarzeń. Business Tourism the magazine. Spring power of events
 Business Tourism the magazine KWARTALNIK nr 1/2015 QUARTERLY no. 1/2015 ISSN: 2084-7416» Intel Extreme Masters 12-15 marca 2015» Intel Extreme Masters 12-15 March 2015 s. 4-5» VII Europejski Kongres Gospodarczy
Regionalne Systemy Innowacji w Polsce
 Regionalne Systemy Innowacji w Polsce Regionalne Systemy Innowacji w Polsce raport z badań Warszawa, styczeń 2013 Regionalne systemy innowacji w Polsce Raport z badań Raport końcowy z badania Przegląd
EGZAMIN W KLASIE TRZECIEJ GIMNAZJUM Z JĘZYKA ANGIELSKIEGO POZIOM PODSTAWOWY KWIECIEŃ 2014. UZUPEŁNIA UCZEŃ miejsce na naklejkę z kodem
 Arkusz zawiera informacje prawnie chronione do momentu rozpoczęcia egzaminu. Układ graficzny CKE 2013 KOD UCZNIA UZUPEŁNIA UCZEŃ PESEL miejsce na naklejkę z kodem EGZAMIN W KLASIE TRZECIEJ GIMNAZJUM Z
WARUNKI UCZESTNICTWA
 MIĘDZYNARODOWE TARGI POZNAŃSKIE sp. z o. o. POZNAŃ INTERNATIONAL FAIR Ltd. ul. Głogowska 14, 60-734 Poznań, Poland tel. +48/61 869 25 46, 25 04; fax +48/61 869 29 51 e-mail: arenadesign@mtp.pl ; www.arenadesign.pl
Kwartalna informacja o rynku pracy
 GŁÓWNY URZĄD STATYSTYCZNY Departament Badań Demograficznych i Rynku Pracy MONITORING RYNKU PRACY Kwartalna informacja o rynku pracy Warszawa, 2014.11.28 WSTĘP Kwartalna informacja o rynku pracy prezentuje
THE ROLE OF DIFFERENT TOUR- ISM CONCEPTS AND FORMS IN THE PURSUANCE OF SUSTAINABLE DEVELOPMENT GOALS
 Turyzm 2008, 18/2 Agnieszka Niezgoda Akademia Ekonomiczna w Poznaniu Katedra Turystyki al. Niepodległości 10 60-967 Poznań tel/fax (061) 8543766 a.niezgoda@ae.poznan.pl ROLA RÓŻNYCH KONCEPCJI I FORM ROZWOJU
Lab6. Dwie tabele powiązane relacją jeden do wiele do jednej tabeli (porównaj laboratorium 3, laboratorium 5) Baza danych Sample: tabela Customer w
 Baza danych Sample: tabela Customer w") Lab6. Dwie tabele powiązane relacją jeden do wiele do jednej tabeli (porównaj laboratorium 3, laboratorium 5) Baza danych Sample: tabela Customer w relacji jeden do wiele do tabeli PURCHASE_ORDER oraz
Lab6. Dwie tabele powiązane relacją jeden do wiele do jednej tabeli (porównaj laboratorium 3, laboratorium 5) Baza danych Sample: tabela Customer w relacji jeden do wiele do tabeli PURCHASE_ORDER oraz
Solo System dźwiękowy TV
 Solo System dźwiękowy TV Podręcznik użytkownika Spis treści Informacje dotyczące bezpieczeństwa Wprowadzenie Dziękujemy... 6 Rozpakowywanie... 6 Instalacja systemu Krok 1: Ustaw system... 7 Krok 2: Podłącz
Program nauczania języka angielskiego dla kursu początkowego i kontynuacyjnego gimnazjum (klas I III)
") Jolanta Dobrowolska Program nauczania języka angielskiego dla kursu początkowego i kontynuacyjnego gimnazjum (klas I III) Nr dopuszczenia MEN DKW-4014-169/00 Dr Jolanta Dobrowolska jest dyrektorem szkoły
Jolanta Dobrowolska Program nauczania języka angielskiego dla kursu początkowego i kontynuacyjnego gimnazjum (klas I III) Nr dopuszczenia MEN DKW-4014-169/00 Dr Jolanta Dobrowolska jest dyrektorem szkoły
Uwaga: całkowite naładowanie akumulatora trwa dłużej, jeśli tablet jest włączony.
 1. Wygląd tabletu Rozmieszczenie elementów urządzenia: MENU ON OFF RJ45 HDMI USB USB LED RESET 2. Pierwsze kroki Uwaga: nieustannie dążymy do zwiększania jakości oferowanych produktów. Jeśli z powodu aktualizacji