pop Actuator for swing gates Instructions and warnings for the fitter istruzioni e avvertenze per l installatore
|
|
|
- Kacper Domański
- 6 lat temu
- Przeglądów:
Transkrypt

1 Actuator for swing gates pop Instructions and warnings for the fitter istruzioni e avvertenze per l installatore Instructions et recommandations pour l installation Anweisungen und hinweise für den installateur Instrucciones j advertencias para el instalador Instrukcja dla instalatora

2 1 2 3
3
4 A B
5 pop Spis: pag. Spis: pag. 1 Opis produktu 32 2 Instalowanie Kontrola Wstępna Instalacja typowa Mocowanie Mocowanie wspornika siłownika do słupka Montaż prostego ramienia Mocowanie siłownika Montaż ramienia wygiętego i mocowanie 33 wspornika do skrzydła 2.8 Wysperzeglanie siłownika od wewnątrz Wysperzeglanie siłownika z zewnątrz (opcjonalnie) Montaż wyłącznika granicznego otwierania Połączenia elektryczne Podłączanie zasilania Zastosowanie akumulatora awaryjnego 33 (opcjonalny) 3 Ruch ręczny lub wysprzeglanie 33 4 Testy odbiorcze i przygotowanie do pracy Test odbiorczy 34 5 Czynności konserwacyjne Utylizacja 34 6 Dane techniczne 34 7 Akcesoria 34 Instrukcje i ostrzeżenia skierowane do 35 użytkownika siłownika POP PL Ostrzeżenia Przed przystąpieniem do instalowania automatyki należy uważnie przeczytać całą instrukcję, ponieważ dostarcza ona ważnych informacji związanych z bezpieczeństwem, instalacją, użytkowaniem i czynnościami konserwacyjnymi. W celu ułatwienia zastosowania poniższych instrukcji utrzymany został porządek kolejności wykonywania poszczególnych faz instalowania. Inne czynności poza tymi zawartymi w niniejszej instrukcji nie są dozwolone. Niewłaściwe użytkowanie może być źródłem uszkodzeń i niebezpiecznych sytuacji dla osób i rzeczy. Firma Nice nie bierze żadnej odpowiedzialności skutki niewłaściwego montażu bram, jak i za deformacje, które mogą stworzyć się podczas użytkowania. Przechowywać niniejszą instrukcję do przyszłej konsultacji. Projekt, wykonanie elementów konstrukcyjnych POP i niniejsza instrukcja spełniają w pełni aktualnie obowiązującą normę. Podczas instalowania jak i użytkowania POP mogą stworzyć się niebezpieczne sytuacje, dlatego też czynności te należy wykonać w pełni przestrzegając normy prawne i regulaminy, a w szczególności: Przed rozpoczęciem instalowania przygotować wszystkie materiały i oprzyrządowanie, które może służyć do podłączenia do automatyki siłownika POP i odpowiednie jest do specyficznej sytuacji zastosowania. Nie wolno używać automatyki przed wykonaniem prób odbiorczych według tego, jak przedstawiono w paragrafie: Przygotowanie do rozruchu. Materiał opakowania należy zutylizować w pełni przestrzegając miejscowe normy prawne. Nie wprowadzać zmian, gdy nie zostały przewidziane w niniejszej instrukcji. Tego typu zmiany mogą być powodem wadliwego funkcjonowania. Firma NICE zwalnia się z odpowiedzialności za szkody wynikające z modyfikacji produktów. Uważać, aby nie zanurzać elementów automatyki w wodzie lub innych płynach. Uważać także, aby przy instalowaniu żaden płyn nie dostał się do środka centrali i do innych otwartych urządzeń współpracujących. W wypadku, gdy płyn dostanie się do środka urządzenia, należy natychmiast odłączyć dany element od automatyki, odłączyć zasilanie i skontaktować się z serwisem Firmy NICE; użytkowanie POP w takim stanie może być niebezpieczne. Nie umieszczać elementów POP w pobliżu źródeł ciepła ani płomieni; może to być przyczyną wadliwego jego funkcjonowania, pożaru lub innych niebezpiecznych sytuacji. Gdy akumulator awaryjny (opcjonal) nie będzie używany przez dłuższy czas należy go odłączyć od automatyki i przechowywać w suchym pomieszczeniu; unika się w ten sposób wyciekania szkodliwych płynów z akumulatora. Centralę podłączyć do linii zasilającej zaopatrzonej w uziemienie. Wszystkie czynności, które wymagają otwarcia obudowy POP, wymagają odłączenia zasilania. Gdy urządzenie odcinające energię nie jest widoczne należy powiesić na nim tabliczkę ostrzegającą: UWAGA, CZYNNOŚCI KONSERWACYJNE W TOKU. Po interwencji wyłączników automatycznych lub bezpieczników i przed ich przywróceniem do pierwotnej pozycji należy odszukać i usunąć anomalię. Gdy naprawa wykonana według wskazówek umieszczonych w niniejszej instrukcji nie da oczekiwanego efektu należy skontaktować się z serwisem firmy NICE. 31


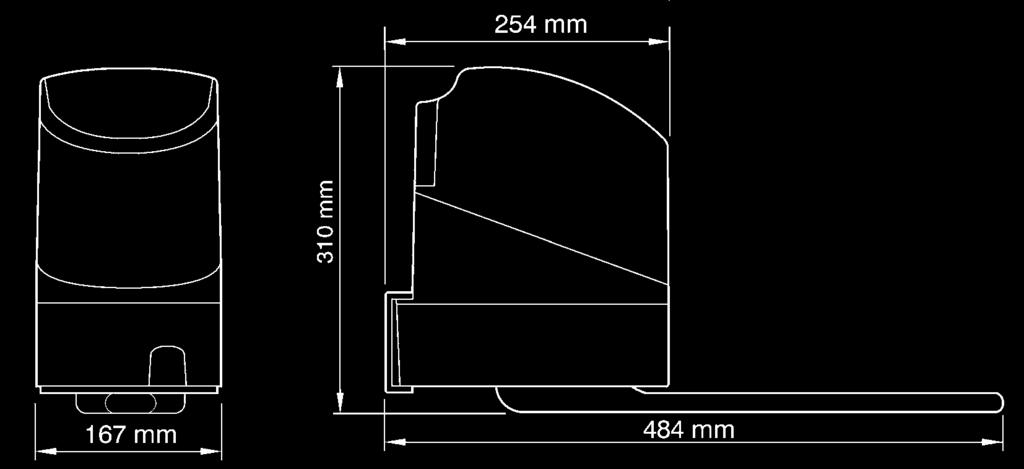
6 1) Opis produktu POP jest siłownikiem do bram skrzydłowych o średnich i małych rozmiarach. Służy do automatyzacji bram skrzydłowych przy długości maksymalnej skrzydła do 1.8m i ciężarze skrzydła do 200kg. Silnik wykonany jest w dwóch wersjach: PP7024 z wbudowaną centralą sterującą z zasilaniem 230V (W wersji PP 7024/V1 zasilanie 120V) PP7224 bez centrali sterującej z siłownikiem PP07224, który podłącza się do centrali sterującej PP ) Instalowanie Pamiętać należy, że instalacja musi być wykonywana wyłącznie przez doświadczony i wykwalifikowany personel zgodnie z instrukcjami umieszczonymi w rozdziale "OSTRZEŻENIA". 2.1) Kontrola Wstępna Przypominamy, że POP jest urządzeniem napędowym do bramy, wydajnym i pewnym, ale nie usuwa wad spowodowanych błędnym zainstalowaniem czy źle wykonanymi czynnościami konserwacyjnymi. Przed przystąpieniem do instalacji napędu należy sprawdzić prawidłowość konstrukcji bramy, czyli czy odpowiada ona aktualnie obowiązującym normom. W szczególności sprawdzić czy: opakowanie siłownika nie jest naruszone i czy zawiera elementy przedstawone na rys. 1: o Nr.1 cz. PP7024 o Nr.1 cz. PP7224 o Nr.2 cz. Proste ramię o Nr.2 cz. Wygięte ramię o Nr.2 cz. Wspornik siłownika o Nr.1 cz. Skrzynka z akcesoriami o Nr.1 cz. Skrzynka elektroniki Openkit, przy otwieraniu i zamykaniu bramy nie ma punktów nadmiernego tarcia, brama jest wyważona, czyli zatrzymana w jakimkolwiek punkcie nie porusza się, miejsce gdzie ma być zamocowany siłownik jest bezpieczne i odpowiednie dla pracy montera, miejsce na zainstalowanie siłownika jest odpowiednie dla jego wymiarów (Rys. 2), sprawdzić czy miejsca, gdzie będą przymocowane poszczególne urządzenia są zabezpieczone przed przypadkowymi uderzeniami i czy powierzchnie montażu są solidne, sprawdzić czy powierzchnie, gdzie zamocowane zostaną fotokomórki są płaskie i gwarantujące prawidłowe ustawienie pomiędzy TX i RX, sprawdzić czy ruch ramienia nie będzie niczym ograniczony (Rys. 3). 2.2) Instalacja typowa (Rys. 4) 1. Siłownik POP PP Siłownik POP PP Fotokomórka 4. Antena 5. Lampa sygnalizacyjna 6. Przełącznik kluczowy 7. Kolumna na fotokomórkę (opcjonalna) 8. Linia elektryczna zasilająca. 2.3) Mocowanie (Rys. 5) Mocowanie wsporników wykonać następująco: Tab. 1 Rys Sprawdzić, na podstawie kąta otwarcia skrzydła, czy możliwe jest uzyskanie wartości umieszczonych w Tab Zmierzyć na słupku wartość A. 3. Na podstawie wartości A i kąta otwarcia skrzydła w tabeli można odczytać dopuszczalne wartości B z Tab. 1. Na przykład:, gdy A jest równe 100mm i gdy chcemy otrzymać kąt otwarcia =100, to B powinno wynosić około 180mm. 32
7 2.4) Mocowanie wspornika siłownika do słupka (Rys. 6) Mocowanie wykonać wkrętami odpowiednimi do materiału słupka. Przymocować szyny w poziomej pozycji. 2.5) Montaż prostego ramienia (Rys. 7) Montaż my być wykonany śrubą M8x25 z podkładką sprężystą. Ramię ustawić w kierunku jak na rys. 7, rys 9. parte anteriore. 2.6) Mocowanie siłownika (Rys. 8) Mocowanie siłownika wykonane jest poprzez wsunięcie go do szyny C i przykręcenie śrubami M6x100 i dostarczonymi nakrętkami. 2.7) Montaż ramienia wygiętego i mocowanie wspornika do skrzydła (Rys. 9) Montaż wykonujemy stosując śrubę M8x45 z odpowiednimi podkładkami plastikowymi i śrubą M8x35 do przymocowania ramienia do wspornika. Wspornik powinien być przyspawany do bramy lub przykręcony śrubami odpowiednimi do materiału, z jakiego wykonane jest skrzydło. Ustawić wspornik z zachowaniem wartości 500mm (Rys. 5-6), przymocować w pozycji poziomej i ustawić odpowiednio do wspornika na słupku, zachowując wartość 100mm. 2.8) Wysperzeglanie siłownika od wewnątrz (Rys. 10) Przebiega w dwóch fazach: A: Podnieść zasłonkę B: Włożyć klucz do wysprzęglania (w zestawie) i przekręcić w kierunku zgodnym z ruchem wskazówek aż do oporu Wysperzeglanie siłownika z zewnątrz (Rys. 11) (opcjonalnie) PL Montaż systemu wysprzęglania odbywa się w sześciu fazach: A: Odczepić plastikową pokrywkę (1) B: Przykręcić trzpień (3) do wałka wysprzęglania (2) C: Napinacz linki (4) przykręcić do właściwego otworu (5) D: Przymocować sprężynę (6) do sworznia (3) i do odpowiedniego zaczepu obudowy E: przeciągnąć linkę wysprzęglajcą (7) poprzez otwory sworznia (3) i napinacza (4) F: Założyć z powrotem plastykową pokrywkę (1) 2.9) Montaż wyłącznika granicznego otwierania (Rys. 12) Przykręcić ogranicznik dwoma śrubami M6x25 we właściwej pozycji po uprzednim wysprzęgleniu siłownika. 2.10) Połączenia elektryczne Przy wykonywaniu połączeń elektrycznych kierować się instrukcjami centrali sterującej POA ) Podłączanie zasilania (Rys. 13) W PP7024: podłączyć kabel zasilający (230V) bezpośrednio do zacisków przy bezpieczniku. W PP7224: podłączyć kabel wychodzący z centrali PP7024 do odpowiednich zacisków. 2.12) Zastosowanie akumulatora awaryjnego (Rys. 14) (opcjonalny) POP posiada przegródkę na akumulator awaryjny (opcjonalny). Usunąć zaznaczoną część ścianki skrzynki centrali, włożyć akumulator i wykonać połączenia. 3) Ruch ręczny lub wysprzeglanie Czynności ręczne (Rys. 10) należy wykonać w wypadku braku prądu lub w wypadku zaistnienia awarii urządzenia. Ruch ręczny umożliwia wykonanie wolnego ruchu siłownika pod warunkiem, że został on prawidłowo zamontowany i z oryginalnymi akcesoriami. 33
8 4) Testy odbiorcze i przygotowanie do pracy Test odbiorczy jest najważniejszą fazą w instalowaniu automatyki i gwarantuje jej bezpieczne użytkowanie. Test może być stosowany także jako okresowa kontrola składowych elementów automatyki. Test odbiorczy całej automatyki musi być wykonany przez doświadczony i wykwalifikowany personel, który weźmie na siebie odpowiedzialność za wykonanie swojej pracy i świadomy jest ewentualnego niebezpieczeństwa. Personel ten ma zweryfikować czy przestrzegane są wymagania i regulaminy normy EN12445, która ustala sposób wykonania kontroli automatyki bram. 4.1) Test odbiorczy 1. Zweryfikować czy wszystko to, co jest zawarte w rozdziale OSTRZEŻENIA jest respektowane. 2. Wykonać próby otwierania i zamykania bramy i sprawdzić czy ruch skrzydła przebiega prawidłowo. Wykonać próby kilkakrotnie, sprawdzając jego płynność, obecność ewentualnych wad w montażu i regulacji jak i ewentualne zwiększone tarcie. 3. Zweryfikować pojedynczo funkcjonowanie wszystkich urządzeń zabezpieczających w urządzeniu. 1. Zmierzyć siłę uderzenia według jak zostało przewidziane w normie EN i ewentualnie, gdy kontrola siły silnika jest stosowana jako sposób na zmniejszenie siły uderzenia: wyregulować tak, aby uzyskać jak najlepsze wyniki. 5) Czynności konserwacyjne Czynności konserwacyjne wykonywać przestrzegając w pełni norm bezpieczeństwa niniejszej instrukcji i według tego, co jest przewidziane w prawie i aktualnych normach. POP nie wymaga specjalnych czynności konserwacyjnych, a przewidziana kontrola, co sześć miesięcy gwarantuje prawidłowe funkcjonowanie systemu. Czynności konserwacyjne polegają na powtórzeniu testu odbiorczego i prób wskazanych w paragrafie 4.1 Test odbiorczy. Gdy przewidziane są inne urządzenia należy wykonać wszystko, co jest dla nich przewidziane w programie czynności konserwacyjnych. 5.1) Utylizacja POP wykonany jest z różnych surowców, niektóre z nich można oddać przetworzenia (aluminium, plastik, kable) inne należy oddać do recyklingu (karty i elementy elektroniczne).! UWAGA: Niektóre elementy mogą zawierać substancje trujące, nie wolno ich porzucać w przypadkowych miejscach. Należy zasięgnąć informacji odnośnie sposobów przerobu i utylizacji materiałów według aktualnie obowiązujących norm miejscowych. 1. Odłączyć automatykę od zasilania. 2. Poodkręcać urządzenia i akcesoria w kolejności przeciwnej do podanej w rozdziale 2 Instalowanie. 3. Wyciągnąć kartę elektroniczną. 4. Pogrupować i dostarczyć poszczególne materiały elektryczne do recyklingu do firm zajmujących się odbiorem tych materiałów. 5. Pozostałe elementy struktury oddać do właściwych punktów złomowania. 6) Dane techniczne Zasilanie Vpp/Hz 230/50 120/50-60 / Vps / / 24 Prąd max. A ~1 ~2 3 Moc silnika W 75 Moment Nm 180 Czas otwierania s 10 Zakres temp. pracy C Stopień zabezpieczenia IP 44 Intensywnośćl pracy 30% Klasa izolacji 1 B * Wersja bez centrali sterującej 7) Akcesoria KIO - Selektor na klucz z wysprzęgleniem z linką. PP7024 PP7024/V1 PP7224* 34
9 Słownik do bram skrzydłowych pop PL Instrukcje i ostrzeżenia skierowane do użytkownika siłownika POP Gratulujemy wyboru automatyki firmy Nice! Nice S.p.a. produkuje elementy do automatyzacji bram, drzwi, bram rolowanych, rolet i markiz: siłowniki, centrale sterujące, piloty, lampy sygnalizacyjne, fotokomórki i akcesoria. Firma Nice stosuje w swoich produktach wyłącznie surowce wysokiej jakości zawsze poszukując nowych i innowacyjnych rozwiązań, maksymalnie ułatwiających użytkowanie tych urządzeń. Elementy te są technicznie wysokiej jakości, estetyczne i dokładnie opracowane ergonomicznie: wasz instalator na pewno wybierze produkt, który najbardziej odpowiada waszym wymaganiom. Firma Nice nie jest producentem waszej bramy, lecz tylko automatu; jest on wynikiem wieloletniej pracy, analizy i wyboru surowców a realizacja instalacji ma być wykonana przez waszego instalatora. Każda automatyka jest jedyna w swoim rodzaju i gdy instalator posiada odpowiednie doświadczenie z pewnością wybierze produkt, który najbardziej odpowiada waszym wymaganiom, pewny i trwały w czasie a szczególnie wykonany profesjonalnie, czyli taki, który będzie odpowiadał aktualnie obowiązującym normom. Automatyka jest wygodnym rozwiązaniem, posiada funkcjonalny system zabezpieczający i gdy jest zadbana będzie wam służyć wiele lat. Gdy automatyka spełnia wasze wymagania w zakresie bezpieczeństwa i zgodnie z normami prawnymi nie znaczy to, że nie istnieją inne niebezpieczeństwa. Mogą się bowiem utworzyć się sytuacje niebezpieczne spowodowane nieodpowiedzialnym i błędnym użytkowaniem. Dlatego też chcemy przekazać wam użyteczne wskazówki w celu uniknięcia takich niekorzystnych sytuacji: Przed pierwszym uruchomieniem automatyki należy poprosić instalatora o dokładne przedstawienie ewentualnych niebezpieczeństw. Przeczytać instrukcję i ostrzeżenia dla instalatora, którą wam przekazał. Przechowywać instrukcję w celu ewentualnych przyszłych konsultacji, lub, aby przekazać ją innemu użytkownikowi automatyki. Wasza automatyka jest systemem, który wykonuje sumiennie wasze rozkazy; nierozumne użytkowanie może stać się niebezpieczne. Nie włączać automatyki, gdy w zasięgu jej działania znajdują się ludzie, zwierzęta lub inne obiekty. 35
10 Dzieci: automatyka gwarantuje wysoki stopień bezpieczeństwa. Zatrzymuje ruch, gdy jej system zabezpieczający odczyta obecność osób lub rzeczy i gwarantuje uaktywnienie tego sytemu w sposób pewny i przewidziany. Bezpieczniej jednak zabronić dzieciom bawienia się w pobliżu automatyki oraz pozostawionymi bez nadzoru pilotami, aby uniknąć nieumyślnego włączenia: nadajniki sterowania to nie zabawka! Anomalie. Gdy zauważy się jakiekolwiek niewłaściwe zachowanie automatyki należy odłączyć od niej zasilanie elektryczne i wysprzęglić ręcznie. Nie wykonywać samodzielnie napraw, ale wezwać uprawnionego instalatora: brama może funkcjonować również bez automatyki po wysprzęgleniu siłownika według jak opisane w dalszej części. Czynności konserwacyjne. Automat, jak każda maszyna, wymaga okresowych czynności konserwacyjnych, co gwarantuje mu bezpieczne i długoletnie funkcjonowanie. Uzgodnić z waszym instalatorem program okresowych przeglądów konserwacyjnych. Firma Nice poleca, aby przeglądy wykonywać, co 6 miesięcy, ale zależy to też od intensywności użytkowania. Jakikolwiek przegląd, związany z czynnościami konserwacyjnymi czy naprawą, ma być wykonany przez wykwalifikowany personel. Nawet wówczas, gdy jesteście pewni swojej wiedzy nie wolno wprowadzać żadnych zmian w instalacji, w parametrach programowania i w regulacji automatyki: czynności te są obowiązkiem instalatora Kontrola końcowa, okresowe przeglądy i ewentualne naprawy mają być udokumentowane przez osobę wykonującą te czynności: dokumenty te ma przechowywać właściciel instalacji. Złomowanie. Po zakończeniu eksploatowania instalacji demontaż musi być wykonany przez upoważnione osoby, materiały mają być oddane do recyklingu według aktualnie obowiązujących miejscowych norm prawnych. Wypadku uszkodzenia lub braku zasilania. Oczekując na przybycie instalatora (lub na powrót energii elektrycznej oraz gdy instalacja nie posiada akumulatorów awaryjnych) urządzenie może być uruchamiane ręcznie, czyli jak każde inne urządzenie nieautomatyczne. Wysprzęglić urządzenie ręcznie: ta czynność jest jedyną czynnością, którą może wykonać użytkownik. Jest to funkcja dokładnie opracowana przez firmę Nice w celu ułatwienia jej obsługi bez stosowania narzędzi i wysiłku fizycznego. Wysprzeglanie siłownika od wewnątrz 1. Podnieść pokrywkę 2. Włożyć klucz wysprzęglający (dostarczony w zestawie) i przekręcić w kierunku ruchu wskazówek zegara aż do oporu. 1 2 wysprzeglanie siłownika od zewnątrz (opcjonalne) Odczepić plastikową pokrywkę (1) Przykręcić trzpień (3) do wałka wysprzęglającego (2) Przykręcić napinacz linki (4) do właściwego otworu (5) Przymocować sprężynę (6) do trzpienia (3) i do właściwego punktu przymocowania w obudowie Przeciągnąć linkę wysprzęglania (7) poprzez otwory sworznia (3) i napinacza linki (4) Założyć w oryginalnej pozycji plastikową pokrywkę. (1) Ważne: gdy wasze urządzenie jest sterowane pilotem, którego działanie po pewnym czasie słabnie lub przestaje on działać to prawdopodobnie baterie w nim znajdujące się wyczerpały się (w zależności od rodzaju baterii może stać się to po kilku miesiącach jak i po dwóch lub trzech latach). Światełko ostrzegawcze w pilocie jest wówczas słabe, w ogóle nie świeci się lub zaświeci się na krótki czas. Przed wezwaniem instalatora wymienić baterie, na takie same z innego funkcjonującego nadajnika. Jeżeli jest to jedyny powód nie funkcjonowania pilota to wystarczy wymienić baterie na nowe tego samego rodzaju. Jesteście zadowoleni z waszej automatyki? W wypadku zamiaru zainstalowania następnych urządzeń zaleca się wezwanie tego samego instalatora, a firma Nice zagwarantuje wam oprócz konsultacji jednego ze specjalistów produkt najbardziej postępowy na rynku, idealne funkcjonujące urządzenie i maksymalną kompatybilność systemu. Dziękujemy za przeczytanie niniejszych wskazówek, życzymy dużej satysfakcji z nowej automatyki. W celu ewentualnych wyjaśnień, czy porad prosimy zwrócić się do waszego instalatora. 36
11 13 PP7024 PP
12 15
13 Dichiarazione CE di conformità / EC declaration of conformity (secondo Direttiva 98/37/EC, Allegato II, parte B) (according to 98/37/EC Directive, Enclosure II, part B) Numero / Number: 172/ Data / Date: 02/2003 Revisione / Revision: 0 Il sottoscritto Lauro Buoro, Amministratore Delegato, dichiara che il prodotto The undersigned Lauro Buoro, General Manager of the following producer, declares that the product Nome produttore / Producer name: Indirizzo / Address: Tipo / Type: Modello / Model: Accessori / Accessories: NICE S.p.a. Via Pezza Alta 13, Z.I. Rustignè - ODERZO - ITALY Motoriduttore elettromeccanico / Electromechanical gearmotor PP7224 Nessun accessorio / No accessory Risulta conforme a quanto previsto dalle seguenti direttive comunitarie / Complies with the following community directives Riferimento n Titolo Reference n Title 98/37/CE (EX 89/392/CEE) DIRETTIVA MACCHINE / Machinery Directive 89/336/CEE DIRETTIVA COMPATIBILITA ELETTROMAGNETICA (EMC) / EMC Electromagnetic Compatibility Directive Risulta conforme a quanto previsto dalle seguenti Norme armonizzate / Complies with the following Harmonised standards Riferimento n Edizione Titolo Livello di valutazione Classe Reference n Issue Title Estimate level Class EN /1998 Caratteristiche di radiodisturbo. Limiti e metodi di misura B Information technology equipment - Radio disturbance characteristics. Limits and methods of measurement Risulta conforme a quanto previsto dalle altre norme e/o specifiche tecniche di prodotto / Complies with the other standards and/or product technical specifications Riferimento n Edizione Titolo Livello di valutazione Classe Reference n Issue Title Estimate level Class EN /2000 Porte e cancelli industriali e commerciali e da autorimessa. Sicurezza in uso di porte motorizzate - Metodi di prova Industrial, commercial and garage doors and gates - Safety in use of power operated doors - Test methods EN /2000 Porte e cancelli industriali e commerciali e da autorimessa. Sicurezza in uso di porte motorizzate - Requisiti Industrial, commercial and garage doors and gates - Safety in use of power operated doors - Requirements Inoltre dichiara che non è consentita la messa in servizio del prodotto suindicato finché la macchina, in cui il prodotto stesso è incorporato, non sia identificata e dichiarata conforme alla direttiva 98/37/CEE / He declares, moreover, that it is not allowed to use the above mentioned product until the machine, in which this product is incorporated, has been identified and declared in conformity with the regulation 98/37/CEE. P.S.:Il prodotto suindicato si intende parte integrante di una delle configurazioni di installazione tipiche, come riportato nei nostri cataloghi generali / The above mentioned product is meant integral part of the of one of the installation configuration as shown on our general catalogues. Oderzo, 8 Maggio 2003 Amministratore delegato (General Manager) Lauro Buoro P.S.: La dichiarazione di conformita del modello PP7024 e presente nel fascicolo di istruzioni della centrale POA1 Please find the declaration of conformity for model PP7024 in the instruction booklet for the POA1 control unit. Nice S.p.a. Oderzo TV Italia Via Pezza Alta, 13 Z.I. Rustignè Tel Fax info@niceforyou.com Nice Padova Sarmeola I Tel Fax info.pd@niceforyou.com Nice Roma I Tel Fax info.roma@niceforyou.com Nice Belgium Leuven (Heverlee) B Tel. +32.(0) Fax +32.(0) info@nicebelgium.be Nice España Madrid E Tel Fax kamarautom@nexo.es Nice France Buchelay F Tel. +33.(0) Fax +33.(0) info@nicefrance.fr Nice France Sud Aubagne F Tel. +33.(0) Fax +33.(0) info.marseille@nicefrance.fr Nice Rhône-Alpes Decines Charpieu F Tel. +33.(0) Fax +33.(0) info.lyon@nicefrance.fr Nice Polska Pruszków PL Tel Fax nice@nice.com.pl IST POP 4865 REV. 00
pop Actuator for swing gates Instructions and warnings for the fitter istruzioni e avvertenze per l installatore
 Actuator for swing gates pop Instructions and warnings for the fitter istruzioni e avvertenze per l installatore Instructions et recommandations pour l installation Anweisungen und hinweise für den installateur
PS124 Instructions and warnings for the fitter
 buffer battery PS124 Instructions and warnings for the fitter Istruzioni ed avvertenze per l installatore Instructions et recommandations pour l installateur Anweisungen und Hinweise für den Installateur
kio Key-operated selector switch with cord-type release Instructions and warnings for the fitter istruzioni e avvertenze per l installatore
 Key-operated selector switch with cord-type release kio Instructions and warnings for the fitter istruzioni e avvertenze per l installatore Instructions et recommandations pour l installation Anweisungen
Moonbus. MOFB-MOFOB photocells. Instructions and warnings for the fitter. Istruzioni ed avvertenze per l installatore
 MOFB-MOFOB photocells Moonbus Instructions and warnings for the fitter Istruzioni ed avvertenze per l installatore Instructions et recommandations pour l installateur Anweisungen und Hinweise für den Installateur
wingo gearmotor for swing gates Instructions and warnings for the fitter Istruzioni e avvertenze per l installatore
 gearmotor for swing gates wingo Instructions and warnings for the fitter Istruzioni e avvertenze per l installatore Instructions et recommandations pour l installation Anweisungen und hinweise für den
smu Instructions and warnings for users
 control units smu Instructions and warnings for users Istruzioni ed avvertenze per l utilizzatore Instructions et recommandations pour l'utilisateur Anweisungen und Hinweise für den Benutzer Instrucciones
SMXI SMXIS. Radio receiver. Installation instructions. Istruzioni per l installazione. Instructions pour l installation. Installationenleitungen
 Radio receiver SMXI SMXIS Installation instructions Istruzioni per l installazione Instructions pour l installation Installationenleitungen Instrucciones para la installación Instrukcja instalowania 1
moby gearmotor for swing gates Instructions and warnings for the fitter Istruzioni e avvertenze per l installatore
 gearmotor for swing gates moby Instructions and warnings for the fitter Istruzioni e avvertenze per l installatore Instructions et recommandations pour l installation Anweisungen und hinweise für den installateur
rondo Electromechanical gearmotor for the automation of balanced rolling gates Instructions and warnings for the fitter
 Electromechanical gearmotor for the automation of balanced rolling gates rondo Instructions and warnings for the fitter istruzioni e avvertenze per l installatore Instructions et recommandations pour l
MASTER220. Importer Nice-Polska Sp. z o.o Pruszków ul. Parzniewska 2A Tel Wyprodukowane przez grupę Nice
 MASTER220 Importer Nice-Polska Sp. z o.o. 05-800 Pruszków ul. Parzniewska 2A Tel. +48 22 759 40 00 Wyprodukowane przez grupę Nice 1 - INFORMACJE OGÓLNE 1A - OSTRZEŻENIA Niewypełnienie poniższych wskazówek
Pop. For swing gates. Instructions and warnings for the fitter. Istruzioni e avvertenze per l installatore
 For swing gates Pop Instructions and warnings for the fitter Istruzioni e avvertenze per l installatore Instructions et recommandations pour l installation Anweisungen und hinweise für den installateur
wingo gearmotor for swing gates Instructions and warnings for the fitter Istruzioni e avvertenze per l installatore
 gearmotor for swing gates wingo Instructions and warnings for the fitter Istruzioni e avvertenze per l installatore Instructions et recommandations pour l installation Anweisungen und hinweise für den
gearmotor for swing gates wingo Instrukcja dla instalatora
 gearmotor for swing gates wingo Instrukcja dla instalatora 1 97mm 85 47 350 771mm 2 3 30mm 4 50 44 52 53 5 33 45 24 51 6 PMDPA 4610 PLA 7 WINGO rif. mod. art. 1 BMGWPA 34567 2 BMGWPB 34567 3 BMGWAA 4610
1) Ostrzeżenia. 2) Opis produktu i przeznaczenie. 3) Instalowanie. 4) Próby odbiorcze. Tabela 1
 Ostrzeżenia. 2) Opis produktu i przeznaczenie. 3) Instalowanie. 4) Próby odbiorcze. Tabela 1") Photocells F210 Installation instructions and warnings Istruzioni ed avvertenze per l installatore Instructions et avertissements pour l'installateur Anweisungen und Hinweise für den Installateur Instrucciones
Photocells F210 Installation instructions and warnings Istruzioni ed avvertenze per l installatore Instructions et avertissements pour l'installateur Anweisungen und Hinweise für den Installateur Instrucciones
neostar A For roller shutters and awnings - Instructions and warnings for the fitter
 tubular motor neostar A For roller shutters and awnings - Instructions and warnings for the fitter Per tapparelle e tende - Istruzioni ed avvertenze per l installatore Pour volets roulants et stores -
F Photocells
 Photocells F210 Installation instructions and warnings Istruzioni ed avvertenze per l installatore Instructions et avertissements pour l'installateur Anweisungen und Hinweise für den Installateur Instrucciones
neostar T Instructions and warnings for the fitter
 tubular motor neostar T Instructions and warnings for the fitter Istruzioni ed avvertenze per l installatore Instructions et recommandations pour l installateur Anweisungen und Hinweise für den Installateur
neostar T Instructions and warnings for the fitter
 tubular motor neostar T Instructions and warnings for the fitter Istruzioni ed avvertenze per l installatore Instructions et recommandations pour l installateur Anweisungen und Hinweise für den Installateur
IB Instructions and warnings for the fitter
 control unit IB Instructions and warnings for the fitter Istruzioni ed avvertenze per l installatore Instructions et recommandations pour l installateur Anweisungen und Hinweise für den Installateur Instrucciones
neostar A For roller shutters and awnings - Instructions and warnings for the fitter
 tubular motor neostar A For roller shutters and awnings - Instructions and warnings for the fitter Per tapparelle e tende - Istruzioni ed avvertenze per l installatore Pour volets roulants et stores -
TT3 Instructions and warnings for the fitter
 control units TT3 Instructions and warnings for the fitter Istruzioni ed avvertenze per l installatore Instructions et recommandations pour l installateur Anweisungen und Hinweise für den Installateur
rondo Electromechanical gearmotor for the automation of balanced rolling gates Instructions and warnings for the fitter
 Electromechanical gearmotor for the automation of balanced rolling gates rondo Instructions and warnings for the fitter istruzioni e avvertenze per l installatore Instructions et recommandations pour l
smxi odbiornik radiowy
 smxi odbiornik radiowy Opis produktu: W centrali A400 jest już zamontowany odbiornik radiowy do nadajników ze zmiennym kodem rolling kode z serii FLOR i VERY VR produkowanych przez Nice. Cechą charakterystyczną
control units mindy TT0 Instrukcje i uwagidla instalatora
 control units mindy TT0 Instrukcje i uwagidla instalatora Uwagi Centrala Mindy TT0 jest przeznaczona do kierowania jednofazowymi silnikami asynchronicznymi zasilanymi napięciem sieciowym, przeznaczonymi
TT3 Instructions and warnings for the fitter
 control units TT3 Instructions and warnings for the fitter Istruzioni ed avvertenze per l installatore Instructions et recommandations pour l installateur Anweisungen und Hinweise für den Installateur
DBM5 DBM7,5 DBM10. connecting device. Instructions and warnings for the fitter. Istruzioni ed avvertenze per l installatore
 connecting device DBM5 DBM7,5 DBM10 Instructions and warnings for the fitter Istruzioni ed avvertenze per l installatore Instructions et recommandations pour l installateur Anweisungen und Hinweise für
DBM5 DBM7,5 DBM10 connecting device Instructions and warnings for the fitter Istruzioni ed avvertenze per l installatore
 connecting device DBM5 DBM7,5 DBM10 Instructions and warnings for the fitter Istruzioni ed avvertenze per l installatore Instructions et recommandations pour l installateur Anweisungen und Hinweise für
1 274 H H= 90mm
 MASTER600 1 274 H 325 185 H= 90mm 2 3 4 5 6 7 2mm 9 8 10 11 TYPOWE ZASTOSOWANIE siłownik lampa a fotokomórki kolumna przełącznik kluczykowy krańcówki listwa zębata tabliczka ostrzegawcza odbojnik DANE
gearmotor for swing gates moby Instrukcja dla instalatora
 gearmotor for swing gates moby Instrukcja dla instalatora 1 110 110mm 4 Y 803mm (series 5000 L=953) 2 3 4 5 34 4 60 56 6 PLA 6 PLA series 4000 PLA 8 series 5000 PLA 10 PLA 11 MB4005 - MB4006 rif. mod.
gearmotor for swing gates wingo Instrukcja dla instalatora
 gearmotor for swing gates wingo Instrukcja dla instalatora 1 97mm 85 47 350 771mm 2 3 30mm 4 50 44 52 53 5 33 45 24 51 6 PMDPA 4610 PLA 7 WINGO rif. mod. art. 1 BMGWPA 34567 2 BMGWPB 34567 3 BMGWAA 4610
Jet. Siłownik do bram skrzydłowych. PL INSTRUKCJA OBSŁUGI
 Jet Siłownik do bram skrzydłowych PL INSTRUKCJA OBSŁUGI 1 - OSTRZEśENIA 4 - WYKRES INSTALACJI WSPORNIKA Niezastosowanie się do niŝej wymienionych instrukcji spowoduje zwolnienie firmy Nice SpA, właściciela
spido gearmotor for sectional doors and overhead spring or counterweight up-and-over doors instructions and warnings for the fitter
 gearmotor for sectional doors and overhead spring or counterweight up-and-over doors spido instructions and warnings for the fitter istruzioni e avvertenze per l installatore Instructions et recommandations
VULCAN. DOKUMENTACJA TECHNICZNO-RUCHOWA v. 1.1 ( )
") VULCAN PODZIEMNY, NIEODWRACALNY, ELEKTROMECHANICZNY MOTOREDUKTOR DO BRAM SKRZYDŁOWYCH. DOKUMENTACJA TECHNICZNO-RUCHOWA v. 1.1 (03.12.2010) WAŻNE UWAGI V2 S.p.A. zastrzega sobie prawo do wprowadzania ewentualnych
VULCAN PODZIEMNY, NIEODWRACALNY, ELEKTROMECHANICZNY MOTOREDUKTOR DO BRAM SKRZYDŁOWYCH. DOKUMENTACJA TECHNICZNO-RUCHOWA v. 1.1 (03.12.2010) WAŻNE UWAGI V2 S.p.A. zastrzega sobie prawo do wprowadzania ewentualnych
volo s-radio Instructions and warnings for the fitter
 climatic sensor volo s-radio Instructions and warnings for the fitter Istruzioni ed avvertenze per l installatore Instructions et recommandations pour l installateur Anweisungen und Hinweisefür den Installateur
neomat H Instructions and warnings for the fitter
 tubular motor neomat H Instructions and warnings for the fitter Istruzioni ed avvertenze per l installatore Instructions et recommandations pour l installateur Anweisungen und Hinweise für den Installateur
mindy A01 Instructions and warnings for the fitter
 control units mindy A01 Instructions and warnings for the fitter Istruzioni ed avvertenze per l installatore Instructions et recommandations pour l installateur Anweisungen und Hinweise für den Installateur
robo,thor control units Instructions and warnings for the fitter Istruzioni ed avvertenze per l installatore
 control units robo,thor Instructions and warnings for the fitter Istruzioni ed avvertenze per l installatore Instructions et recommandations pour l installateur Anweisungen und Hinweise für den Installateur
tubular motor neoplus Instrukcje i uwagi dla instalatora
 tubular motor neoplus Instrukcje i uwagi dla instalatora NEOPLUS jest produktem firmy Motus S.p.a. (TV). ERGO i PLANO są produktem firmy Nice S.p.a.(TV) Włochy a Motus S.p.a jest spółką należącą do grupy
neoplus Instructions and warnings for the fitter
 tubular motor neoplus Instructions and warnings for the fitter Istruzioni ed avvertenze per l installatore Instructions et recommandations pour l installateur Anweisungen und Hinweise für den Installateur
mindy A01 Instructions and warnings for the fitter
 control units mindy A01 Instructions and warnings for the fitter Istruzioni ed avvertenze per l installatore Instructions et recommandations pour l installateur Anweisungen und Hinweise für den Installateur
neoplus Instructions and warnings for the fitter
 tubular motor neoplus Instructions and warnings for the fitter Istruzioni ed avvertenze per l installatore Instructions et recommandations pour l installateur Anweisungen und Hinweise für den Installateur
Moonbus. MOFB-MOFOB photocells
 MOFB-MOFOB photocells Moonbus Instructions and warnings for the fitter Istruzioni ed avvertenze per l installatore Instructions et recommandations pour l installateur Anweisungen und Hinweise für den Installateur
wingo gearmotor for swing gates Instructions and warnings for the fitter Istruzioni e avvertenze per l installatore
 gearmotor for swing gates wingo Instructions and warnings for the fitter Istruzioni e avvertenze per l installatore Instructions et recommandations pour l installation Anweisungen und hinweise für den
mindya60 Installation instructions
 control units mindya60 Installation instructions Istruzioni per l installazione Instructions pour l installation Installationenleitungen Instrucciones para la installación Instrukcja instalowania mindy
mindya60 Installation instructions
 control units mindya60 Installation instructions Istruzioni per l installazione Instructions pour l installation Installationenleitungen Instrucciones para la installación Instrukcja instalowania mindy
AXIL. DOKUMENTACJA TECHNICZNO-RUCHOWA v. 1.2 ( )
") AXIL ELEKTROMECHANICZNY, NIEODWRACALNY SIŁOWNIK DO BRAM SKRZYDŁOWYCH DOKUMENTACJA TECHNICZNO-RUCHOWA v. 1.2 (04.12.2009) WAŻNE UWAGI V2 S.p.A. zastrzega sobie prawo do wprowadzania ewentualnych zmian w
AXIL ELEKTROMECHANICZNY, NIEODWRACALNY SIŁOWNIK DO BRAM SKRZYDŁOWYCH DOKUMENTACJA TECHNICZNO-RUCHOWA v. 1.2 (04.12.2009) WAŻNE UWAGI V2 S.p.A. zastrzega sobie prawo do wprowadzania ewentualnych zmian w
volo s-radio Instructions and warnings for the fitter
 climatic sensor volo s-radio Instructions and warnings for the fitter Istruzioni ed avvertenze per l installatore Instructions et recommandations pour l installateur Anweisungen und Hinweisefür den Installateur
Tub. For industrial sliding doors. Instructions and warnings for the fitter. Istruzioni ed avvertenze per l installatore
 For industrial sliding doors Tub Instructions and warnings for the fitter Istruzioni ed avvertenze per l installatore Instructions et recommandations pour l installateur Anweisungen und Hinweise für den
neomat A Instructions and warnings for the fitter
 tubular motor neomat A Instructions and warnings for the fitter Istruzioni ed avvertenze per l installatore Instructions et recommandations pour l installateur Anweisungen und Hinweise für den Installateur
PW200 Elektromechaniczny siłownik bram skrzydłowych
 PW200 Elektromechaniczny siłownik bram skrzydłowych Instrukcja instalacji MIWI-URMET Sp. z o.o. 91-341 Łódź, ul. Pojezierska 90A Tel. 042 616 21 00, fax 042 616 21 13 e-mail: miwi@miwiurmet.pl, web: http://www.miwiurmet.pl
INSTRUKCJA INSTALACJI I OBSŁUGI AUTOMATYKI DO BRAM
 Instrukcja instalacji i obsługi automatyki do bram skrzydłowych INSTRUKCJA INSTALACJI I OBSŁUGI AUTOMATYKI DO BRAM max PRZESUWNYCH długość skrzydła O 3m MAX. ( R20/310M) WADZE lub 450 4 m KG ( R20/510M)
Tabela 1 Fotokomórka FOTO FOTO II FOTO 1 FOTO 1 II. FA1 (przyciąć mostek A na TX i RX, jak na rysunku. 6)
") Photocells F210B Instructions and warnings for the fitter Istruzioni ed avvertenze per l installatore Instructions et recommandations pour l installateur Anweisungen und Hinweise für den Installateur Instrucciones
Photocells F210B Instructions and warnings for the fitter Istruzioni ed avvertenze per l installatore Instructions et recommandations pour l installateur Anweisungen und Hinweise für den Installateur Instrucciones
gearmotor for sectional doors and overhead spring or counterweight up-and-over doors spido Instrukcja instalowania
 gearmotor for sectional doors and overhead spring or counterweight up-and-over doors spido Instrukcja instalowania 1 2 16 SPA2 SPA4 SPA21 (max 2 pz) SPIDO 230V~ - SPIDO 110V~ rif. mod. art. 1 PPD0124 4540
DICHIARAZIONE DI CONFORMITA DECLARATION OF CONFORMITY
 DICHIARAZIONE DI CONFORMITA DECLARATION OF CONFORMITY GAS APPLIANCES Tipo prodotto / product name BS 24 CF Codice comm.le e nome del modello / commercial code and models name ARISTON Marchio comm..le /
SMX2 SMX2R. Radio receiver. Instructions and warnings for the fitter. Istruzioni ed avvertenze per l installatore
 Radio receiver SMX2 SMX2R Instructions and warnings for the fitter Istruzioni ed avvertenze per l installatore Instructions et recommandations pour l installateur Anweisungen und Hinweise für den Installateur
FT210. Optical Device
 FT210 Optical Device Installation instructions and warnings Istruzioni ed avvertenze per l installatore Instructions et avertissements pour l'installateur Anweisungen und Hinweise für den Installateur
A5L Elektromechaniczny siłownik bram skrzydłowych
 A5L Elektromechaniczny siłownik bram skrzydłowych Instrukcja instalacji MIWI-URMET Sp. z o.o. 91-341 Łódź, ul. Pojezierska 90A Tel. 042 616 21 00, fax 042 616 21 13 e-mail: miwi@miwiurmet.pl, web: http://www.miwiurmet.pl
F210S. Optical Device
 F210S Optical Device Installation instructions and warnings Istruzioni ed avvertenze per l installatore Instructions et avertissements pour l'installateur Anweisungen und Hinweise für den Installateur
KRONO. Dokumentacja techniczna 10 Akt. 0.2 CAME 02/98 319M43. Automatyka zewnętrzna do bram dwuskrzydłowych
 KRONO Automatyka zewnętrzna do bram dwuskrzydłowych Dokumentacja techniczna 10 Akt. 0.2 CAME 02/98 319M43 Instalacja typowa: 1) Zespół silnikowy lewy 2) Zespół silnikowy prawy 3) Sterownik 4) Odbiornik
robo, thor, otto control unit Instructions and warnings for the fitter Istruzioni ed avvertenze per l installatore
 control unit robo, thor, otto Instructions and warnings for the fitter Istruzioni ed avvertenze per l installatore Instructions et recommandations pour l installateur Anweisungen und Hinweise für den Installateur
Metro. For swing gates. Instructions and warnings for the fitter. Istruzioni ed avvertenze per l installatore
 For swing gates Metro Instructions and warnings for the fitter Istruzioni ed avvertenze per l installatore Instructions et recommandations pour l installateur Anweisungen und Hinweise für den Installateur
Mindy A500. control unit. Instructions and warnings for the fitter. Istruzioni ed avvertenze per l installatore
 control unit Mindy A00 Instructions and warnings for the fitter Istruzioni ed avvertenze per l installatore Instructions et recommandations pour l installateur Anweisungen und Hinweise für den Installateur
control electronics spido Instrukcje dla instalatora
 control electronics spido Instrukcje dla instalatora APRE OPEN OUVRE FFNET ABRE OTWIERA CHIUDE CLOSE FERME SCHLIE T CIERRA ZAMYKA RADIO LED OK PP 3 4 LUCY 24 TX 1 2 3 4 5 6 7 8 910 12 12345 5a LUCY 24
control electronics spido Instrukcje dla instalatora
 control electronics spido Instrukcje dla instalatora APRE OPEN OUVRE FFNET ABRE OTWIERA CHIUDE CLOSE FERME SCHLIE T CIERRA ZAMYKA RADIO LED OK PP 3 4 LUCY 24 TX 5a 6a LUCY 24 ALT NC LUCY 24 TX 1 2 3 4
neomat Instructions and warnings for the fitter
 tubular motor neomat Instructions and warnings for the fitter Istruzioni ed avvertenze per l installatore Instructions et recommandations pour l installateur Anweisungen und Hinweise für den Installateur
control units mindy A400 Instrukcja dla instalatora
 control units mindy A400 Instrukcja dla instalatora mindy A400 Spis: pag. pag. 1 Opis produktu 93 2 Instalowanie 93 2.1 Kontrola wstępna 93 2.2 Mocowanie centrali A400 94 2.3 Urządzenie typowe 94 2.4 Połączenia
mindy A400 Instrukcja dla instalatora
 control units mindy A400 Instrukcja dla instalatora mindy A400 Spis: pag. pag. 1 Opis produktu 93 2 Instalowanie 93 2.1 Kontrola wstępna 93 2.2 Mocowanie centrali A400 94 2.3 Urządzenie typowe 94 2.4 Połączenia
DS1. Radio command digital selector PUK CODE
 DS1 Radio command digital selector PUK CODE Use and installation instructions and warnings Istruzioni ed avvertenze per l 'installazione e l'uso Instructions et recommandations pour l installation et l
DS1 Radio command digital selector PUK CODE
 DS1 Radio command digital selector PUK CODE Use and installation instructions and warnings Istruzioni ed avvertenze per l 'installazione e l'uso Instructions et recommandations pour l installation et l
TECHNO Instrukcja montażu i użytkowania
 TECHNO Siłownik elektromechaniczny do bram skrzydłowych Instrukcja montażu i użytkowania Wymiary: Dane techniczne: W komplecie: 1. Siłownik lewy lub prawy 2. Uchwyt montażowy do słupka 3. Uchwyt montażowy
Mindy A01. Control units. EN - Instructions and warnings for installation and use. IT - Istruzioni ed avvertenze per l installazione e l uso
 Mindy A01 Control units EN - Instructions and warnings for installation and use IT - Istruzioni ed avvertenze per l installazione e l uso FR - Instructions et avertissements pour l installation et l utilisation
Dynamos. Siłownik do bram przesuwnych PL INSTRUKCJA OBSŁUGI
 Dynamos Siłownik do bram przesuwnych PL INSTRUKCJA OBSŁUGI OSTRZEŻENIA -sprawdź czy usunięto ręczne zabezpieczenia będące na wyposażeniu bramy -przed pierwszym uruchomieniem sprawdź czy automat został
mindy TT1V control units Instructions and warnings for the fitter Istruzioni ed avvertenze per l installatore
 control units mindy TT1V Instructions and warnings for the fitter Istruzioni ed avvertenze per l installatore Instructions et recommandations pour l installateur Anweisungen und Hinweise für den Installateur
TCB65. sensitive edge. Instructions and warnings for the fitter. Istruzioni ed avvertenze per l installatore
 sensitive edge TCB65 Instructions and warnings for the fitter Istruzioni ed avvertenze per l installatore Instructions et recommandations pour l installateur Anweisungen und Hinweise für den Installateur
SMX2 SMX2R. Radio receiver. Instructions and warnings for the fitter. Istruzioni ed avvertenze per l installatore
 Radio receiver SMX2 SMX2R Instructions and warnings for the fitter Istruzioni ed avvertenze per l installatore Instructions et recommandations pour l installateur Anweisungen und Hinweise für den Installateur
Mindy A control unit. Instructions and warnings for the fitter. Istruzioni ed avvertenze per l installatore
 control unit Mindy A00 Instructions and warnings for the fitter Istruzioni ed avvertenze per l installatore Instructions et recommandations pour l installateur Anweisungen und Hinweise für den Installateur
control units mindya500 Instrukcja instalowania
 control units mindya00 Instrukcja instalowania mindy A00 Spis: Opis produktu Instalowanie. Instrukcje instalowania. Selekcja napięcia zasilania. Opis połączeń. wagi związane z połączeniami Próby odbiorcze
mindya500 Instrukcja instalowania
 control units mindya00 Instrukcja instalowania mindy A00 Spis: Opis produktu Instalowanie. Instrukcje instalowania. Selekcja napięcia zasilania. Opis połączeń. wagi związane z połączeniami Próby odbiorcze
Seria ATI ATI. Siłownik naziemny do bram skrzydłowych. Wykonanie standardowe. Charakterystyka ogólna
 Seria ATI ATI Dokumentacja techniczna 119D49 Siłownik naziemny do bram skrzydłowych ykonanie standardowe 1 - siłownik ATI yposażenie 2 centrala sterująca 3 karta odbiornika radiowego 4 fotokomórki bezpieczeństwa
planotime remote controls Instructions and warnings for the fitter istruzioni e avvertenze per l installatore
 remote controls planotime Instructions and warnings for the fitter istruzioni e avvertenze per l installatore Instructions et recommandations pour l installation Anweisungen und hinweise für den installateur
control units mindy A400 Instrukcja dla instalatora
 control units mindy A400 Instrukcja dla instalatora mindy A400 Spis: pag. pag. 1 Opis produktu 93 2 Instalowanie 93 2.1 Kontrola wstępna 93 2.2 Mocowanie centrali A400 94 2.3 Instalacja typowa 94 2.4 Połączenia
TT4 - TT5. Control unit
 Control unit TT4 - TT5 Instructions and warnings for the fitter Istruzioni ed avvertenze per l installatore Instructions et recommandations pour l installateur Anweisungen und Hinweise für den Installateur
TT4 - TT5. Control unit
 Control unit TT4 - TT5 Instructions and warnings for the fitter Istruzioni ed avvertenze per l installatore Instructions et recommandations pour l installateur Anweisungen und Hinweise für den Installateur
DEKLARACJA ZGODNOŚCI CE
 TŁUMACZENIE DEKLARACJA ZGODNOŚCI CE GAZOWE POJEMNOŚCIOWE PODGRZEWACZE WODY NAZWA / MODEL: patrz tabela MARKA: ARISTON Merloni Termosanitari SpA oświadcza z pełną odpowiedzialnością, że wymienione powyżej
FT210B. Optical Device
 FT210B Optical Device Installation instructions and warnings Istruzioni ed avvertenze per l installatore Instructions et avertissements pour l'installateur Anweisungen und Hinweise für den Installateur
SPIS TREŚCI 1. OPIS I CHARAKTERYSTYKA TECHNICZNA 2. INSTALACJA 3. DZIAŁANIE 4. DZIAŁANIE MANUALNE 5. SZCZEGÓLNE ZASTOSOWANIA 6. KONSERWACJA 7.
 SEVEN SPIS TREŚCI 1. OPIS I CHARAKTERYSTYKA TECHNICZNA 2. INSTALACJA 3. DZIAŁANIE 4. DZIAŁANIE MANUALNE 5. SZCZEGÓLNE ZASTOSOWANIA 6. KONSERWACJA 7. NAPRAWA 1 Napęd SEVEN stosowany jest do bram przesuwnych
mindy A100F control units Instructions and warnings for the fitter Istruzioni ed avvertenze per l installatore
 control units mindy A0F Instructions and warnings for the fitter Istruzioni ed avvertenze per l installatore Instructions et recommandations pour l installateur Anweisungen und Hinweise für den Installateur
LASER Instrukcja montażu i użytkowania LASER
 LASER Napęd do bram przesuwnych Instrukcja montażu i użytkowania Wymiary: Dane techniczne: W komplecie: 1. Korpus napędu z pokrywą. 7. Wkręty 3,5/19 do pokrywy 4 szt. 2. Podstawa montażowa. 8. Sprężyna
SPIS TREŚCI. 1 Uwagi dotyczące bezpieczeństwa. 3 Kontrole wstępne. 6 Instrukcje i ostrzeżenia dla użytkownika końcowego. 7 Deklaracja zgodności WE
 Istruzioni ed avvertenze per l installazione e l uso Instructions and warnings for installation and use Instructions et avertissements pour l installation et l usage Instrucciones y advertencias para su
mindy TT1L control units Instructions and warnings for the fitter Istruzioni ed avvertenze per l installatore
 control units mindy TT1L Instructions and warnings for the fitter Istruzioni ed avvertenze per l installatore Instructions et recommandations pour l installateur Anweisungen und Hinweise für den Installateur
Mindy A924. control unit. Instructions and warnings for the fitter. Istruzioni ed avvertenze per l installatore
 control unit Mindy A924 Instructions and warnings for the fitter Istruzioni ed avvertenze per l installatore Instructions et recommandations pour l installateur Anweisungen und Hinweise für den Installateur
Nice TTN3724HS TTN3724RHS TTN6024HS TTN6024RHS
 Nice TTN3724HS TTN3724RHS TTN6024HS TTN6024RHS Do bram skrzydłowych PL - Instrukcje i ostrzeżenia na temat instalacji i użytkowania SPIS TREŚCI OGÓLNE OSTRZEŻENIA: BEZPIECZEŃSTWO - MONTAŻ - UŻYTKOWANIE
INSTRUKCJA MONTAŻU I OBSŁUGI MECHANIZMU STEROWANIA BRAMY PRZESUWNEJ VULCANO 1600
 INSTRUKCJA MONTAŻU I OBSŁUGI MECHANIZMU STEROWANIA BRAMY PRZESUWNEJ VULCANO 1600 UWAGA! Przed montażem i pierwszym użyciem należy bezwzględnie przeczytać niniejszą instrukcję. Instrukcja ta stanowi integralny
Instrukcja instalacji i obsługi automatyki brushless do bram skrzydłowych BE20 INSTRUKCJA INSTALACJI I OBSŁUGI AUTOMATYKI DO BRAM STERUJĄCĄ H70/103AC
 Instrukcja instalacji i obsługi automatyki brushless do bram skrzydłowych BE20 INSTRUKCJA INSTALACJI I OBSŁUGI AUTOMATYKI DO BRAM PRZESUWNYCH max długość skrzydła O MAX. 2,5 WADZE m 450 KG z NA enkoderem
EL 3024 INSTRUKCJA MONTAŻU
 Bariera drogowa EL 3024 INSTRUKCJA MONTAŻU PRZYKŁADOWA INSTALACJA Legenda: 1. Bariera drogowa 2. Centrala sterująca 3. Bariera podczerwieni 4. Bezpiecznik 5. Kolumna 1200mm z włącznikiem kluczykowym 6.
Informacja techniczna
 pl Informacja techniczna Zestaw rozszerzający LK nr art. 4918 146 004 0 Zestaw wymienny LK nr art. 4918 146 006 0 Zastosowanie zgodne z przeznaczeniem Becker-Antriebe GmbH Friedrich-Ebert-Straße 2-4 35764