neostar T Instructions and warnings for the fitter
|
|
|
- Barbara Adamska
- 6 lat temu
- Przeglądów:
Transkrypt
1 tubular motor neostar T Instructions and warnings for the fitter Istruzioni ed avvertenze per l installatore Instructions et recommandations pour l installateur Anweisungen und Hinweise für den Installateur Instrucciones y advertencias para el instalador Instrukcje i uwagi dla instalatora
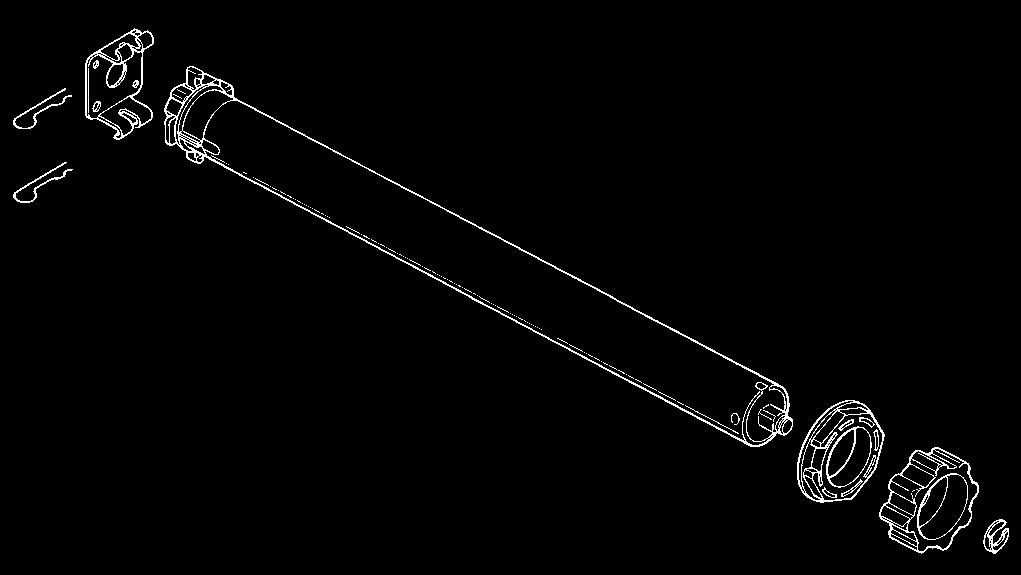
2 NEOSTAR_T jest produktem firmy Motus S.p.a. (TV) z Włoch. Motus S.p.a. jest spółką należącą do grupy Nice S.p.a. Ostrzeżenia: Silniki z serii NEOSTAR służą do automatyzacji ruchu zasłon słonecznych; każde inne ich zastosowanie jest nieprawidłowe i zabronione. Silniki przeznaczone są do użytku w zespołach mieszkaniowych; czas pracy ciągłej przewidziany jest na 4 minuty w cyklu 20%. Przy wyborze typu silnika w stosunku do zastosowania naakleży brać pod uwagę moment nomunalnyy i czas funkcjonowania umieszczone na tabliczce znamionowej. Minimalna średnica rury, gdzie silnik może zostać zainstalowany, ma wynosić 40mm dla NEOSTAR ST; 52mm dla NEOSTAR MT i 70mm dla NEOSTAR LT. Instalacja musi być wykonana przez personel techniczny i zgodnie z normami bezpieczeństwa. Minimalna wysokość instalowania to 2,5 m od ziemi lub od podłogi z możliwością łatwego dostępu. Minimalna odległość w poziomie od maksymalnego punktu otwarcia zasłony do jakiegokolwiek przedmiotu stałego nie może być mniejsza od 0,4 m. W urządzeniach montowanych na zewnątrz przewód zasilający z PCV zainstalować wewnątrz kanalika zabezpieczającego. Chronić silnik przed zgnieceniem, uderzeniem, spadnięciem lub kontaktem z płynami jakiegokolwiek rodzaju; nie dziurawić i nie wkręcać śrub na całej długości rury; nie używać więcej przełączników sterowania do tego samego silnika (rys.1). Przed wykonaniem czynności konserwacyjnych lub napraw zwrócić się do personelu technicznego. 1) Opis produktu Silniki z serii NEOSTAR ST 35mm, NEOSTAR MT ø45mm (rys. 2) i NEOSTAR LT ø58mm posiadaj ą elektroniczny wyłącznik krańcowy o dużej precyzji, który w sposób ciągły odczytuje pozycję zasłony. W fazie programowania wpisuje się położenia graniczne: zasłony zamkniętej i zasłony otwartej; ruch zatrzyma się automatycznie po dojściu do tych dwóch pozycji. Elektroniczny wyłącznik krańcowy jest w stanie skompensować ewentualne wydłużenia płótna (funkcja CAT ) gwarantując perfekcyjne zamykanie skrzyni i zapobiegając rozluźnieniu się płótna, kiedy jest otwarta. 2) Instalowanie Przygotować silnik według następującej sekwencji (rys. 4): 1. Wsunąć tuleję (E) na silnik (A) do momentu założenia jej na odpowiedni występ pierścienia (F). 2. Założyć adapter (D) na wał silnika. Mocowanie adaptera na silniku NEOSTAR ST jest automatyczne na zatrzask. 3. Przymocować adapter na silniku NEOSTAR MT pierścieniem sprężystym. Wsunąć tak złożony silnik do rury nawijania zasłony do momentu jej nasunięcia na tuleję (E). Przykręcić rurę do adaptera (D) śrubą M4x10 tak, aby uniknąć możliwych przesunięć osiowych silnika (rys. 5). 2.1) Połączenia elektryczne Silniki NEOSTAR_T mogą być zaprogramowane do redukcji momentu RDC, zmniejszając o około 50% moment silnika na krótko przed całkowitym zamknięciem się zasłony unikając w ten sposób nadmiernego naciągnięcia płótna. NEOSTAR_T posiada również funkcję poluzowania RDT, która zmniejsza naciągnięcie płótna po zakończeniu ruchu zamykania, w taki sposób, aby płótno nie pozostało nadmiernie naciągnięte przez dłuższy okres. Funkcje CAT, RDC i RDT zostały opracowane do symulacji zachowania osoby, która ręcznie, ostrożnie i starannie odwija i zawija zasłonę. Rysunek 3 A: Silnik rurowy NEOSTAR_T B: Haczyk lub zawleczka do przymocowania C: Wspornik i część dystansowa D: adapter napędowy E: Tuleja luźna F: Pierścień luźny Na koniec zablokować głowicę silnika we wsporniku (C), z ewentualną częścią dystansową, haczykami lub zawleczkami (B).! UWAGA: podczas programowania należy zastosować przełącznik sterowania, który pozwoli na realizację fazy wzniesienia i obniżenia zasłony; jako alternatywę, można zastosować do programowania odpowiednią jednostkę sterującą TTU i zamienić później z przełącznikiem sterowania ostatecznego.! UWAGA: przy podłączeniu silnika należy zastosować wyłącznik wielobiegunowy do odłączenia od sieci elektrycznej, gdzie odległość pomiędzy stykami ma wynosić co najmniej 3 mm (wyłącznik sekcyjny lub gniazdo i wtyczka, itp.)! UWAGA: skrupulatnie przestrzegać przewidzianych połączeń; w wypadku niepewności nie próbować ale zapoznać się z odpowiednimi szczegółowymi kartami technicznymi, które dostępne są na stronie internetowej: Błędne wykonanie połączeń może spowodować uszkodzenie i stworzyć niebezpieczne sytuacje. Przewód do połączeń elektrycznych silnika NEOSTAR_T posiada 4 żyły: fazową ruchu wzniesienia, obniżenia, Wspólną (zwykle podłączoną do neutralnego) i Uziemienie (połączenie dla zabezpieczenia przed porażeniem). Zastosowany został prosty silnik z elektromechanicznymi wyłącznikami krańcowymi (rys. 6); w NEOSTAR_T zastosowany będzie system elektronicznego wyłącznika krańcowego, z możliwością zaprogramowania, do zatrzymania silnika w żądanych pozycjach. Brązowy = faza elektryczna wzniesienia (otwierania) Czarny = faza elektryczna obniżania (zawijania) Niebieski = Wspólny Żółtozielony = Uziemienie NEOSTAR_T TTU 22
3 Fazy elektryczne silnika wzniesienia i obniżenia są zamienne, ponieważ pierwsza faza obraca silnikiem w jednym kierunku a druga faza w drugim kierunku. Wzniesienie i obniżenie zależy sposobu założenia silnika w rurze nawijania. System elektronicznego wyłącznika krańcowego ustala i dostosowuje fazę elektryczną wzniesienia tylko podczas fazy programowania. Przypomina się, że dla systemu elektronicznego wyłącznika krańcowego ruchy obniżania i wzniesienia nie są takie same; na przykład, redukcja momentu RDC odbywa się tylko w ruchu wzniesienia. Po czynności programowania możliwe jest wykonanie połączenia w sposób równoległy kilku silników NEOSTAR_T co pozwoli na zastosowanie tylko jednego przełącznika sterowania. 2.2) Łącznik i przewód zasilający (ten rozdział dotyczy tylko wersji NEOSTAR MT i jest przeznaczony dla techników serwisu obsługi)! UWAGA: gdy przewód zasilający jest uszkodzony należy go wymienić na identyczny dostępny u producenta lub w serwisie technicznym. Gdy zajdzie konieczność odłączenia silnika od przewodu zasilającego postąpić tak, jak wskazano na poniższych rysunkach. Przekręcić tuleją do momentu dopasowania nacięcia do jednego z ząbków zaczepu, po czym odczepić. 3) Regulacje Powtórzyć czynność dostosowania do następnego ząbka. Silniki rurowe z serii NEOSTAR_T posiadają elektroniczny wyłącznik krańcowy, który przerywa ruch kiedy zasłona osiągnie pozycje graniczne zamknięcia lub otwarcia, które odpowiadają zasłonie całkowicie zawiniętej (pozycja 0) lub otwartej (pozycja 1). Te dwie pozycje zapamiętane są w odpowiedniej fazie programowania, którą należy wykonać z silnikiem i z zasłoną już całkowicie zamontowaną. Gdy pozycje 0 i 1 nie zostały jeszcze zapisane sterowanie silnikiem Zgiąć przewód w kierunku do wnętrza i ściągnąć zabezpieczenie odkręcając delikatnie w kierunku na zewnątrz. jest również możliwe ale ruch jego zostanie chwilowo przerwany w początkowej fazie, później, po tym przerwaniu, ruch będzie kontynuowany bez przeszkód. Można także zaprogramować, lub nie, redukcję momentu RDC w ruchu zamykania. Pociągnąć i wyciągnąć łącze PL Zasłona zamknięta (pozycja 0) Zasłona otwarta (pozycja 1) Pozycja początku redukcji momentu RDC w ruchu zamykania 23
4 4) Programowanie Inwertor sterowania należy zastosować tylko do fazy programowania, służy on do uaktywnienia obu faz ruchu silnika. Do tego celu można zastosować także odpowiednią jednostkę sterowania TTU. Przycisk to ten, który podnosi zasłonę; to ten, który ją obniża. Gdy ruch odbędzie się w kierunku przeciwnym należy zmienić przewody elektryczne zasilania silnika. Gdy nie życzymy sobie uaktywnienia redukcji momentu RDC należy postąpić w następująco: Tabela A1 Programowanie pozycji 0 i 1 bez RDC (rys.7) Przykład 1. Przycisnąć i utrzymać pod naciskiem przycisk, który podnosi zasłonę. 2. Odczekać do momentu zatrzymania się silnika na wskutek ukończenia zwijania się zasłony (pozycja 0 ). Zwolnić przycisk. 3. Przycisnąć i utrzymać pod naciskiem przycisk, który obniża zasłonę. 4. Zwolnić przycisk, kiedy zasłona osiągnie żądaną pozycję ( 1 ). Gdy jest to konieczne, do wyregulowania pozycji należy przycisnąć więcej razy przyciski i. 5. Przycisnąć jednocześnie i utrzymać pod naciskiem oba przyciski i. 6. Odczekać około 3 sekund, na zakończenie krótkiego ruchu wzniesienia i obniżenia się zasłony do pozycji wcześniej zaprogramowanej. 7. Zwolnić oba przyciski i. Uwaga: jeśli w przyszłości chcemy wprowadzić redukcji momentu RDC należy wtedy wykasować pozycje 0 i 1 (patrz tabela A3) i powtórzyć programowanie z RDC (patrz tabela A2). Gdy wymagamy uaktywnienia redukcji momentu RDC, która działa tylko w ruchu wzniesienia kilka centymetrów przed pozycje 0, należy postępować następująco: Tabela A2 Programowanie pozycji 0 i 1 z RDC (rys. 8) Przykład 1. Przycisnąć i utrzymać pod naciskiem przycisk, który podnosi zasłonę. 2. Odczekać do momentu zatrzymania się silnika na wskutek ukończenia zwijania się zasłony (pozycja 0 ). 3. Przycisnąć jednocześnie przycisk wzniesienia i przycisk obniżenia. 4. Odczekać do momentu zakończenia krótkiego ruchu obniżania zasłony. 5. Zwolnić dwa przyciski i. 6. Przycisnąć i utrzymać pod naciskiem przycisk, który obniża zasłonę. 7. Zwolnić przycisk, kiedy zasłona osiągnie żądaną pozycję ( 1 ). Gdy jest to konieczne, dodatkowo wyregulować pozycję przycisnąć więcej razy przyciski i. 8. Przycisnąć razem i utrzymać pod naciskiem oba przyciski i. 9. Odczekać, około 3 sekund, na zakończenie krótkiego ruchu wzniesienia i obniżenia się zasłony do pozycji wcześniej zaprogramowanej. 10. Zwolnić oba przyciski i. Uwaga: gdyw przyszłości chcemy zrezygnować z redukcji momentu RDC należy wykasować obie pozycje (patrz tabela A3) i powtórzyć programowanie pozycji bez RDC (patrz tabela A1). 3s 3s Gdy silnik, już wcześniej zaprogramowany, zostanie zamontowany do innej zasłony należy skasować zapamiętane pozycje. Tabela A3 Kasowanie pozycji 0 i 1 i RDC (rys. 9) Przykład 1. Przycisnąć razem i utrzymać pod naciskiem oba przyciski i. 2. Odczekać, około 3 sekund, na zakończenie krótkiego ruchu wzniesienia i obniżenia się zasłony. 3. Zwolnić oba przyciski i. 3s Uwaga: kasowanie można wykonać wówczas gdy faza programowania pozycji została efektywnie zakończona; kontrola jest prosta ponieważ silnik obraca się w obu kierunkach bez krótkich przerw w początkowej fazie ruchu. 24
5 5) Co robić gdy... czyli pomoc w momentach gdy coś jest nie tak! W fazie wzniesienia, przed osiągnięciem pozycji 0 silnik zatrzymuje się i słychać, że wykonuje 3 krotną próbę startu. To objaw normalny: w momencie wzniesienia, kiedy odczytane zostanie przeciążenie to silnik wyłączy się na 1 sekundę i później wykonuje 3 krotną próbę startu aby zakończyć ruch. W fazie obniżania, przed osiągnięciem pozycji 1, silnik zatrzymuje się. To objaw normalny: przy obniżaniu, kiedy odczytane zostanie przeciążenie, silnik wyłączy się. Przy włączonym zasilaniu silnik nie porusza się. Wyeliminować interwencję zabezpieczenia termicznego, odczekując do momentu schłodzenia się silnika, sprawdzić czy wartości napięcia sieciowego odpowiadają wartościom wskazanym na tabliczce silnika: należy zmierzyć napięcie pomiędzy Wspólnym i fazą. Podłączyć zasilanie do ruchu w przeciwną stronę. Gdy silnik nadal nie startuje to prawdopodobnie istnieje uszkodzenie w centrali elektronicznego wyłącznika krańcowego lub w uzwojeniu silnika. W fazie obniżania silnik obraca się tylko przez 1/2 obrotu, w fazie wznoszenia wygląda na to, że porusza się regularnie. Należy zakończyć ruch wnoszenia tak, aby system wyłącznika krańcowego osiągnął swoją pozycję 0. 6) Charakterystyki techniczne silników rurowych NEOSTAR_T Napięcie zasilenia i częstotliwość : Patrz dane techniczne na etykietce przy każdym modelu Prąd i moc : Patrz dane techniczne na etykietce przy każdym modelu Moment i Prędkość : Patrz dane techniczne na etykietce przy każdym modelu Czas pracy stałej : maksymalnie 4 Cykl pracy : maksymalnie 20% Stopie ń zabezpieczenia : IP 44 Temperatura funkcjonowania : C Dokładność (rozdzielczość) wyłącznika krańcowego : Powyżej 0,55 (zależy od typu NEOSTAR_T) Nice S.p.A. rezerwuje sobie prawo do wprowadzania zmian w produktach w każdej chwili kiedy będzie uważała to za niezbędne. PL 25


6 1 NEOSTAR MT NEOSTAR ST 2 B 3 C F A E D B C F A E D 4 L N FUSE COM M NEOSTAR_T
 I and is identical of the corresponding model Axis Magis_T. Motus S.p.a. is a company of the Nice S.")

 / Low Voltage Directive (LVD) 89/336/CEE Direttiva Compatibilità Elettromagnetica (EMC) / Electromagnetic Compatibility")

7 Dichiarazione di conformità N : Axis Magis_T Rev 1 declaration of conformity NEOSTAR_T è prodotto da MOTUS S.p.a. (TV) ed è identico al corrispettivo modello Axis Magis_T. Motus S.p.a. è una società del gruppo Nice S.p.a. NEOSTAR_T is produced by Motus S.p.a. (TV) I and is identical of the corresponding model Axis Magis_T. Motus S.p.a. is a company of the Nice S.p.a. group MOTUS S.p.a. via Pezza Alta 13, Z.I. Rustignè - ODERZO - ITALY dichiara che il prodotto: Axis Magis_T / declares that the product: Axis Magis_T Motoriduttore per automatizzare tende da sole / Gearmotor for awning automation È conforme ai Requisiti Essenziali di Sicurezza delle Direttive: / Complies with the Essential Safety Requirements of Directives: 73/23/CEE Direttiva Bassa Tensione (LVD) / Low Voltage Directive (LVD) 89/336/CEE Direttiva Compatibilità Elettromagnetica (EMC) / Electromagnetic Compatibility (EMC) E risulta conforma a quanto previsto dalle norme e/o specifiche tecniche di prodotto: And complies with the following product standards and/or technical specifications: LVD: CEI EN ; EN ; IEC EMC: EN 55014; EN ; EN Data /date Amministratore Delegato / General Manager 21 Febbraio 2003 Lauro Buoro 27
8 Nice S.p.a. Oderzo TV Italia Via Pezza Alta, 13 Z.I. Rustignè Tel Fax Nice Padova Sarmeola I Tel Fax info.pd@niceforyou.com Nice Belgium Leuven (Heverlee) B Tel. +32.(0) Fax +32.(0) info@nicebelgium.be Nice España Madrid E Tel Fax kamarautom@nexo.es Nice France Sud Aubagne F Tel. +33.(0) Fax +33.(0) info.marseille@nicefrance.fr Nice Rhône-Alpes Decines Charpieu F Tel. +33.(0) Fax +33.(0) info.lyon@nicefrance.fr /NST REV. 01 Nice Roma I Tel Fax info.roma@niceforyou.com Nice France Buchelay F Tel. +33.(0) Fax +33.(0) info@nicefrance.fr Nice Polska Pruszków PL Tel Fax nice@nice.com.pl
neostar T Instructions and warnings for the fitter
 tubular motor neostar T Instructions and warnings for the fitter Istruzioni ed avvertenze per l installatore Instructions et recommandations pour l installateur Anweisungen und Hinweise für den Installateur
neostar A For roller shutters and awnings - Instructions and warnings for the fitter
 tubular motor neostar A For roller shutters and awnings - Instructions and warnings for the fitter Per tapparelle e tende - Istruzioni ed avvertenze per l installatore Pour volets roulants et stores -
neostar A For roller shutters and awnings - Instructions and warnings for the fitter
 tubular motor neostar A For roller shutters and awnings - Instructions and warnings for the fitter Per tapparelle e tende - Istruzioni ed avvertenze per l installatore Pour volets roulants et stores -
PS124 Instructions and warnings for the fitter
 buffer battery PS124 Instructions and warnings for the fitter Istruzioni ed avvertenze per l installatore Instructions et recommandations pour l installateur Anweisungen und Hinweise für den Installateur
neomat H Instructions and warnings for the fitter
 tubular motor neomat H Instructions and warnings for the fitter Istruzioni ed avvertenze per l installatore Instructions et recommandations pour l installateur Anweisungen und Hinweise für den Installateur
tubular motor neoplus Instrukcje i uwagi dla instalatora
 tubular motor neoplus Instrukcje i uwagi dla instalatora NEOPLUS jest produktem firmy Motus S.p.a. (TV). ERGO i PLANO są produktem firmy Nice S.p.a.(TV) Włochy a Motus S.p.a jest spółką należącą do grupy
neomat Instructions and warnings for the fitter
 tubular motor neomat Instructions and warnings for the fitter Istruzioni ed avvertenze per l installatore Instructions et recommandations pour l installateur Anweisungen und Hinweise für den Installateur
neoplus Instructions and warnings for the fitter
 tubular motor neoplus Instructions and warnings for the fitter Istruzioni ed avvertenze per l installatore Instructions et recommandations pour l installateur Anweisungen und Hinweise für den Installateur
neoplus Instructions and warnings for the fitter
 tubular motor neoplus Instructions and warnings for the fitter Istruzioni ed avvertenze per l installatore Instructions et recommandations pour l installateur Anweisungen und Hinweise für den Installateur
control units mindy TT0 Instrukcje i uwagidla instalatora
 control units mindy TT0 Instrukcje i uwagidla instalatora Uwagi Centrala Mindy TT0 jest przeznaczona do kierowania jednofazowymi silnikami asynchronicznymi zasilanymi napięciem sieciowym, przeznaczonymi
neomat A Instructions and warnings for the fitter
 tubular motor neomat A Instructions and warnings for the fitter Istruzioni ed avvertenze per l installatore Instructions et recommandations pour l installateur Anweisungen und Hinweise für den Installateur
Moonbus. MOFB-MOFOB photocells. Instructions and warnings for the fitter. Istruzioni ed avvertenze per l installatore
 MOFB-MOFOB photocells Moonbus Instructions and warnings for the fitter Istruzioni ed avvertenze per l installatore Instructions et recommandations pour l installateur Anweisungen und Hinweise für den Installateur
kio Key-operated selector switch with cord-type release Instructions and warnings for the fitter istruzioni e avvertenze per l installatore
 Key-operated selector switch with cord-type release kio Instructions and warnings for the fitter istruzioni e avvertenze per l installatore Instructions et recommandations pour l installation Anweisungen
TT3 Instructions and warnings for the fitter
 control units TT3 Instructions and warnings for the fitter Istruzioni ed avvertenze per l installatore Instructions et recommandations pour l installateur Anweisungen und Hinweise für den Installateur
TT3 Instructions and warnings for the fitter
 control units TT3 Instructions and warnings for the fitter Istruzioni ed avvertenze per l installatore Instructions et recommandations pour l installateur Anweisungen und Hinweise für den Installateur
smu Instructions and warnings for users
 control units smu Instructions and warnings for users Istruzioni ed avvertenze per l utilizzatore Instructions et recommandations pour l'utilisateur Anweisungen und Hinweise für den Benutzer Instrucciones
IB Instructions and warnings for the fitter
 control unit IB Instructions and warnings for the fitter Istruzioni ed avvertenze per l installatore Instructions et recommandations pour l installateur Anweisungen und Hinweise für den Installateur Instrucciones
DBM5 DBM7,5 DBM10. connecting device. Instructions and warnings for the fitter. Istruzioni ed avvertenze per l installatore
 connecting device DBM5 DBM7,5 DBM10 Instructions and warnings for the fitter Istruzioni ed avvertenze per l installatore Instructions et recommandations pour l installateur Anweisungen und Hinweise für
DBM5 DBM7,5 DBM10 connecting device Instructions and warnings for the fitter Istruzioni ed avvertenze per l installatore
 connecting device DBM5 DBM7,5 DBM10 Instructions and warnings for the fitter Istruzioni ed avvertenze per l installatore Instructions et recommandations pour l installateur Anweisungen und Hinweise für
mindy TT1V control units Instructions and warnings for the fitter Istruzioni ed avvertenze per l installatore
 control units mindy TT1V Instructions and warnings for the fitter Istruzioni ed avvertenze per l installatore Instructions et recommandations pour l installateur Anweisungen und Hinweise für den Installateur
volo s-radio Instructions and warnings for the fitter
 climatic sensor volo s-radio Instructions and warnings for the fitter Istruzioni ed avvertenze per l installatore Instructions et recommandations pour l installateur Anweisungen und Hinweisefür den Installateur
1) Ostrzeżenia. 2) Opis produktu i przeznaczenie. 3) Instalowanie. 4) Próby odbiorcze. Tabela 1
 Ostrzeżenia. 2) Opis produktu i przeznaczenie. 3) Instalowanie. 4) Próby odbiorcze. Tabela 1") Photocells F210 Installation instructions and warnings Istruzioni ed avvertenze per l installatore Instructions et avertissements pour l'installateur Anweisungen und Hinweise für den Installateur Instrucciones
Photocells F210 Installation instructions and warnings Istruzioni ed avvertenze per l installatore Instructions et avertissements pour l'installateur Anweisungen und Hinweise für den Installateur Instrucciones
F Photocells
 Photocells F210 Installation instructions and warnings Istruzioni ed avvertenze per l installatore Instructions et avertissements pour l'installateur Anweisungen und Hinweise für den Installateur Instrucciones
SMXI SMXIS. Radio receiver. Installation instructions. Istruzioni per l installazione. Instructions pour l installation. Installationenleitungen
 Radio receiver SMXI SMXIS Installation instructions Istruzioni per l installazione Instructions pour l installation Installationenleitungen Instrucciones para la installación Instrukcja instalowania 1
mindy TT1L control units Instructions and warnings for the fitter Istruzioni ed avvertenze per l installatore
 control units mindy TT1L Instructions and warnings for the fitter Istruzioni ed avvertenze per l installatore Instructions et recommandations pour l installateur Anweisungen und Hinweise für den Installateur
Monos. Tubular motor. EN - Installation and use instructions and warnings. IT - Istruzioni ed avvertenze per l installazione e l uso
 Tubular motor Monos EN - Installation and use instructions and warnings IT - Istruzioni ed avvertenze per l installazione e l uso FR - Instructions et avertissements pour l installation et l utilisation
SILNIK RUROWY NEMO Instrukcja i uwagi instalatora
 SILNIK RUROWY NEMO Instrukcja i uwagi instalatora Bezpieczeństwo użytkowania OSTRZEŻENIA STOSOWANIE SIĘ DO PONIŻSZYCH ZALECEŃ JEST ISTOTNE DLA BEZPIECZEŃSTWA UŻYTKOWNIKA. ZACHOWAJ TĄ INSTRUKCJĘ. NIEPRAWIDŁOWA
SMX2 SMX2R. Radio receiver. Instructions and warnings for the fitter. Istruzioni ed avvertenze per l installatore
 Radio receiver SMX2 SMX2R Instructions and warnings for the fitter Istruzioni ed avvertenze per l installatore Instructions et recommandations pour l installateur Anweisungen und Hinweise für den Installateur
INSTRUKCJA NAPĘDÓW SERII 35 I 45 BD
 Dane techniczne Napędy typu BD przeznaczone są do zautomatyzowania pracy rolet zewnętrznych lub bram rolowanych. Posiadają mechanizm detekcji przeszkód, dzięki któremu silnik wyczuwając opór na swojej
Neostar T. For rolling shutters and awnings. Installation and use instructions and warnings. Istruzioni ed avvertenze per l installazione e l uso
 For rolling shutters and awnings Neostar T Installation and use instructions and warnings Warning: follow these personal safety instructions very carefully. Important safety instructions; save these instructions
volo s-radio Instructions and warnings for the fitter
 climatic sensor volo s-radio Instructions and warnings for the fitter Istruzioni ed avvertenze per l installatore Instructions et recommandations pour l installateur Anweisungen und Hinweisefür den Installateur
TT4 - TT5. Control unit
 Control unit TT4 - TT5 Instructions and warnings for the fitter Istruzioni ed avvertenze per l installatore Instructions et recommandations pour l installateur Anweisungen und Hinweise für den Installateur
TT4 - TT5. Control unit
 Control unit TT4 - TT5 Instructions and warnings for the fitter Istruzioni ed avvertenze per l installatore Instructions et recommandations pour l installateur Anweisungen und Hinweise für den Installateur
pop Actuator for swing gates Instructions and warnings for the fitter istruzioni e avvertenze per l installatore
 Actuator for swing gates pop Instructions and warnings for the fitter istruzioni e avvertenze per l installatore Instructions et recommandations pour l installation Anweisungen und hinweise für den installateur
TT2N. Eu: Built-in receiver module
 TT2N Built-in receiver module Eu: 0682 Instructions and warnings for the Fitter Istruzioni ed avvertenze per l Installatore Instructions et recommandations pour l Installateur Instrucciones y advertencias
TTP. programming unit. Instructions and warnings for use. Istruzioni ed avvertenze per l uso. Instructions et recommandations pour l utilisation
 programming unit TTP Instructions and warnings for use Istruzioni ed avvertenze per l uso Instructions et recommandations pour l utilisation Anweisungen und Hinweise für die Bedienung Instrucciones y advertencias
SMX2 SMX2R. Radio receiver. Instructions and warnings for the fitter. Istruzioni ed avvertenze per l installatore
 Radio receiver SMX2 SMX2R Instructions and warnings for the fitter Istruzioni ed avvertenze per l installatore Instructions et recommandations pour l installateur Anweisungen und Hinweise für den Installateur
TT4 - TT5. control units. Instructions and warnings for the fitter. Istruzioni ed avvertenze per l installatore
 control units TT4 - TT5 Instructions and warnings for the fitter Istruzioni ed avvertenze per l installatore Instructions et recommandations pour l installateur Anweisungen und Hinweise für den Installateur
wingo gearmotor for swing gates Instructions and warnings for the fitter Istruzioni e avvertenze per l installatore
 gearmotor for swing gates wingo Instructions and warnings for the fitter Istruzioni e avvertenze per l installatore Instructions et recommandations pour l installation Anweisungen und hinweise für den
Instructions et avertissements pour l installation et l utilisation. Anweisungen und Hinweise für die Installation und die Bedienung
 One-Max One-Max H Controller Installation and use instructions and warnings Istruzioni ed avvertenze per l installazione e l uso Instructions et avertissements pour l installation et l utilisation Instrucciones
planotime remote controls Instructions and warnings for the fitter istruzioni e avvertenze per l installatore
 remote controls planotime Instructions and warnings for the fitter istruzioni e avvertenze per l installatore Instructions et recommandations pour l installation Anweisungen und hinweise für den installateur
DICHIARAZIONE DI CONFORMITA DECLARATION OF CONFORMITY
 DICHIARAZIONE DI CONFORMITA DECLARATION OF CONFORMITY GAS APPLIANCES Tipo prodotto / product name BS 24 CF Codice comm.le e nome del modello / commercial code and models name ARISTON Marchio comm..le /
INSTRUKCJA NAPĘDÓW SERII 35 I 45 R
 www.sukcesgroup.pl Dane techniczne Napędy typu R to napędy z odbiornikiem radiowym, które umożliwiają bezprzewodowe sterowanie za pomocą pilota. Przeznaczone są do zautomatyzowania pracy rolet i bram rolowanych.
TCB65. sensitive edge. Instructions and warnings for the fitter. Istruzioni ed avvertenze per l installatore
 sensitive edge TCB65 Instructions and warnings for the fitter Istruzioni ed avvertenze per l installatore Instructions et recommandations pour l installateur Anweisungen und Hinweise für den Installateur
moby gearmotor for swing gates Instructions and warnings for the fitter Istruzioni e avvertenze per l installatore
 gearmotor for swing gates moby Instructions and warnings for the fitter Istruzioni e avvertenze per l installatore Instructions et recommandations pour l installation Anweisungen und hinweise für den installateur
Roll Up 28. PL Instrukcja. Ref A
 Roll Up 28 WT PL Instrukcja Ref. 5122117A Copyright 2013 Somfy SAS. All rights reserved - V1-02/2013 1 SPIS TREŚCI 1. Informacje wstępne 35 1.1 Zakres stosowania 35 1.2 odpowiedzialność 36 2. Instalacja
rondo Electromechanical gearmotor for the automation of balanced rolling gates Instructions and warnings for the fitter
 Electromechanical gearmotor for the automation of balanced rolling gates rondo Instructions and warnings for the fitter istruzioni e avvertenze per l installatore Instructions et recommandations pour l
TT2L TT2D. Eu: Instructions and warnings for the Fitter Istruzioni ed avvertenze per l Installatore
 TT2L Eu: 0682 TT2D Built-in receiver module Instructions and warnings for the Fitter Istruzioni ed avvertenze per l Installatore Instructions et recommandations pour l Installateur Instrucciones y advertencias
Neoplus MH. Tubular Motors
 Tubular Motors Neoplus MH LH Installation and use instructions and warnings Istruzioni ed avvertenze per l installazione e l uso Instructions et avertissements pour l'installation et l'utilisation Anweisungen
Neoplus MH. Tubular Motors
 Tubular Motors Neoplus MH LH Installation and use instructions and warnings Istruzioni ed avvertenze per l installazione e l uso Instructions et avertissements pour l'installation et l'utilisation Anweisungen
Neoplus MH. Tubular Motors
 Tubular Motors Neoplus MH LH Installation and use instructions and warnings Istruzioni ed avvertenze per l installazione e l uso Instructions et avertissements pour l'installation et l'utilisation Anweisungen
Stelaż pod biurko z elektryczną regulacją wysokości
 Stelaż pod biurko z elektryczną regulacją wysokości PODRĘCZNIK OBSŁUGI DA-90387 Napięcie znamionowe: 100-240 V Praca ciągła 2 minuty, przerwa co najmniej 18 minut. OSTRZEŻENIE / INFORMACJA WAŻNE: Należy
Moonbus. MOFB-MOFOB photocells
 MOFB-MOFOB photocells Moonbus Instructions and warnings for the fitter Istruzioni ed avvertenze per l installatore Instructions et recommandations pour l installateur Anweisungen und Hinweise für den Installateur
TYPE: TG S, TG M TUBULAR MOTOR FOR SHUTTERS AND AWNINGS
 EN Instructions and warnings for installation and use TYPE:, TUBULAR MOTOR FOR SHUTTERS AND AWNINGS IT Istruzioni ed avvertenze per l installazione e l uso FR Instructions et avertissements pour l installation
Instrukcja instalacji
 Instrukcja instalacji SOMFY niniejszym oświadcza, że urządzenie to zaprojektowane do zasilania napięciem 230V/50Hz spełnia zasadnicze wymagania oraz inne istotne postanowienia dyrektyw mających zastosowanie
TECHNO Instrukcja montażu i użytkowania
 TECHNO Siłownik elektromechaniczny do bram skrzydłowych Instrukcja montażu i użytkowania Wymiary: Dane techniczne: W komplecie: 1. Siłownik lewy lub prawy 2. Uchwyt montażowy do słupka 3. Uchwyt montażowy
NAPĘDY SERII 35EV/S I 45EV/S
 www.sukcesgroup.pl NAPĘDY SERII 35EV/S I 45EV/S Nieprzestrzeganie niniejszej instrukcji może stworzyć zagrożenie dla życia i zdrowia, a także może rzutować na poprawną pracę całej rolety. Zaleca się postępowanie
INSTRUKCJA DO SIŁOWNIKA RUROWEGO YYGL35 / YYGL45
 INSTRUKCJA DO SIŁOWNIKA RUROWEGO YYGL35 / YYGL45 Centrala; Zakład w Bielsku Białej ul. Warszawska 153, 43-300 Bielsko Biała, Polska tel. +48 33 81 95 300, fax. +48 33 82 28 512 Zakład w Opolu ul. Gosławicka
Altus 50 RTS / 60 RTS
 Altus 50 RTS / 60 RTS Instrukcja obsługi napędów z odbiornikiem radiowym serii Altus 50 RTS / 60 RTS. Informacje ogólne Napędy serii Altus RTS mogą współpracować z wszystkimi nadajnikami serii RTS np.:
Mindy A500. control unit. Instructions and warnings for the fitter. Istruzioni ed avvertenze per l installatore
 control unit Mindy A00 Instructions and warnings for the fitter Istruzioni ed avvertenze per l installatore Instructions et recommandations pour l installateur Anweisungen und Hinweise für den Installateur
F210S. Optical Device
 F210S Optical Device Installation instructions and warnings Istruzioni ed avvertenze per l installatore Instructions et avertissements pour l'installateur Anweisungen und Hinweise für den Installateur
wingo gearmotor for swing gates Instructions and warnings for the fitter Istruzioni e avvertenze per l installatore
 gearmotor for swing gates wingo Instructions and warnings for the fitter Istruzioni e avvertenze per l installatore Instructions et recommandations pour l installation Anweisungen und hinweise für den
Tabela 1 Fotokomórka FOTO FOTO II FOTO 1 FOTO 1 II. FA1 (przyciąć mostek A na TX i RX, jak na rysunku. 6)
") Photocells F210B Instructions and warnings for the fitter Istruzioni ed avvertenze per l installatore Instructions et recommandations pour l installateur Anweisungen und Hinweise für den Installateur Instrucciones
Photocells F210B Instructions and warnings for the fitter Istruzioni ed avvertenze per l installatore Instructions et recommandations pour l installateur Anweisungen und Hinweise für den Installateur Instrucciones
MASTER220. Importer Nice-Polska Sp. z o.o Pruszków ul. Parzniewska 2A Tel Wyprodukowane przez grupę Nice
 MASTER220 Importer Nice-Polska Sp. z o.o. 05-800 Pruszków ul. Parzniewska 2A Tel. +48 22 759 40 00 Wyprodukowane przez grupę Nice 1 - INFORMACJE OGÓLNE 1A - OSTRZEŻENIA Niewypełnienie poniższych wskazówek
J5 HTM Instrukcja
 www.somfy.pl J5 HTM Instrukcja 1 Informacje podstawowe Proszę przeczytać uważnie instrukcję w całości w celu poznania wszystkich funkcji. Somfy nie odpowiada za szkody i usterki wynikające z nieznajomości
DEKLARACJA ZGODNOŚCI CE
 TŁUMACZENIE DEKLARACJA ZGODNOŚCI CE GAZOWE POJEMNOŚCIOWE PODGRZEWACZE WODY NAZWA / MODEL: patrz tabela MARKA: ARISTON Merloni Termosanitari SpA oświadcza z pełną odpowiedzialnością, że wymienione powyżej
DEKLARACJA ZGODNOŚCI CE
 DEKLARACJA ZGODNOŚCI CE Nr GW/029/2011 Dostawca Adres Reprezentujący Producenta Elettronica Italiana Sp. z o.o. ul. Jana Pawła 80/98, 00-175 Warszawa Gewiss S.p.A. Via A. Volta, 1 24069 Cenate Sotto (BG)
Neoplus M L. Tubular Motors
 Tubular Motors Neoplus M L Installation and use instructions and warnings Istruzioni ed avvertenze per l installazione e l uso Instructions et avertissements pour l'installation et l'utilisation Anweisungen
INSTRUKCJA NAPĘDÓW SERII 55 I 59 RM
 Dane techniczne y typu RM to napędy z odbiornikiem radiowym, które umożliwiają bezprzewodowe sterowanie za pomocą pilota. Przeznaczone są do zautomatyzowania pracy bram rolowanych. Posiadają głowicę awaryjnego
Wskazówki montażowe. Podłaczenie elektryczne. OXIMO RTS pasuje do standardowych uchwytów montażowych stosowanych do serii LT 50
 napęd do rolet z wbudowanym odbiornikiem radiowym, układ rozpoznawania przeszkody z wyłącznikiem przeciążeniowym programowana pozycja komfortowa Wskazówki montażowe OXIMO RTS pasuje do standardowych uchwytów
Wskazówki montażowe. Montaż w skrzynce roletowej przy użyciu fabrycznie dostarczonej dwustronnej taśmy klejącej
 Art. nr 1 810 315 Odbiornik radiowy do wbudowania w skrzynkę rolety, Możliwość współpracy z dowolnymi nadajnikami RTS oraz czujnikiem Soliris Sensor RTS (automatyka słoneczna), Programowane położenia komfortowe,
Spis treści. Dane techniczne. Montaż
 Spis treści Dane techniczne... 2 Przygotowanie rury nawojowej...3 Określenie stanu regulacji rolety... 4 Zapamiętywanie nadajnika przy zaprogramowanych krańcówkach... 4 Regulacja wyłączników krańcowych...
rondo Electromechanical gearmotor for the automation of balanced rolling gates Instructions and warnings for the fitter
 Electromechanical gearmotor for the automation of balanced rolling gates rondo Instructions and warnings for the fitter istruzioni e avvertenze per l installatore Instructions et recommandations pour l
Era-Era Zero E S / E M / E MH / E L / E LH / E Z M
 Era-Era Zero E S / E M / E MH / E L / E LH / E Z M Tubular motor EN - Instructions and warnings for installation and use IT - Istruzioni ed avvertenze per l installazione e l uso FR - Instructions et avertissements
SPIS TREŚCI 1. OPIS I CHARAKTERYSTYKA TECHNICZNA 2. INSTALACJA 3. DZIAŁANIE 4. DZIAŁANIE MANUALNE 5. SZCZEGÓLNE ZASTOSOWANIA 6. KONSERWACJA 7.
 SEVEN SPIS TREŚCI 1. OPIS I CHARAKTERYSTYKA TECHNICZNA 2. INSTALACJA 3. DZIAŁANIE 4. DZIAŁANIE MANUALNE 5. SZCZEGÓLNE ZASTOSOWANIA 6. KONSERWACJA 7. NAPRAWA 1 Napęd SEVEN stosowany jest do bram przesuwnych
Nice TTN3724HS TTN3724RHS TTN6024HS TTN6024RHS
 Nice TTN3724HS TTN3724RHS TTN6024HS TTN6024RHS Do bram skrzydłowych PL - Instrukcje i ostrzeżenia na temat instalacji i użytkowania SPIS TREŚCI OGÓLNE OSTRZEŻENIA: BEZPIECZEŃSTWO - MONTAŻ - UŻYTKOWANIE
INSTRUKCJA NAPĘDÓW SERII 35 I 45 EVY
 www.sukcesgroup.pl INSTRUKCJA NAPĘDÓW SERII 35 I 45 EVY Nieprzestrzeganie niniejszej instrukcji może stworzyć zagrożenie dla życia i zdrowia, a także może rzutować na poprawną pracę całej rolety. Zaleca
Pop. For swing gates. Instructions and warnings for the fitter. Istruzioni e avvertenze per l installatore
 For swing gates Pop Instructions and warnings for the fitter Istruzioni e avvertenze per l installatore Instructions et recommandations pour l installation Anweisungen und hinweise für den installateur
Wskazówki montażowe. Podłaczenia elektryczne. Altus RTS pasuje do uchwytów montażowych stosowanych ze standardowymi napędami SOMFY
 napęd z wbudowanym odbiornikiem radiowym, do rolet, markiz lub innych osłon przeciwsłonecznych, wyłącznik przeciążeniowy, dowolnie ustalana pozycja komfortowa Wskazówki montażowe NIE TAK Altus RTS pasuje
Wskazówki montażowe. Podłaczenia elektryczne. Altea RTS pasuje do uchwytów montażowych stosowanych ze standardowymi napędami SOMFY
 napęd z wbudowanym odbiornikiem radiowym, do refleksoli z systemem zaczepowym, (screenów wiatroodpornych) wyłącznik przeciążeniowy, prędkość obrot. 32 obr/min, co 30 cykli (góra/dół) automatyczna korekta
Spis treści POLSKI. 2 Polski
 To-Max Controller Installation and use instructions and warnings Warning: follow these personal safety instructions very carefully. Important safety instructions; save these instructions for future use.
To-Max. Controller
 To-Max Controller Installation and use instructions and warnings Warning: follow these personal safety instructions very carefully. Important safety instructions; save these instructions for future use.
Tub. For industrial sliding doors. Instructions and warnings for the fitter. Istruzioni ed avvertenze per l installatore
 For industrial sliding doors Tub Instructions and warnings for the fitter Istruzioni ed avvertenze per l installatore Instructions et recommandations pour l installateur Anweisungen und Hinweise für den
ZC4 319M43 34 Seria Z PŁYTA STERUJĄCA CHARAKTERYSTYKA OGÓLNA
 Seria Z PŁYTA STERUJĄCA ZC4 319M43 34 CHARAKTERYSTYKA OGÓLNA Elektryczna centrala sterująca ZC4 przeznaczona jest do sterowania urządzeniami jednofazowymi 30V o mocy do 600W, szczególnie do siłowników
NAPĘD Z WBUDOWANYM ODBIORNIKIEM RADIOWYM I DETEKCJĄ PRZESZKÓD SERIA 35, 45 [EVY]
![NAPĘD Z WBUDOWANYM ODBIORNIKIEM RADIOWYM I DETEKCJĄ PRZESZKÓD SERIA 35, 45 [EVY]](/thumbs/95/126172370.jpg "NAPĘD Z WBUDOWANYM ODBIORNIKIEM RADIOWYM I DETEKCJĄ PRZESZKÓD SERIA 35, 45 [EVY]") 433 MHz Praca wszystkich urządzeń na częstotliwości 433 MHz. Wszystkie urządzenia przystosowane do pracy z zasilaniem 230 V / 50 Hz DANE TECHNICZNE Zasilanie 230 V / 50 Hz, Wbudowany odbiornik radiowy
433 MHz Praca wszystkich urządzeń na częstotliwości 433 MHz. Wszystkie urządzenia przystosowane do pracy z zasilaniem 230 V / 50 Hz DANE TECHNICZNE Zasilanie 230 V / 50 Hz, Wbudowany odbiornik radiowy
Mindy A01. Control units. EN - Instructions and warnings for installation and use. IT - Istruzioni ed avvertenze per l installazione e l uso
 Mindy A01 Control units EN - Instructions and warnings for installation and use IT - Istruzioni ed avvertenze per l installazione e l uso FR - Instructions et avertissements pour l installation et l utilisation
INSTRUKCJA OBSŁUGI. inteo Soliris RTS. Soliris RTS. 1. Dane techniczne Soliris RTS. 2. Podłączenia. Radiowa automatyka słoneczno wiatrowa
 Radiowa automatyka słoneczno wiatrowa INSTRUKCJA OBSŁUGI Soliris RTS Czujnik Soliris Odbiornik Pilot W celu optymalnego wykorzystania możliwości Sterownika Soliris RTS, prosimy Państwa o dokładne zapoznanie
Mindy A control unit. Instructions and warnings for the fitter. Istruzioni ed avvertenze per l installatore
 control unit Mindy A00 Instructions and warnings for the fitter Istruzioni ed avvertenze per l installatore Instructions et recommandations pour l installateur Anweisungen und Hinweise für den Installateur
ApricolorVARIA230V - ApricolorVARIA T - ApricolorVARIA24V
 ZASTOSOWANIE Siłownik do okien APRICOLOR VARIA przeznaczony jest do elektrycznego otwierania i zamykania okien uchylnych z zawiasami w górnej lub dolnej części okna, okien połaciowych i świetlików. Do
spido gearmotor for sectional doors and overhead spring or counterweight up-and-over doors instructions and warnings for the fitter
 gearmotor for sectional doors and overhead spring or counterweight up-and-over doors spido instructions and warnings for the fitter istruzioni e avvertenze per l installatore Instructions et recommandations
EnergiaPL Sp. z o.o. al. KEN 36 lok. 112B Warszawa Polska NIP KRS
 EnergiaPL Sp. z o.o. al. KEN 36 lok. 112B 02-797 Warszawa Polska NIP 951-238-23-40 KRS 0000519640 www.energiapl.com e-mail : info@energiapl.com 1 Cyrkon SmartBox Cyrkon SmartBox to seria nowoczesnych urządzeń
DS1. Radio command digital selector PUK CODE
 DS1 Radio command digital selector PUK CODE Use and installation instructions and warnings Istruzioni ed avvertenze per l 'installazione e l'uso Instructions et recommandations pour l installation et l
DS1 Radio command digital selector PUK CODE
 DS1 Radio command digital selector PUK CODE Use and installation instructions and warnings Istruzioni ed avvertenze per l 'installazione e l'uso Instructions et recommandations pour l installation et l
Nice Moon MOTB. Digital switch. EN - Instructions and warnings for installation and use. IT - Istruzioni ed avvertenze per l installazione e l uso
 EN - Instructions and warnings for installation and use IT - Istruzioni ed avvertenze per l installazione e l uso FR - Instructions et avertissements pour l installation et l utilisation ES - Instrucciones
INSTRUKCJA NAPĘDÓW SERII 45 RM
 Dane techniczne Napędy typu RM to napędy z odbiornikiem radiowym, które umożliwiają bezprzewodowe sterowanie za pomocą pilota. Przeznaczone są do zautomatyzowania pracy rolet zewnętrznych i bram rolowanych.
Przed rozpoczęciem podłączania urządzenia koniecznie zapoznać się z niniejszą instrukcją Eolis RTS!
 Radiowa automatyka wiatrowa Eolis RTS INSTRUKCJA OBSŁUGI W celu optymalnego wykorzystania możliwości Sterownika Eolis RTS, prosimy Państwa o dokładne zapoznanie się z niniejszą instrukcją. W przypadku