IAN KITCHEN RADIO SKR 800 B2 KITCHEN RADIO KÖKSRADIO RADIO KUCHENNE VIRTUVINIS RADIJAS KÜCHENRADIO
|
|
|
- Józef Tadeusz Nowicki
- 6 lat temu
- Przeglądów:
Transkrypt


1 KITCHEN RADIO KITCHEN RADIO Operating instructions and safety instructions RADIO KUCHENNE Instrukcja obsługi i wskazówki bezpieczeństwa KÖKSRADIO Bruksanvisning och säkerhetsanvisningar VIRTUVINIS RADIJAS Naudojimo instrukcija ir saugos nurodymai KÜCHENRADIO Bedienungsanleitung und Sicherheitshinweise IAN
2 Before reading, unfold the page containing the illustrations and familiarise yourself with all functions of the device. Vik ut bildsidan och ha den till hands när du läser igenom anvisningarna och gör dig bekant med apparatens / maskinens funktioner. Przed przeczytaniem proszę rozłożyć stronę z ilustracjami, a następnie proszę zapoznać się z wszystkimi funkcjami urządzenia. Prieš skaitydami atsiverskite lapą su paveikslėliais ir susipažinkite su visomis prietaiso funkcijomis. Klappen Sie vor dem Lesen die Seite mit den Abbildungen aus und machen Sie sich anschließend mit allen Funktionen des Gerätes vertraut. GB Operating instructions and safety instructions Page 1 SE Bruksanvisning och säkerhetsanvisningar Sidan 23 PL Instrukcja obsługi i wskazówki bezpieczeństwa Strona 45 LT Naudojimo instrukcija ir saugos nurodymai Puslapis 67 DE / AT / CH Bedienungsanleitung und Sicherheitshinweise Seite 89

3
4 Contents Introduction... 3 Information about these operating instructions...3 Copyright...3 Proper use...3 Warning notices...3 Safety Hazard from electrical current...4 Notes on batteries...5 Basic safety instructions...5 Description of components... 7 Operation... 8 Package contents and transport inspection...8 Disposal of packaging...8 Requirements for the set-up location...9 Installation under a wall cupboard...9 Dismantling...10 Setting up the device...10 Connecting to a power supply Inserting batteries FM wire aerial...11 Handling and use...12 Making basic settings...12 Setting the alarm time and alarm type...13 Switching off the alarm...14 Switching the radio mode on/off...14 Adjusting the volume...14 Search for a station...14 Adjusting stations manually...15 Storing stations manually...15 Calling up preset radio stations...15 Automatic station search (AMS function)...15 Receiving stations in mono...16 Kitchen timer...16 Switching the display dimmer on/off...17 Switching the LED light on/off...17 GB 1
5 Troubleshooting...18 Fault causes and remedies...18 Cleaning...19 Cleaning the housing...19 Storage when not in use...19 Disposal...19 Disposal of the device...19 Battery disposal...20 Appendix...20 Technical data...20 Notes on the EU Declaration of Conformity...20 Kompernass Handels GmbH warranty...21 Service...22 Importer GB
6 Introduction Information about these operating instructions Copyright Congratulations on the purchase of your new device. You have selected a high-quality product. The operating instructions are part of this product. They contain important information about safety, usage and disposal. Before using the product, please familiarise yourself with all operating and safety instructions. Use the product only as described and for the range of applications specified. Retain these instructions for future reference. Please also pass these operating instructions on to any future owner. Proper use This documentation is protected by copyright. Any copying or reproduction, including in the form of extracts, or any reproduction of images (even in a modified state), is permitted only with the written authorisation of the manufacturer. The SilverCrest trademark and the retail name are the property of their respective owners. This device is a consumer electronics device designed for the reception of FM radio programmes, as a kitchen timer and as an alarm by means of an alarm tone or radio. It is intended only for indoor use. The device is intended to be set up as a free-standing unit or to be installed under a wall cupboard. To do so, the integrated adjustable foot or the mounting plate must be used. The device is not intended for any other purpose, nor for use beyond the scope described. The device is not intended for use in commercial or industrial environments. The manufacturer accepts no responsibility for damage caused by failure to observe these instructions, improper use or repairs, unauthorised modifications or the use of unapproved replacement parts. The risk is borne solely by the user. Warning notices The following warning notices are used in these operating instructions: DANGER A warning notice of this hazard level indicates an imminently hazardous situation. Failure to avoid this hazardous situation could result in serious injuries or even death. Follow the instructions in this warning notice to avoid the risk of serious injuries or death. GB 3
7 CAUTION A warning notice of this hazard level indicates a risk of property damage. Failure to avoid this situation could result in property damage. Follow the instructions in this warning notice to prevent property damage. NOTE A note provides additional information that makes handling the device easier for you. Safety This section contains important safety instructions for handling the device. This device complies with statutory safety regulations. Improper use may result in personal injury and property damage. Hazard from electrical current DANGER Danger to life from electrical current! Contact with live cables or components can is a danger to life! Comply with the following safety information in order to avoid the hazard from electrical current: Do not use the device if the mains power plug or the mains cable is damaged. When disconnecting the device from the mains supply, always pull on the plug and never on the cable. Never touch the mains plug or the device with wet hands. The device housing must not be opened under any circumstances. Touching live connections or making modifications to the electrical or mechanical assembly can lead to a risk of electrocution and fire. Do not insert any objects into the ventilation slots or other openings on the device. The device consumes power in standby mode. To disconnect the device completely from the mains supply, remove the power plug from the mains socket. The device must be positioned so that you have unrestricted access to the mains socket at all times and can pull out the plug immediately in an emergency. 4 GB
8 Notes on batteries DANGER Risk of injury caused by incorrect handling of batteries! Keep batteries out of the reach of children. Children might put batteries into their mouths and swallow them. If a battery has been swallowed, seek medical assistance immediately. Do not throw batteries into a fire. Never subject batteries to high temperatures. Explosion hazard! Do not charge batteries unless they are explicitly labelled as "rechargeable". Do not open the batteries or short-circuit them. Do not mix different types of batteries. Empty batteries should be removed because of the increased risk of leakage. The batteries should also be removed from the device if it is not being used for long periods. Battery acid leaking from a battery can cause skin irritation. If it contacts your skin, rinse off with plenty of water. If the liquid comes into contact with your eyes, rinse thoroughly with plenty of water, do not rub and consult a doctor immediately. The section entitled "Inserting batteries" describes how to insert and remove batteries correctly. Basic safety instructions To ensure safe operation of the device, follow the safety guidelines set out below: This device may be used by children aged 8 years and above and by persons with limited physical, sensory or mental capabilities, or lack of experience and knowledge, provided that they are under supervision or have been told how to use the device safely and are aware of the potential risks. Children must not play with the device. Cleaning and maintenance conducted by user must not be carried out by children unless they are supervised. DANGER! Do not allow children to play with the packaging material! Keep all packaging materials away from children. There is a risk of suffocation! Check the device for visible external damage before use. Do not operate an device that has been damaged or dropped. If the cables or connections are damaged, have them replaced by authorised specialists or Customer Service. Protect the connection cable from hot surfaces and sharp edges. Ensure that the power cable is not stretched tightly or kinked. Do not allow the cable to dangle over edges (tripwire effect). GB 5
9 All repairs must be carried out by authorised specialist companies or Customer Service. Improper repairs may put the user at risk. It will also invalidate any warranty claims. Defective components must always be replaced with original replacement parts. It is ensured only for these parts that they fulfil the safety requirements. Do not make any unauthorised modifications or alterations to the device. Always place the device on a stable and level surface. It can be damaged if dropped. Do not expose the device to direct sunlight or high temperatures. Otherwise it may overheat and be irreparably damaged. Be sure to provide sufficient air circulation to avoid a heat build-up. Never cover the device. There is a fire hazard! Do not place the product near heat sources such as radiators or other heat-generating devices. Keep the device away from open flames (e.g. candles) at all times. The device is not designed for use in rooms with high temperature or humidity (e.g. bathrooms) or excessive dust. Protect the device from spray or dripping water. Never submerge the device in water, do not place the device near water and do not place any object filled with liquid (e.g. vases) on top of the device. If you notice a burning smell or smoke, pull out the plug from the mains socket immediately and remove the batteries. In the event of malfunctions and thunderstorms, disconnect the plug from the mains socket. 6 GB
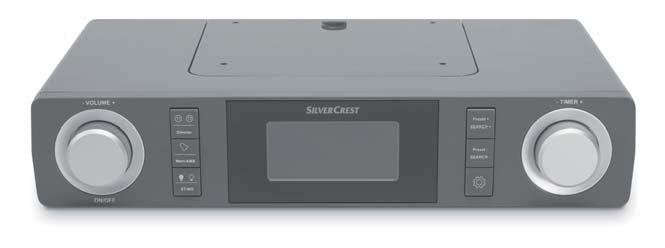
10 Description of components (See fold-out page for illustrations) Dial VOLUME+ ON/OFF Dimmer button Mem/AMS button ST/MO button Mounting plate Display Preset + SEARCH + button Preset SEARCH button button TIMER+ dial Adjustable foot (fold-out) LED light Speakers Power cable Battery compartment Wire aerial for FM reception Spacer (for under-cabinet installation) Mounting screw (long) Mounting screw (short) Operating instructions GB 7
11 Operation Package contents and transport inspection DANGER Do not allow children to play with packaging materials. There is a risk of suffocation. Remove all parts of the device and the operating instructions from the box. Remove all packaging materials from the device. Please check the contents of the package (see fold-out page). The product includes the following components: Kitchen radio Mounting plate 4 spacers 4 mounting screws (long) 4 mounting screws (short) (pre-assembled) These operating instructions (symbol) NOTE Check the package for completeness and signs of visible damage. If any items are missing or damaged as a result of defective packaging or transportation, contact the Service Hotline (see section "Service"). Disposal of packaging The packaging protects the device from damage during transport. The packaging materials have been selected for aspects of environmental friendliness and disposal, and they are therefore recyclable. Returning the packaging to the material cycle conserves raw materials and reduces the amount of waste that is generated. Dispose of packaging materials that are no longer needed in accordance with applicable local regulations. NOTE If possible, keep the original packaging for the complete warranty period of the device so that the device can be packaged properly for return shipment in the event of a warranty claim. 8 GB
12 Requirements for the set-up location For the safe and trouble-free operation of the device, the set-up location must fulfil the following requirements: When setting up the device, place it on a firm, flat and horizontal surface. Use the fold-out adjustable foot. The surfaces of some items of furniture might contain components that can corrode and soften the rubber feet of the device. If necessary, place a mat under the device s rubber feet. Set up or mount the device in such a way that the provided ventilation openings and speakers are not covered. Do not operate the device in a hot, wet or extremely damp environment or near flammable materials. The mounting location must be selected so that the device is not exposed to vapours. Do not install the device directly over a hotplate. The mains socket must be easily accessible so that the plug can be easily pulled out in an emergency. Installation under a wall cupboard 3,1 cm 6,3 cm Using the supplied mounting plate, you can install the device, e.g. under a wall cupboard. Proceed as follows to mount the device: Slide the mounting plate to the rear and remove it from the device. Find a suitable installation location for the device (see also the section "Requirements for the set-up location"). GB 9
13 Hold the mounting plate under the installation location. Ensure that the front edge of the mounting plate is approx. 3.1 cm behind the front of the cupboard so that the device is connects flush with the cupboard after installation. The side edges of the mounting plate must spaced approx. 6.3 cm away from adjacent cabinets or walls. Mark the 4 mounting points with a pencil. Using a pin or nail, make a small depression at the respective marking points. If required, place the supplied spacers between the cupboard and the mounting plate. If you are using the spacers, you will need the long mounting screws. Screw the mounting plate tight using the mounting screws provided ( or ). Dismantling With the top of the device against the mounting plate, push the device back until it clicks into place. Check to ensure that the device is firmly in position and safely route the power cable and the wire aerial. Pull the device forwards off the mounting plate. Unscrew the screws ( or ) on the mounting plate and remove the mounting plate from the wall cupboard. Setting up the device You can also set up the device on a level surface. So not to cover the ventilation slots and speakers on the bottom of the device, you must fold out the adjustable foot of the device: Reach into the recess on the side of the adjustable foot and pull it out as far as it will go. Select a suitable location for the device (also see the section "Set-up location requirements"). 10 GB
14 Connecting to a power supply CAUTION Before connecting the device, compare the connection data of the device (voltage and frequency) on the rating plate with that of your electrical supply. This data must match so that the device is not damaged. Insert the power plug into a mains socket. The device starts an automatic station search and saves the stations that can be received in the max. 20 preset slots. (RDS (radio data system)) flashes briefly on the display. If there is a suitably strong RDS signal, the time and date will be set automatically. If the RDS signal is too weak, the time display ( ) appears on the display and the time and date must be set manually. Inserting batteries You can prevent the programmed time or preset stations from being lost in the event of a power outage by inserting 2 x 1.5 V batteries (type AA/Mignon/LR6). The batteries ensure that the internal clock continues to run even during a power outage. The display will go out, however. When power is restored, the correct time automatically appears on the display. NOTE The device can also be operated without batteries. The display, radio and alarm do not function in emergency mode. In the event of a power failure, all settings will be lost. Open the cover of the battery compartment on the bottom of the device. FM wire aerial Insert 2 x 1.5 V batteries of the type AA/Mignon/LR6 (not included in the product) into the battery compartment. Insert the batteries in the battery compartment as shown on the polarity diagram. Then close the battery compartment by replacing the cover and clicking it into place. Completely unwind the wire aerial for FM radio reception. GB 11
15 Handling and use Making basic settings Requirement: The device is in clock/standby mode. NOTE If there is a suitably strong RDS signal (radio data system), the time and date will be set automatically. Neither an adjustment of summer/winter time is made automatically by the RDS nor does the station name appear on the display. Make the settings quickly. If you do not press a button for 15 seconds, the entry is cancelled. All settings made up to this point are saved automatically. Press the button for about 2 seconds. The symbol for the 24-hour format ( ) flashes on the display. Turn the TIMER+ dial to switch between 24-hour ( ) and 12-hour format ( ). NOTE If the 12-hour format ( ) is set, PM appears in the upper left of the display from 12:00 PM until 11:59 PM. From 12:00 AM to 11:59 AM, nothing appears on the display. Press the button to accept the setting. The hours flash on the display. Turn the TIMER+ dial left or right to set the hours. Press the button to accept the setting. The minutes flash on the display. Turn the TIMER+ dial left or right to set the minutes. Press the button to accept the setting. The year flashes on the display. Turn the TIMER+ dial left or right to set the year. Press the button to accept the setting. The month flashes on the display. Turn the TIMER+ dial left or right to set the month. Press the button to accept the setting. The date flashes on the display. Turn the TIMER+ dial left or right to set the date. Press the button to accept the setting. (RDS (radio data system)) flashes on the display. Turn the TIMER+ dial left or right to turn the RDS function (On) or (Off). When the RDS function is turned on the signal is strong enough, the time and date is corrected automatically if necessary. 12 GB
16 Press the button to accept the setting. DT (display dimmer) flashes on the display. Turn the TIMER+ dial left or right to turn the display dimmer (Off) or (On). When the display dimmer is turned on, the display illumination is deactivated between 11:00 PM and 5:00 AM. This switch-off time is programmed permanently and cannot be changed. Press the button to accept the setting. The time, date and, if applicable, DT and appear on the display. Push the TIMER+ dial to show the year on the display. Press it again to return to the time display. Setting the alarm time and alarm type The alarm time and alarm type are shown below left on the display. Press the Mem/AMS button for about 2 seconds. The hours flash on the display. Turn the TIMER+ dial left or right to set the hours. Press Mem/AMS button to accept the setting. The minutes flash on the display. Turn the TIMER+ dial left or right to set the minutes. Press Mem/AMS button to accept the setting. The alarm type radio flashes on the display. Turn the TIMER+ dial once to the right to set the alarm type. Turn the TIMER+ dial again to the right to set the alarm type. Press Mem/AMS button to accept the selected alarm type. NOTE Press Mem/AMS button for a few seconds to display the alarm time. In the event of a power outage, any programmed alarm times will be deactivated and not reactivated when the power comes back. GB 13
17 Switching off the alarm While the alarm is sounding, press the Mem/AMS button or the VOLUME+ ON/OFF dial to switch off the alarm for 24 hours. If the alarm is not manually deactivated, the device will switch off the alarm automatically after 1 hour. Switching the radio mode on/off NOTE The technical features of this device enable an adjustable reception capability that exceeds the permitted FM frequency range of MHz. In some countries, different national regulations may apply to the assigned radio frequency ranges. Please note that information received outside of the assigned radio frequency ranges may not be exploited, passed on to third parties or otherwise misused. Turn the VOLUME+ ON/OFF dial to turn on the radio mode. Press the VOLUME+ ON/OFF dial again to switch off the radio mode and to switch the device back into the clock/standby mode. Adjusting the volume Turn the VOLUME+ ON/OFF dial to the right to increase the volume. Turn the VOLUME+ ON/OFF dial to the left to decrease the volume. The set volume will be shown on the display as a value between (mute) and. Search for a station Press the Preset + SEARCH + button for 2 seconds to jump to the next station that can be received with a higher frequency. Press the Preset SEARCH button for 2 seconds to jump to the next station that can be received with a lower frequency. The station frequency is shown on the display and the speakers are switched off during the station search. If a station broadcasting in stereo is being received, ST appears on the display. 14 GB
18 Adjusting stations manually Press the button for 2 seconds and the frequency display flashes. You must make your setting within 5 seconds otherwise you will have to press the button again for 2 seconds. Press the Preset + SEARCH + or the Preset SEARCH button to search for a frequency in steps of 0.1 MHz. Press the button for 2 seconds and the frequency display stops flashing and the station is saved. The station frequency is shown on the display and the speakers are switched off during the station search. If a station broadcasting in stereo is being received, ST appears on the display. Storing stations manually Press the Preset + SEARCH + or the Preset SEARCH button for about 2 seconds to search for a frequency. Press the Mem/AMS button briefly. The current preset number flashes on the display, e.g.. Press the Preset + SEARCH + or the Preset SEARCH button to search for a frequency. Press the Mem/AMS button to save the station in the selected preset. Calling up preset radio stations Press the Preset + SEARCH + or the Preset SEARCH button to call up the saved radio station. Automatic station search (AMS function) The device uses the AMS function to automatically search for stations and saves them in the 20 preset slots of the device. The device starts at the lowest frequency. Depending on reception, it is possible that not all 20 presets can be assigned. Press the Mem/AMS button for about 2 seconds. The device begins the station search and allocates the stations found to the preset slots from to max.. Every time a station is saved, the frequency remains briefly on the display. Once all the station presets are filled, if receivable, the search is terminated and the station saved in the first preset is played. GB 15
19 Receiving stations in mono If you would like to receive a station in mono, press and hold the ST/ MO button for about 2 seconds until ST (for stereo display) disappears from the display. NOTE ST is only displayed if the station can actually be received in stereo. Kitchen timer If you would like to switch back to stereo reception, press and hold the ST/MO button again for around 2 seconds until ST appears on the display. The device has a practical kitchen timer with which you can monitor cooking and baking times, for example. You can set 2 kitchen timers. Setting and operating the kitchen timer Turn the TIMER+ dial left or right to set Timer 1. The display flashes. NOTE Timer 1 can be set in steps of 5 minutes from 5 minutes up to 3 hours 55 minutes. The time is given as "hh:mm". If no change is made to the setting for about 15 seconds, the device will switch back to the previous operating mode without saving the settings. Turn the TIMER+ dial to accept the setting. The display lights up and the countdown for Timer 1 starts immediately. Press the Dimmer button to set Timer 2. The display flashes. NOTE Timer 2 can be set in steps of 1 minute from 1 minute up to 3 hours 59 minutes. If you set the countdown to between 1 minute and 4 minutes, the time is shown as "mm:ss". If you set the countdown to 5 minutes or more, the time will be shown as "hh:mm". If no change is made to the setting for about 15 seconds, the device will switch back to the previous operating mode without saving the settings. Turn the TIMER+ dial to accept the setting. The display lights up and the countdown for Timer 2 starts immediately. The countdown for Timer 1 and Timer 2 gives a warning beep at 30, 15, 10 and 5 seconds before expiry to indicate the alarm time. At the end of the countdown, an alarm signal with rising volume sounds. Press the TIMER+ or the VOLUME+ ON/OFF dial to switch off the alarm. Timer 1 or Timer 2 goes off. 16 GB
20 Cancelling the kitchen timer If only Timer 1 is set, press the TIMER+ dial for 2 seconds to cancel the Timer 1. The display goes out. If both Timer 1 and Timer 2 are set, press the Dimmer button. Timer 1 is selected and the display flashes. Press the Dimmer button again. Timer 2 is selected and the display flashes. Push the TIMER+ dial for 2 seconds to cancel the selected timer. The or display goes out. Push the TIMER+ dial again for 2 seconds to cancel the remaining timer countdown. The or display goes out. Switching the display dimmer on/off Press the Dimmer button for 2 about seconds to switch the display dimmer on or off. If the display dimmer is switched on, the display goes off after around 15 seconds. The display on the device lights up for approx. 15 seconds on every operation. When the display dimmer is switched off, the display is lit permanently. NOTE In the radio mode, the display is lit permanently even if the display dimmer is activated. Switching the LED light on/off Press the ST/MO button to switch on the LED light on the bottom of the device. Press the ST/MO button again to switch off the LED light. NOTE If you do not switch off the LED light, it switches off automatically after 120 minutes. GB 17
21 Troubleshooting This section contains important information about fault identification and rectification. Follow the instructions to avoid hazards and damage. Fault causes and remedies The following table will help you to identify and rectify minor malfunctions: Fault Possible cause Remedy The display indicates nothing. No sound. Static noise in the radio reception. The time and station presets are lost after a power failure. No automatic time setting. The plug is not connected. The mains socket is not supplying power. The display is switched off automatically or manually. The volume is set to minimum. The device is in clock/ standby mode. The reception is weak. No batteries in the battery compartment or batteries are dead. The RDS signal is too weak. Insert the power plug into the socket. Check the house mains fuse. Press any button on the device. Increase the volume with the VOLUME+ ON/OFF dial. Press the VOLUME+ ON/OFF dial to switch on the radio mode. Try to improve reception by moving the wire aerial. Press and hold the ST/MO button for about 2 seconds to switch the station to mono. Check that the batteries have sufficient voltage and replace them if necessary. The time and station presets will need to be reprogrammed. The time must be set manually. NOTE If the above-mentioned solutions do not resolve the problem, please contact Customer Service (see section "Service"). 18 GB
22 Cleaning DANGER Danger to life from electrical current! Remove the plug from the mains socket before starting to clean the device. CAUTION Damage to the device! To avoid irreparable damage to the device, ensure that no moisture penetrates the device during cleaning. Cleaning the housing Clean the surfaces of the device with a soft, dry cloth. Use a lightly moistened cloth and a mild detergent to remove stubborn dirt residues. Storage when not in use If you do not intend to use the device for an extended period of time, disconnect it from the power supply, remove the batteries and store it in a clean, dry place without exposure to direct sunlight. Disposal Disposal of the device The symbol shown on the left of a crossed-out dustbin means that this device is subject to Directive 2012/19/EU. This Directive prescribes that this device must not be disposed of in normal household waste at the end of its lifecycle, but it must be brought to a specially designated collection point, recycling depot or disposal company. This disposal is free of charge for the user. Protect the environment and dispose of this device properly. You can obtain further information from your local disposal company or the city or local authority. GB 19
23 Battery disposal Appendix Do not dispose of the batteries in the domestic waste. Defective or worn-out batteries must be recycled according to Directive 2006/66/EC. All consumers are statutorily obliged to dispose of batteries at a collection site in their community/ city district or at a retail store. This obligation is intended to ensure that batteries are disposed of in an environmentally responsible manner. Dispose of batteries only when they are fully discharged. Technical data Input voltage V ~ 50 Hz Protection class II / Batteries for data retention Power consumption (in operation) 2 x 1.5 V type AA/Mignon/LR6 (not supplied) approx. 5 W Power consumption (standby) Speakers power output Frequency range of radio (FM) > 0.8 W approx. 2 x 0.4 W (at 10% harmonic distortion) MHz Station presets 20 Operating temperature Storage temperature +15 C up to +35 C +5 C up to +40 C Humidity (no condensation) 5 to 70% Dimensions (W x H x D) (without adjustable foot) approx. 26 x 5 x 15.5 cm Weight approx. 775 g Notes on the EU Declaration of Conformity With regard to conformity, this device complies with the basic requirements and other relevant provisions of the Electromagnetic Compatibility Directive 2014/30/EU, the Low Voltage Directive 2014/35/EU, the Ecodesign Directive 2009/125/EG and also the RoHS Directive 2011/65/EU. The complete EU Declaration of Conformity is available from the importer. 20 GB
24 Kompernass Handels GmbH warranty Dear Customer, This appliance has a 3-year warranty valid from the date of purchase. If this product has any faults, you, the buyer, have certain statutory rights. Your statutory rights are not restricted in any way by the warranty described below. Warranty conditions The validity period of the warranty starts from the date of purchase. Please keep your original receipt in a safe place. This document will be required as proof of purchase. If any material or production fault occurs within three years of the date of purchase of the product, we will either repair or replace the product for you at our discretion. This warranty service is dependent on you presenting the defective appliance and the proof of purchase (receipt) and a short written description of the fault and its time of occurrence. If the defect is covered by the warranty, your product will either be repaired or replaced by us. The repair or replacement of a product does not signify the beginning of a new warranty period. Warranty period and statutory claims for defects The warranty period is not prolonged by repairs effected under the warranty. This also applies to replaced and repaired components. Any damage and defects present at the time of purchase must be reported immediately after unpacking. Repairs carried out after expiry of the warranty period shall be subject to a fee. Scope of the warranty This appliance has been manufactured in accordance with strict quality guidelines and inspected meticulously prior to delivery. The warranty covers material faults or production faults. The warranty does not extend to product parts subject to normal wear and tear or fragile parts such as switches, batteries, baking moulds or parts made of glass. The warranty does not apply if the product has been damaged, improperly used or improperly maintained. The directions in the operating instructions for the product regarding proper use of the product are to be strictly followed. Uses and actions that are discouraged in the operating instructions or which are warned against must be avoided. This product is intended solely for private use and not for commercial purposes. The warranty shall be deemed void in cases of misuse or improper handling, use of force and modifications / repairs which have not been carried out by one of our authorised Service centres. GB 21
25 Warranty claim procedure Service Importer To ensure quick processing of your case, please observe the following instructions: Please have the till receipt and the item number (e.g. IAN 12345) available as proof of purchase. You will find the item number on the type plate, an engraving on the front page of the instructions (bottom left), or as a sticker on the rear or bottom of the appliance. If functional or other defects occur, please contact the service department listed either by telephone or by . You can return a defective product to us free of charge to the service address that will be provided to you. Ensure that you enclose the proof of purchase (till receipt) and information about what the defect is and when it occurred. You can download these instructions along with many other manuals, product videos and software on Service Great Britain Tel.: ( 0.10/Min.) kompernass@lidl.co.uk IAN Please note that the following address is not the service address. Please use the service address provided in the operating instructions. KOMPERNASS HANDELS GMBH BURGSTRASSE BOCHUM GERMANY 22 GB
26 Innehållsförteckning Inledning...25 Information om den här bruksanvisningen...25 Upphovsrätt...25 Föreskriven användning...25 Varningar...25 Säkerhet...26 Fara på grund av elektricitet...26 Information om batterier...27 Grundläggande säkerhetsanvisningar...27 Beskrivning av delar...29 Ta produkten i bruk...30 Leveransens innehåll och transportinspektion...30 Kassera förpackningen...30 Krav på uppställningsplatsen...31 Montering under ett väggskåp...31 Demontering...32 Ställa upp produkten...32 Koppla ström till produkten...33 Lägga i batterier...33 UKV-bandantenn...33 Användning och drift...34 Göra grundinställningar Ställa in väckningstid och typ av väckning...35 Stänga av alarmsignalen...36 Sätta på/stänga av radion...36 Ställa in volym...36 Söka sändare...36 Ställa in sändare manuellt...37 Spara sändare manuellt...37 Hämta sparade sändare...37 Automatisk sändarsökning (AMS-funktion)...37 Ta emot sändare i mono...38 Kökstimer...38 Sätta på/stänga av dimmer...39 Tända/Släcka LED-belysning...39 SE 23
27 Åtgärda fel...40 Orsaker till fel och åtgärder...40 Rengöring...41 Rengöra höljet...41 Förvara produkten när den inte används...41 Kassering...41 Kassera produkten...41 Kassera batterier...42 Bilaga...42 Tekniska data...42 Information om försäkran om EU-överensstämmelse...42 Garanti från Kompernass Handels GmbH...43 Service...44 Importör SE
28 Inledning Information om den här bruksanvisningen Ett stort grattis till din nyinköpta produkt! Du har valt en produkt med hög kvalitet. Bruksanvisningen ingår som en del av leveransen. Den innehåller viktig information om säkerhet, användning och återvinning. Läs noga igenom alla användar- och säkerhetsanvisningar innan du börjar använda produkten. Använd endast produkten enligt beskrivningarna och i de syften som anges här. Ta väl vara på den här bruksanvisningen. Lämna över all dokumentation tillsammans med produkten om du överlåter den till någon annan person. Upphovsrätt Det här dokumentet skyddas av upphovsrätt. För all form av mångfaldigande eller eftertryck, även delvis, samt återgivning av bilderna, även i förändrat skick, krävs tillverkarens skriftliga tillstånd. Varumärket SilverCrest och varunamnet tillhör respektive ägare. Föreskriven användning Varningar Den här hemelektronikprodukten ska bara användas inomhus för mottagning av radioprogram på UKV, som kökstimer samt för väckning med alarmsignal eller radio. Produkten kan ställas upp fritt eller monteras under ett väggskåp. Då måste man använda antingen den integrerade foten resp. monteringsplattan. All annan eller utökad form av användning strider mot föreskrifterna. Produkten ska inte användas yrkesmässigt eller industriellt. Det finns inga möjligheter att ställa krav på ersättning för skador som är ett resultat av felaktig användning, felaktigt utförda reparationer, otillåtna ändringar på produkten eller för att reservdelar som inte är godkända använts. Allt ansvar vilar på användaren. I den här bruksanvisningen används följande varningar: FARA En varning på den här nivån innebär en akut farlig situation. Om ingenting görs för att åtgärda situationen kan resultatet bli allvarliga personskador eller dödsolyckor. Följ anvisningarna i varningstexten för att undvika svåra personskador och dödsolyckor. SE 25
29 AKTA En varning på den här nivån innebär risk för sakskador. Om ingenting görs för att undvika situationen kan resultatet bli sakskador. Följ anvisningarna i varningstexten för att undvika sakskador. OBSERVERA Under Observera finns extra information som ska hjälpa dig att handskas med produkten. Säkerhet Det här kapitlet innehåller viktig information för säker hantering av produkten. Den här produkten motsvarar gällande säkerhetsbestämmelser. Om den används på fel sätt kan den orsaka person- och sakskador. Fara på grund av elektricitet FARA Livsfarlig elektrisk ström! Det är livsfarligt att komma i kontakt med spänningsförande ledningar eller komponenter! Följ nedanstående säkerhetsanvisningar för att undvika olyckor på grund av elektrisk ström: Använd inte produkten om kontakten eller strömkabeln skadats. Fatta alltid tag om kontakten när du ska dra ut den ur uttaget, dra inte i själva kabeln. Ta aldrig i strömkabeln eller kontakten med våta händer. Du får absolut inte öppna produktens hölje. Om man rör vid spänningsförande anslutningar och förändrar den elektriska och mekaniska konstruktionen finns risk för elchocker och eldsvåda. Stick inte in några föremål i ventilationsöppningarna eller några andra öppningar på produkten. Produkten förbrukar ström även i standbyläget. För att bryta strömförbindelsen helt måste kontakten dras ut ur eluttaget. Därför måste produkten ställas så att man alltid lätt kommer åt det eluttag som används så att det går snabbt att dra ut kontakten i nödsituationer. 26 SE
30 Information om batterier FARA Risk för personskador vid felaktig hantering av batterier! Barn får inte handskas med batterier. De kan stoppa dem i munnen och svälja dem. Om någon råkar svälja ett batteri måste man omedelbart söka medicinsk vård. Batterier får inte kastas i en eld. Batterier får inte utsättas för höga temperaturer. Explosionsrisk! Endast batterier som är märkta som uppladdningsbara får laddas upp igen. Batterier får inte öppnas eller kortslutas. Olika typer av batterier får inte kombineras i produkten. Helt urladdade batterier bör tas ut, eftersom det finns en ökad risk för läckage. Batterierna bör även tas ut ur produkten när den inte används. Batterisyra som läcker från ett batteri kan irritera huden. Vid hudkontakt ska batterisyran sköljas bort i rikligt med vatten. Om vätskan kommer in i ögonen ska man spola med rikligt med vatten, inte gnugga. Uppsök därefter omedelbart en läkare. Hur batterierna sätts in och tas ut ur produkten beskrivs i kapitlet Sätta i batterier. Grundläggande säkerhetsanvisningar Observera följande anvisningar för säker hantering av produkten: Den här produkten kan användas av barn som är minst 8 år och av personer med begränsad fysisk, sensorisk eller mental förmåga eller bristande erfarenhet och/eller kunskap om de hålls under uppsikt eller har instruerats i hur produkten används på ett säkert sätt och inser vilka risker det innebär. Barn får inte leka med produkten. Rengöring och allmän service får bara göras av barn om någon vuxen håller uppsikt. FARA! Förpackningsmaterial är inga leksaker! Håll allt förpackningsmaterial på avstånd från barn. Risk för kvävning! Kontrollera om produkten har några synliga skador innan du använder den. Om produkten är skadad eller har fallit i golvet får den inte användas. Om kablarna eller anslutningarna är skadade ska du låta en auktoriserad fackverkstad eller vår kundtjänst byta ut dem. Skydda anslutningskabeln från heta ytor och vassa kanter. Akta så att kabeln inte spänns för mycket eller bockas. Låt inte anslutningskabeln hänga ner över ett hörn (snubbeltrådseffekt). Låt endast en auktoriserad fackverkstad eller vår kundtjänst reparera produkten. Felaktigt utförda reparationer kan innebära en risk för användaren. Dessutom upphör garantin att gälla. SE 27
31 Defekta delar får endast bytas ut mot reservdelar i original. Det är endast originaldelarna som uppfyller säkerhetskraven. Gör inga egna ombyggnader eller förändringar på produkten. Ställ alltid produkten på en stabil och jämn yta. Den kan skadas om den faller i golvet. Utsätt inte produkten för direkt solljus eller höga temperaturer. Då kan den bli överhettad och skadas så att den inte går att reparera. Sörj för god luftcirkulation för att undvika överhettning. Täck aldrig över produkten. Brandrisk! Placera inte produkten i närheten av värmekällor som element eller andra apparater som alstrar värme. Håll alltid produkten på avstånd från öppna lågor (t ex stearinljus). Produkten är inte avsedd att användas i utrymmen med hög temperatur eller luftfuktighet (t ex badrum) eller där det bildas mycket damm. Skydda produkten från vattenstänk och vattendroppar. Doppa aldrig ner produkten i vatten, ställ den inte i närheten av vatten och ställ inga vätskefyllda kärl (t ex blomvaser) på produkten. Om du märker att det luktar bränt eller ryker om produkten måste du genast dra ut kontakten och ta ut batterierna. Dra ut kontakten ur uttaget vid störningar och åska. 28 SE
32 Beskrivning av delar (se bilder på den uppfällbara sidan) Skruvreglage VOLUME+ ON/OFF Dimmer-knapp Mem/AMS-knapp ST/MO-knapp Monteringsplatta Display Preset + SEARCH +-knapp Preset SEARCH -knapp -knapp Skruvreglage TIMER+ Fot (utfällbar) LED-belysning Högtalare Strömkabel Batterifack Bandantenn för UKV-mottagning Distanshållare (för montering under skåp) Fästskruv (lång) Fästskruv (kort) Bruksanvisning SE 29
33 Ta produkten i bruk Leveransens innehåll och transportinspektion FARA Barn får inte leka med förpackningsmaterial. Det finns risk för kvävning. Ta upp alla delar av produkten och bruksanvisningen ur förpackningen. Ta bort allt förpackningsmaterial. Kontrollera att leveransen är komplett (se uppfällbar sida). Leveransen innehåller följande delar: Köksradio Monteringsplatta 4 distanshållare 4 fästskruvar (långa) 4 fästskruvar (korta) Den här bruksanvisningen OBSERVERA (förmonterad) (symbolisk bild) Kontrollera att leveransen är komplett och inte har några synliga skador. Om någonting saknas eller om leveransen skadats på grund av bristfällig förpackning eller i transporten ska du vända dig till vår Service Hotline (se kapitel Service). Kassera förpackningen Förpackningen ska skydda produkten från transportskador. Förpackningsmaterialet har valts med tanke på miljön och de tekniska förutsättningarna för avfallshantering och kan därför återvinnas. Genom att återföra förpackningen till kretsloppet kan vi spara på råvaror och minska sopberget. Kassera förpackningar som inte behövs längre enligt gällande lokala bestämmelser. OBSERVERA Spara helst originalförpackningen under garantitiden så att du kan använda den för att packa ner produkten ordentligt om du skulle behöva skicka in den för att utnyttja garantin. 30 SE
34 Krav på uppställningsplatsen För att produkten ska fungera säkert och utan problem måste uppställningsplatsen uppfylla följande krav: Ställ produkten på ett fast, plant och vågrätt underlag. Använd den utfällbara foten. Vissa möbelytor innehåller ämnen som kan angripa och mjuka upp gummifötterna. Placera ev. ett underlägg under produktens gummifötter. Ställ produkten så att ventilationsöppningarna och högtalarna inte täcks över. Använd inte produkten där det är hett, vått eller mycket fuktigt och inte i närheten av brännbart material. Produkten måste monteras på ett ställe som inte utsätts för stora mängder ånga. Montera inte produkten direkt ovanför spis, grill, mikro eller liknande tillagningsplatser. Det eluttag som produkten kopplas till måste vara lättåtkomligt så att det går snabbt att dra ut kontakten i nödsituationer. Montering under ett väggskåp 3,1 cm 6,3 cm Med medföljande monteringsplatta väggskåp. Gör då så här: kan du t ex montera produkten under ett För monteringsplattan bakåt och ta loss den från produkten. Leta upp en lämplig plats att montera produkten (se också kapitel Krav på uppställningsplatsen). SE 31
35 Håll monteringsplattan under det ställe där produkten ska monteras. Monteringsplattans främre kant ska då placeras ca 3,1 cm innanför skåpkanten så att övergången mellan produkten och skåpet blir jämn. Monteringsplattans sidor måste befinna sig på ca 6,3 cm avstånd från angränsande skåp eller väggar. Markera de 4 fästpunkterna med t ex ett stift. Gör en liten fördjupning i märkena med ett stift eller en spik. Sätt ev. medföljande distanshållare mellan skåp och monteringsplatta. Om du använder distanshållarna behöver du de långa skruvarna. Skruva fast monteringsplattan med medföljande fästskruvar ( eller ). För in produkten med ovansidan mot monteringsplattan tills den klickar fast. Kontrollera att produkten sitter stadigt och att strömkabeln och bandantennen dras på ett säkert sätt. Demontering Dra produkten framåt för att lossa den från monteringsplattan. Skruva ut fästskruvarna ( eller ) ur monteringsplattan och ta bort plattan från väggskåpet. Ställa upp produkten Alternativt kan produkten också ställas upp. För att ventilationsöppningarna och högtalarna på produktens undersida inte ska täckas över när produkten ställs upp måste foten fällas ut: Ta tag i inbuktningen på foten och fäll ut den så långt det går. Leta upp en lämplig plats att ställa produkten (se också kapitel Krav på uppställningsplatsen). 32 SE
36 Koppla ström till produkten AKTA Jämför uppgifterna för anslutning (spänning och frekvens) på produktens typskylt med angivelserna för ditt elnät innan du ansluter produkten. Dessa data måste stämma överens, annars kan produkten skadas. Sätt kontakten i ett eluttag. Produkten startar en automatisk sändarsökning och sparar de sändare som tas emot på max 20 minnesplatser. På displayen blinkar en kort stund (RDS, radiodatasystem). Om RDS-signalen är tillräckligt bra ställs klockslag och datum in automatiskt. Om RDS-signalen är för svag visas tiden ( ) i displayen och klockslag samt datum måste ställas in manuellt. Lägga i batterier Genom att lägga in två 1,5V-batterier (typ AA/mignon/LR6) undviker man att det inprogrammerade klockslaget, minnesplatserna samt alarmtider försvinner efter ett strömavbrott. Batterierna ser till så att klockan tickar vidare under ett strömavbrott. Displayen släcks emellertid. När strömmen kommer tillbaka visas rätt klockslag automatiskt på displayen. OBSERVERA Produkten kan även användas utan batterier. Display, radio och timer fungerar inte vid nöddrift. Alla inställningar som gjorts återställs efter ett strömavbrott. Öppna locket till batterifacket på produktens undersida. UKV-bandantenn Lägg in 2 stycken 1,5V-batterier av typ AA/mignon/LR6 (ingår inte i leveransen) i batterifacket. Lägg polerna enligt märkningen i facket. Stäng batterifacket igen genom att sätta på locket och låta det snäppa fast. Linda ut hela bandantennen för UKV-mottagning. SE 33
37 Användning och drift Göra grundinställningar Förutsättning: Produkten står på läge klocka/standby. OBSERVERA Om RDS-signalen (RDS, radiodatasystem) är tillräckligt bra ställs klockslag och datum in automatiskt. RDS anpassar inte produkten till sommar- eller vintertid automatiskt och sändarens namn visas inte på displayen. Gör inställningarna snabbt. Inställningen avbryts efter ca 15 sekunder utan aktivitet. Inställningar som gjorts innan dess sparas automatiskt. Håll -knappen inne i ca 2 sekunder. På displayen blinkar tiden i 24-timmarsformat ( ). Använd skruvreglaget TIMER+ för att växla mellan 24-timmars- ( ) och 12-timmarsformatet ( ). OBSERVERA Om du ställt in 12-timmarsformatet ( ) visas PM uppe till vänster på displayen från kl. 12:00 på dagen till klockan 11:59 på kvällen. Från midnatt till kl. 11:59 på förmiddagen visas bara siffrorna på displayen. Tryck på -knappen för att göra inställningen verksam. Timangivelsen blinkar på displayen. Vrid skruvreglaget TIMER+ åt vänster eller höger för att ställa in rätt timme. Tryck på -knappen för att göra inställningen verksam. Minutangivelsen blinkar på displayen. Vrid skruvreglaget TIMER+ åt vänster eller höger för att ställa in minuterna. Tryck på -knappen för att göra inställningen verksam. Årtalsangivelsen visas på displayen. Vrid skruvreglaget TIMER+ åt vänster eller höger för att ställa in årtalet. Tryck på -knappen för att göra inställningen verksam. Månadsangivelsen blinkar på displayen. Vrid skruvreglaget TIMER+ åt vänster eller höger för att ställa in månaden. Tryck på -knappen för att göra inställningen verksam. Dagsangivelsen blinkar på displayen. 34 SE
38 Vrid skruvreglaget TIMER+ åt vänster eller höger för att ställa in dagen. Tryck på -knappen för att göra inställningen verksam. blinkar på displayen (RDS, radiodatasystem). Vrid skruvreglaget TIMER+ åt vänster eller höger för att sätta RDSfunktionen på (av) eller (på). Om RDS-signalen är påkopplad och tillräckligt bra korrigeras klockslag och datum automatiskt vid behov. Tryck på -knappen för att göra inställningen verksam. DT (displaydimmer) blinkar på displayen. Vrid skruvreglaget TIMER+ åt vänster eller höger för att sätta dimmerfunktionen på (av) eller (på). När dimmern är påkopplad stängs displaybelysningen av mellan kl. 23:00 och kl. 05:00. Den här tiden är fast programmerad och kan inte ändras. Tryck på -knappen för att göra inställningen verksam. På displayen visas klockslag, datum och ev. DT och. Tryck på skruvreglaget TIMER+ för att visa årtalet på displayen. Tryck en gång till för att ta fram klockan igen. Ställa in väckningstid och typ av väckning Väckningstid och typ av väckning visas nere till vänster på displayen. Håll Mem/AMS-knappen inne i ca 2 sekunder. Timangivelsen blinkar på displayen. Vrid skruvreglaget TIMER+ åt vänster eller höger för att ställa in rätt timme. Tryck på Mem/AMS-knappen för att göra inställningen verksam. Minutangivelsen blinkar på displayen. Vrid skruvreglaget TIMER+ åt vänster eller höger för att ställa in minuterna. Tryck på Mem/AMS-knappen för att göra inställningen verksam. Väckning med radio blinkar på displayen. Vrid skruvreglaget TIMER+ en gång åt höger för att ställa in väckningstypen på (av). Vrid skruvreglaget TIMER+ åt höger en gång till för att ställa in väckningstyp alarmsignal. Tryck på Mem/AMS-knappen för att göra väckningstypen verksam. OBSERVERA Tryck på Mem/AMS-knappen för att visa väckningstiden i några sekunder. Vid ett strömavbrott avaktiveras de programmerade väckningstiderna och de återaktiveras inte när strömmen kommer tillbaka. SE 35
IAN KITCHEN RADIO SKR 800 B2 KÖKSRADIO RADIO KUCHENNE KÜCHENRADIO VIRTUVINIS RADIJAS. Bruksanvisning och säkerhetsanvisningar
 KITCHEN RADIO KÖKSRADIO Bruksanvisning och säkerhetsanvisningar RADIO KUCHENNE Instrukcja obsługi i wskazówki bezpieczeństwa VIRTUVINIS RADIJAS Naudojimo instrukcija ir saugos nurodymai KÜCHENRADIO Bedienungsanleitung
Bruksanvisning för hjärta LED Bruksanvisning for hjerte LED Instrukcja obsługi serce LED User Instructions for heart LED
 422-516 Bruksanvisning för hjärta LED Bruksanvisning for hjerte LED Instrukcja obsługi serce LED User Instructions for heart LED SE - Bruksanvisning i original NO - Bruksanvisning i original PL - Instrukcja
422-496. Bruksanvisning för tomte LED Bruksanvisning for nisse LED Instrukcja obsługi mikołaj LED User Instructions for Gnome LED
 422-496 Bruksanvisning för tomte LED Bruksanvisning for nisse LED Instrukcja obsługi mikołaj LED User Instructions for Gnome LED SE - Bruksanvisning i original NO - Bruksanvisning i original PL - Instrukcja
LED WASHER 30x3W WHITE IP65 F
 USER MANUAL / INSTRUKCJA OBSŁUGI LED WASHER 30x3W WHITE IP65 F7200171 LED WASHER 30x3W WHITE IP65 F7200171 Table of contents 1 Introduction... 2 2 Safety information... 2 3 Product information... 2 3.1
SE - Bruksanvisning i original NO - Bruksanvisning i original PL - Instrukcja obsługi w oryginale EN - Operating instructions in original
 422-464 Bruksanvisning för ljusslinga LED Bruksanvisning for lysslynge LED Instrukcja obsługi Łańcuch świetlny LED User instructions for light strand LED SE - Bruksanvisning i original NO - Bruksanvisning
WYŁĄCZNIK CZASOWY OUTDOOR TIMER
 003-582 PL WYŁĄCZNIK CZASOWY Instrukcja obsługi (Tłumaczenie oryginalnej instrukcji) Ważny! Przed użyciem uważnie przeczytaj instrukcję obsługi! Zachowaj ją na przyszłość. EN OUTDOOR TIMER Operating instructions
BLACKLIGHT SPOT 400W F
 BLACKLIGHT SPOT 400W F2000339 USER MANUAL / INSTRUKCJA OBSŁUGI BLACKLIGHT SPOT 400W F2000339 Table of Contents 1 Introduction... 2 2 Safety information... 2 3 Product information... 2 3.1 Specification...
Bruksanvisning för lysrörsarmatur 2 x 18 W. Instrukcja obsługi oprawy świetlówkowej 2 x 18 W. Operating Instructions for Strip Light 2 x 18 W
 Bruksanvisning för lysrörsarmatur 2 x 18 W Instrukcja obsługi oprawy świetlówkowej 2 x 18 W Operating Instructions for Strip Light 2 x 18 W 424-054 SV PL EN Bruksanvisning i original Instrukcja obsługi
422-995. Bruksanvisning för ljusslinga Bruksanvisning for lysslynge Instrukcja obsługi girlandy świetlnej User Instructions for light strand
 422-995 Bruksanvisning för ljusslinga Bruksanvisning for lysslynge Instrukcja obsługi girlandy świetlnej User Instructions for light strand SE - Bruksanvisning i original NO - Bruksanvisning i original
940-172. Bruksanvisning för väggklocka Bruksanvisning for veggur Instrukcja obsługi zegara ściennego User Instructions for wall clock
 940-172 Bruksanvisning för väggklocka Bruksanvisning for veggur Instrukcja obsługi zegara ściennego User Instructions for wall clock SE - Bruksanvisning i original NO - Bruksanvisning i original PL - Instrukcja
POWER BANK KM0209-KM0211
 Bedienungsanleitung POWER BANK KM0209-KM0211 OWNER S MANUAL INSTRUKCJA OBSŁUGI PL EN Owner s manual SAFETY INFORMATION Before use, read this manual carefully and follow its instructions. Producer does
Bruksanvisning för toppstjärna Bruksanvisning for toppstjerne Instrukcja obsługi gwiazda na choinkę User instructions for top star
 422-548 Bruksanvisning för toppstjärna Bruksanvisning for toppstjerne Instrukcja obsługi gwiazda na choinkę User instructions for top star SE - Bruksanvisning i original NO - Bruksanvisning (Oversettelse
Zasady bezpieczeństwa
 2 3 Zasady bezpieczeństwa GB The door and the feeding flap must be closed when operating the machine! PL Drzwiczki i klapka szczeliny podawczej muszą być zamknięte w trakcie używania urządzenia! GB Ensure
Bruksanvisning för lykta LED. Bruksanvisning for LED-lykt. Instrukcja obsługi latarenki LED. User Instructions for LED lamp
 Bruksanvisning för lykta LED Bruksanvisning for LED-lykt Instrukcja obsługi latarenki LED User Instructions for LED lamp 422-964 SV NO PL EN Bruksanvisning i original Bruksanvisning i original Instrukcja
 www.irs.gov/form990. If "Yes," complete Schedule A Schedule B, Schedule of Contributors If "Yes," complete Schedule C, Part I If "Yes," complete Schedule C, Part II If "Yes," complete Schedule C, Part
311186J. Copyright 2004, Graco Inc. is registered to I.S. EN ISO 9001
 311186J Copyright 2004, Graco Inc. is registered to I.S. EN ISO 9001 2 3 4 5 6 7 8 9 10 11 12 13 14 15 16 17 18 19 20 21 Graco warrants all equipment referenced in this document which is manufactured by
INSTRUCTION MANUAL. Strona 1
 INSTRUCTION MANUAL www.flash-butrym.pl Strona 1 LED SPOT LIGHT INSTRUCTION MANUAL Thank you for purchasing the LEDSPOT10W Spot light. It is a small and easy to carry unit that is simple to install. Features:
Bruksanvisning för väckarklocka Bruksanvisning for vekkeklokke Instrukcja obsługi budzika User Instructions for alarm clock
 940-180 Bruksanvisning för väckarklocka Bruksanvisning for vekkeklokke Instrukcja obsługi budzika User Instructions for alarm clock SE - Bruksanvisning i original NO - Bruksanvisning i original PL - Instrukcja
HAPPY ANIMALS L01 HAPPY ANIMALS L03 HAPPY ANIMALS L05 HAPPY ANIMALS L07
 HAPPY ANIMALS L0 HAPPY ANIMALS L0 HAPPY ANIMALS L0 HAPPY ANIMALS L07 INSTRUKCJA MONTAŻU ASSEMBLY INSTRUCTIONS Akcesoria / Fittings K ZW W8 W7 Ø x 6 szt. / pcs Ø7 x 70 Narzędzia / Tools DO MONTAŻU POTRZEBNE
HAPPY ANIMALS L02 HAPPY ANIMALS L04 HAPPY ANIMALS L06 HAPPY ANIMALS L08
 HAPPY ANIMALS L02 HAPPY ANIMALS L04 HAPPY ANIMALS L06 HAPPY ANIMALS L08 INSTRUKCJA MONTAŻU ASSEMBLY INSTRUCTIONS Akcesoria / Fittings K O G ZW W8 W4 20 szt. / pcs 4 szt. / pcs 4 szt. / pcs 4 szt. / pcs
POWER BANK. Owner s manual Instrukcja obsługi EN PL
 POWER BANK Owner s manual Instrukcja obsługi EN PL Safety instructions Owner s manual 1. Read this instruction manual before first use, and keep it for future reference. Producer is not responsible for
DO MONTAŻU POTRZEBNE SĄ DWIE OSOBY! INSTALLATION REQUIRES TWO PEOPLE!
 1 HAPPY ANIMALS B09 INSTRUKCJA MONTAŻU ASSEMBLY INSTRUCTIONS Akcesoria / Fittings K1 M M1 ZM1 Z T G1 17 szt. / pcs 13 szt. / pcs B1 13 szt. / pcs W4 13 szt. / pcs W6 14 szt. / pcs U1 1 szt. / pcs U N1
LED MAGIC BALL MP3 F
 USER MANUAL / INSTRUKCJA OBSŁUGI LED MAGIC BALL MP3 F7000623 LED MAGIC BALL MP3 F7000623 Table of contents 1 Introduction... 2 2 Safety information... 2 3 Product information... 2 3.1 Specification...
423-420. Bruksanvisning för bordslampa Bruksanvisning for bordlampe Instrukcja obsługi lampa stołowa User Instructions for table lamp
 423-420 Bruksanvisning för bordslampa Bruksanvisning for bordlampe Instrukcja obsługi lampa stołowa User Instructions for table lamp SE - Bruksanvisning i original NO - Bruksanvisning i original PL - Instrukcja
423-458. Bruksanvisning för fönsterlampa Bruksanvisning for vinduslampe Instrukcja obsługi lampa okienna User Instructions for window lamp
 423-458 Bruksanvisning för fönsterlampa Bruksanvisning for vinduslampe Instrukcja obsługi lampa okienna User Instructions for window lamp SE - Bruksanvisning i original NO - Bruksanvisning i original PL
SSW1.1, HFW Fry #20, Zeno #25 Benchmark: Qtr.1. Fry #65, Zeno #67. like
 SSW1.1, HFW Fry #20, Zeno #25 Benchmark: Qtr.1 I SSW1.1, HFW Fry #65, Zeno #67 Benchmark: Qtr.1 like SSW1.2, HFW Fry #47, Zeno #59 Benchmark: Qtr.1 do SSW1.2, HFW Fry #5, Zeno #4 Benchmark: Qtr.1 to SSW1.2,
 www.irs.gov/form990. If "Yes," complete Schedule A Schedule B, Schedule of Contributors If "Yes," complete Schedule C, Part I If "Yes," complete Schedule C, Part II If "Yes," complete Schedule C, Part
SE - Bruksanvisning i original NO - Bruksanvisning i original PL - Instrukcja obsługi w oryginale EN - Operating instructions in original
 956-128 Bruksanvisning för campingbord med stolar Bruksanvisning for campingbord med stoler Instrukcja obsługi stołu kempingowego z krzesłami User instructions for camping table with chairs SE - Bruksanvisning
Selfie Monopod MA426. Instrukcja obsługi User s Manual
 Selfie Monopod MA426 Instrukcja obsługi User s Manual PL Selfie Monopod Przeczytaj wszystkie instrukcje przed użyciem oraz zachowaj te informacje do wykorzystania w przyszłości. Zestaw: 1x mobile phone
Jazz EB207S is a slim, compact and outstanding looking SATA to USB 2.0 HDD enclosure. The case is
 1. Introduction Jazz EB207S is a slim, compact and outstanding looking SATA to USB 2.0 HDD enclosure. The case is made of aluminum and steel mesh as one of the coolest enclosures available. It s also small
SE HÖGSKÅP Bruksanvisning i original Viktigt! Läs bruksanvisningen noggrant innan användning! Spara den för framtida behov.
 003896 SE HÖGSKÅP Bruksanvisning i original Viktigt! Läs bruksanvisningen noggrant innan användning! Spara den för framtida behov. NO HØYSKAP Bruksanvisning (Oversettelse av original bruksanvisning) Viktig!
423-339. Bruksanvisning för LED-downlight Bruksanvisning for LED-downlight Instrukcja obsługi lampy punktowej LED User instructions for LED Downlight
 423-339 Bruksanvisning för LED-downlight Bruksanvisning for LED-downlight Instrukcja obsługi lampy punktowej LED User instructions for LED Downlight SE - Bruksanvisning i original NO - Bruksanvisning i
SE - Bruksanvisning i original NO - Bruksanvisning i original PL - Instrukcja obsługi w oryginale EN - Operating instructions in original
 422-462 Bruksanvisning för ljusslinga LED Bruksanvisning for lysslynge LED Instrukcja obsługi Łańcuch świetlny LED User instructions for light strand LED SE - Bruksanvisning i original NO - Bruksanvisning
HAPPY K04 INSTRUKCJA MONTAŻU ASSEMBLY INSTRUCTIONS DO MONTAŻU POTRZEBNE SĄ DWIE OSOBY! INSTALLATION REQUIRES TWO PEOPLE! W5 W6 G1 T2 U1 U2 TZ1
 HAPPY K0 INSTRUKCJA MONTAŻU ASSEMBLY INSTRUCTIONS W Akcesoria / Fittings W W G K szt. / pcs M Ø Ø 0 Ø, Ø Ø. 0 ø8 M 8 szt. / pcs 0 szt. / pcs szt. / pcs T U U szt. / pcs szt. / pcs szt. / pcs S TZ szt.
Universal Bluetooth speaker
 Universal Bluetooth speaker Owner s manual Instrukcja obsługi EN PL Safety instructions Owner s manual 1. Read this instruction manual before first use, and keep it for future reference. Producer is not
Bruksanvisning för batteridriven juldekoration. Bruksanvisning for batteridrevet juledekorasjon
 425-422 Bruksanvisning för batteridriven juldekoration Bruksanvisning for batteridrevet juledekorasjon Instrukcja obsługi dekoracji bożonarodzeniowej na baterie Operating instructions for battery-powered
DO MONTAŻU POTRZEBNE SĄ DWIE OSOBY! INSTALLATION REQUIRES TWO PEOPLE!
 1 HAPPY ANIMALS SZ11 A INSTRUKCJA MONTAŻU ASSEMBLY INSTRUCTIONS Akcesoria / Fittings K1 M M1 ZM1 Z G1 szt. / pcs 0 szt. / pcs B1 6 szt. / pcs 6 szt. / pcs W6 0 szt. / pcs U1 19 szt. / pcs U 50 szt. / pcs
FOG MACHINE FLZ-1500 DMX+ RE F
 FOG MACHINE FLZ-1500 DMX+ RE F5100336 USER MANUAL / INSTRUKCJA OBSŁUGI FOG MACHINE FLZ-1500 DMX+ RE F5100336 Table of Contents 1 Introduction... 2 2 Safety information... 2 3 Product information... 3 3.1
Bruksanvisning för kökstimer. Bruksanvisning for kjøkkentimer. Instrukcja obsługi minutnika kuchennego. User Instructions for Kitchen Timer
 Bruksanvisning för kökstimer Bruksanvisning for kjøkkentimer Instrukcja obsługi minutnika kuchennego User Instructions for Kitchen Timer 943-115 SV NO PL EN Bruksanvisning i original Bruksanvisning i original
SE - Bruksanvisning i original NO - Bruksanvisning i original PL - Instrukcja obsługi w oryginale EN - Operating instructions in original
 422-497 Bruksanvisning för ljusslinga tomtar LED Bruksanvisning for lysslynge nisser LED Instrukcja obsługi łańcucha mikołaje LED User Instructions for light strand gnomes LED SE - Bruksanvisning i original
DO MONTAŻU POTRZEBNE SĄ DWIE OSOBY! INSTALLATION REQUIRES TWO PEOPLE!
 HAPPY ANIMALS RW08 INSTRUKCJA MONTAŻU ASSEMBLY INSTRUCTIONS Akcesoria / Fittings K M M ZM ZW G 0 szt. / pcs W szt. / pcs B szt. / pcs szt. / pcs W U 8 szt. / pcs 4 szt. / pcs U N szt. / pcs Ø3 x szt. /
422-590. Bruksanvisning för ljusslinga Bruksanvisning for lysslynge Instrukcja obsługi łańcucha świetlnego User instructions for string light
 422-590 Bruksanvisning för ljusslinga Bruksanvisning for lysslynge Instrukcja obsługi łańcucha świetlnego User instructions for string light SE - Bruksanvisning i original NO - Bruksanvisning (Oversettelse
SE ENTRÉTAK Bruksanvisning i original Viktigt! Läs bruksanvisningen noggrant innan användning! Spara den för framtida behov.
 005060 SE ENTRÉTAK Bruksanvisning i original Viktigt! Läs bruksanvisningen noggrant innan användning! Spara den för framtida behov. NO ENTRÉTAK Bruksanvisning (Oversettelse av original bruksanvisning)
Bruksanvisning för bordslampa. Bruksanvisning for bordlampe. Instrukcja obsługi lampy biurkowej. User Instructions for Table Lamp
 Bruksanvisning för bordslampa Bruksanvisning for bordlampe Instrukcja obsługi lampy biurkowej User Instructions for Table Lamp 425-067 SV NO PL EN Bruksanvisning i original Bruksanvisning i original Instrukcja
Bruksanvisning för lampfot Bruksanvisning for lampefot Instrukcja obsługi podstawa lampy User instructions for lamp base
 423-531 Bruksanvisning för lampfot Bruksanvisning for lampefot Instrukcja obsługi podstawa lampy User instructions for lamp base SE - Bruksanvisning i original NO - Bruksanvisning (Oversettelse av original
LED PAR 56 7x10 4in1 RGBW F
 USER MANUAL / INSTRUKCJA OBSŁUGI LED PAR 56 7x10 4in1 RGBW F7100311 LED PAR 56 7x10W 4in1 RGBW F7100311 Table of Contents 1 Introduction... 2 2 Safety information... 2 3 Product information... 2 3.1 Specification...
619-622. Bruksanvisning för digital däckdjupstestare. Bruksanvisning for digital dekkdybdemåler
 619-622 Bruksanvisning för digital däckdjupstestare Bruksanvisning for digital dekkdybdemåler Instrukcja obsługi cyfrowego miernika głębokości bieżnika opony User instructions for digital tyre tread gauge
Bruksanvisning för batteridriven julstjärna. Instrukcja obsługi gwiazdy bożonarodzeniowej na baterie
 422-420 Bruksanvisning för batteridriven julstjärna Bruksanvisning for batteridrevet julestjerne Instrukcja obsługi gwiazdy bożonarodzeniowej na baterie User instructions for battery powered powered Star
HÄNGMATTA NO HENGEKØYE HAMAK HAMMOCK
 000-811 SE HÄNGMATTA Bruksanvisning i original Viktigt! Läs bruksanvisningen noggrant innan användning! Spara den för framtida behov. NO HENGEKØYE Bruksanvisning (Oversettelse av original bruksanvisning)
Bruksanvisning för ljusslinga modell. Bruksanvisning for lysslynge modell. Instrukcja obsługi łańcucha świetlnego
 Bruksanvisning för ljusslinga modell Bruksanvisning for lysslynge modell Instrukcja obsługi łańcucha świetlnego Operating Instructions for String of Lights 946-314 SV NO PL EN Bruksanvisning i original
Bruksanvisning för glaskula LED. Bruksanvisning for glasskule LED. Instrukcja obsługi bąbki szklanej LED. User Instructions for Glass ball LED
 Bruksanvisning för glaskula LED Bruksanvisning for glasskule LED Instrukcja obsługi bąbki szklanej LED User Instructions for Glass ball LED 422-963 SV NO PL EN Bruksanvisning i original Bruksanvisning
LED WALL WASHER 36x3W RGBW 3SC IP65 F
 USER MANUAL / INSTRUKCJA OBSŁUGI LED WALL WASHER 36x3W RGBW 3SC IP65 F7200168 LED WALL WASHER 36x3W RGBW 3SC IP65 F7200168 Table of contents 1 Introduction... 2 2 Safety information... 2 3 Product information...
Installation of EuroCert software for qualified electronic signature
 Installation of EuroCert software for qualified electronic signature for Microsoft Windows systems Warsaw 28.08.2019 Content 1. Downloading and running the software for the e-signature... 3 a) Installer
420-068. Bruksanvisning för lampa LED Bruksanvisning for lampe LED Instrukcja obsługi lampki LED User instructions for lamp LED
 420-068 Bruksanvisning för lampa LED Bruksanvisning for lampe LED Instrukcja obsługi lampki LED User instructions for lamp LED SE - Bruksanvisning i original Rätten till ändringar förbehålles. Vid eventuella
1,5 kw/4 t LOG SPLITTER. Item no ,5 kw/ 4 t LOG SPLITTER 1,5 kw/ 4 t VEDKLØYVER. 1,5 kw/ 4 t ŁUPARKA DO DREWNA. 1,5 kw/ 4 t VEDKLYV
 1,5 kw/4 t LOG SPLITTER Item no. 008121 OPERATING INSTRUCTIONS BRUKSANVISNING 1,5 kw/ 4 t LOG SPLITTER 1,5 kw/ 4 t VEDKLØYVER Important! Read the user instructions carefully before use. Save them for future
 !850016! www.irs.gov/form8879eo. e-file www.irs.gov/form990. If "Yes," complete Schedule A Schedule B, Schedule of Contributors If "Yes," complete Schedule C, Part I If "Yes," complete Schedule C,
[ROBOKIDS MANUAL] ROBOROBO
![[ROBOKIDS MANUAL] ROBOROBO](/thumbs/24/4313056.jpg "[ROBOKIDS MANUAL] ROBOROBO") 1 2 When you plug in or unplug the cable, be sure to insert pressing the hook of the connection cable. If you want to input the program to your robot, you should first connect the Card reader with the
1 2 When you plug in or unplug the cable, be sure to insert pressing the hook of the connection cable. If you want to input the program to your robot, you should first connect the Card reader with the
Bruksanvisning för julby med tåg. Bruksanvisning for juleby med tog. Instrukcja obsługi świątecznej wioski z pociągiem
 Bruksanvisning för julby med tåg Bruksanvisning for juleby med tog Instrukcja obsługi świątecznej wioski z pociągiem User Instructions for Christmas Village with Train 422-426 SV NO PL EN Bruksanvisning
Instrukcja obsługi miernika zużycia energii. Operating Instructions for Power Meter
 POL SKI Instrukcja obsługi miernika zużycia energii Operating Instructions for Power Meter 406-074 PL EN Instrukcja obsługi w oryginale Operating instructions in original 20.06.2011 Jula AB POLSKI ZASADY
 www.irs.gov/form990. If "Yes," complete Schedule A Schedule B, Schedule of Contributors If "Yes," complete Schedule C, Part I If "Yes," complete Schedule C, Part II If "Yes," complete Schedule C, Part
422-540. Bruksanvisning för adventsljus Bruksanvisning for adventsstake Instrukcja obsługi świecznika adwentowego User instructions for advent light
 422-540 Bruksanvisning för adventsljus Bruksanvisning for adventsstake Instrukcja obsługi świecznika adwentowego User instructions for advent light SE - Bruksanvisning i original NO - Bruksanvisning (Oversettelse
957-189. Bruksanvisning för pannlampa Bruksanvisning for hodelykt Instrukcja obsługi lampy czołowej User Instructions for headlamp
 957-189 Bruksanvisning för pannlampa Bruksanvisning for hodelykt Instrukcja obsługi lampy czołowej User Instructions for headlamp SE - Bruksanvisning i original NO - Bruksanvisning i original PL - Instrukcja
Distributör/ Distributør/ Dystrybutor/ Distributor Jula Poland Sp. z o.o., ul. Malborska 49, 03-286 Warszawa, Polska
 422-467 422-474 Bruksanvisning för julstjärna Bruksanvisning for julestjerne Instrukcja obsługi gwiazda bożonarodzeniowa Operating instructions for Christmas star SE - Bruksanvisning i original Rätten
INSTRUKCJA UŻYTKOWNIKA
 INSTRUKCJA UŻYTKOWNIKA Wierzymy, że będziemy kroczyć do przodu. Z pasją powiększamy nasze doświadczenie. Zapominamy o frustracjach, ale nie o naszym niewyczerpanym potencjale. Chcemy osiągnąć i przekroczyć
EN Desktop Weather Station Instruction Manual
 V3067 EN Desktop Weather Station Instruction Manual Introduction This desktop weather station comes with weather prediction, clock, calendar, day, temperature and humidity display. It is battery powered
DM-ML, DM-FL. Auxiliary Equipment and Accessories. Damper Drives. Dimensions. Descritpion
 DM-ML, DM-FL Descritpion DM-ML and DM-FL actuators are designed for driving round dampers and square multi-blade dampers. Example identification Product code: DM-FL-5-2 voltage Dimensions DM-ML-6 DM-ML-8
TACHOGRAPH SIMULATOR DTCOSIM
 TACHOGRAPH SIMULATOR DTCOSIM Service Manual USB-KSIM interface General description The simulator is a device that is used as a replacement for tachograph in the vehicle where the tachograph is not mandatory,
Bruksanvisning för LED-list. Bruksanvisning for LED-list. Instrukcja obsługi listwy LED. User Instructions for LED Strip
 Bruksanvisning för LED-list Bruksanvisning for LED-list Instrukcja obsługi listwy LED User Instructions for LED Strip 423-310 SV NO PL EN Bruksanvisning i original Bruksanvisning i original Instrukcja
LED PAR 18x10W RGBW 4in1 IP65 F
 LED PAR 18x10W RGBW 4in1 IP65 F7100310 USER MANUAL / INSTRUKCJA OBSŁUGI LED PAR 18x10W RGBW 4in1 IP65 F7100310 Table of contents 1 Introduction... 2 2 Safety information... 2 2.1 Specification... 2 3 Installation...
LED PAR Set 4x PAR 36 12x3W F
 USER MANUAL / INSTRUKCJA OBSŁUGI LED PAR Set 4x PAR 36 12x3W F7100306 Table of contents 1 Introduction... 2 2 Safety information... 2 3 Specification... 2 4 Installation... 3 5 Connections... 3 5.1 Connecting
LED WASHER RGB IP34 F
 USER MANUAL / INSTRUKCJA OBSŁUGI LED WASHER RGB IP34 F7200182 LED WASHER RGB IP34 F7200182 Table of contents 1 Introduction... 2 2 Safety information... 2 3 Product information... 2 3.1 Specification...
Zakopane, plan miasta: Skala ok. 1: = City map (Polish Edition)
") Zakopane, plan miasta: Skala ok. 1:15 000 = City map (Polish Edition) Click here if your download doesn"t start automatically Zakopane, plan miasta: Skala ok. 1:15 000 = City map (Polish Edition) Zakopane,
Zakopane, plan miasta: Skala ok. 1:15 000 = City map (Polish Edition) Click here if your download doesn"t start automatically Zakopane, plan miasta: Skala ok. 1:15 000 = City map (Polish Edition) Zakopane,
LED PAR 18x 10W RGBW 4in1 Aluminium single cast v.iii F B
 LED PAR 18x 10W RGBW 4in1 Aluminium single cast v.iii F7000048B USER MANUAL / INSTRUKCJA OBSŁUGI LED PAR 18x 10W RGBW 4in1 Aluminium single cast v.iii F7000048B Table of Contents 1 Introduction... 2 2
UV LED LAMP 9 W LAMPA UV LED 9 W
 UV LED LAMP 9 W LAMPA UV LED 9 W Operation Manual Instrukcja obsługi -Please read the manual carefully before using- -Proszę przeczytać instrukcję obsługi przed użyciem- UV LED LAMP 9 W - 2017/01 PACKAGE
USB firmware changing guide. Zmiana oprogramowania za przy użyciu połączenia USB. Changelog / Lista Zmian
 1 / 12 Content list / Spis Treści 1. Hardware and software requirements, preparing device to upgrade Wymagania sprzętowe i programowe, przygotowanie urządzenia do aktualizacji 2. Installing drivers needed
LED PAR 64 18x10W 4in1 CLASSIC F
 LED PAR 64 18x10W 4in1 CLASSIC F7100309 USER MANUAL / INSTRUKCJA OBSŁUGI LED PAR 64 18x10W 4in1 CLASSIC F7100309 Table of Contents 1 Introduction... 2 2 Safety information... 2 3 Product information...
Instrukcja obsługi. binding machine KRIS. instruction manual. 80-393 GDAŃSK ul. Krynicka 1 tel.: (058) 55 43 555 fax: (058) 55 43 500 ODDZIAŁ:
 55 43 555 fax: (058) 55 43 500 ODDZIAŁ:") Instrukcja obsługi instruction manual 80-393 GDAŃSK ul. Krynicka 1 tel.: (058) 55 43 555 fax: (058) 55 43 500 ODDZIAŁ: 02-784 WARSZAWA ul. Janowskiego 9 tel.: (022) 648 03 48..49 fax: (022) 648 03 50 bindownica
Instrukcja obsługi instruction manual 80-393 GDAŃSK ul. Krynicka 1 tel.: (058) 55 43 555 fax: (058) 55 43 500 ODDZIAŁ: 02-784 WARSZAWA ul. Janowskiego 9 tel.: (022) 648 03 48..49 fax: (022) 648 03 50 bindownica
LED PAR 18x10W RGBW 4in1 Aluminum single cast II ver. F
 LED PAR 18x10W RGBW 4in1 Aluminum single cast II ver. F71000269 USER MANUAL / INSTRUKCJA OBSŁUGI LED PAR 18x 10W RGBW 4in1 Aluminium single cast II ver. F71000269 Table of Contents 1 Introduction... 2
LED MINI DERBY 4x3W RGBW F
 USER MANUAL / INSTRUKCJA OBSŁUGI LED MINI DERBY 4x3W RGBW F7000598 LED MINI DERBY 4x3W RGBW F7000598 Table of contents 1 Introduction... 2 2 Safety information... 2 3 Product information... 2 3.1 Specification...
Bruksanvisning för LED-downlight. Bruksanvisning for LED-downlight. Instrukcja obsługi lampy punktowej LED. User Instructions for LED Downlight
 Bruksanvisning för LED-downlight Bruksanvisning for LED-downlight Instrukcja obsługi lampy punktowej LED User Instructions for LED Downlight 423-321 SV NO PL EN Bruksanvisning i original Bruksanvisning
Stacja filtracyjna MCP-16RC
 Kompaktowy filtr kartridżowy, czyszczony impulsami sprężonego powietrza jest kompaktowym filtrem kartridżowym do lokalnego oczyszczania powietrza w pomieszczeniach, gdzie jest możliwy odzysk powietrza.
 www.irs.gov/form990. If "Yes," complete Schedule A Schedule B, Schedule of Contributors If "Yes," complete Schedule C, Part I If "Yes," complete Schedule C, Part II If "Yes," complete Schedule C, Part
Camspot 4.4 Camspot 4.5
 User manual (addition) Dodatek do instrukcji obsługi Camspot 4.4 Camspot 4.5 1. WiFi configuration 2. Configuration of sending pictures to e-mail/ftp after motion detection 1. Konfiguracja WiFi 2. Konfiguracja
SE - Bruksanvisning i original NO - Bruksanvisning i original PL - Instrukcja obsługi w oryginale EN - Operating instructions in original
 422-994 Bruksanvisning för julkalender LED Bruksanvisning for julekalender LED Instrukcja obsługi kalendarza adwentowego LED User Instructions for advent calendar LED SE - Bruksanvisning i original NO
Bruksanvisning för batterijlus LED. Bruksanvisning for batterilys LED. Instrukcja obsługi świeczki LED na baterie
 Bruksanvisning för batterijlus LED Bruksanvisning for batterilys LED Instrukcja obsługi świeczki LED na baterie User Instructions for battery light LED 422-387 SV NO PL EN Bruksanvisning i original Bruksanvisning
379-075. Bruksanvisning för skoställ Bruksanvisning for skostativ Instrukcja obsługi stojaka na buty User instructions for shoe rack
 379-075 Bruksanvisning för skoställ Bruksanvisning for skostativ Instrukcja obsługi stojaka na buty User instructions for shoe rack SE - Bruksanvisning i original NO - Bruksanvisning i original PL - Instrukcja
 www.irs.gov/form990. If "Yes," complete Schedule A Schedule B, Schedule of Contributors If "Yes," complete Schedule C, Part I If "Yes," complete Schedule C, Part II If "Yes," complete Schedule C, Part
user s manual NV-002MIC
 user s manual NV-002MIC NV-002MIC - user's manual, ver. 1.0 INFORMATION EMC (2004/108/EC) and LVD (2006/95/EC ) Directives CE Marking Our products are manufactured to comply with requirements of following
Presenter SNP6000. Register your product and get support at Instrukcja obsługi
 Register your product and get support at www.philips.com/welcome Presenter SNP6000 PL Instrukcja obsługi 1 a b c d e 2 3 4 Federal Communication Commission Interference Statement This equipment has been
Car MP3 Player MM211. Aby zapewnić prawidłową obsługę sprzętu zapoznaj się dokładnie z instrukcją i zachowaj ją na przyszłość.
 Car MP3 Player MM211 Aby zapewnić prawidłową obsługę sprzętu zapoznaj się dokładnie z instrukcją i zachowaj ją na przyszłość. To ensure proper use of this product please read this User s Manual carefully
FOG MACHINE FLZ-2000 DMX + LED 3in1 RGB F
 FOG MACHINE FLZ-2000 DMX + LED 3in1 RGB F5100331 USER MANUAL / INSTRUKCJA OBSŁUGI FOG MACHINE FLZ-2000 DMX + LED 3in1 RGB F5100331 Table of Contents 1 Introduction... 2 2 Safety information... 2 3 Product
Bruksanvisning för fönsterlampa Bruksanvisning for vinduslampe Instrukcja obsługi lampa okienna User Instructions for window lamp
 423-459 Bruksanvisning för fönsterlampa Bruksanvisning for vinduslampe Instrukcja obsługi lampa okienna User Instructions for window lamp SE - Bruksanvisning i original NO - Bruksanvisning i original PL
FOG MACHINE FLM RE II ver. F
 FOG MACHINE FLM -1500+ RE II ver. F5100333 USER MANUAL / INSTRUKCJA OBSŁUGI FOG MACHINE FLM-1500+ RE II ver. F5100333 Table of Contents 1 Introduction... 2 2 Safety information... 2 3 Product information...
Hippo Boombox MM209N CD. Instrukcja obsługi User s Manual
 Hippo Boombox Instrukcja obsługi User s Manual OPIS PRZYCISKÓW: PL ON-OFF/MODE: 1. Włącz on/off: Naciśnij przycisk, aby włączyć urządzenie. Przytrzymaj dłużej, aby wyłączyć. 2. MODE: Wybierz źródło sygnału:
UV LED LAMP 24 W LAMPA UV LED 24 W
 UV LED LAMP 24 W LAMPA UV LED 24 W Operation Manual / Instrukcja obsługi -Please read the manual carefully before using- -Proszę przeczytać instrukcję obsługi przed użyciem- PACKAGE CONTAINS UV LED lamp
INSTRUKCJA OBSŁUGI OPERATIONAL MANUAL KRZESEŁKO / HIGH CHAIR MINI WYPRODUKOWANO ZGODNIE Z NORMĄ PN-EN 14988
 PL INSTRUKCJA OBSŁUGI OPERATIONAL AL MANUAL KRZESEŁKO / HIGH CHAIR MINI WYPRODUKOWANO ZGODNIE Z NORMĄ PN-EN 14988 A B C D E F G PL WAŻNE! ZACHOWAĆ W CELU POWOŁANIA SIĘ W PRZYSZŁOŚCI! OSTRZEŻENIA Nieprzestrzeganie
POLITYKA PRYWATNOŚCI / PRIVACY POLICY
 POLITYKA PRYWATNOŚCI / PRIVACY POLICY TeleTrade DJ International Consulting Ltd Sierpień 2013 2011-2014 TeleTrade-DJ International Consulting Ltd. 1 Polityka Prywatności Privacy Policy Niniejsza Polityka
LED PAR 64 18x12W RGBW 4in1 ZOOM IP65 F
 LED PAR 64 18x12W RGBW 4in1 ZOOM IP65 F7100250 USER MANUAL / INSTRUKCJA OBSŁUGI LED PAR 64 18x12W RGBW 4in1 ZOOM IP65 F7100250 Table of contents 1 Introduction... 2 2 Safety information... 2 2.1 Specification...