INSTRUKCJA OBSŁUGI INSTRUCTIONS FOR USE GEBRAUCHSANWEISUNG
|
|
|
- Konrad Piotrowski
- 7 lat temu
- Przeglądów:
Transkrypt

1 INSTRUKCJA OBSŁUGI INSTRUCTIONS FOR USE GEBRAUCHSANWEISUNG KÓŁKA Z UCHWYTEM DO FOTELIKÓW SAMOCHODOWYCH WHEELS WITH A STRAP FOR A BABY CAR SEAT RÄDER MIT GRIFF FÜR EINE BABYSCHALE


2 ZDJĘCIA/ PHOTOS/ FOTOS: 1. kółka z adapterami wheels with adapters Räder mit Adaptern 2. uchwyt / the strap / Der Griff


3
4 PL: INSTRUKCJA OBSŁUGI Produkt składa się z adapterów z kółkami (FOT. 1) oraz uchwytu (FOT. 2). Produkt służy do przenoszenia i przewożenia dziecka w foteliku za pomocą kółek na niewielkiej odległości, na równej i suchej powierzchni. OSTRZEŻENIA: 1. Przed instalacją i użyciem produktu przeczytaj uważnie instrukcję obsługi i zachowaj ją na przyszłość. 2. W przypadku niestosowania zaleceń wynikających z instrukcji obsługi, zagrożone może być bezpieczeństwo dziecka. 3. Używaj produktu wyłącznie do fotelików wskazanych w instrukcji. Używanie produktu w innych modelach fotelików może być niebezpieczne. 4. Produkt powinien być używany wyłącznie poza samochodem. 5. Podczas montażu i demontażu adapterów z kółkami oraz podczas używania produktu, zawsze upewnij się, że dziecko jest prawidłowo zapięte pasami fotelika. 6. Każdorazowo przed podniesieniem fotelika upewnij się, czy jego pałąk jest zablokowany w pozycji pionowej (do noszenia), a uchwyt jest zamontowany zgodnie z instrukcją. 7. Każdorazowo przed przewiezieniem dziecka w foteliku z użyciem kółek, upewnij się, czy pałąk fotelika jest zablokowany w pozycji poziomej. 8. Każdorazowo przed przewiezieniem dziecka w foteliku z użyciem kółek, upewnij się, czy adaptery są prawidłowo zatrzaśnięte w gniazdach mocujących fotelika. 9. Za każdym razem gdy przenosisz lub przewozisz dziecko w foteliku przy użyciu produktu, upewnij się, że dziecko jest prawidłowo zapięte pasami fotelika. Nie zapięcie dziecka pasami grozi jego wypadnięciem lub wysunięciem się z fotelika. 10. Nie wolno przewozić dziecka w foteliku z użyciem kółek po drogach publicznych i niepublicznych, w zatłoczonych miejscach, po nierównościach, po schodach czy stromych nawierzchniach. W takich miejscach nie przewoź dziecka w foteliku z użyciem kółek, ale przenieś fotelik. 11. Nigdy nie pozostawiaj dziecka w foteliku bez opieki, ani w samochodzie ani poza nim. Pozostawienie dziecka bez opieki może być dla niego niebezpieczne. Odpowiedzialność za bezpieczeństwo i stały nadzór nad dzieckiem spoczywa na Tobie. 12. Nigdy nie stawiaj fotelika z dzieckiem z zamontowanym produktem wysoko np. na stole, blacie, łóżku itp. 13. Przy przewożeniu dziecka w foteliku z użyciem kółek zawsze uważnie obserwuj otoczenie, monitoruj przeszkody, zwracaj uwagę na nadchodzących ludzi, pojazdy, zwierzęta. 14. Produkt służy do przenoszenia i przewożenia dziecka przez krótki okres czasu. Prawidłowy rozwój dziecka wymaga regularnych zmian jego pozycji. 15. Przenosząc i przewożąc dziecko w foteliku z użyciem kółek nie biegnij. 16. Zachowaj ostrożność na pochyłych powierzchniach. Przewożąc dziecko w foteliku z użyciem kółek zawsze trzymaj uchwyt w dłoni. Przy większej pochyłości nie przewoź dziecka w foteliku, ale przenieś fotelik. 17. Zachowaj ostrożność na nierównej powierzchni. Gdy pokonujesz większą nierówność, np. krawężnik, nie przewoź dziecka w foteliku z użyciem kółek, ale przenieś fotelik. 18. Trzymaj opakowanie i jego elementy z dala od dzieci, aby uniknąć niebezpieczeństwa uduszenia. 19. Nie pozwalaj dziecku na zabawę produktem, opakowaniem produktu i jego elementami. Produkt może być użytkowany wyłącznie przez osobę dorosłą zgodnie z instrukcją obsługi. 20. Nie przewoź ani nie przenoś w foteliku dziecka cięższego niż 13 kg. 21. Uchwyt powinien być dobrze dopasowany do wzrostu osoby dorosłej korzystającej z produktu. Jeżeli uchwyt nie będzie dopasowany zgodnie z instrukcją, może to mieć wpływ na stabilność fotelika.
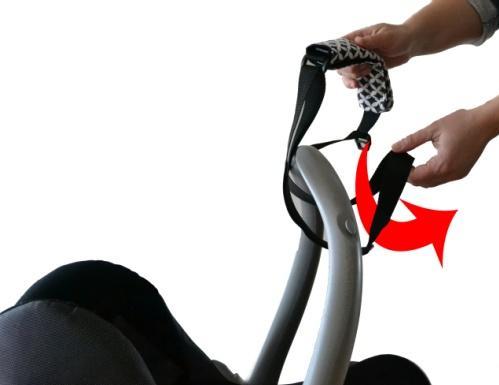
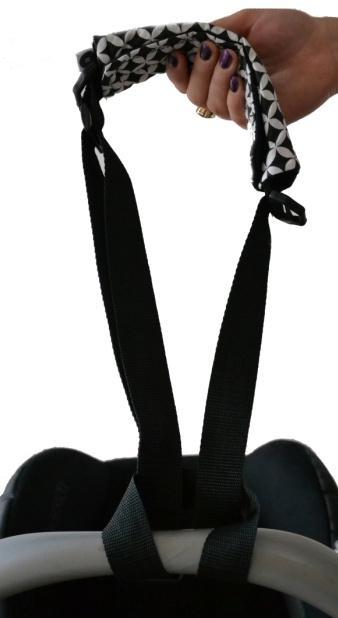
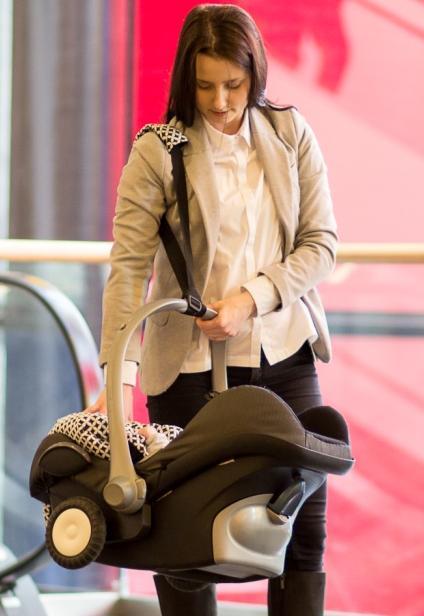
5 22. Kontroluj regularnie uchwyt oraz adaptery z kółkami, sprawdzając zużycie i uszkodzenia. 23. Przy przenoszeniu dziecka w foteliku za pomocą uchwytu na ramieniu, zawsze trzymaj pałąk fotelika w dłoni, co zapobiega upuszczeniu fotelika np. w przypadku zsunięcia się uchwytu z ramienia. 24. Usuń adaptery z gniazd fotelika każdorazowo gdy przewozisz dziecko w foteliku w samochodzie. INSTRUKCJA UŻYTKOWANIA: MONTAŻ ADAPTERÓW Z KÓŁKAMI DO FOTELIKA: Przed montażem adapterów z kółkami do fotelika zapoznaj się z instrukcją obsługi danego modelu fotelika, wskazującą w jaki sposób zamontować fotelik do adapterów ramy wózka. Umieść adaptery z kółkami w gniazdach mocujących fotelika i zatrzaśnij je na adapterach - lewy adapter (L) do lewego gniazda, a prawy (R) do prawego (FOT. 1, FOT. 3). Przed użyciem produktu zawsze sprawdź czy adaptery są zatrzaśnięte i bezpiecznie zamontowane. MONTAŻ UCHWYTU DO FOTELIKA: Upewnij się, że uchwyt nie jest skręcony. Przeprowadź końcówkę dolnej części taśmy uchwytu (krótsza część taśmy z krótszym ochraniaczem - FOT. 2 A) pod pałąkiem fotelika, a następnie przeprowadź przez końcówkę taśmy całą resztę uchwytu z ochraniaczem (FOT. 4). Naciągnij taśmę tak mocno, jak to jest możliwe, aby zacisnęła się na pałąku fotelika (FOT. 5). Zablokuj pałąk służący do przenoszenia fotelika w pozycji poziomej (FOT. 6). Za pomocą regulatorów dostosuj długość uchwytu w taki sposób, aby przy delikatnym uniesieniu tyłu fotelika (ok. 5 cm nad podłożem) krótszą osłonkę swobodnie trzymać w dłoni (FOT. 8, 10, 12). Przypnij górną część uchwytu (FOT. 2 B) do dolnej części uchwytu (FOT. 2 A) i dostosuj długość uchwytu w taki sposób, aby przy delikatnym uniesieniu tyłu fotelika taśma z dłuższym ochraniaczem swobodnie spoczywała na ramieniu (FOT. 8, 9). DEMONTAŻ ADAPTERÓW: Przed demontażem adapterów zapoznaj się z instrukcją obsługi danego modelu fotelika, wskazującą w jaki sposób zdemontować fotelik z adapterów ramy wózka. Naciśnij przycisk zwalniający adapter, jednocześnie przytrzymując i ciągnąc adapter w dół (FOT. 7). Usuń adaptery z gniazd mocujących fotelika każdorazowo gdy przewozisz dziecko w foteliku w samochodzie. PRZEWOŻENIE DZIECKA W FOTELIKU POZA SAMOCHODEM (Z UŻYCIEM KÓŁEK): Fotelik z prawidłowo zamontowanym produktem umożliwia wygodne przewiezienie dziecka za pomocą kółek w foteliku po podłożu, bez konieczności noszenia fotelika. Przed przewiezieniem dziecka w foteliku, upewnij się, czy dziecko jest prawidłowo zapięte pasami fotelika. Pałąk służący do przenoszenia fotelika musi być zablokowany w pozycji poziomej (FOT. 6). W celu przewiezienia dziecka w foteliku z użyciem kółek, końcówkę taśmy z dłuższą osłonką (FOT. 2 B) oprzyj na ramieniu, a krótszą osłonkę uchwyć w dłoni (FOT. 2 A, 9). Przewożąc dziecko w foteliku nie idź przed fotelikiem, tylko prowadź fotelik z boku i zawsze trzymaj krótszy ochraniacz (FOT 2 A) w dłoni, tak aby mieć kontrolę nad dzieckiem i ruchem fotelika. FOT. 13 wskazuje prawidłową pozycję w stosunku do fotelika, FOT. 14 nieprawidłową. Taśma powinna zostać dopasowana do wzrostu osoby przewożącej fotelik w taki sposób aby przy delikatnym uniesieniu tyłu fotelika (ok. 5 cm nad podłożem) była napięta zarówno w części dolnej, jak i w części spoczywającej na ramieniu (FOT. 9, 12) oraz aby zachować wyprostowaną postawę. W celu wprowadzenia w ruch fotelika, należy pociągnąć dłonią uchwyt, w taki sposób, że tylnia część fotelika, do której zaczepiony jest uchwyt, oderwie się delikatnie od podłoża (FOT. 9, 12). Podczas przewożenia dziecka tylnia część fotelika nie powinna być uniesiona o więcej niż ok. 5 cm nad podłożem. Możliwe jest także odpięcie górnej części taśmy i korzystanie wyłącznie z uchwytu trzymanego w dłoni (FOT. 10). PRZENOSZENIE DZIECKA W FOTELIKU PRZY UŻYCIU TAŚMY: Pałąk służący do przenoszenia fotelika musi być zablokowany w pozycji pionowej (do noszenia) (FOT. 11). Upewnij się, że czy uchwyt jest prawidłowo przytwierdzony do pałąka fotelika. W celu
6 przeniesienia dziecka w foteliku przy pomocy produktu, końcówkę taśmy z krótszą osłonką oprzyj na ramieniu (FOT. 2 A), a dłonią trzymaj pałąk fotelika (FOT. 11). Zawsze przytrzymuj pałąk fotelika w dłoni, co zapobiega upuszczeniu fotelika. GB: INSTRUCTIONS FOR USE The product consists of adapters with wheels (photo 1) and the strap (photo 2). You can use product to carry and transport your child in the car seat for short trips, on even and dry ground. WARNINGS: 1. Before installing and using the product read this instruction manual carefully and retain it for future reference. 2. Your child s safety may be affected if you do not follow these instructions. 3. You can only use the Rollersy with the car seat brands indicated in this instruction manual. Failure to comply with this may be dangerous. 4. The product is designed for be used only outside the car. 5. During installation and removal of the adapters with wheels, as well as during usage of the product, always make sure that your child is properly buckled in by car seat harness. 6. Before lifting the car seat, always ensure the carrying handle is "clicked into the upright carrying position, and the Rollersy strap is attached properly, in accordance with this instruction manual. 7. Always before wheeling your child in the car seat with the Rollersy, place the car seat s carrying handle into the horizontal sleeping position. 8. Always before using the Rollersy, check to make sure that the adapters are properly clicked/installed in the car seat, as per this instruction manual. 9. Always before lifting the car seat and before transporting your child in its car seat with Rollersy, make sure your child is securely buckled in by car seat harness, to prevent it from falling or sliding out. 10. Do not transport your child in the car seat using wheels on roads, in crowded places, on obstacles, stairs or slopes. Lift and carry the car seat instead. 11. Never leave a child unattended in the car seat while in the car or elsewhere. It may be dangerous to leave your child unattended. Your child s safety is your responsibility. 12. Never leave the car seat with Rollersy on a raised surface, such as a table, table top, bed etc. as it can fall off. 13. While transporting your child in the car seat with Rollersy, always carefully watch the surroundings, monitor the obstacles, look out for coming people, vehicles, animals. 14. You can use Rollersy to carry and transport your child in the car seat only for short trips. It is important for proper motor and muscle development that you change your child s position regularly. 15. Never run while carrying or wheeling your child with the Rollersy. 16. Do not transport your child on sloping ground when using the Rollersy, but lift and carry the car seat instead. At all times ensure to hold the Rollersy strap. 17. Be careful on uneven ground. Do not use Rollersy when encountering obstacles, for example a step. Instead, lift and carry the car seat. 18. Keep the packaging and its elements away from children, to avoid the risk of suffocation. 19. Do not let your child play with this product, the packaging or its elements. The product can be used only by an adult person in accordance with this instruction manual. 20. The product is suitable for children up to 13 kg only. 21. Adjust the length of the Rollersy strap to the height of the adult using the product. If the strap is not correctly adjusted according to the instructions, the stability of the car seat may be affected. 22. Check the strap and the adapters with wheels regularly, verifying the wear and any damages in the product.
7 23. When using the Rollersy strap for lifting and carrying a child in the car seat on your shoulder, always hold the carrying handle of the car seat in your hand. This will prevent accidents, for example dropping the car seat. 24. Always remove the adapters with wheels from the car seat when using the seat as a car seat. INSTRUCTIONS FOR ASSEMBLY/ DISASSEMBLY: INSTALLING THE ROLLERSY ADAPTERS WITH WHEELS TO THE CAR SEAT: Before installation of the Rollersy adapters to your car seat, read your car seat instruction manual, showing how to attach the car seat to the baby stroller frame. Follow the same process to attach Rollersy adapters with wheels to the car seat and lock them in place the left adapter (L) on the left side of the car seat and the right adapter (R) on the right side. Check to make sure the adapters are properly clicked in the car seat (photo 1, photo 3). Always before using the product ensure that the adapters are properly clicked in and installed safely into the car seat. ATTACHMENT OF THE ROLLERSY STRAP: Make sure the strap is not twisted. Place the end of the hand section of the strap (shorter belt with shorter soft pad - photo 2 A) around the carrying handle, and then slide the rest of the strap with the pads into the end of the lower section of the strap (photo 4). Tighten the strap as much as possible on the carrying handle (photo 5). Click the carrying handle into the horizontal sleeping position (photo 6). Using regulators adjust the length of the strap, so that you can easily hold the shorter pad in your hand when the back of the car seat is slightly raised (about 5 cm above the ground) (photo 8, 10, 12). Attach the shoulder section of the strap (photo 2 B) to the hand section of the strap (photo 2 A) and adjust the length of the strap, so that you can easily put the longer pad on your shoulder when the back of the seat is slightly raised (photo 8, 9). REMOVING THE ADAPTERS: Before removing the adapters, read your car seat instruction manual, showing how to remove the car seat from the baby stroller frame. Push in the control button on one side of the car seat while removing the adapter from the car seat (photo 7). Always remove the adapters from the seat before using the car seat in the car. USING ROLLERSY FOR TRANSPORTATION OF A CHILD IN THE CAR SEAT OUTSIDE THE CAR (USING WHEELS): A car seat with properly installed product enables convenient transportation of a child in the car seat on the ground, with the use of the adapters with wheels and a strap, without carrying heavy car seat. Always before transportation of a child in the car seat, make sure if your child is fastened securely with the car seat harness. The carrying handle must be locked in horizontal sleeping position (photo 6). When using the product to transport your child in the car seat using adapters with wheels, put the strap with the longer pad (photo 2 B) on your shoulder and hold the shorter pad in your hand (photo 2 A, 9). While transporting your child in the car seat, do not walk ahead of the seat, but walk alongside it, and always hold the shorter pad in your hand (photo 2 A), to control movement of the seat. photo 13 shows correct position relative to the car seat, photo 14 shows the incorrect position. Adjust the length of the strap to your height, so that the strap is tight in the hand section and in the shoulder section when the back of the car seat is slightly raised (about 5 cm above the ground) and you can keep an upright posture (photo 9, 12). To move the car seat, pull the strap so that, the back of the seat, to which the strap is attached, is slightly raised off the ground (photo 9, 12). While transporting your child in the car seat, the back of the car seat shouldn t be raised more than about 5 cm above the ground. It is also possible to unfasten the shoulder section of the strap and using only the hand section of the strap (photo 10). USING THE STRAP FOR LIFTING AND CARRYING A CHILD IN THE CAR SEAT: The carrying handle must be locked in an upright - carrying position (photo 11). Make sure the strap is attached properly to the carrying handle of the car seat. For lifting and carrying a child in the car seat using the product, use the hand section of the strap (photo 2 A). Put the shorter soft pad on
8 your shoulder while holding the carrying handle in your hand (photo 11). Always hold the carrying handle of your car seat in your hand, to prevent the child dropping out of the car seat. D: GEBRAUCHSANWEISUNG Das Produkt besteht aus den Adaptern mit Rädern (Abb. 1) und dem Griff (Abb. 2). Das Produkt dient zum kurzzeitigen Befördern des Kindes im Sitz mit Rädern auch auf Kurzstrecken, einer ebenen und trockenen Fläche. WARNUNGEN: 1. Schauen Sie sich vor der Installation und Benutzung des Produkts diese Gebrauchsanweisung sorgfältig an und bewahren Sie die Gebrauchsanweisung für eine zukünftige Verwendung auf. 2. Falls Sie die Empfehlungen dieser Gebrauchsanweisung nicht beachten, kann die Sicherheit des Kindes bedroht werden. 3. Benutzen Sie das Produkt nur für Sitze, die in der Gebrauchsanweisung genannt wurden. Die Benutzung in anderen Sitztypen kann gefährlich sein. 4. Das Produkt darf ausschließlich außerhalb des Autos benutzt werden. 5. Vergewissern sie sich, sowohl bei der Montage und Demontage der Adapter mit Rädern, als auch beim Benutzen des Produktes, ob das Kind ordnungsgemäß mit dem Hosenträger- Gurtsystem der Babyschale angeschnallt ist. 6. Überprüfen Sie immer zuerst, ob der Tragebügel in die Trageposition (aufrecht) eingerastet und der Griff gemäß der Gebrauchsanweisung montiert ist, bevor Sie den Sitz anheben. 7. Überprüfen Sie immer zuerst, ob der Tragebügel waagerecht eingerastet ist, bevor Sie das Kind im Sitz mit Rädern befördern. 8. Überprüfen Sie immer zuerst, ob die Adapter in die Befestigungen des Sitzes richtig eingerastet sind, bevor Sie das Kind im Sitz mit Rädern befördern wollen. 9. Immer dann, wenn Sie das Kind im Sitz tragen oder befördern, vergewissern Sie sich, ob das Kind mit dem Hosenträger-Gurtsystem richtig angeschnallt ist. Wird das Kind mit dem Hosenträger-Gurtsystem nicht angeschnallt, kann es aus dem Sitz herausfallen oder herausrutschen. 10. Es ist verboten, das Kind im Sitz mit Rädern auf öffentlichen und nicht öffentlichen Straßen, an belebten Orten, auf Unebenheiten, Treppen oder steilen Oberflächen zu befördern. In solchen Fällen befördern Sie das Kind nicht im Sitz mit Rädern, sondern tragen den Sitz. 11. Lassen Sie das Kind nie unbeaufsichtigt im Sitz zurück, nicht im Auto und nicht außerhalb des Autos. Das Kind unbeaufsichtigt zurückzulassen, kann gefährlich sein. Sie tragen die Verantwortung für die Sicherheit und die stetige Aufsicht über das Kind. 12. Stellen Sie den Sitz nie mit dem Kind auf eine erhöhte Oberfläche, wie.z.b. Tisch, Arbeitsplatte, Bett, usw. 13. Beim Befördern des Kindes im Sitz mit Rädern beobachten Sie immer aufmerksam die Umgebung und werden auf Hindernisse, ankommende Personen, Fahrzeuge und Tiere aufmerksam. 14. Das Produkt dient zum kurzzeitigen Befördern des Kindes im Sitz mit Rädern.. Für eine gute Entwicklung des Kindes ist es wichtig, dass es regelmäßig verschiedene Positionen einnimmt. 15. Rennen Sie nicht, wenn Sie das Kind im Sitz mit Rädern tragen oder befördern. 16. Auf schrägen Oberflächen gehen Sie vorsichtig vor. Wenn Sie das Kind im Sitz mit Rädern befördern, halten Sie immer den Griff in der Hand. Bei größeren Neigungen befördern Sie das Kind nicht im Sitz, sondern tragen die Babyschale. 17. Auf unebenen Oberflächen gehen Sie vorsichtig vor. Wenn Sie eine größere Unebenheit überwinden, z.b. Bordsteinkante, befördern Sie das Kind nicht im Sitz mit Rädern, sondern tragen die Babyschale.
9 18. Bewahren Sie Verpackungsmaterial und dessen Elementen außer Reichweite der Kinder auf, um Erstickungsgefahr zu verhindern. 19. Lassen Sie das Kind mit dem Produkt, Verpackungsmaterial und deren Elemente nicht spielen. Das Produkt darf nur durch Erwachsene gemäß der Gebrauchsanweisung benutzt werden. 20. Es ist nicht zulässig, ein Kind im Sitz zu befördern oder zu tragen, dessen Körpergewicht schwerer ist als 13 kg ist. 21. Der Griff muss richtig an die Größe des Erwachsenen angepasst werden, der das Produkt benutzt. Wird der Griff nicht gemäß der Gebrauchsanweisung angepasst, kann es die Stabilität der Babyschale beeinflussen. 22. Überprüfen Sie regelmäßig den Griff und Adapter mit Rädern auf deren Verbrauch und Beschädigungen. 23. Wenn Sie das Kind im Sitz mit dem Griff über der Schulter tragen, halten Sie immer den Tragebügel in der Hand. Dies verhindert, dass der Sitz, z.b. beim Rutschen des Griffs von der Schulter fällt. 24. Entfernen Sie die Adapter aus den Befestigungen des Sitzes, immer wenn Sie das Kind im Sitz im Auto befördern. GEBRAUCHSANWEISUNG: MONTAGE DER ADAPTER MIT RÄDERN AN DEN SITZ: Vor der Montage der Adapter mit Rädern an den Sitz lesen Sie die Gebrauchsanweisung des gegebenen Sitzmodells, die darauf hinweist, wie der Sitz an die Adapter des Kinderwagenrahmens montiert werden soll. Schieben Sie die Adapter mit Rädern in die Befestigungen des Sitzes hinein und lassen Sie diese in die Adapter einrasten - den linken Adapter (L) in die linke Befestigung und den rechten Adapter (R) in die rechte Befestigung (Abb. 1, 3). Vor dem Gebrauch des Produkts muss immer überprüft werden, ob die Adapter eingerastet und sicher montiert sind. MONTAGE DES GRIFFES AN DEN SITZ: Vergewissern Sie sich, ob der Griff nicht verdreht ist. Legen Sie das Ende des unteren Teils des Griffbandes (kürzerer Teil des Bandes mit kürzerem Gurtpolster Abb. 2A) unter den Tragebügel des Sitzes und dann legen Sie den restlichen Griff mit Gurtpolster durch das Ende des Bandes (Abb. 4). Spannen Sie das Band so stark wie möglich, bis es in den Tragebügel des Sitzes eingerastet ist (Abb. 5). Lassen Sie den Tragebügel zum Tragen des Sitzes in die waagerechte Position einrasten (Abb. 6). Passen Sie des Griffs mit den Reglern so, dass es beim leichten Anheben des hinteren Teils des Sitzes (ca. 5 cm über den Boden) möglich ist, das kürzere Griffpolster in der Hand frei zu halten (Abb. 8, 10, 12). Stecken Sie den oberen Teil des Griffs (Abb. 2 B) an den unteren Teil des Griffs (Abb. 2 A) an und lassen Sie die Länge des Griffs so angleichen, dass es beim leichten Anheben des hinteren Teils des Sitzes möglich ist, das Band mit dem längeren Gurtpolster frei auf die Schulter zu legen (Abb. 8, 9). DEMONTAGE DER ADAPTER: Vor der Demontage der Adapter lesen Sie die Gebrauchsanweisung des gegebenen Sitzmodells, die darauf hinweist, wie der Sitz aus den Adaptern des Kinderwagenrahmens demontiert werden soll. Drücken Sie auf den Adapterknopf sowie halten und ziehen Sie den Adapter gleichzeitig nach unten (Abb. 7). Entfernen Sie die Adapter aus den Befestigungen des Sitzes, immer wenn Sie das Kind im Sitz im Auto befördern. BEFÖRDERN DES KINDES IM SITZ AUSSERHALB DES AUTOS (MIT RÄDERN): Der Sitz, an den das Produkt richtig montiert wurde, ermöglicht einen bequemen Transport des Kindes dank der Rädern über dem Boden, ohne Notwendigkeit, den Sitz zu tragen. Immer dann, wenn Sie das Kind im Sitz befördern, vergewissern Sie sich, ob das Kind mit dem Hosenträger- Gurtsystem richtig angeschnallt ist. Der Tragebügel zum Tragen des Sitzes muss in die waagerechte Position eingerastet sein (Abb. 6). Um das Kind im Sitz mit Rädern zu befördern, legen Sie das Ende des Bandes mit dem längeren Gurtpolster (Abb. 2 B) auf die Schulter, und halten Sie das kürzere Gurtpolster in der Hand (Abb. 2 A, 9). Beim Befördern des Kindes im Sitz gehen Sie nie
10 vor dem Sitz, sondern seitlich und halten Sie immer das kürzere Gurtpolster in der Hand (Abb. 2 A), so dass Sie die Aufsicht über das Kind haben können. Abb. 13 zeigt die richtige Position dem Sitz gegenüber, Abb. 14 zeigt dagegen die falsche Position. Das Band muss an die Größe der Person, die den Sitz befördert, so angepasst werden, dass es beim leichten Anheben des hinteren Teils des Sitzes (ca. 5 cm über den Boden) sowohl im unteren Teil als auch im auf der Schulter liegenden Teil gespannt ist (Abb. 9, 12) und die aufrechte Körperhaltung möglich ist. Um den Sitz in Bewegung zu setzen, muss der Griff mit der Hand so gezogen werden, dass der hintere Teil des Sitzes, an den der Griff eingehakt ist, sich vom Boden fein löst (Abb. 9, 12). Beim Befördern des Kindes darf der hintere Teil des Sitzes nicht mehr als ca. 5 cm über den Boden angehoben werden. Es ist auch möglich, den oberen Teil des Bandes abzuschnallen und nur den Griff in der Hand zu benutzen (Abb. 10). TRAGEN DES KINDES IM SITZ MIT BAND: Der Tragebügel zum Tragen des Sitzes muss in die aufrechte Position (zum Tragen) eingerastet sein (Abb. 11). Vergewissern Sie sich, ob der Griff an den Tragebügel des Sitzes richtig montiert ist. Um das Kind im Sitz mit dem Produkt zu tragen, stützen Sie das Ende des Bandes mit dem kürzeren Polstergurt (Abb. 2 A) auf die Schulter und halten Sie den Tragebügel des Sitzes mit der Hand (Abb. 11). Halten Sie immer den Tragebügel des Sitzes in der Hand, so dass der Sitz nicht fällt. PL: KONSERWACJA: Adaptery oraz kółka mogą być czyszczone wodą z mydłem. Taśma oraz materiałowe osłonki mogą być prane ręcznie w delikatnym środku piorącym w temperaturze nie wyższej niż 30 C. Nie prasować. Nie suszyć mechanicznie. Nie czyścić chemicznie. Nie chlorować. SKŁAD: UCHWYT: taśma - polipropylen 100%, osłonki: obszycie bawełna 100%, wkład: włóknina silikonowa poliester 100%, rzep - nylon 100%; WOREK: bawełna 100%. GB: MAINTENANCE: Adapters with wheels can be cleaned with mild detergent and water. The strap and material pads can be hand washed with mild detergent at max. 30 C. Do not iron. Do not tumble dry. Do not dry clean. Do not bleach. COMPOSITION: STRAP: belt - polypropylene 100%, pads: hem cotton 100%, contribution: silicone nonwoven polyester 100%, bur - nylon 100%, BAG: cotton 100%. DE: WARTUNG: Die Adapter und Räder können mit Seifenwasser gereinigt werden. Das Band mit Materialgurtpolstern kann in einem zarten Waschmittel bei einer Temperatur von mindestens 30 C handgewaschen werden. Nicht bügeln. Nicht chemisch reinigen. Nicht maschinell trocknen. Nicht chloren. BESTANDTEILE: GRIFF: Band - Polypropylen 100%, Gurtpolster: Bezug Baumwolle 100%, Einlage: Silikonfaserrohstoff Polyester 100%, Klettverschluss - Nylon 100%; TASCHE: Baumwolle 100%. PL: SEGREGACJA ODPADÓW: Ze względu na ochronę środowiska, po otwarciu opakowania i złomowaniu części produktu po jego użytkowaniu, prosimy o segregację odpadów. Przepisy dotyczące segregacji odpadów i wywozu śmieci mogą się różnić w każdym kraju. Prosimy o przestrzeganie odpowiednich przepisów dotyczących utylizacji odpadów.
11 GB: WASTE SEPARATION: As we care for the environment, we request the user to separate the waste produced at the start (packaging) and end (product parts) of the life of the product. Waste removal is arranged differently depending on the country. We request to observe your country s waste disposal regulations. DE: ABFALLTRENNUNG: Aus Umweltschutzgründen bitten wir den Benutzer nach der Öffnung der Verpackung und nach der Verschrottung der Produktteile nach dessen Verwendung den anfallenden Abfall zu trennen. Die Vorschriften über die Abfalltrennung und Müllabfuhr können in jedem Land verschieden sein. Wir bitten Sie darum, die entsprechenden Vorschriften über die Wiederverwertung von Abfällen zu beachten. PL: KOMPATYBILNE FOTELIKI: Produkt jest przeznaczony do zamontowania do fotelików samochodowych dla dzieci do 13 kg (grupa 0-13 kg). Przed zakupem produktu zawsze upewnij się, czy będzie on pasował do określonego modelu fotelika samochodowego. Pełna lista fotelików, do których pasuje produkt znajduje się poniżej: GB: COMPATIBLE CAR SEATS: The product is suitable for children to approximately 13 kg (group 0-13 kg). Always check to make sure the product fits in your car seat properly before purchasing it. Below you can find the full list of car seats compatible with the product: DE: KOMPATIBEL BABYSCHALEN: Das Produkt dient zur Montage an die Kindersitze für Kinder bis 13 kg (Gruppe 0-13 kg). Vor dem Kauf des Produkts vergewissern Sie sich immer, ob es zum bestimmten Kindersitzmodell passen wird. Eine vollständige Liste der zum Produkt passenden Sitze finden Sie unten: BE SAFE IZI GO BE SAFE IZI GO MODULAR I-SIZE CYBEX ATON Q CYBEX ATON Q PLUS CYBEX ATON Q I-SIZE CYBEX ATON M CYBEX CLOUD Q CYBEX CLOUD Q PLUS MAXI COSI CABRIOFIX MAXI COSI PEBBLE MAXI COSI PEBBLE PLUS MAXI COSI CITY MAXI COSI CITY SPS SAFETY 1ST ONE SAFE XT X-LANDER X-CAR X-LANDER BE SAFE AVIONAUT ULTRALITE
12 WYPRODUKOWANO W POLSCE/ MADE IN POLAND HERGESTELLT IN POLEN PRODUCENT/ PRODUCER/ PRODUZENT: ROLLERSY Sp. z o.o. ul. Piasta 16a/ Rybnik info@rollersy.com
INSTRUKCJA OBSŁUGI INSTRUCTIONS FOR USE GEBRAUCHSANWEISUNG GEBRUIKSAANWIJZING
 INSTRUKCJA OBSŁUGI INSTRUCTIONS FOR USE GEBRAUCHSANWEISUNG GEBRUIKSAANWIJZING KÓŁKA Z UCHWYTEM DO FOTELIKÓW SAMOCHODOWYCH WHEELS WITH A STRAP FOR A BABY CAR SEAT RÄDER MIT GRIFF FÜR EINE BABYSCHALE WIELEN
HAPPY ANIMALS L01 HAPPY ANIMALS L03 HAPPY ANIMALS L05 HAPPY ANIMALS L07
 HAPPY ANIMALS L0 HAPPY ANIMALS L0 HAPPY ANIMALS L0 HAPPY ANIMALS L07 INSTRUKCJA MONTAŻU ASSEMBLY INSTRUCTIONS Akcesoria / Fittings K ZW W8 W7 Ø x 6 szt. / pcs Ø7 x 70 Narzędzia / Tools DO MONTAŻU POTRZEBNE
HAPPY ANIMALS L02 HAPPY ANIMALS L04 HAPPY ANIMALS L06 HAPPY ANIMALS L08
 HAPPY ANIMALS L02 HAPPY ANIMALS L04 HAPPY ANIMALS L06 HAPPY ANIMALS L08 INSTRUKCJA MONTAŻU ASSEMBLY INSTRUCTIONS Akcesoria / Fittings K O G ZW W8 W4 20 szt. / pcs 4 szt. / pcs 4 szt. / pcs 4 szt. / pcs
User Manual Instrukcja obsługi
 www.twistcar.eu User Manual Instrukcja obsługi KKS Jakub Sadowski Sp. J. Łowicka 51/23A 02-535 Warszawa, Poland biuro@twistcar.eu Pojazd dziecięcy Twist-ball Dziękujemy za zakup pojazdu dziecięcego Twist-ball.
DO MONTAŻU POTRZEBNE SĄ DWIE OSOBY! INSTALLATION REQUIRES TWO PEOPLE!
 1 HAPPY ANIMALS B09 INSTRUKCJA MONTAŻU ASSEMBLY INSTRUCTIONS Akcesoria / Fittings K1 M M1 ZM1 Z T G1 17 szt. / pcs 13 szt. / pcs B1 13 szt. / pcs W4 13 szt. / pcs W6 14 szt. / pcs U1 1 szt. / pcs U N1
099 Łóżko półpiętrowe 2080x1010(1109)x Bunk bed 2080x1010(1109)x1600 W15 INSTRUKCJA MONTAŻU ASSEMBLY INSTRUCTION
x Bunk bed 2080x1010(1109)x1600 W15 INSTRUKCJA MONTAŻU ASSEMBLY INSTRUCTION") INSTRUKCJA MONTAŻU ASSEMBLY INSTRUCTION 2 WAŻNE, ZACHOWAĆ DO PÓŹNIEJSZEGO STOSOWANIA- UWAŻNIE PRZECZYTAĆ IMPORTANT, SAVE FOR FURTHER USAGE- READ CAREFULLY INSTRUKCJA UZYTKOWANIA USER S MANUAL. Aby uniknąć
INSTRUKCJA MONTAŻU ASSEMBLY INSTRUCTION 2 WAŻNE, ZACHOWAĆ DO PÓŹNIEJSZEGO STOSOWANIA- UWAŻNIE PRZECZYTAĆ IMPORTANT, SAVE FOR FURTHER USAGE- READ CAREFULLY INSTRUKCJA UZYTKOWANIA USER S MANUAL. Aby uniknąć
Montageanleitung Automatische Verriegelung Assembly Instructions - Automatic Locking Instrukcja Montażu - Zamknięcie Automatyczne
 Montageanleitung Automatische Verriegelung Assembly Instructions - Automatic Locking Instrukcja Montażu - Zamknięcie Automatyczne Container & Compactor Components Übersicht Overview Orientacja Schritt
DO MONTAŻU POTRZEBNE SĄ DWIE OSOBY! INSTALLATION REQUIRES TWO PEOPLE!
 1 HAPPY ANIMALS SZ11 A INSTRUKCJA MONTAŻU ASSEMBLY INSTRUCTIONS Akcesoria / Fittings K1 M M1 ZM1 Z G1 szt. / pcs 0 szt. / pcs B1 6 szt. / pcs 6 szt. / pcs W6 0 szt. / pcs U1 19 szt. / pcs U 50 szt. / pcs
TR18 INSTALATION MANUAL / INSTRUKCJA MONTAŻU. cart for flat displays
 INSTLTION NUL / INSTRUKCJ ONTŻU cart for flat displays WRNING: Please read this manual before the installation to ensure proper assembly. The assembly should be carried out in accordance with this manual
DO MONTAŻU POTRZEBNE SĄ DWIE OSOBY! INSTALLATION REQUIRES TWO PEOPLE!
 HAPPY ANIMALS RW08 INSTRUKCJA MONTAŻU ASSEMBLY INSTRUCTIONS Akcesoria / Fittings K M M ZM ZW G 0 szt. / pcs W szt. / pcs B szt. / pcs szt. / pcs W U 8 szt. / pcs 4 szt. / pcs U N szt. / pcs Ø3 x szt. /
T I R O L 163/01 01,03,04,05,06, 07,09,10,11,12, 13,14,15,16,17, 18,19,20,21,25, 26,27,31,71,72 22,23 A A. ø4x20
 T I R O L 1 2 ø4x20 163/01 1. A A 01,03,04,05,06, 07,09,10,11,12, 13,14,15,16,17, 18,19,20,21,25, 26,27,31,71,72 10 20 22,23 32 01 2. 3 4 M4x23 :7 B.1 B 96 B.2 (4) Nawierca się zawsze w wewnętrznej powoerzchni
HAPPY K04 INSTRUKCJA MONTAŻU ASSEMBLY INSTRUCTIONS DO MONTAŻU POTRZEBNE SĄ DWIE OSOBY! INSTALLATION REQUIRES TWO PEOPLE! W5 W6 G1 T2 U1 U2 TZ1
 HAPPY K0 INSTRUKCJA MONTAŻU ASSEMBLY INSTRUCTIONS W Akcesoria / Fittings W W G K szt. / pcs M Ø Ø 0 Ø, Ø Ø. 0 ø8 M 8 szt. / pcs 0 szt. / pcs szt. / pcs T U U szt. / pcs szt. / pcs szt. / pcs S TZ szt.
BLACKLIGHT SPOT 400W F
 BLACKLIGHT SPOT 400W F2000339 USER MANUAL / INSTRUKCJA OBSŁUGI BLACKLIGHT SPOT 400W F2000339 Table of Contents 1 Introduction... 2 2 Safety information... 2 3 Product information... 2 3.1 Specification...
A500Flash. Skrócona instrukcja instalacji... 2 Quick Guide... 5 A500Flash Kurzanleitung... 8
 A500Flash Skrócona instrukcja instalacji... 2 Quick Guide... 5 A500Flash Kurzanleitung... 8 1 Skrócona instrukcja instalacji Proces podłączenia adaptera dokonujemy zawsze przy wyłączonym zasilaniu Amigi.
098 Łóżko piętrowe 2080x1010(1109)x Double bunk bed 2080x1010(1109)x1600 W15 MONTAGEANLEITUNG ASSEMBLY INSTRUCTION
x Double bunk bed 2080x1010(1109)x1600 W15 MONTAGEANLEITUNG ASSEMBLY INSTRUCTION") 098 Double bunk bed 2080x(9)x600 W5 MONTAGEANLEITUNG ASSEMBLY INSTRUCTION 2 WAŻNE, ZACHOWAĆ DO PÓŹNIEJSZEGO STOSOWANIA- UWAŻNIE PRZECZYTAĆ IMPORTANT, SAVE FOR FURTHER USAGE- READ CAREFULLY INSTRUKCJA UZYTKOWANIA
098 Double bunk bed 2080x(9)x600 W5 MONTAGEANLEITUNG ASSEMBLY INSTRUCTION 2 WAŻNE, ZACHOWAĆ DO PÓŹNIEJSZEGO STOSOWANIA- UWAŻNIE PRZECZYTAĆ IMPORTANT, SAVE FOR FURTHER USAGE- READ CAREFULLY INSTRUKCJA UZYTKOWANIA
Instrukcja obsługi. ibind A8/A12/A15/A20. instruction manual. 80-393 GDAŃSK ul. Krynicka 1 tel.: (058) 55 43 555 fax: (058) 55 43 500
 55 43 555 fax: (058) 55 43 500") Instrukcja obsługi instruction manual 80-9 GDAŃSK ul. Krynicka tel.: (08) fax: (08) 00 ODDZIAŁ: 0-78 WARSZAWA ul. Janowskiego 9 tel.: (0) 8 0 8..9 fax: (0) 8 0 0 BindownicE ibind A8/A/A/A0 BINDING MACHINEs
Instrukcja obsługi instruction manual 80-9 GDAŃSK ul. Krynicka tel.: (08) fax: (08) 00 ODDZIAŁ: 0-78 WARSZAWA ul. Janowskiego 9 tel.: (0) 8 0 8..9 fax: (0) 8 0 0 BindownicE ibind A8/A/A/A0 BINDING MACHINEs
Centrala Bank PKO BP o/ Choszczno Sąd Rejonowy Szczecin
 Es ist uns ein Vergnügen, Ihnen das von uns mitentwickelte Montagesystem für PV Module vorstellen zu dürfen. Wir empfehlen vor Beginn der Montage eine kurze Unterweisung bzw. Schulung bei unseren Fachleuten
1113NG 487. Importer. Assembly Instructions. Instrukcja Montażu 66 GEYZ
 1113NG 487 Importer www.ogrodosfera.pl Assembly Instructions Instrukcja Montażu 66 GEYZ 1 2 3 ASSEMBLY INSTRUCTIONS (ENGLISH). Before starting, read through the assembly instructions carefully. Check thoroughly
Stargard Szczecinski i okolice (Polish Edition)
") Stargard Szczecinski i okolice (Polish Edition) Janusz Leszek Jurkiewicz Click here if your download doesn"t start automatically Stargard Szczecinski i okolice (Polish Edition) Janusz Leszek Jurkiewicz
Stargard Szczecinski i okolice (Polish Edition) Janusz Leszek Jurkiewicz Click here if your download doesn"t start automatically Stargard Szczecinski i okolice (Polish Edition) Janusz Leszek Jurkiewicz
Camspot 4.4 Camspot 4.5
 User manual (addition) Dodatek do instrukcji obsługi Camspot 4.4 Camspot 4.5 1. WiFi configuration 2. Configuration of sending pictures to e-mail/ftp after motion detection 1. Konfiguracja WiFi 2. Konfiguracja
TORBY PAPIEROWE / OPAKOWANIA
 TORBY PAPIEROWE / OPAKOWANIA Papierowe torby skrojone na miarę! W produkowanych przez nas torbach stosujemy nowatorskie rozwiązania i wysokiej jakości materiały. Przywiązujemy ogromna uwagę do detali.
NOA. User manual. The baby seat is suitable for children older than 15 months. The baby seat is suitable for children weighing from 0 to 13 kg
 NOA User manual The baby seat is suitable for children older than 15 months. The baby seat is suitable for children weighing from 0 to 13 kg WARNING: DO NOT MOUNT the baby seat on front car seats with
WYŁĄCZNIK CZASOWY OUTDOOR TIMER
 003-582 PL WYŁĄCZNIK CZASOWY Instrukcja obsługi (Tłumaczenie oryginalnej instrukcji) Ważny! Przed użyciem uważnie przeczytaj instrukcję obsługi! Zachowaj ją na przyszłość. EN OUTDOOR TIMER Operating instructions
Instrukcja obsługi. Trymer ROTARY ROTARY TRIMMER. instruction manual GDAŃSK ul. Krynicka 1 tel.: (058) fax: (058)
 fax: (058)") Instrukcja obsługi instruction manual 80-9 GDAŃSK ul. Krynicka 1 tel.: (058) 55 4 555 fax: (058) 55 4 500 Trymer ROTARY ROTARY TRIMMER ODDZIAŁ: 02-784 WARSZAWA ul. Janowskiego 9 tel.: (022) 648 0 48..49
Instrukcja obsługi instruction manual 80-9 GDAŃSK ul. Krynicka 1 tel.: (058) 55 4 555 fax: (058) 55 4 500 Trymer ROTARY ROTARY TRIMMER ODDZIAŁ: 02-784 WARSZAWA ul. Janowskiego 9 tel.: (022) 648 0 48..49
Installation of EuroCert software for qualified electronic signature
 Installation of EuroCert software for qualified electronic signature for Microsoft Windows systems Warsaw 28.08.2019 Content 1. Downloading and running the software for the e-signature... 3 a) Installer
LED WASHER 30x3W WHITE IP65 F
 USER MANUAL / INSTRUKCJA OBSŁUGI LED WASHER 30x3W WHITE IP65 F7200171 LED WASHER 30x3W WHITE IP65 F7200171 Table of contents 1 Introduction... 2 2 Safety information... 2 3 Product information... 2 3.1
Stand Up. design by Mikomax Team
 design by Mikomax Team PL / EN / DE / Coraz więcej pracowników skarży się na dyskomfort fizyczny w pracy. Nawet najlepszy fotel biurowy nie rozwiąże tego problemu. Doraźne rozwiązania również nie jeśli
SSW1.1, HFW Fry #20, Zeno #25 Benchmark: Qtr.1. Fry #65, Zeno #67. like
 SSW1.1, HFW Fry #20, Zeno #25 Benchmark: Qtr.1 I SSW1.1, HFW Fry #65, Zeno #67 Benchmark: Qtr.1 like SSW1.2, HFW Fry #47, Zeno #59 Benchmark: Qtr.1 do SSW1.2, HFW Fry #5, Zeno #4 Benchmark: Qtr.1 to SSW1.2,
GB 320 GB 460. Instrukcja obsługi. Instruction manual GDAŃSK ul. Krynicka 1 tel.: fax:
 80-393 GDAŃSK ul. Krynicka 1 tel.: 58 55 43 555 fax: 58 55 43 500 ODDZIAŁ: 02-784 WARSZAWA ul. Janowskiego 9 tel.: 22 648 03 48..49 fax: 22 648 03 50 Instrukcja obsługi Instruction manual Gilotyny / guillotines
Hippo Boombox MM209N CD. Instrukcja obsługi User s Manual
 Hippo Boombox Instrukcja obsługi User s Manual OPIS PRZYCISKÓW: PL ON-OFF/MODE: 1. Włącz on/off: Naciśnij przycisk, aby włączyć urządzenie. Przytrzymaj dłużej, aby wyłączyć. 2. MODE: Wybierz źródło sygnału:
Instrukcja obsługi. binding machine KRIS. instruction manual. 80-393 GDAŃSK ul. Krynicka 1 tel.: (058) 55 43 555 fax: (058) 55 43 500 ODDZIAŁ:
 55 43 555 fax: (058) 55 43 500 ODDZIAŁ:") Instrukcja obsługi instruction manual 80-393 GDAŃSK ul. Krynicka 1 tel.: (058) 55 43 555 fax: (058) 55 43 500 ODDZIAŁ: 02-784 WARSZAWA ul. Janowskiego 9 tel.: (022) 648 03 48..49 fax: (022) 648 03 50 bindownica
Instrukcja obsługi instruction manual 80-393 GDAŃSK ul. Krynicka 1 tel.: (058) 55 43 555 fax: (058) 55 43 500 ODDZIAŁ: 02-784 WARSZAWA ul. Janowskiego 9 tel.: (022) 648 03 48..49 fax: (022) 648 03 50 bindownica
Czy mogę podjąć gotówkę w [nazwa kraju] bez dodatkowych opłat? Fragen, ob Gebühren anfallen, wenn man in einem bestimmten Land Geld abhebt
![Czy mogę podjąć gotówkę w [nazwa kraju] bez dodatkowych opłat? Fragen, ob Gebühren anfallen, wenn man in einem bestimmten Land Geld abhebt](/thumbs/93/111611271.jpg "Czy mogę podjąć gotówkę w [nazwa kraju] bez dodatkowych opłat? Fragen, ob Gebühren anfallen, wenn man in einem bestimmten Land Geld abhebt") - Allgemeines Czy mogę podjąć gotówkę w [nazwa kraju] bez dodatkowych opłat? Fragen, ob Gebühren anfallen, wenn man in einem bestimmten Land Geld abhebt Jakie opłaty obowiązują za korzystanie z obcych
- Allgemeines Czy mogę podjąć gotówkę w [nazwa kraju] bez dodatkowych opłat? Fragen, ob Gebühren anfallen, wenn man in einem bestimmten Land Geld abhebt Jakie opłaty obowiązują za korzystanie z obcych
Zwora Yale US06. Yale seria US kg. Zastosowanie. Właściwości. Parametry techniczne
 Zwora Yale US06 Yale seria US06 270 kg Zastosowanie Zwory serii US06 przeznaczone są do realizowania kontroli dostępu w pomieszczeniach wymagających podstawowej ochrony np. drzwi wewnętrzne. Właściwości
Instrukcja montażu konstrukcji wolnostojącej do kolektorów płaskich
 Instrukcja montażu konstrukcji wolnostojącej do kolektorów płaskich Aluminum free-standing structure/montageanweisung der freistehenden Aluminium- Konstruktion 2m 2, 2,5m 2, 2,57m 2 02-1051 ; 02-1052;
Czy mogę podjąć gotówkę w [nazwa kraju] bez dodatkowych opłat? Fragen, ob Gebühren anfallen, wenn man in einem bestimmten Land Geld abhebt
![Czy mogę podjąć gotówkę w [nazwa kraju] bez dodatkowych opłat? Fragen, ob Gebühren anfallen, wenn man in einem bestimmten Land Geld abhebt](/thumbs/101/148910499.jpg "Czy mogę podjąć gotówkę w [nazwa kraju] bez dodatkowych opłat? Fragen, ob Gebühren anfallen, wenn man in einem bestimmten Land Geld abhebt") - Allgemeines Czy mogę podjąć gotówkę w [nazwa kraju] bez dodatkowych opłat? Czy mogę podjąć gotówkę w [nazwa kraju] bez dodatkowych opłat? Fragen, ob Gebühren anfallen, wenn man in einem bestimmten Land
- Allgemeines Czy mogę podjąć gotówkę w [nazwa kraju] bez dodatkowych opłat? Czy mogę podjąć gotówkę w [nazwa kraju] bez dodatkowych opłat? Fragen, ob Gebühren anfallen, wenn man in einem bestimmten Land
Improper use may lead to a serious threat to the life of your child. NOTE: Do not mount the safety seat on a passenger seat equipped with an airbag.
 1. Important information Before using the car safety seat please read this user manual carefully. Improper use may lead to a serious threat to the life of your child. NOTE: Do not mount the safety seat
Katowice, plan miasta: Skala 1: = City map = Stadtplan (Polish Edition)
") Katowice, plan miasta: Skala 1:20 000 = City map = Stadtplan (Polish Edition) Polskie Przedsiebiorstwo Wydawnictw Kartograficznych im. Eugeniusza Romera Click here if your download doesn"t start automatically
Katowice, plan miasta: Skala 1:20 000 = City map = Stadtplan (Polish Edition) Polskie Przedsiebiorstwo Wydawnictw Kartograficznych im. Eugeniusza Romera Click here if your download doesn"t start automatically
Selfie Monopod MA426. Instrukcja obsługi User s Manual
 Selfie Monopod MA426 Instrukcja obsługi User s Manual PL Selfie Monopod Przeczytaj wszystkie instrukcje przed użyciem oraz zachowaj te informacje do wykorzystania w przyszłości. Zestaw: 1x mobile phone
PL Str Instrukcja montażu. EN Page 4-5. Assembly instruction. DE Page 6-7. Montageanleitung
 347600.1 PL Str. 2-3 EN Page 4-5 DE Page 6-7 Instrukcja montażu Assembly instruction Montageanleitung 501-88 SPIS TREŚCI 1. BEZPIECZEŃSTWO I OSTRZEŻENIA 2. UŻYTKOWANIE 3. USTAWIENIA I INSTALACJA 4. ZMIANA
Zasady bezpieczeństwa
 2 3 Zasady bezpieczeństwa GB The door and the feeding flap must be closed when operating the machine! PL Drzwiczki i klapka szczeliny podawczej muszą być zamknięte w trakcie używania urządzenia! GB Ensure
Tychy, plan miasta: Skala 1: (Polish Edition)
") Tychy, plan miasta: Skala 1:20 000 (Polish Edition) Poland) Przedsiebiorstwo Geodezyjno-Kartograficzne (Katowice Click here if your download doesn"t start automatically Tychy, plan miasta: Skala 1:20 000
Tychy, plan miasta: Skala 1:20 000 (Polish Edition) Poland) Przedsiebiorstwo Geodezyjno-Kartograficzne (Katowice Click here if your download doesn"t start automatically Tychy, plan miasta: Skala 1:20 000
Przyimki. Präpositionen
 Przyimki Präpositionen Przyimki to słowa współpracujące z rzeczownikiem lub z zaimkiem: pod stołem do szkoły w pokoju dla ciebie z rodzicami od babci Tak samo funkcjonują przyimki w języku niemieckim.
WSKAZANIA BEZPIECZEŃSTWA
 WSKAZANIA BEZPIECZEŃSTWA - Niniejszy sprzęt może być użytkowany przez dzieci w wieku co najmniej 8 lat i przez osoby o obniżonych możliwościach fizycznych, umysłowych i osoby o braku doświadczenia i znajomości
 www.irs.gov/form990. If "Yes," complete Schedule A Schedule B, Schedule of Contributors If "Yes," complete Schedule C, Part I If "Yes," complete Schedule C, Part II If "Yes," complete Schedule C, Part
BABY SAFE TM. SPORT 9-36 kg (GROUP I-II-III)
") BABY SAFE TM SPORT 9-36 kg (GROUP I-II-III) INSTRUKCJA OBSŁUGI IMPORTER: CAR-ACTIVE SP. Z O.O. Rolna 195 02-729 WARSZAWA TEL.: (+48 46) 833 32 25 FAX.: (+48 46) 816 60 03 E-MAIL: INFO@CAR-ACTIVE.EU WWW.CAR-ACTIVE.EU
BABY SAFE TM SPORT 9-36 kg (GROUP I-II-III) INSTRUKCJA OBSŁUGI IMPORTER: CAR-ACTIVE SP. Z O.O. Rolna 195 02-729 WARSZAWA TEL.: (+48 46) 833 32 25 FAX.: (+48 46) 816 60 03 E-MAIL: INFO@CAR-ACTIVE.EU WWW.CAR-ACTIVE.EU
HR-800. Regał stojący Storage shelving Steckregal. 875 kg 175 kg INSTRUKCJA MANUAL BEDIENUNGSANLEITUNG
 Regał stojący Storage shelving Steckregal INSTRUKCJA MANUAL BEIUNGSANLEITUNG HR-800 Maksymalne obciążenie przy równomiernym rozłożeniu Max load capacity uniformly distributed Maximale Belastbarkeit bei
Zakopane, plan miasta: Skala ok. 1: = City map (Polish Edition)
") Zakopane, plan miasta: Skala ok. 1:15 000 = City map (Polish Edition) Click here if your download doesn"t start automatically Zakopane, plan miasta: Skala ok. 1:15 000 = City map (Polish Edition) Zakopane,
Zakopane, plan miasta: Skala ok. 1:15 000 = City map (Polish Edition) Click here if your download doesn"t start automatically Zakopane, plan miasta: Skala ok. 1:15 000 = City map (Polish Edition) Zakopane,
Instrukcja Montażu. Zawór pilotowy. Zawór przełączający 3-drogowy. Zawór odcinający. Wkład filtrujący. Zawór iglicowy EB-FD300=A
 FD 300 Einbau-Anleitung Installation Instructions Instrukcja Montażu E1 Bauteile Components Części =Pilotventil Pilot valve Zawór pilotowy =3-Wege-Umschaltventil 3-Way manual selector Zawór przełączający
www.mniejszosci.narodowe.mac.gov.pl www.jezyki-mniejszosci.pl
 www.mniejszosci.narodowe.mac.gov.pl www.jezyki-mniejszosci.pl Polski system oświaty umożliwia uczniom należącym do mniejszości narodowych i etnicznych podtrzymywanie poczucia tożsamości narodowej, etnicznej,
INSTRUKCJA OBSŁUGI OPERATIONAL MANUAL LAT / YEARS. gtx
 INSTRUKCJA OBSŁUGI OPERATIONAL MANUAL 2+ LAT / YEARS ROWEREK Biegowy / Walking bike gtx 2 1 3 4 PL WAŻNE! PRZECZYTAJ I ZACHOWAJ DO PÓŹNIEJSZEGO STOSOWANIA! INSTRUKCJA MONTAŻU Prosimy postępować zgodnie
3 FIXING POINTS kg GROUP I. Click. SAFETY BELT installation diagram. Warning: Do not use other fixing points than the indicated ones.
 GROUP I Suitable for children weighing from 9 to 18kg Baby 9-18 kg 3 FIXING POINTS Use the three-point safety belt and the ISOFIX connector to install the seat. ISOFIX connector installation diagram The
INSTRUKCJA MONTAŻU MARBO E SPORT LISTA CZĘŚCI (PARTS LIST) (ASSEMBLY INSTRUCTION) MH-W102 NR CZĘŚCI (PART NO.) ILOŚĆ (QUANTITY) OPIS (DESCRIPTION)
 (ASSEMBLY INSTRUCTION) MH-W102 NR CZĘŚCI (PART NO.) ILOŚĆ (QUANTITY) OPIS (DESCRIPTION)") LISTA CZĘŚCI (PARTS LIST) NR CZĘŚCI (PART NO.) ILOŚĆ (QUANTITY) OPIS (DESCRIPTION) 1 ŚRUBA (HEX BOLT) x70 6 ŚRUBA (HEX BOLT) 0 3 ŚRUBA (CARRIAGE BOLT) 5 INSTRUKCJA MONTAŻU (ASSEMBLY INSTRUCTION) MH-W10
LISTA CZĘŚCI (PARTS LIST) NR CZĘŚCI (PART NO.) ILOŚĆ (QUANTITY) OPIS (DESCRIPTION) 1 ŚRUBA (HEX BOLT) x70 6 ŚRUBA (HEX BOLT) 0 3 ŚRUBA (CARRIAGE BOLT) 5 INSTRUKCJA MONTAŻU (ASSEMBLY INSTRUCTION) MH-W10
MM210. Instrukcja obsługi User s Manual
 Chilli Boombox Instrukcja obsługi User s Manual OPIS PRZYCISKÓW: PL ON-OFF/MODE: 1. Włącz on/off: Naciśnij przycisk, aby włączyć urządzenie. Przytrzymaj dłużej, aby wyłączyć. 2. MODE: Wybierz źródło sygnału:
Návod k použití. Instrukcja obsługi. Návod k použitiu. Instruction Leaflet PŘED POUŽITÍM SI PROSÍM PŘEČTĚTE DŮKLADNĚ NÁVOD A USCHOVEJTE HO!
 CZ Instrukcja obsługi Návod k použití PRZED UŻYCIEM PRZECZYTAJ SZCZEGÓŁY I ZACHOWAJ INSTRUKCJĘ OBSŁUGI PŘED POUŽITÍM SI PROSÍM PŘEČTĚTE DŮKLADNĚ NÁVOD A USCHOVEJTE HO! SK Instruction Leaflet Návod k použitiu
Einbau von Rauchwarnmeldern nach DIN 14676
 Einbau von Rauchwarnmeldern nach DIN 14676 Gesetzlich ist der Eigentümer für die Installation von Rauchwarnmeldern verantwortlich. Objekt: Einfamilienhaus mit insgesamt 3 Etagen. Objektanschrift: Beispielweg
Wojewodztwo Koszalinskie: Obiekty i walory krajoznawcze (Inwentaryzacja krajoznawcza Polski) (Polish Edition)
 (Polish Edition)") Wojewodztwo Koszalinskie: Obiekty i walory krajoznawcze (Inwentaryzacja krajoznawcza Polski) (Polish Edition) Robert Respondowski Click here if your download doesn"t start automatically Wojewodztwo Koszalinskie:
Wojewodztwo Koszalinskie: Obiekty i walory krajoznawcze (Inwentaryzacja krajoznawcza Polski) (Polish Edition) Robert Respondowski Click here if your download doesn"t start automatically Wojewodztwo Koszalinskie:
Steuerberaterin Ria Franke
 Polnische Arbeitnehmer mit Wohnsitz in Polen Polscy pracownicy z miejscem zamieszkania w Polsce Steuerberaterin Ria Franke Verdienst > 450 / Monat Wynagrodzenie > 450 /miesięcznie Entscheidung über die
dodatkowych opłat? Fragen, ob Gebühren anfallen, wenn man in einem bestimmten Land Geld abhebt
 - Allgemeines Kann ich in [Land] gebührenfrei Geld abheben? Czy mogę podjąć gotówkę w [nazwa kraju] bez dodatkowych opłat? Fragen, ob Gebühren anfallen, wenn man in einem bestimmten Land Geld abhebt Welche
LO-EMMA Stroller. User manual
 LO-EMMA Stroller User manual 1. IMPORTANT INFORMATION: Before using the product, please read this user manual carefully and keep it for future reference. Improper use of the stroller could result in serious
Łóżka Materace Stoliki
 P.W"PATRYK" Ilona Mikołajczyk NIP 619-149-08-79 Regon 250688043 Dział obsługi klienta: tel. 503-853-432 tel. 502-036-122 tel. 722-221-215 e-mail: biuro@pwpatryk.pl Informacje / Information / Informationen
L200-R15-PW L200-R15-PW+ L200-R18-PW
 MITSUBISHI L200 205-208 - INSTRUKCJA MONTAŻU (Płyta wyciągarki) FITTING INSTRUCTION (Winch plate) инструкция монтажа (Лебедка пластины) MONTAGEANLEITUNG (Winch Platte) L200-R5-PW L200-R5-PW+ L200-R8-PW
INSTRUCTION MANUAL. Strona 1
 INSTRUCTION MANUAL www.flash-butrym.pl Strona 1 LED SPOT LIGHT INSTRUCTION MANUAL Thank you for purchasing the LEDSPOT10W Spot light. It is a small and easy to carry unit that is simple to install. Features:
ŚRODKI OCHRONY INDYWIDUALNEJ BHP CRL
 ŚRODKI OCHRONY INDYWIDUALNEJ BHP CRL SPIS: Rękawiczki lateksowe białe 7262 SM strona 2 Rękawiczki lateksowe czarne 2005SM strona 3 Rękawiczki nitrylowe niebieskie 7005NG - strona 4 Rękawiczki nitrylowe
Klaps za karę. Wyniki badania dotyczącego postaw i stosowania kar fizycznych. Joanna Włodarczyk
 Klaps za karę Wyniki badania dotyczącego postaw i stosowania kar fizycznych Joanna Włodarczyk joanna.wlodarczyk@fdds.pl Warszawa, 1.12.2017 Fundacja Dajemy Dzieciom Siłę, 2017 Informacje o badaniu Badanie
LED PAR 56 7*10W RGBW 4in1 SLIM
 LED PAR 56 7*10W RGBW 4in1 SLIM USER MANUAL Attention: www.flash-butrym.pl Strona 1 1. Please read this specification carefully before installment and operation. 2. Please do not transmit this specification
 www.irs.gov/form990. If "Yes," complete Schedule A Schedule B, Schedule of Contributors If "Yes," complete Schedule C, Part I If "Yes," complete Schedule C, Part II If "Yes," complete Schedule C, Part
 Podłączyć do gniazda Przykręcić nakrętkę radełkowaną Sposób montażu akcesoriów Wszystkie trzy akcesoria (tj. lusterko, haczyk i magnes) są mocowane do kamery ten sam sposób, co poniżej. Sposób montażu:
TPO-700. Instrukcja obsługi. Trymer. instruction manual GDAŃSK ul. Krynicka 1 tel.: fax:
 Instrukcja obsługi instruction manual 80-393 GDAŃSK ul. Krynicka 1 tel.: 58 55 43 555 fax: 58 55 43 500 ODDZIAŁ: 02-784 WARSZAWA ul. Janowskiego 9 tel.: 22 648 03 48..49 fax: 22 648 03 50 Trymer TRIMMER
PAPER CUTTER A4/A3 GUILLOTINES
 Instrukcja obsługi instruction manual 80-393 GDAŃSK ul. Krynicka 1 tel.: (058) 55 43 555 fax: (058) 55 43 500 ODDZIAŁ: 02-784 WARSZAWA ul. Janowskiego 9 tel.: (022) 648 03 48..49 fax: (022) 648 03 50 GILOTYNY
WÓZEK SPACEROWY / STROLLER ROYAL
 PL INSTRUKCJA OBSŁUGI OPERATIONAL MANUAL WÓZEK SPACEROWY / STROLLER ROYAL 1 2 3 4 5 6 7 8 BY USTAWIĆ DŁUGOŚĆ TO ADJUST LENGTH 9 ZATRZAŚNIJ KLAMRY PRESS TOGETHER TO CLOSE 10 ABY OTWORZYĆ WCIŚNIJ PRZYCISKI
NOA PLUS. Instrukcja obsługi User manual. fotelik samochodowy child safety seat
 Instrukcja obsługi User manual NOA PLUS fotelik samochodowy child safety seat Grupa wagowa 0+ uniwersalny 0kg - 13kg Y Suitable for Group 0+ and 0kg to 13kg Y PL Informacja Urządzenie przytrzymujące dla
Futuro. design by Przemysław Mac Stopa
 design by Przemysław Mac Stopa PL / EN / DE / Optymalizacja powierzchni biurowej i tym samym kosztów biura jest kluczowa. Wyzwaniem jest jednak połączenie tego wymagania z utrzymaniem wysokiego komfortu
Arca. Design: Ronald Straubel
 Arca Design: Ronald Straubel 3 ARCA 21SL CHROM P51PU ARCA 21SL CZARNY P54PU 4 ARCA 21SL METALIK P54PU ARCA 21SL CZARNY P54PU 5 1 KRZESŁO - 2 KOLORY TAPICERKI 1 CHAIR - 2 UPHOLSTERY COLOURS W modelach ARCA
Offenburg Olsztyn. Einführung / Wprowadzenie. Wspolpraca mlodziezy / Zusammenarbeit. Zespol Szkol Elektronicznych i Telekomunikacyjnych w Olsztynie
 Einführung / Wprowadzenie Nasze cele: Poznanie naszych odmiennych kultur Poznanie ludzi z innych krajow Porownanie naszych miast Zabawa Einführung / Wprowadzenie Wir wollen: Kennenlernen einer anderen
NISSAN NAVARA NP
 NISSAN NAVARA NP300 2015 INSTRUKCJA MONTAŻU (Płyta wyciągarki) FITTING INSTRUCTION (Winch plate) инструкция монтажа (Лебедка пластины) MONTAGEANLEITUNG (Winch Platte) NP300-R15-PW Wykaz elementów: Specification
INSTRUKCJA OBSŁUGI OPERATIONAL MANUAL KRZESEŁKO / CHAIR MAX WYPRODUKOWANO ZGODNIE Z NORMĄ PN-EN 14988
 PL INSTRUKCJA OBSŁUGI OPERATIONAL MANUAL KRZESEŁKO / CHAIR MAX WYPRODUKOWANO ZGODNIE Z NORMĄ PN-EN 14988 LISTA CZĘŚCI / PARTS LIST A B C D E F G H I J K L M A K G C B E H F M D J 1 2 3 4 5 6 7 8 9 PL
Instrukcja obsługi. Bindownica S100 S100 BINDING MACHINE. instruction manual GDAŃSK ul. Krynicka 1 tel.: (058) fax: (058)
 fax: (058)") Instrukcja obsługi instruction manual 80-393 GDAŃSK ul. Krynicka 1 tel.: (058) 55 43 555 fax: (058) 55 43 500 Bindownica S100 S100 BINDING MACHINE ODDZIAŁ: 02-784 WARSZAWA ul. Janowskiego 9 tel.: (022)
Instrukcja obsługi instruction manual 80-393 GDAŃSK ul. Krynicka 1 tel.: (058) 55 43 555 fax: (058) 55 43 500 Bindownica S100 S100 BINDING MACHINE ODDZIAŁ: 02-784 WARSZAWA ul. Janowskiego 9 tel.: (022)
Helena Boguta, klasa 8W, rok szkolny 2018/2019
 Poniższy zbiór zadań został wykonany w ramach projektu Mazowiecki program stypendialny dla uczniów szczególnie uzdolnionych - najlepsza inwestycja w człowieka w roku szkolnym 2018/2019. Składają się na
INSTRUKCJA MONTAŻU MARBO E SPORT (ASSEMBLY INSTRUCTION) P R O F E S S I O N A L F I T N E S S E Q U I P M E N T
 P R O F E S S I O N A L F I T N E S S E Q U I P M E N T") INSTRUKCJA MONTAŻU (ASSEMBLY INSTRUCTION) MARBO E SPORT P R O F E S S I O N A L F I T N E S S E Q U I P M E N T www.marbo-sport.pl PRZED MONTAŻEM Przeczytaj to zanim rozpoczniesz montaż urządzenia Podczas
INSTRUKCJA MONTAŻU (ASSEMBLY INSTRUCTION) MARBO E SPORT P R O F E S S I O N A L F I T N E S S E Q U I P M E N T www.marbo-sport.pl PRZED MONTAŻEM Przeczytaj to zanim rozpoczniesz montaż urządzenia Podczas
DC UPS. User Manual. Page 1
 DC UPS User Manual Page 1 1. Specyfikacja 1.1 Zasilacz PowerWalker DC UPS 12V jest innowacyjnym rozwiązaniem do zasilania prądem stałym o napięciu 12 VDC urządzeń do max 30W (2,5 A) obciążenia. W urządzeniu
SPINNER High reliability RF Power Loads
 D 5 W, 10 W OADS VSWR 0 f 1 GHz 1 f 2 GHz 2 f 5 GHz 5 f 7 GHz Effektive eistung BN 53 17 27 BN 53 17 12 BN 53 12 21 BN 53 12 25 0 f 7 GHz 1.06 1.11 1.17 1.22 5 W 2. 10 W 2. 1000 V N Stecker N male 7-16
User manual 3800/3880 250ml
 User manual 3800/3880 250ml How to install the original chip into the refillable cartridge for the Epson Stylus Pro 3800/3880 and refill the cartridge. What you need: 1. Refillable cartridge 2. Syringe
Szkoła płynnego mówienia B1/B2 edycja I
 10 czerwca 2019 Dzisiaj nauczysz się, jak wyrazić swoje zdanie i jak przy nim obstawać. Jako przykład i zadania domowe posłużą nam przykładowe testy z egzaminów Goethe-Institut, Telc oraz ÖSD B1 i B2.
MITSUBISHI L200 L200-PW
 MITSUBISHI L200 INSTRUKCJA MONTAŻU (Płyta wciągarki) FITTING INSTRUCTION (Winch plate) инструкция монтажа (Лебедка пластины) MONTAGEANLEITUNG (Winch Platte) L200-PW 1. Płyta wciągarki (szt. 1) Winch plate
Liam. Instrukcja obsługi User manual. fotelik samochodowy child safety seat
 Instrukcja obsługi User manual Liam fotelik samochodowy child safety seat Grupa wagowa 0+ i I uniwersalny 0kg - 18kg Suitable for Group 0+ and I / 0kg to 18kg Informacja Urządzenie przytrzymujące dla
TYRE PYROLYSIS. REDUXCO GENERAL DISTRIBUTOR :: ::
 TYRE PYROLYSIS Installation for rubber waste pyrolysis designed for processing of used tyres and plastic waste (polyethylene, polypropylene, polystyrene), where the final product could be electricity,
FREZARKA DO PAZNOKCI
 FREZARKA DO PAZNOKCI NAIL DRILL NAGELFRÄSER ФРЕЗЕР ДЛЯ НОГТЕЙ 3829 INSTRUKCJA OBSŁUGI USER MANUAL DESCRIPTION BEDIENUNGSANLEITUNG ИНСТРУКЦЯ ПО ЭКСПЛУАТАЦИИ 2. SKŁAD ZESTAWU rączka frez/ trzpień frez/ trzpień
Wojewodztwo Koszalinskie: Obiekty i walory krajoznawcze (Inwentaryzacja krajoznawcza Polski) (Polish Edition)
 (Polish Edition)") Wojewodztwo Koszalinskie: Obiekty i walory krajoznawcze (Inwentaryzacja krajoznawcza Polski) (Polish Edition) Robert Respondowski Click here if your download doesn"t start automatically Wojewodztwo Koszalinskie:
Wojewodztwo Koszalinskie: Obiekty i walory krajoznawcze (Inwentaryzacja krajoznawcza Polski) (Polish Edition) Robert Respondowski Click here if your download doesn"t start automatically Wojewodztwo Koszalinskie:
Spis Treści / contents. Rolety materiałowe MINI Roller blinds MINI type. Rolety materiałowe STANDARD 4. Rolety dachowe Skylight roller blinds
 Katalog Produktów Spis Treści / contents Rolety materiałowe MINI Roller blinds MINI type 3 Rolety materiałowe STANDARD Roller blinds STANDARD type 4 Rolety dachowe Skylight roller blinds 5 2 Rolety materiałowe
Upewnij się, że do dziecka dociera wystarczająca ilość powietrza Nigdy nie odpinaj więcej niż jednej klamry jednocześnie
 UWAGA! WAŻNE! ZACHOWAĆ W CELU POWOŁANIA SIĘ W PRZYSZŁOŚCI Przed użyciem zapoznaj się z treścią instrukcji obsługi OSTRZEŻENIE: Twoja równowaga może być zakłócona ruchami Twoimi i dziecka OSTRZEŻENIE: Zachować
MaPlan Sp. z O.O. Click here if your download doesn"t start automatically
 Mierzeja Wislana, mapa turystyczna 1:50 000: Mikoszewo, Jantar, Stegna, Sztutowo, Katy Rybackie, Przebrno, Krynica Morska, Piaski, Frombork =... = Carte touristique (Polish Edition) MaPlan Sp. z O.O Click
WAŻNE: Instrukcja przedstawia podstawową formę montażu. Więcej metod i powiązanych akcesoriów znajdziesz na stronie klusdesign.pl
 Montaż oprawy na bazie profilu LARKO Części niezbędne do skonstruowania oprawy na bazie profilu LARKO Profil (A) Zaślepki (B) Osłona (C) Taśma LED (D) Sprężyny (E) Elementy niezbędne przy czynnościach
Spis Treści / contents. Rolety materiałowe Dzień-Noc MINI Day-night roller blinds MINI type
 Katalog Produktów Spis Treści / contents Rolety materiałowe Dzień-Noc MINI Day-night roller blinds MINI type 3 Rolety materiałowe Dzień-Noc bez kasety Day-night roller blinds 4 Rolety materiałowe Dzień-Noc
Pokrywa kołnierza ø120 z tuleją 1½ oraz ø180 z tuleją 2. Flange Cover ø120 with 1 ½ Sleeve and ø180 with 2 Sleeve. Instrukcja montażu
 Pokrywa kołnierza ø0 z tuleją ½ oraz ø80 z tuleją Instrukcja montażu Flange Cover ø0 with ½ Sleeve and ø80 with Sleeve Installation Manual 5.0.06 576 INSTRUKCJA MONTAŻU Spis treści PL. INFORMACJE OGÓLNE....
Jøtul I 570 FL. Szyba / Glass. Jøtul I 570 FL. Art.no. TS39B002. PL - Instrukcja montażu dodatkowej szyby 2 GB - Installation Instructions 4
 Jøtul I 570 FL Szyba / Glass Jøtul I 570 FL PL - Instrukcja montażu dodatkowej szyby 2 G - Installation Instructions 4 rt.no. TS39002 PL - Przed użyciem prosimy dokładnie przeczytać instrukcje ogólnego
MATERIAŁ DIAGNOSTYCZNY Z JĘZYKA NIEMIECKIEGO
 dysleksja MATERIAŁ DIAGNOSTYCZNY Z JĘZYKA NIEMIECKIEGO Arkusz III POZIOM ROZSZERZONY Czas pracy 110 minut ARKUSZ III GRUDZIEŃ ROK 2005 Instrukcja dla ucznia 1. Sprawdź, czy arkusz zawiera 8 ponumerowanych
LED MAGIC BALL MP3 F
 USER MANUAL / INSTRUKCJA OBSŁUGI LED MAGIC BALL MP3 F7000623 LED MAGIC BALL MP3 F7000623 Table of contents 1 Introduction... 2 2 Safety information... 2 3 Product information... 2 3.1 Specification...
kolorystyka mebli/colours
 Neptun Nowy system Neptun rosnnie wraz z Twoim dzieckiem. Regulowana wysokosncn połoza menia materaca w łonza mku dla niemowlaka pozwala na jego obniza menie gdy dziecko zaczyna wstawacn. Nowoczesne łonza
Zdecyduj: Czy to jest rzeczywiście prześladowanie? Czasem coś WYDAJE SIĘ złośliwe, ale wcale takie nie jest.
 Zdecyduj: Czy to jest rzeczywiście prześladowanie? Czasem coś WYDAJE SIĘ złośliwe, ale wcale takie nie jest. Miłe przezwiska? Nie wszystkie przezwiska są obraźliwe. Wiele przezwisk świadczy o tym, że osoba,