English Česky Magyar Polski Slovenčina. HandleEasy 330gsm
|
|
|
- Agnieszka Czyż
- 8 lat temu
- Przeglądów:
Transkrypt
1 English Česky Magyar Polski Slovenčina HandleEasy 330gsm

2
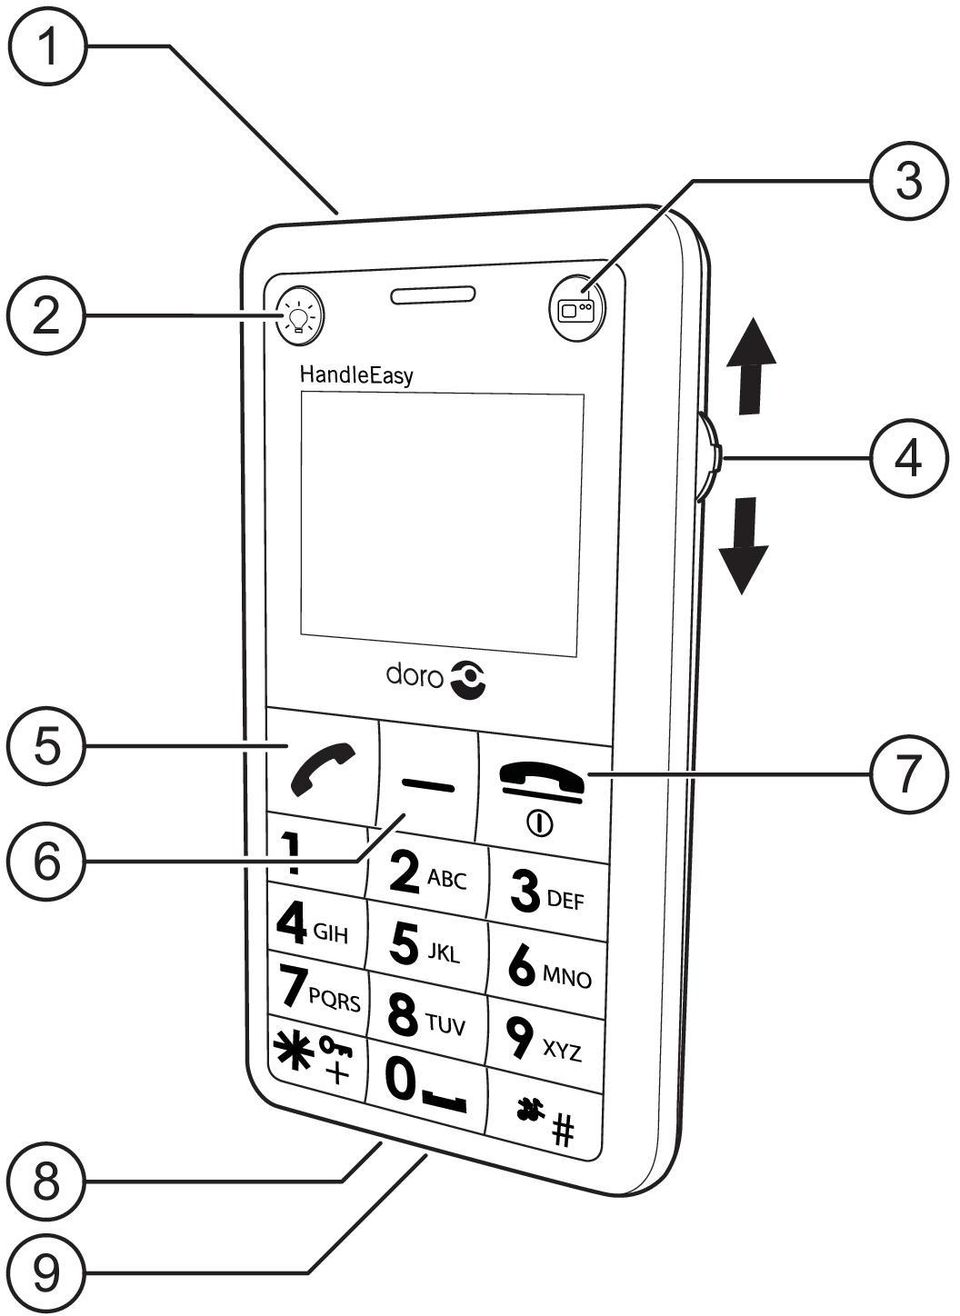
3 English 1 Alarm Call Key 2 Torch Key 3 FM Radio Key 4 Side Key 5 Call Key q 6 Return/Menu Key 7 End Key L 8 Charging socket 9 Headset socket Česky 1 Tlačítko tísňového volání 2 Tlačítko Baterka 3 Tlačítko FM rádio 4 Boční tlačítko 5 Tlačítko Volat q 6 Tlačítko Zpět/ Menu 7 Tlačítko Konec L 8 Zdířka adaptéru 9 Konektor headsetu Magyar 1 Vészhívás gomb 2 Zseblámpa gomb 3 FM rádió gomb 4 Oldalsó gomb 5 Hívás gomb q 6 Vissza/Menü gomb 7 Befejezés gomb L 8 Töltőaljzat 9 Headset aljzat

4 Polski 1 Klawisz wywołania alarmowego 2 Klawisz latarki 3 Klawisz radia FM 4 Klawisz boczny 5 Klawisz wywołania q Slovenčina 1 Tlačidlo núdzového volania 2 Tlačidlo Svetlo 3 Tlačidlo Rádio FM 4 Bočné rolovacie tlačidlo 5 Tlačidlo Volanie q 6 Tlačidlo Návrat/ Ponuka 6 Powrót/Klawisz menu 7 Klawisz zakończenia L 8 Gniazdo ładowarki 9 Gniazdo zestawu słuchawkowego 7 Tlačidlo Ukončiť L 8 Konektor pre nabíjačku 9 Konektor hlavovej súpravy

5 English Installation Note! Always turn off the telephone before removing the battery cover. Battery cover To remove the battery cover, press carefully on the cover and slide it downwards. To replace the battery cover, slide it from below and up along the telephone. Installation/removal of SIM card Make sure that the SIM card s contacts are facing inwards and that the cut-off corner is pointing upwards. Take care not to scratch or bend the contacts on the SIM card.

6 English If the SIM card is missing, damaged or incorrectly inserted, No SIM Card will be shown in the display. Installation/removal of battery Place the top of the battery in the battery slot with the battery contacts facing the contacts in the slot, then press carefully on the bottom of the battery until it locks in place. To remove the battery, carefully press and lift the bottom of the battery in the fingershaped groove. Charging Connect the mains adapter to the wall socket and to the socket on the telephone. Charging is completed when a full battery symbol and the text Full Charged are displayed. Charge the telephone for 12 hours the first time. After that, it takes approximately 5 hours to fully charge the battery.

7 English Battery Full battery capacity will not be reached until the battery has been charged 4 5 times. Batteries degrade over time, which means that call time and standby time will normally decrease with regular use. The automatic charging mechanism prevents the batteries from being overcharged or damaged due to prolonged charging. When the battery is running low, is displayed and a warning signal is heard. Warning! Only use batteries, charger and accessories that have been approved for use with this particular model. Connecting other accessories may be dangerous and may invalidate the telephone s type approval and guarantee. Connection to a USB port on a computer may damage the telephone and/or the computer.

8 Display symbols English Phone Book Calls Text message Alarm Conversion Profiles Calculator Signal level New SMS Roaming Headset connected Keypad locked Alarm active Ring signal only Vibration + ring Vibration only Battery level FM Radio Settings

9 English Operation Activating the telephone To turn the telephone on/off, press and hold L for three seconds. If the SIM card is locked with a PIN code (Personal Identification Number), the display shows Insert PIN1:. Enter your PIN code and confirm with q to unlock the SIM card. Note! Most network operators allow the emergency number 112 to be called without unlocking the SIM card. If you enter the wrong PIN code, the display will show Insert PIN1 (#):, where # is the number of attempts left. When no more attempts remain, you need the PUK code (Personal Unblocking Key) supplied with your SIM card to unlock the card and supply a new PIN code.

10 English Enter the PUK code, confirm with q, then enter a new PIN code and confirm it. If PIN and PUK codes were not supplied with the SIM card, contact your network operator. Phone code The telephone can be password-protected for additional security. Enter Phone code will then be displayed on activation (after unlocking the SIM card). Enter the Phone code and press q to unlock. Note! The default Phone code is "0000". See the Settings/Security menu on how to change the Phone code.
.")
11 English Making a call 1. Enter the number with the keypad. Skip backwards with. 2. Press q to dial. A signal will be heard as the number is dialled. 3. Press L to end the call. Note! When making international calls, press * twice for the international prefix "+". Dialling with the phonebook 1. Press L to show the phone book. 2. Scroll the list by sliding the Side key up/down, or press a keypad key to jump to the entries beginning with that character. 3. Press q to dial the selected contact. 4. Press L to end the call. Receiving a call 1. Press q to answer, or L to reject the call without answering. 2. Press L to end the call.

12 English SMS text messages If a new SMS message has been received, New Message is displayed and a signal is played. Press q to open the inbox. % is displayed at the top of the screen when you have unread messages in the inbox. A flashing % means that the inbox is full. Delete some messages to free up memory. See the Text messages menu for further instructions on how to read, write, send and save or delete text messages. Using the keypad The numerical keypad is also used for typing. Press each key repeatedly to scroll between characters and numbers. Press # to toggle between upper/lower case and numbers. Press * for punctuation marks or special characters. Press to erase the last entered character.

13 English Note! When the display is in sleep mode the first keypress will only activate the display. Keylock The Keylock locks the keypad to avoid accidental use of the keys. To lock the Keylock, press and hold *. To unlock, press then *. Incoming calls can be answered by pressing q even if the Keylock is locked. When the call is ended or rejected by pressing L, the Keylock is locked again. The emergency number 112 and the Alarm Call Key can be used without unlocking the Keylock. Volume control The volume can be adjusted during a call by moving the Side Key up/down.

14 Headset English When a headset is connected, is shown on the display and the telephone s internal microphone is automatically disconnected. With the included headset incoming calls can be answered by pressing the headset answering button for 1 second. Warning! Using a headset on high volume can damage your hearing. Adjust the sound volume carefully when using a headset. 10

15 Key functions English Call Key q Used for answering and initiating calls, and for confirming menu choices and settings. Pressing q in standby mode will display the Call List: Outgoing call (blue arrow) Incoming call (green arrow)! Missed call (red exclamation mark) Pressing q while talking will display the call option list: Handsfree Activates the Speakerphone function. Mute Switches the microphone on/off Disconnect Disconnects the call (same as L) 11
 Pressing q while talking will display the call option list: Handsfree")
16 English End Key L Used for ending or rejecting calls, to cancel the current menu option and/or to return to standby mode. Pressing L in standby mode will display the Phone Book. Pressing and holding L for three seconds will switch the phone on/off. Return/Menu Key Pressing in standby mode will display the menu. It is then used to return to the previous mode or menu level. Pressing while typing will delete the previous character. Pressing hold. while talking will put the call in 12

17 English Side Key The Side Key is a 3-way key that can both be pressed and moved up/down. In menus, moving the Side Key up/down will scroll through menus, lists and settings. Pressing the key will usually confirm a selection or move to the next menu level. In standby mode, either moving or pressing the Side Key will activate the display. While talking, pressing the Side Key will activate the speakerphone function, and moving it up/down will adjust the sound volume. Torch Key Press and hold to switch the torch on/off. FM Radio Key Press to switch the FM Radio on/off when the headset is connected. If already on, pressing the key will display the FM radio menu. 13

18 English Alarm Call Key The Alarm Call Key is a speed dialling key for calling an emergency number. Pressing the Alarm Call Key for 1 second will automatically dial the programmed number even if the Keylock is active. Note! The Alarm Call Key number has to be programmed by the user before use. * Key Press and hold * to activate the keypad lock l. When typing, * is used to enter punctuation marks or special characters. # Key Press and hold # to change user profile. When typing, # is used to change between upper/lower case and numbers. 14

19 Press English Menu to bring up the main menu. Move the Side Key up/down to scroll between menus and press the Side Key or q to make selections. Use the Side Key or the numerical keypad to navigate within menus and sub-menus. Press to go back to the previous level, or L to close all menus and return to standby mode. Phone Book Profiles Calls Calculator Text message FM Radio Alarm Settings Conversion 15

20 English Phone Book 1 Browse Displays all saved contacts. Select an entry and press the Side Key to bring up the contacts sub-menu, or press q to call. Details/edit Edit the name, group and telephone number for each entry. Delete Deletes the entry from the memory. Send message to Opens a text message window. Type your message, then press q to bring up choices for sending and/or saving the message. Copy to SIM phonebook (phone contacts) Press q to copy the selected entry to the SIM card. Copy to Phone (SIM card contacts) Press q to copy the selected entry to the phone memory. 16

21 English Send number Sends the details for the selected entry as an SMS message. Press q to view the details, then press q again to bring up choices for sending and/or saving the message. Group browse Browse the numbers belonging to a group. Create Adds a new contact (see below) 2 Create Adds a new contact. 1. Select "Name?" and press the Side Key. 2. Use the keypad to enter a name or description for the new contact. Press # to toggle between upper/lower case and numbers. Press * for punctuation marks or special characters. Press to back up/erase. 3. Press q to confirm. 4. Select <Common> and press the Side Key. Select a group for the new contact and press q to confirm. 17
22 English 5. Select "No?" and press the Side Key. 6. Enter the number for the contact, including the area code. Press * twice to insert the international prefix "+" if needed. 7. Press q twice to save the new contact. 3 Storage Status Shows the number of stored contacts on the SIM card and in the phone memory 4 Abbreviated dial Phonebook contacts can be assigned to one of the number keys 2 9 for speed dialling. 1. Scroll to one of the assignable keys in the list. 2. Press the Side Key twice to set or change the key assignment. The phonebook will now open. 3. Select a contact from the phonebook and press the Side Key to assign it to the selected speed dialling key. 18
23 English 5 Copy From SIM card to phone Press q to copy all contacts on the SIM card to the phone memory. From phone to SIM card Press q to copy all contacts in the phone memory to the SIM card. 6 Delete All Entries Delete all ME entries Press q to delete all contacts from the phone memory. Delete all SIM entries Press q to delete all contacts from the SIM card. Note! The phone can store 100 entries. The memory capacity of the SIM card depends on the type of card used. 19
24 English 7 SDN Phonebook The SDN (Service Dialling Number) Phonebook contains phone numbers for the network operator's services. SDN Phonebook entries are stored on the SIM card and cannot be changed or deleted. Move the Side Key up/down to scroll to the desired entry, then press q for options: Details Press q to show details for the selected entry. Call Press q to call the selected entry. Note! SDN is not used by all network operators. 20
25 Calls English 1/2/3 Incoming/Outgoing/Missed call The 10 most recent incoming, outgoing or missed calls are saved in the call memory. Outgoing call (blue arrow) Incoming call (green arrow)! Missed call (red exclamation mark) 1. Move the Side Key up/down to select a call from the list. 2. Press q to call directly, or press the Side Key for options (see below), then q to confirm. Call Calls the selected number. Edit before dial Gives the opportunity to edit the number before calling. 21
26 English Send message to Opens a text message window for replying to the caller. Type your message, then press q to bring up choices for saving and/or sending the message. Delete Press q twice to delete the call. Save number Creates a new contact for the number (see Phone Book). Delete all Press q twice to delete all saved calls. 22
27 English 4 Call Duration Contains call time logs. Outgoing Duration The total duration of all outgoing calls. Incoming Duration The total duration of all incoming calls. Last Call Duration The duration of the most recent incoming or outgoing call. Press q to reset the time logs to 0. 23
28 English Text message 1 Read message 1. Move the Side Key up/down to scroll through received messages. 2. Press q to read the selected message. 3. Press q again to bring up more options: Text reply Opens a new text message window. Type your message, then press q to view the saving options: Only send Sends the message without saving it. Only save Saves the message in the Draftbox. Send and save Sends the message and saves it in the Outbox. Select one of the alternatives above, then press q to send the reply. 24
29 English Forward/Edit Review the message and edit it if needed, then press q to view the saving options (see page 23). Select one of the alternatives, then press q once to enter a number manually or twice to open the phonebook. After entering/selecting a number, press q twice to view the sending options: Send message to Press q to send the message to the recipient(s). Insert more DA To add multiple recipients: enter another number, then press q twice to return to the sending options. Repeat if needed. Dial back Press q to dial the number of the sender directly. 25
30 English Extract number Displays any telephone numbers contained in the message as well as the number of the sender. 1. Move the Side Key up/down to scroll through the displayed numbers. 2. Press q to call the number or press the Side Key to save the number in a phonebook entry (see Phone Book). Delete Press q twice to delete the message. 2 Write message Opens a text message window. Type your message, then press q to view the saving options (see page 23). Select one of the alternatives, then press q once to enter a number manually or twice to open the phonebook. After entering or selecting a recipient number, press q twice to view the sending options (see page 24). 26
31 English 3 Outbox Contains saved sent messages. Move the Side Key up/down to scroll through the list of messages, then press q once to review the message, and once more for options: Forward/Edit Review the message and edit it if needed, then press q to view the saving options (see page 23). Select one of the alternatives, then press q once to enter a number manually or twice to open the phonebook. After entering or selecting a recipient number, press q twice to view the sending options (see page 24). Delete Press q twice to delete the message. 27
32 English 4 Draftbox Contains saved unsent messages. Move the Side Key up/down to scroll through the list of messages, then press q once to review the message, and once more for options: Forward/Edit Review the message and edit it if needed, then press q to view the saving options (see page 23). Select one of the alternatives, then press q once to enter a number manually or twice to open the phonebook. After entering or selecting a recipient number, press q twice to view the sending options (see page 24). Delete Press q twice to delete the message. 28
33 English 5 Voice mail Voice mail messages are stored on the network. You call the network Voice Mailbox number to listen to your messages. Listen to voice mail messages Calls the Voice Mailbox number to retreive messages. Voice mailbox number Enter the Voice Mailbox number and confirm with q. Note! The number to the voice mail is provided by the network operator. The Voice Mailbox can now be speed-dialled by pressing and holding 1. 29
34 English 6 Message Setup Service Center This number must be entered and saved to be able to use the SMS function. The number can be obtained from the network operator. Storage Media SIM preferred Messages are stored on the SIM card. Phone preferred Messages are stored in the phone memory. Storage Status Shows the number of saved messages on the SIM card and in the phone memory. 30
35 English 7 Delete all Delete all messages Deletes all saved messages from the Inbox, Outbox and Draftbox. Delete inbox messages Deletes all messages from the Inbox. Delete outbox messages Deletes all messages from the Outbox. Delete draftbox messages Deletes all messages from the Draftbox. 31
36 English Alarm Move the Side Key up/down to select Alarm 1, 2 or 3, then press q. To set the alarm: Select On and press q. 1. Enter the time for the alarm, then press q for options: 2. For a single occurence, select One shot alarm and press q to save the alarm. For a repeated alarm, select Weekly alarm and press q. Scroll through the list of weekdays and press the Side Key to mark each weekday that the alarm should be active on. Press q to save the alarm. To disable the alarm: Select Off and press q. Note! The alarm function works even if the telephone is switched off. 32
37 Conversion English The phone has a conversion tool for Currency, Area, Energy, Length, Mass, Power, Pressure, Temperature, Time, Velocity and Volume. 1. Select Type and press q. 2. Select Convert type and press q. 3. Scroll to the desired conversion type and confirm by pressing q. 4. Select the first Unit: entry and press q. 5. Select Choose unit and and press q. 6. Scroll to the desired unit you want to convert from and press q. 7. Scroll down to the second Unit: entry and press q. 8. Select Choose unit and and press q. 9. Scroll to the desired unit you want to convert to and press q. 10. Scroll down to Input: and enter the value you want to convert. The result is immediately visible in Res.:. 33
38 English Profiles The phone has 5 user profiles with different settings for call and alert signals. The profiles are preset in the factory but can be modified to suit individual needs. Move the Side Key up/down to scroll through the list of user profiles and press q to select a profile. 1 Set as default Set this profile to be loaded as default when the phone is switched on. 2 Personalize Change settings for the selected profile: Call alert Ring tone Move the Side Key up/down to scroll through the different ring tones and press q to select a ring tone. 34
39 English Ringing volume Move the Side Key up/down to change the sound volume of the ring signal. Release the key or press to return to the menu. Call alert Choose between Ring only, Vibrate only, or Ring & Vibrate. Confirm by pressing q. SMS alert Set the alert signal for incoming SMS messages. Same functions and settings as Call Alert. Key sound Volume 2 Loud beep on key press Volume 1 Muted beep on key press Off No key sound 35
40 English System alert Enable/disable the sound alert for system messages. Alert On/Off Enable/disable the telephone on/off melody. 3 Reset Resets the selected profile to the factory setting. 4 Title Enter a new name for the selected profile and confirm with q. 36
41 Calculator English The Calculator can perform basic math operations. 1. Enter the first number using the number keys 0 9. Use # to enter decimal points. 2. Move the Side Key up/down or press * to select an operation ( + - * / ), then press the Side Key to confirm. 3. Enter the next number. 4. Repeat step 2 3 as necessary, or press q to calculate the result. 5. Press to clear the result and exit to the menu. 37
42 FM Radio English Note! The FM Radio and its settings are only available when a headset is connected. The FM Radio menu can also be reached by pressing when the radio is active. Move the Side Key up/down to search for radio stations, or press number keys 1 9 to select previously saved channels (see Save channel below). Press q to view the FM Radio options: Off Disables the FM radio. Automatic Searching Move the Side Key up/down to automatically search for transmitting radio stations. The display shows while searching. 38
43 English Manual Searching Move the Side Key up/down to change the frequency in 0.1 MHz steps. Adjust Volume Move the Side Key up/down to adjust the sound volume. Save Channel 1. Move the Side Key up/down to select one of the 9 available channel presets. 2. Press q to save the currently tuned station to the selected channel. 39
44 Settings English 1 Phone Display Backlight Sets the display backlighting to be always on, or to shut off after 15 or 30 seconds of inactivity. Note! Leaving the backlighting on will drain the battery faster than normal. Wallpaper 1. Select one of the images to use as background for the display, then press the Side Key or q to preview. 2. Move the Side Key up/down to change images while previewing. 3. Press q to confirm your selection. LCD Contrast Move the Side Key up/down to adjust the light intensity of the display screen. 40
45 English Greeting Message Enable/disable and edit the greeting message. Language Sets the menu language of the phone. Automatic means that the language will change depending on the network operator's geographical location. Date/Time Display Enable/disable the time and date on the display. Clock Date & Time Settings Enter the time and date using the number keys. Confirm with q. Date Display Format Select your desired format for displaying the date (day-month-year etc.). Date Separator Select a separator sign (dot, slash, or none) for date presentation. Time Display Format Select 12 hour or 24 hour time format. 41
46 English Note! If the battery is removed the stored time and date will be displayed the next time the phone is switched on. Own number Three telephone numbers related to the owner/user can be entered here. Keylock The automatic Keylock function can be set to be disabled, or activated after 30 Seconds or 60 Seconds of inactivity in standby mode. Factory Default Resets the telephone to the factory settings. Note! The phone lock password is required to access the Factory Default setting. The default phone lock password is "0000". Note! The Emergency number for the Alarm Call Key has to be reprogrammed after a Factory Default reset. Phone book entries and SMS messages are not affected. 42
47 English 2 Alarm Call Setting Alarm number Enter the phone number to be dialled by the Alarm Call Key and press q to confirm. Delay setting Sets the time delay before the Alarm number is dialled after pressing the Alarm Call Key. Select 3 Seconds, 5 Seconds or 8 Seconds and press q to confirm. 3 Call CLIR Prevents the phone number from being displayed on the recipients phone. Contact your network operator for more information about this service. Auto redial When enabled, the phone will automatically redial the number 10 times after a busy signal or unanswered call. 43
48 English Any key answer When enabled any key, except L and, can be pressed to answer an incoming call. 4 Network Note! These functions have to be supported by the network and subscribed by the user. For more information contact your network operator. Call Waiting An alert tone will be heard if there is an incoming call while talking. Press q to put the current call on hold and answer the incoming call. The following options can be selected: Interrogate Displays if the service is active or not. Activate Enables the function. Deactivate Disables the function. 44
49 English Call Forwarding Incoming calls can be diverted to another phone number. Unconditional Divert Diverts all incoming calls to the other number. Divert When Busy Diverts incoming calls if the line is busy. No Answer Divert Diverts incoming calls if unanswered. No Service Divert Diverts incoming calls if the phone is out of service. The following settings can be selected for each Call Forwarding function: Interrogate Displays if the service is active or not. Activate Enables the function. Deactivate Disables the function 45
50 English Restrict calls To increase security the phone can be restricted to disallow certain types of calls. Note! To activate these functions a Restrict Calls password is needed. Contact your network operator to get the Restrict Calls password. Note! The emergency number 112 can be called regardless of these restrictions. All Outgoing Calls User can answer incoming calls but not dial out. All Int l Calls User can not call international or long distance phone numbers. Int l Except To Home User can not call international or long distance phone numbers except to the own region. All Incoming Calls User can dial out but not receive incoming calls. 46
51 English Incoming While Roam User can not receive incoming calls while roaming (operating in other networks). The following options can be selected for the Restrict Calls functions: Interrogate Displays if the service is active or not. Activate Enables the function. Deactivate Disables the function. Network Select Mode Automatic selection Network is selected automatically according to the SIM card's information. Manual selection Network is selected from a list by the user. 47
52 English 5 Security The SIM card is protected with a PIN code (Personal Identification Number). The Phone can be set to ask for the PIN code on startup. Power On PIN1 ON Enabled, PIN code required when phone is switched on. OFF Disabled, no PIN code required. Change PIN1 To change the PIN code, enter a new PIN code and confirm with q. Change PIN2 Some SIM cards can have dual PIN codes. If your network operator supports this function, the second PIN code can be set here. 48
53 English Phone code The telephone can be password-protected for additional security. ON Verify when power-on Phone code required when the phone is switched on. OFF Phone code disabled. Change Phone code To change the Phone code, enter a new code and confirm with q. Note! The default Phone code is "0000". 49
54 English Troubleshooting Phone cannot be switched on 1. Battery charge low Connect the power adapter and charge the battery for 12 hours. 2. Battery incorrectly installed Check the installation of the battery. Failure to charge the battery 1. Battery or charger damaged Check the battery and charger. 2. Battery recharged in temperatures below 10 C or above 55 C Improve the charging environment. 2. Charger incorrectly connected to phone or power socket Check the charger connections. 50
55 English Standby time decreases 1. Battery charge capacity too low Install a new battery. 2. Too far from network transmitting tower Searching the network demands a lot of power. Find a place with stronger signal or turn off the phone temporarily in areas with weak signal. Failure to place or receive calls 1. Restricted calls function activated Deactivate the Restricted calls function. If this does not solve the problem, contact the network operator. PIN code not accepted 1. Wrong PIN code entered too many times Enter the PUK code to change the PIN code, or contact the network operator. 51
56 English No SIM card indication 1. SIM card damaged Check the condition of the SIM card. If the card is damaged, contact the network operator. 2. SIM card incorrectly installed Check the SIM card installation. 3. SIM card dirty or damp Wipe the metal surface of the SIM card with a clean cloth. Failure to connect to network 1. SIM card invalid Contact the SIM card provider. 2. No coverage of GSM service Contact the network operator. 3. Signal too weak See Weak signal below. 52
57 English Weak signal 1. Too far from network transmitting tower. Try again from another location. 2. Network congestion. Try calling at a later time. Echo or degraded sound quality 1. Regional problem caused by a bad network relay. Hang up and redial as this may switch to another network relay. Failure to add a contact 1. Phonebook memory full Delete contacts to free up memory. Failure to set a function 1. Network operator does not support the function or the user has not ordered the service Contact the network operator. 53
58 English Care and Maintenance Your unit is a technically advanced product and should be treated with the greatest care. By following the advice below, you can ensure that the guarantee will cover any damage. Protect the unit from moisture. Rain/snowfall, moisture and all types of liquid can contain substances that corrode the electronic circuits. If the unit gets wet, you should remove the battery and allow the unit to dry completely before you replace it. Do not use or keep the unit in dusty, dirty environments. The unit s moving parts and electronic components can be damaged. Do not keep the unit in warm places. High temperatures can reduce the life span for electronic equipment, damage batteries and distort or melt certain plastics. Do not keep the unit in cold places. When the unit warms up to normal temperature, condensation can form on the inside which can damage the electronic circuits. Do not try to open the unit in any other way than that which is indicated here. Do not drop the unit. Do not knock or shake it either. If it is treated roughly the circuits and precision mechanics can be broken. Do not use strong chemicals to clean the unit. Use the charger indoors. The advice above applies to the unit, battery, charger or other accessories. If the telephone is not working as it should, please contact the place of purchase for service. Don t forget the receipt or a copy of the invoice. 54
59 English Further safety information The unit and the accessories can contain small parts. Keep them out of the reach of small children. Operating environment Remember to follow any particular rules that may apply wherever you happen to be, and always turn off the unit whenever its use is forbidden, or it can cause interference or danger. Only use the unit in its normal user position. This unit complies with guidelines for radiation when it is used either in a normal position against your ear, or when it is at least 2.2 cm (7/8 inch) from your body. If the unit is carried close to your body in a case, belt holder or other holder these should not contain any metal, and the product should be placed at the distance from your body specified above. Make sure that the distance instructions above are followed until the transfer is complete. Parts of the unit are magnetic. The unit can attract metal objects. Do not keep credit cards or other magnetic media near the unit, as information stored on them can be erased. Medical units The use of equipment that transmits radio signals, e.g. mobile phones, can interfere with insufficiently protected medical apparatus. Consult a doctor or the manufacturer of the apparatus to determine if it has adequate protection against external radio signals, or if you have any questions. If notices have been put up at health care facilities instructing you to turn off the unit while you are there, you should comply. Hospitals and other health care facilities sometimes use equipment that can be sensitive to external radio signals. 55
60 Pacemaker English Pacemaker manufacturers recommend a distance of at least 15 cm (6 inches) between a mobile phone and a pacemaker to avoid the risk of interference with the pacemaker. These recommendations are in accordance with independent research and recommendations from Wireless Technology Research. People with pacemakers should: always keep the unit at a distance of at least 15 cm from the pacemaker not carry the unit in a breast-pocket hold the unit against the ear on the opposite side from the pacemaker to reduce the risk of interference. If you suspect that there is a risk of interference, turn off the unit and move it further away. Hearing aids Some digital wireless units can cause interference to some hearing aids. Using the Doro HearPlus eh346m EarHook can eliminate this for hearing aids with a T position. If any other interference occurs, please contact your operator. Vehicles Radio signals can affect electronic systems in motor vehicles (e.g. electronic fuel injection, ABS brakes, automatic cruise control, air bag systems) that have been incorrectly installed or are inadequately protected. Contact the manufacturer or its representative for more information about your vehicle or any additional equipment. 56
61 English Do not keep or transport flammable liquids, gases or explosives together with the unit or its accessories. For vehicles equipped with air bags: Remember that air bags fill with air with considerable force. Do not place objects, including fixed or portable radio equipment in the area above the airbag or the area where it might expand. Serious injuries may be caused if the mobile phone equipment is incorrectly installed and the airbag fills with air. It is forbidden to use the unit whilst flying. Turn off the unit before you board a plane. Using wireless telecom units inside a plane can involve risks for air safety and interfere with telecommunications. It can also be illegal. Areas with explosion risk Always turn off the unit when you are in an area where there is a risk of explosion and follow all signs and instructions. An explosion risk exists in places that include areas where you are normally requested to turn off your car engine. Within such an area, sparks can cause explosion or fire which can lead to personal injuries, even death. Turn off the unit at filling stations i.e. near petrol pumps and garages. Follow the restrictions that are in force on the use of radio equipment near places where fuel is stored and sold, chemical factories and places where blasting is in progress. Areas with risk for explosion are often - but not always - clearly marked. This also applies to below decks on ships; the transport or storage of chemicals; vehicles that use liquid fuel (such as propane or butane); areas where the air contains chemicals or particles, such as grain, dust or metal powder. 57
62 English Emergency calls Important! Mobile phones such as this unit use radio signals, the mobile phone network, the terrestrial network and user-programmed functions. This means that connection in all circumstances cannot be guaranteed. Therefore you should never rely solely on a mobile phone for very important calls such as medical emergencies. Specific Absorption Rate (SAR) This device meets applicable international safety requirements for exposure to radio waves. This telephone measures 0.3 W/kg (GSM 900MHz), 0.2 W/kg (DCS 1800MHz) (measured over 10g tissue). The max. limit according to WHO is 2W/kg (measured over 10g tissue). Declaration of conformity Doro hereby declares that the Doro HandleEasy 330gsm conforms to the essential requirements and other relevant regulations contained in the Directives 1999/5/EC (R&TTE) and 2002/95/EC (RoHS). A copy of the Declaration of Conformity can be found at Specifications Network: GSM 900/DCS1800 Dual Band Size: 105 mm x 55 mm x 16 mm Weight: 70 g (excl. battery) Battery: 3.7V/900 mah Li-ion battery 58
63 English Guarantee This product is guaranteed for a period of 12 months from the date of purchase. In the unlikely event of a fault occurring during this period, please contact the place of purchase. Proof of purchase is required for any service or support needed during the guarantee period. This guarantee shall not apply to a fault caused by an accident or a similar incident or damage, liquid ingress, negligence, abnormal usage, not reasonably maintained or any other circumstances on the purchaser's part. Furthermore, this guarantee shall not apply to any faults caused by a thunderstorm or any other voltage fluctuations. As a matter of precaution, we recommend disconnecting the device during a thunderstorm. Batteries are consumables and are not included in any guarantee. This guarantee does not apply if batteries other than Doro original batteries have been used. UK If you cannot resolve the fault using the section Troubleshooting, technical support is available by on tech@doro-uk.com -premium rate telephone number: calls cost 50 pence per minute (prices correct at the time of publication). You can also contact us in writing regarding any Spares or Technical query: Customer Services Doro UK Ltd 1 High Street Chalfont St Peter Buckinghamshire SL9 9QE Further contact details are available on our website: 59
64
65 Česky Instalace Pozor! Před sejmutím krytu baterie telefon vždy vypněte. Kryt baterie Chcete-li sejmout kryt baterie, jemně stiskněte kryt a stáhněte ho dolů. Chcete-li vrátit kryt baterie na místo, nasuňte ho zezdola na telefon. Instalace a vyjmutí SIM karty Zkontrolujte, zda jsou kontakty SIM karty otočené dovnitř a zkosený roh směřuje nahoru. Dejte pozor, abyste kontakty na SIM kartě nepoškrábali nebo neohnuli.
66 Česky Pokud není SIM karta vložena, je poškozena nebo je vložena nesprávně, zobrazí se na displeji zpráva Chybí SIM karta. Instalace a vyjmutí baterie Umístěte horní část baterie do prostoru pro baterii tak, aby kontakty baterie směřovaly proti kontaktům v prostoru pro baterii a potom opatrně zatlačte na spodní část baterie, až baterie dosedne na místo. Chcete-li baterii vyjmout, opatrně stiskněte spodní část baterie a zvedněte ji pomocí výřezu pro prst. Nabíjení Zapojte síťový adaptér do el. zásuvky a do konektoru na telefonu. Nabíjení je dokončeno, když se na displeji zobrazí symbol plné baterie a text Nabito. Poprvé nabíjejte telefon 12 hodin. Potom trvá úplné nabití baterie přibližně 5 hodin.
67 Česky Baterie Plné kapacity baterie bude dosaženo teprve po 4 až 5 nabitích. Baterie časem slábnou, což znamená, že běžným používáním se zkracuje doba hovoru a pohotovostní doba. Automatický nabíjecí mechanismus zabraňuje přebití nebo poškození baterií z důvodu příliš dlouhého nabíjení. Když je baterie téměř vybitá, zobrazí se na displeji ikona a zazní výstražný signál. Pozor! Používejte pouze baterie, nabíječku a příslušenství, které byly schváleny pro použití s tímto modelem. Připojení jiného příslušenství může být nebezpečné a může mít za následek zrušení platnosti typové zkoušky telefonu a záruky. Připojením k portu USB v počítači může dojít k poškození telefonu nebo počítače.
68 Česky Symboly na displeji Telefonní seznam Hovory Textová zpráva Budík Převod Profily Kalkulačka FM rádio Intenzita signálu Nová SMS Roaming Připojen headset Zamknutá klávesnice Zapnutý budík Pouze vyzvánění Vibrace + vyzvánění Pouze vibrace Úroveň nabití baterie Nastavení
69 Česky Používání telefonu Zapnutí telefonu Chcete-li zapnout nebo vypnout telefon, stiskněte a podržte na tři sekundy tlačítko L. Pokud je SIM karta chráněna PIN kódem (Personal Identification Number), na displeji se zobrazí zpráva Zadejte PIN1:. Zadejte PIN kód a potvrďte stisknutím tlačítka q ; tím odemknete SIM kartu. Pozor! Většina síťových operátorů umožňuje volat na číslo tísňového volání 112 i bez odemknutí SIM karty. Pokud zadáte chybný PIN kód, na displeji se zobrazí text Zadejte PIN1 (číslo):, kde číslo je počet zbývajících pokusů. Když už nezbývají žádné další pokusy, budete potřebovat PUK (Personal Unblocking Key) kód dodaný se SIM kartou, pomocí něhož kartu odblokujete a zadáte nový PIN kód.
70 Česky Zadejte PUK kód, potvrďte ho tlačítkem q, potom zadejte nový PIN kód a potvrďte ho. Pokud nebyly se SIM kartou dodány kódy PIN a PUK, obraťte se na svého operátora sítě. Kód telefonu Telefon lze dále zabezpečit heslem. Na displeji se potom při zapnutí (po odemknutí SIM karty) zobrazí zpráva Zadejte kód telefonu. Zadejte kód telefonu a odemkněte telefon stisknutím tlačítka q. Pozor! Výchozí kód telefonu je Informace o změně kódu telefonu naleznete v menu Nastavení/Zabezpečení.
71 Česky Volání 1. Zadejte číslo pomocí klávesnice. Dozadu se posunete tlačítkem. 2. Stisknutím tlačítka q vytočte číslo. Při vytáčení čísla bude znít signál. 3. Stisknutím tlačítka L ukončete hovor. Pozor! U mezinárodních hovorů zadejte dvojím stisknutím tlačítka * mezinárodní předvolbu +. Volání pomocí telefonního seznamu 1. Stisknutím tlačítka L zobrazte telefonní seznam. 2. Seznam můžete procházet posouváním bočního tlačítka nahoru a dolů, nebo stiskněte na klávesnici znak, a zobrazí se položky začínající tímto znakem. 3. Stisknutím tlačítka q zavoláte vybraný kontakt. 4. Stisknutím tlačítka L ukončete hovor.
72 Česky Přijetí hovoru 1. Stisknutím tlačítka q hovor přijmete, nebo stiskněte tlačítko L a hovor odmítněte, aniž byste ho přijali. 2. Stisknutím tlačítka L ukončete hovor. Textové zprávy SMS Po přijetí nové zprávy SMS se na displeji zobrazí text Nová zpráva a zazní signál. Stisknutím tlačítka q otevřete složku Doručené. % Když jsou ve složce Doručené nepřečtené zprávy, zobrazí se na horním okraji displeje ikona. Blikající ikona % znamená, že složkä Doručené je plná. Uvolněte paměť odstraněním některých zpráv. Další pokyny ke čtení, psaní, odesílání a ukládání nebo odstraňování textových zpráv naleznete v menu Textové zprávy. Používání klávesnice Numerická klávesnice slouží rovněž k psaní textů. Opakovaným stisknutím jednoho tlačítka můžete procházet znaky a číslice.
73 Česky Stisknutím tlačítka # můžete přepínat mezi velkými a malými písmeny a číslicemi. Stisknutím tlačítka * zobrazíte interpunkční znaménka nebo speciální znaky. Stisknutím tlačítka zadaný znak. smažete poslední Pozor! Když je displej v režimu spánku, prvním stisknutím tlačítka pouze zapnete displej. Zámek klávesnice Pomocí funkce Zámek klávesnice zamknete klávesnici a zabráníte neúmyslnému stisknutí tlačítek. Zámek klávesnice zapnete stisknutím a podržením tlačítka *. Zámek odemknete stisknutím tlačítka a potom tlačítka *. Příchozí hovory lze přijmout stisknutím tlačítka q i když je zapnut Zámek klávesnice. Pokud hovor ukončíte nebo odmítnete stisknutím tlačítka L, Zámek klávesnice se znovu zapne.
74 Česky Číslo tísňového volání 112 a Tlačítko tísňového volání lze použít bez vypnutí Zámku klávesnice. Ovládání hlasitosti Hlasitost lze během hovoru upravit posouváním bočního tlačítka nahoru a dolů. Headset Po připojení headsetu se na displeji zobrazí ikona a automaticky se odpojí interní mikrofon telefonu. S připojeným headsetem lze příchozí hovory přijmout stisknutím tlačítka headsetu na 1 sekundu. Pozor! Používáním headsetu při vysoké hlasitosti můžete způsobit poškození sluchu. Při používání headsetu pečlivě nastavte hlasitost zvuku. 10
75 Česky Funkce tlačítek Tlačítko Volat q Používá se k přijímání a uskutečňování hovorů a pro potvrzování voleb a nastavení v menu. Stisknutím tlačítka q v pohotovostním režimu zobrazíte Seznam hovorů: Odchozí hovor (modrá šipka)! Příchozí hovor (zelená šipka) Nepřijatý hovor (červená vykřičník) Stisknutím tlačítka q během hovoru zobrazíte seznam možností hovoru: Handsfree Zapne funkci Hlasitý telefon. Ztlumit Zapínání a vypínání mikrofonu Odpojit Odpojí hovor (stejná fukce jako tlačítko L) 11
76 Česky Tlačítko Konec L Používá se k ukončení nebo odmítnutí hovorů, ke zrušení aktuální možnosti menu nebo k návratu do pohotovostního režimu. Stisknutím tlačítka L v pohotovostním režimu zobrazíte Telefonní seznam. Stisknutím a podržením tlačítka L na tři sekundy telefon zapnete nebo vypnete. Tlačítko Zpět/Menu Stisknutím tlačítka v pohotovostním režimu zobrazíte menu. Potom se používá k návratu do předchozího režimu nebo úrovně menu. Stisknutím tlačítka předchozí znak. Stisknutím tlačítka přidržíte. během psaní smažete během hovoru hovor 12
77 Česky Boční tlačítko Boční tlačítko je 3cestné tlačítko, které lze stisknout a posouvat nahoru nebo dolů. V menu můžete posouváním Bočního tlačítka nahoru a dolů procházet menu, seznamy a nastavení. Stisknutím tlačítka obvykle potvrdíte výběr nebo se posunete do další úrovně menu. V pohotovostním režimu posunutím nebo stisknutím Bočního tlačítka zapnete displej. Během hovoru zapnete stisknutím Bočního tlačítka funkci hlasitého telefonu a posouváním nahoru a dolů nastavíte hlasitost zvuku. Tlačítko Baterka Stisknutím a podržením zapnete nebo vypnete baterku. Tlačítko FM rádio Stisknutím zapnete nebo vypnete FM rádio, když je připojený headset. Pokud je již rádio zapnuté, zobrazíte stisknutím tlačítka menu FM rádia. 13
78 Česky Tlačítko tísňového volání Tlačítko tísňového volání je tlačítko rychlé volby pro volání na číslo tísňového volání. Stisknutím tlačítka tísňového volání na 1 sekundu se automaticky vytočí naprogramované číslo (i když je zapnutý Zámek klávesnice). Pozor! Tlačítko tísňového volání musí uživatel naprogramovat před jeho použitím. * Stisknutím a podržením tlačítka * zapnete zámek klávesnice l. Během psaní se tlačítko * používá k zadávání interpunkčních znamének nebo speciálních znaků. # Stisknutím a podržením tlačítka # změníte uživatelský profil. Během psaní se tlačítko # používá k přepínání velkých a malých písmen a číslic. 14
79 Stisknutím tlačítka Česky Menu zobrazíte hlavní menu. Posouváním Bočního tlačítka nahoru a dolů můžete procházet menu a stisknutím Bočního tlačítka nebo tlačítka q provedete výběr. K pohybu mezi menu a podmenu používejte Boční tlačítko nebo numerickou klávesnici. Stisknutím tlačítka se vrátíte na předchozí úroveň. Stisknutím tlačítka L zavřete všechna menu a vrátíte se do pohotovostního režimu. Telefonní seznam Profily Hovory Kalkulačka Textová zpráva FM rádio Budík Nastavení Převod 15
80 Česky Telefonní seznam 1 Procházet Zobrazí všechny uložené kontakty. Vybráním položky a stisknutím Bočního tlačítka zobrazíte podmenu kontaktů, nebo můžete stisknout tlačítko q a zavolat. Detaily/upravit Umožňuje upravit jméno, skupinu a telefonní číslo jednotlivých položek. Smazat Vymaže položku z paměti. Odeslat zprávu Otevře okno textové zprávy. Napište zprávu a stisknutím tlačítka q zobrazte volby pro odeslání nebo uložení zprávy. Kopírovat do telefonního seznamu na SIM kartě (kontakty v telefonu) Stisknutím tlačítka q zkopírujete vybranou položku na SIM kartu. Kopírovat do telefonu (kontakty na SIM kartě) Stisknutím tlačítka q zkopírujete vybranou položku do paměti telefonu. 16
81 Česky Odeslat číslo Umožňuje odeslat detaily vybrané položky jako zprávu SMS. Stisknutím tlačítka q zobrazíte detaily. Potom stiskněte tlačítko q znovu a zobrazíte volby pro odeslání nebo uložení zprávy. Procházení skupiny Umožňuje procházet čísla patřící do skupiny. Vytvořit Přidá nový kontakt (viz níže). 2 Vytvořit Přidá nový kontakt. 1. Vyberte položku Jméno? a stiskněte Boční tlačítko. 2. Pomocí klávesnice zadejte jméno nebo popis nového kontaktu. Stisknutím tlačítka # můžete přepínat mezi velkými a malými písmeny a číslicemi. Stisknutím tlačítka * zobrazíte interpunkční znaménka nebo speciální znaky. Stisknutím tlačítka se vrátíte zpět nebo smažete znak. 3. Stisknutím tlačítka q potvrďte zadání. 17
82 Česky 4. Vyberte položku <Skupina> a stiskněte Boční tlačítko. Vyberte skupinu pro nový kontakt a potvrďte zadání stisknutím tlačítka q. 5. Vyberte položku Číslo? a stiskněte Boční tlačítko. 6. Zadejte číslo kontaktu včetně směrového čísla. V případě potřeby zadejte dvojím stisknutím tlačítka * mezinárodní předvolbu. 7. Dvojím stisknutím tlačítka q uložte nový kontakt. 3 Stav paměti Zobrazí počet uložených kontaktů na SIM kartě a v paměti telefonu. 4 Zkrácená volba Kontakty z telefonního seznamu lze přiřadit jednomu z číselných tlačítek 2-9 pro rychlou volbu. 1. Přejděte v seznamu na jedno z přiřaditelných tlačítek. 18
83 Česky 2. Dvojím stisknutím Bočního tlačítka nastavte nebo změňte přiřazení tlačítka. Otevře se telefonní seznam. 3. Vyberte kontakt v telefonním seznamu a stisknutím Bočního tlačítka ho přiřaďte vybranému tlačítku rychlé volby. 5 Kopírovat Ze SIM karty do telefonu Stisknutím tlačítka q zkopírujete všechny kontakty na SIM kartě do paměti telefonu. Ze telefonu na SIM kartu Stisknutím tlačítka q zkopírujete všechny kontakty v paměti telefonu na SIM kartu. 6 Smazat všechny položky Smazat všechny položky TEL Stisknutím tlačítka q vymažete všechny kontakty z paměti telefonu. Smazat všechny položky SIM Stisknutím tlačítka q vymažete všechny kontakty ze SIM karty. 19
84 Česky Pozor! Do telefonu lze uložit 100 položek. Kapacita paměti SIM karty závisí na typu použité karty. 7 Telefonní seznam služebních čísel (SDN) Telefonní seznam služebních čísel (SDN, Service Dialling Number) obsahuje telefonní čísla služeb operátora sítě. Položky telefonního seznamu SDN jsou uloženy na SIM kartě a nelze je měnit ani mazat. Posunutím Bočního tlačítka nahoru nebo dolů přejděte na požadovanou položku a stisknutím tlačítka q zobrazte možnosti: Detaily Stisknutím tlačítka q zobrazíte detaily vybrané položky. Volat Stisknutím tlačítka q zavoláte číslo vybrané položky. Pozor! SDN nepoužívají všichni operátoři sítě. 20
85 Hovory Česky 1/2/3 Příchozí/Odchozí/Nepřijatý hovor V paměti hovorů je uloženo posledních 10 příchozích, odchozích či nepřijatých hovorů.! Odchozí hovor (modrá šipka) Příchozí hovor (zelená šipka) Nepřijatý hovor (červená vykřičník) 1. Posunutím Bočního tlačítka nahoru nebo dolů vyberte hovor v seznamu. 2. Stisknutím tlačítka q můžete přímo zavolat, nebo stiskněte Boční tlačítko, zobrazte možnosti (viz níže), a potvrďte akci stisknutím tlačítka q. Volat Zavolá vybrané číslo. Před voláním upravit Umožňuje číslo před voláním upravit. 21
86 Česky Odeslat zprávu Otevře okno textové zprávy a umožní odpovědět volajícímu. Napište zprávu a stisknutím tlačítka q zobrazte volby pro uložení nebo odeslání zprávy. Smazat Dvojím stisknutím tlačítka q hovor smažete. Uložit číslo Vytvoří nový kontakt pro dané číslo (viz Telefonní seznam). Smazat vše Dvojím stisknutím tlačítka q smažete všechny uložené hovory. 22
87 Česky 4 Doba trvání hovoru Obsahuje protokoly dob trvání hovorů. Doba trvání odchozích Celková doba trvání všech odchozích hovorů. Doba trvání příchozích Celková doba trvání všech příchozích hovorů. Doba trvání posledního hovoru Doba trvání posledního příchozího nebo odchozího hovoru. Stisknutím tlačítka q protokoly vynulujete. 23
Installation of EuroCert software for qualified electronic signature
 Installation of EuroCert software for qualified electronic signature for Microsoft Windows systems Warsaw 28.08.2019 Content 1. Downloading and running the software for the e-signature... 3 a) Installer
Camspot 4.4 Camspot 4.5
 User manual (addition) Dodatek do instrukcji obsługi Camspot 4.4 Camspot 4.5 1. WiFi configuration 2. Configuration of sending pictures to e-mail/ftp after motion detection 1. Konfiguracja WiFi 2. Konfiguracja
User s manual for icarwash
 User s manual for icarwash BKF Myjnie Bezdotykowe Sp. z o.o. Skarbimierzyce 22 72 002 Dołuje (k. Szczecina) Skarbimierzyce, 2014.11.14 Version v0.2 Table of Contents Table of Contents Settings Login Navigation
Car MP3 Player MM211. Aby zapewnić prawidłową obsługę sprzętu zapoznaj się dokładnie z instrukcją i zachowaj ją na przyszłość.
 Car MP3 Player MM211 Aby zapewnić prawidłową obsługę sprzętu zapoznaj się dokładnie z instrukcją i zachowaj ją na przyszłość. To ensure proper use of this product please read this User s Manual carefully
USB firmware changing guide. Zmiana oprogramowania za przy użyciu połączenia USB. Changelog / Lista Zmian
 1 / 9 Content list / Spis Treści 1. Hardware and software requirements, preparing device to upgrade Wymagania sprzętowe i programowe, przygotowanie urządzenia do aktualizacji 2. Installing drivers and
USB firmware changing guide. Zmiana oprogramowania za przy użyciu połączenia USB. Changelog / Lista Zmian
 1 / 12 Content list / Spis Treści 1. Hardware and software requirements, preparing device to upgrade Wymagania sprzętowe i programowe, przygotowanie urządzenia do aktualizacji 2. Installing drivers needed
Tuber radio BT MA407. Instrukcja obsługi User s Manual
 Tuber radio BT MA407 Instrukcja obsługi User s Manual User s Manual MA407 INSTRUCTIONS...4 BASIC...4 TROUBLESHOOTING...5 DATA TRANSFERRING / CHARGING VIA USB CABLE...5 INTERFACES...5 SPECIFICATIONS...6
SLU0056. Multifunctional Wireless Stereo Headphone
 SLU0056 Multifunctional Wireless Stereo Headphone Owner s manual Instrukcja obsługi EN PL Owner s manual 1. Technical parameter Bluetooth Protocol Frequency range Effective distance FM frequency range
High Definition Car Video Recorder Quer. Operation Manual KOM0474
 High Definition Car Video Recorder Quer Operation Manual KOM0474 EN Instruction to Keys Function 1 USB Interface 2 On/Off key 3.5V power input jack 4 SD/MMC card slot 5 Speaker 6 Bracket hole 7 MIC 8 Battery
Instrukcja konfiguracji usługi Wirtualnej Sieci Prywatnej w systemie Mac OSX
 UNIWERSYTETU BIBLIOTEKA IEGO UNIWERSYTETU IEGO Instrukcja konfiguracji usługi Wirtualnej Sieci Prywatnej w systemie Mac OSX 1. Make a new connection Open the System Preferences by going to the Apple menu
INSTRUKCJE JAK AKTYWOWAĆ SWOJE KONTO PAYLUTION
 INSTRUKCJE JAK AKTYWOWAĆ SWOJE KONTO PAYLUTION Kiedy otrzymana przez Ciebie z Jeunesse, karta płatnicza została zarejestrowana i aktywowana w Joffice, możesz przejść do aktywacji swojego konta płatniczego
KOM0774. Owner s manual EN. Car DVR Instrukcja obsługi PL
 KOM0774 Owner s manual EN Car DVR Instrukcja obsługi PL Owner s manual Instruction to keys function 1 USB Interface 2 On/Off key 3.5V power input jack 4 SD/MMC card slot 5 Speaker 6 Bracket hole 7 MIC
Rainbow Eye Bluetooth Speaker MA417 User s Manual
 Rainbow Eye Bluetooth Speaker MA417 User s Manual Opis funkcji: INSTRUKCJA OBSŁUGI Wbudowany Bluetooth 2.1 + bezprzewodowy moduł EDR Dzwięk audio przez Bluetooth, perfekcyjna jakość dzwięku oraz efekt
INSTRUKCJA OBSŁUGI / MANUAL GUIDE. Mobile Phone TEL1711
 INSTRUKCJA OBSŁUGI / MANUAL GUIDE Mobile Phone TEL1711 PRZYCISKI / BUTTONS 4 1 2 1 3 5 1 PRZYCISKI PL 1. Lewy klawisz funkcyjny / prawy klawisz funkcyjny: Funkcje pokazane w lewym / prawym dolnym rogu
[ROBOKIDS MANUAL] ROBOROBO
![[ROBOKIDS MANUAL] ROBOROBO](/thumbs/24/4313056.jpg "[ROBOKIDS MANUAL] ROBOROBO") 1 2 When you plug in or unplug the cable, be sure to insert pressing the hook of the connection cable. If you want to input the program to your robot, you should first connect the Card reader with the
1 2 When you plug in or unplug the cable, be sure to insert pressing the hook of the connection cable. If you want to input the program to your robot, you should first connect the Card reader with the
USB firmware changing guide. Zmiana oprogramowania za przy użyciu połączenia USB. Changelog / Lista Zmian
 1 / 14 Content list / Spis Treści 1. Hardware and software requirements, preparing device to upgrade Wymagania sprzętowe i programowe, przygotowanie urządzenia do aktualizacji 2. Installing drivers and
SSW1.1, HFW Fry #20, Zeno #25 Benchmark: Qtr.1. Fry #65, Zeno #67. like
 SSW1.1, HFW Fry #20, Zeno #25 Benchmark: Qtr.1 I SSW1.1, HFW Fry #65, Zeno #67 Benchmark: Qtr.1 like SSW1.2, HFW Fry #47, Zeno #59 Benchmark: Qtr.1 do SSW1.2, HFW Fry #5, Zeno #4 Benchmark: Qtr.1 to SSW1.2,
TACHOGRAPH SIMULATOR DTCOSIM
 TACHOGRAPH SIMULATOR DTCOSIM Service Manual USB-KSIM interface General description The simulator is a device that is used as a replacement for tachograph in the vehicle where the tachograph is not mandatory,
Rev Źródło:
 KamPROG for AVR Rev. 20190119192125 Źródło: http://wiki.kamamilabs.com/index.php/kamprog_for_avr Spis treści Introdcution... 1 Features... 2 Standard equipment... 4 Installation... 5 Software... 6 AVR
DO MONTAŻU POTRZEBNE SĄ DWIE OSOBY! INSTALLATION REQUIRES TWO PEOPLE!
 1 HAPPY ANIMALS B09 INSTRUKCJA MONTAŻU ASSEMBLY INSTRUCTIONS Akcesoria / Fittings K1 M M1 ZM1 Z T G1 17 szt. / pcs 13 szt. / pcs B1 13 szt. / pcs W4 13 szt. / pcs W6 14 szt. / pcs U1 1 szt. / pcs U N1
METHOD 2 -DIAGNOSTIC OUTSIDE
 VW MOTOMETER BOSCH METHOD 1 - OBD 2 METHOD 2 -DIAGNOSTIC OUTSIDE AFTER OPERATION YOU MUST DISCONECT ACU OR REMOVE FUSE FOR RESTART ODOMETER PO ZROBIENIU LICZNIKA ZDJĄĆ KLEMĘ LUB WYJĄĆ 2 BEZPIECZNIKI OD
Senior phone ML0639. Owner s manual EN Instrukcja obsługi PL
 Senior phone ML0639 Owner s manual EN Instrukcja obsługi PL 1 General information 1.1 Profile Please read this pamphlet carefully in order to make your phone in perfect condition. Perfectly combining
 www.irs.gov/form990. If "Yes," complete Schedule A Schedule B, Schedule of Contributors If "Yes," complete Schedule C, Part I If "Yes," complete Schedule C, Part II If "Yes," complete Schedule C, Part
DO MONTAŻU POTRZEBNE SĄ DWIE OSOBY! INSTALLATION REQUIRES TWO PEOPLE!
 1 HAPPY ANIMALS SZ11 A INSTRUKCJA MONTAŻU ASSEMBLY INSTRUCTIONS Akcesoria / Fittings K1 M M1 ZM1 Z G1 szt. / pcs 0 szt. / pcs B1 6 szt. / pcs 6 szt. / pcs W6 0 szt. / pcs U1 19 szt. / pcs U 50 szt. / pcs
Instrukcja obsługi miernika zużycia energii. Operating Instructions for Power Meter
 POL SKI Instrukcja obsługi miernika zużycia energii Operating Instructions for Power Meter 406-074 PL EN Instrukcja obsługi w oryginale Operating instructions in original 20.06.2011 Jula AB POLSKI ZASADY
PY-FM01. Patent N.O.: BLUETOOTH CAR KIT WITH FM MODULATOR
 EN Patent N.O.: 200830101862.9 BLUETOOTH CAR KIT WITH FM MODULATOR 1 FEATURES AND FUNCTIONS Bluetooth Hand-free Car Kit 1 Bluetooth A2DP wireless music transmission, hand-free car kit for dialing and conversation.
WYŁĄCZNIK CZASOWY OUTDOOR TIMER
 003-582 PL WYŁĄCZNIK CZASOWY Instrukcja obsługi (Tłumaczenie oryginalnej instrukcji) Ważny! Przed użyciem uważnie przeczytaj instrukcję obsługi! Zachowaj ją na przyszłość. EN OUTDOOR TIMER Operating instructions
DO MONTAŻU POTRZEBNE SĄ DWIE OSOBY! INSTALLATION REQUIRES TWO PEOPLE!
 HAPPY ANIMALS RW08 INSTRUKCJA MONTAŻU ASSEMBLY INSTRUCTIONS Akcesoria / Fittings K M M ZM ZW G 0 szt. / pcs W szt. / pcs B szt. / pcs szt. / pcs W U 8 szt. / pcs 4 szt. / pcs U N szt. / pcs Ø3 x szt. /
HAPPY K04 INSTRUKCJA MONTAŻU ASSEMBLY INSTRUCTIONS DO MONTAŻU POTRZEBNE SĄ DWIE OSOBY! INSTALLATION REQUIRES TWO PEOPLE! W5 W6 G1 T2 U1 U2 TZ1
 HAPPY K0 INSTRUKCJA MONTAŻU ASSEMBLY INSTRUCTIONS W Akcesoria / Fittings W W G K szt. / pcs M Ø Ø 0 Ø, Ø Ø. 0 ø8 M 8 szt. / pcs 0 szt. / pcs szt. / pcs T U U szt. / pcs szt. / pcs szt. / pcs S TZ szt.
INSTRUCTION MANUAL. Strona 1
 INSTRUCTION MANUAL www.flash-butrym.pl Strona 1 LED SPOT LIGHT INSTRUCTION MANUAL Thank you for purchasing the LEDSPOT10W Spot light. It is a small and easy to carry unit that is simple to install. Features:
OSTC GLOBAL TRADING CHALLENGE MANUAL
 OSTC GLOBAL TRADING CHALLENGE MANUAL Wrzesień 2014 www.ostc.com/game Po zarejestrowaniu się w grze OSTC Global Trading Challenge, zaakceptowaniu oraz uzyskaniu dostępu to produktów, użytkownik gry będzie
Aktualizacja Oprogramowania Firmowego (Fleszowanie) Microprocessor Firmware Upgrade (Firmware downloading)
 Microprocessor Firmware Upgrade (Firmware downloading)") Aktualizacja Oprogramowania Firmowego (Fleszowanie) Microprocessor Firmware Upgrade (Firmware downloading) ROGER sp.j. Gościszewo 59 82-416 Gościszewo Poland tel. 055 2720132 fax 055 2720133 www.roger.pl
Aktualizacja Oprogramowania Firmowego (Fleszowanie) Microprocessor Firmware Upgrade (Firmware downloading) ROGER sp.j. Gościszewo 59 82-416 Gościszewo Poland tel. 055 2720132 fax 055 2720133 www.roger.pl
Mobile Phone TEL2406. Instrukcja obsługi User s Manual
 Mobile Phone TEL2406 Instrukcja obsługi User s Manual Przyciski TEL2406 1. Lewy klawisz funkcyjny / Prawy przycisk: Funkcje pokazane w lewym/prawym dolnym rogu ekranu. 2. Zadzwoń / Odbierz, Naciśnij po
Strona główna > Produkty > Systemy regulacji > System regulacji EASYLAB - LABCONTROL > Program konfiguracyjny > Typ EasyConnect.
 Typ EasyConnect FOR THE COMMISSIONING AND DIAGNOSIS OF EASYLAB COMPONENTS, FSE, AND FMS Software for the configuration and diagnosis of controllers Type TCU3, adapter modules TAM, automatic sash device
Informacje ogólne General information
 Telefon komórkowy Mobile phone Informacje ogólne General information Uwaga! Konstrukcja produktów i parametry techniczne mogą ulec zmianie bez wcześniejszego powiadomienia. Dotyczy to przede wszystkim
Samurai SHARK SH903. RF Combo Wireless Mouse & Keyboard
 Samurai SHARK SH903 RF Combo Wireless Mouse & Keyboard Instrukcja obsługi Instalacja baterii SH903-Samurai Uwaga! Bezprzewodowa myszka optyczna używa baterii typu AAA. Żeby osiągnąć najlepszą wydajność
POLITYKA PRYWATNOŚCI / PRIVACY POLICY
 POLITYKA PRYWATNOŚCI / PRIVACY POLICY TeleTrade DJ International Consulting Ltd Sierpień 2013 2011-2014 TeleTrade-DJ International Consulting Ltd. 1 Polityka Prywatności Privacy Policy Niniejsza Polityka
MS2401. Instrukcja obsługi User's manual
 Telefon komórkowy Mobile phone MS2401 Instrukcja obsługi User's manual Informacje ogólne General information Uwaga! Konstrukcja produktów i parametry techniczne mogą ulec zmianie bez wcześniejszego powiadomienia.
 www.irs.gov/form990. If "Yes," complete Schedule A Schedule B, Schedule of Contributors If "Yes," complete Schedule C, Part I If "Yes," complete Schedule C, Part II If "Yes," complete Schedule C, Part
HAPPY ANIMALS L01 HAPPY ANIMALS L03 HAPPY ANIMALS L05 HAPPY ANIMALS L07
 HAPPY ANIMALS L0 HAPPY ANIMALS L0 HAPPY ANIMALS L0 HAPPY ANIMALS L07 INSTRUKCJA MONTAŻU ASSEMBLY INSTRUCTIONS Akcesoria / Fittings K ZW W8 W7 Ø x 6 szt. / pcs Ø7 x 70 Narzędzia / Tools DO MONTAŻU POTRZEBNE
Pomoc do programu konfiguracyjnego RFID-CS27-Reader User Guide of setup software RFID-CS27-Reader
 2017-01-24 Pomoc do programu konfiguracyjnego RFID-CS27-Reader User Guide of setup software RFID-CS27-Reader Program CS27 Reader należy uruchomić przez wybór opcji CS27 i naciśnięcie przycisku START. Programme
HAPPY ANIMALS L02 HAPPY ANIMALS L04 HAPPY ANIMALS L06 HAPPY ANIMALS L08
 HAPPY ANIMALS L02 HAPPY ANIMALS L04 HAPPY ANIMALS L06 HAPPY ANIMALS L08 INSTRUKCJA MONTAŻU ASSEMBLY INSTRUCTIONS Akcesoria / Fittings K O G ZW W8 W4 20 szt. / pcs 4 szt. / pcs 4 szt. / pcs 4 szt. / pcs
Freedom Wireless Headphone MM65. Instrukcja obsługi User s Manual
 Freedom Wireless Headphone MM65 Instrukcja obsługi User s Manual Manual INSTALLATION... 4 WIRELESS NET AUDIO CHAT... 5 WIRELESS MONITORING... 5 LISTEN TO THE RADIO... 5 WIRED HEADPHONE (WITHOUT BATTERIES)...
ORIGINAL USER MANUAL. Remote Control Z-Wave NC 896-GB IU/ZRH12/ /F
 WARRANTY The manufacturer guarantees correct device functioning. It also undertakes to repair or replace faulty device if damage is a result of material or structural faults. The warranty period is 2 months
 !850016! www.irs.gov/form8879eo. e-file www.irs.gov/form990. If "Yes," complete Schedule A Schedule B, Schedule of Contributors If "Yes," complete Schedule C, Part I If "Yes," complete Schedule C,
myphone 2014. All rights reserved. User Manual myphone HAMMER
 User Manual myphone HAMMER 1 Thank you for choosing myphone Hammer. Please read the Manual carefully. myphone Hammer is designed for use in GSM 900/1800 MHz. Rugged, waterproof and dustproof housing, contrast,
CL3D, CL3D-G. Cross-laser.
 EN www.nivelsystem.com Cross-laser CL3D, CL3D-G Thank you for purchasing a Nivel System CL3D, CL3D-G laser. To best use the purchased instrument, please read the instructions carefully and put in a convenient
 Podłączyć do gniazda Przykręcić nakrętkę radełkowaną Sposób montażu akcesoriów Wszystkie trzy akcesoria (tj. lusterko, haczyk i magnes) są mocowane do kamery ten sam sposób, co poniżej. Sposób montażu:
1. W systemie Windows przejdź do Panel sterowania> Sieć i Internet> Centrum sieci i udostępniania.
 1. W Panelu sterowania kliknij dwukrotnie Połączenia sieciowe, a następnie kliknij prawym przyciskiem myszy kartę sieci bezprzewodowej i wybierz Właściwości. Okno dialogowe Połączenie sieci bezprzewodowej
MOBILE PHONE SENIOR TOWER TEL1704. Instrukcja obsługi User s Manual
 MOBILE PHONE SENIOR TOWER TEL1704 Instrukcja obsługi User s Manual Przyciski 1. Lewy klawisz funkcyjny / Prawy przycisk: Funkcje pokazane w lewym/prawym dolnym rogu ekranu. 2. Zadzwoń / Odbierz (zielony),
BLACKLIGHT SPOT 400W F
 BLACKLIGHT SPOT 400W F2000339 USER MANUAL / INSTRUKCJA OBSŁUGI BLACKLIGHT SPOT 400W F2000339 Table of Contents 1 Introduction... 2 2 Safety information... 2 3 Product information... 2 3.1 Specification...
ARNOLD. EDUKACJA KULTURYSTY (POLSKA WERSJA JEZYKOWA) BY DOUGLAS KENT HALL
 BY DOUGLAS KENT HALL") Read Online and Download Ebook ARNOLD. EDUKACJA KULTURYSTY (POLSKA WERSJA JEZYKOWA) BY DOUGLAS KENT HALL DOWNLOAD EBOOK : ARNOLD. EDUKACJA KULTURYSTY (POLSKA WERSJA Click link bellow and free register
Read Online and Download Ebook ARNOLD. EDUKACJA KULTURYSTY (POLSKA WERSJA JEZYKOWA) BY DOUGLAS KENT HALL DOWNLOAD EBOOK : ARNOLD. EDUKACJA KULTURYSTY (POLSKA WERSJA Click link bellow and free register
Mobile phone. Owner's manual
 ML0529 Mobile phone Owner's manual Owner s manual Instrukcja obsługi EN PL EN 2 1 General information 1.1 Profile Please read this pamphlet carefully in order to make your phone in perfect condition. Perfectly
Instrukcja obsługi. Radio z zegarem CRL-330
 Instrukcja obsługi Radio z zegarem CRL-330 www.denver-electronics.com Przed korzystaniem z tego produktu proszę uważnie i w pełni przeczytać tę instrukcję obsługi. Informacje o produkcie EN PL Correctly
Mobile phone ML0529.1
 Mobile phone ML0529.1 Owner s manual EN Instrukcja obsługi PL 1 General information 1.1 Profile Please read this pamphlet carefully in order to make your phone in perfect condition. Perfectly combining
EN Desktop Weather Station Instruction Manual
 V3067 EN Desktop Weather Station Instruction Manual Introduction This desktop weather station comes with weather prediction, clock, calendar, day, temperature and humidity display. It is battery powered
Szybka instrukcja obsługi
 2 Podłączenia OV-HomeSpot TV 1 Szybka instrukcja obsługi Instalacja baterii w pilocie Sensor sygnału pilota Pilot Zasilacz AC Bezprzewodowy router WejścieWi-Fi Port USB do podłączenia bezprzewodowego odbiornika
Stargard Szczecinski i okolice (Polish Edition)
") Stargard Szczecinski i okolice (Polish Edition) Janusz Leszek Jurkiewicz Click here if your download doesn"t start automatically Stargard Szczecinski i okolice (Polish Edition) Janusz Leszek Jurkiewicz
Stargard Szczecinski i okolice (Polish Edition) Janusz Leszek Jurkiewicz Click here if your download doesn"t start automatically Stargard Szczecinski i okolice (Polish Edition) Janusz Leszek Jurkiewicz
Hippo Boombox MM209N CD. Instrukcja obsługi User s Manual
 Hippo Boombox Instrukcja obsługi User s Manual OPIS PRZYCISKÓW: PL ON-OFF/MODE: 1. Włącz on/off: Naciśnij przycisk, aby włączyć urządzenie. Przytrzymaj dłużej, aby wyłączyć. 2. MODE: Wybierz źródło sygnału:
Zakopane, plan miasta: Skala ok. 1: = City map (Polish Edition)
") Zakopane, plan miasta: Skala ok. 1:15 000 = City map (Polish Edition) Click here if your download doesn"t start automatically Zakopane, plan miasta: Skala ok. 1:15 000 = City map (Polish Edition) Zakopane,
Zakopane, plan miasta: Skala ok. 1:15 000 = City map (Polish Edition) Click here if your download doesn"t start automatically Zakopane, plan miasta: Skala ok. 1:15 000 = City map (Polish Edition) Zakopane,
Raport bieżący: 44/2018 Data: g. 21:03 Skrócona nazwa emitenta: SERINUS ENERGY plc
 Raport bieżący: 44/2018 Data: 2018-05-23 g. 21:03 Skrócona nazwa emitenta: SERINUS ENERGY plc Temat: Zawiadomienie o zmianie udziału w ogólnej liczbie głosów w Serinus Energy plc Podstawa prawna: Inne
LED PAR 56 7x10 4in1 RGBW F
 USER MANUAL / INSTRUKCJA OBSŁUGI LED PAR 56 7x10 4in1 RGBW F7100311 LED PAR 56 7x10W 4in1 RGBW F7100311 Table of Contents 1 Introduction... 2 2 Safety information... 2 3 Product information... 2 3.1 Specification...
Tychy, plan miasta: Skala 1: (Polish Edition)
") Tychy, plan miasta: Skala 1:20 000 (Polish Edition) Poland) Przedsiebiorstwo Geodezyjno-Kartograficzne (Katowice Click here if your download doesn"t start automatically Tychy, plan miasta: Skala 1:20 000
Tychy, plan miasta: Skala 1:20 000 (Polish Edition) Poland) Przedsiebiorstwo Geodezyjno-Kartograficzne (Katowice Click here if your download doesn"t start automatically Tychy, plan miasta: Skala 1:20 000
LED PAR 56 7*10W RGBW 4in1 SLIM
 LED PAR 56 7*10W RGBW 4in1 SLIM USER MANUAL Attention: www.flash-butrym.pl Strona 1 1. Please read this specification carefully before installment and operation. 2. Please do not transmit this specification
Ilona B. Miles website Terms of Use (ewentualnie: Service)
") Ilona B. Miles website Terms of Use (ewentualnie: Service) 1. The owner of the website Ilona B. Miles is Success Solutions LLC, Sonaty Street 6/1108, 02-744 Warsaw, Tax Identification Number: 5213689531,
Ilona B. Miles website Terms of Use (ewentualnie: Service) 1. The owner of the website Ilona B. Miles is Success Solutions LLC, Sonaty Street 6/1108, 02-744 Warsaw, Tax Identification Number: 5213689531,
LED WASHER 30x3W WHITE IP65 F
 USER MANUAL / INSTRUKCJA OBSŁUGI LED WASHER 30x3W WHITE IP65 F7200171 LED WASHER 30x3W WHITE IP65 F7200171 Table of contents 1 Introduction... 2 2 Safety information... 2 3 Product information... 2 3.1
Zasady bezpieczeństwa
 2 3 Zasady bezpieczeństwa GB The door and the feeding flap must be closed when operating the machine! PL Drzwiczki i klapka szczeliny podawczej muszą być zamknięte w trakcie używania urządzenia! GB Ensure
Revenue Maximization. Sept. 25, 2018
 Revenue Maximization Sept. 25, 2018 Goal So Far: Ideal Auctions Dominant-Strategy Incentive Compatible (DSIC) b i = v i is a dominant strategy u i 0 x is welfare-maximizing x and p run in polynomial time
Jazz EB207S is a slim, compact and outstanding looking SATA to USB 2.0 HDD enclosure. The case is
 1. Introduction Jazz EB207S is a slim, compact and outstanding looking SATA to USB 2.0 HDD enclosure. The case is made of aluminum and steel mesh as one of the coolest enclosures available. It s also small
UHF DSP Wireless Microphone System
 UHF DSP Wireless Microphone System USER MANUAL INSTRUKCJA OBSŁUGI ENGLISH UHF DSP Wireless Microphone System Specification Modulation Method: /4 DQPSK Frequency Range: 610-786MHz, 2x100/4x50CH Sampling
POWER BANK KM0209-KM0211
 Bedienungsanleitung POWER BANK KM0209-KM0211 OWNER S MANUAL INSTRUKCJA OBSŁUGI PL EN Owner s manual SAFETY INFORMATION Before use, read this manual carefully and follow its instructions. Producer does
Product Specification Name: MiNi WiFi controller
 Product Specification Name: MiNi WiFi controller Product Summarization MiNi WiFi controller is a kind of WiFi controller with small volume developed by our company. We have upgraded its appearance, the
 www.irs.gov/form990. If "Yes," complete Schedule A Schedule B, Schedule of Contributors If "Yes," complete Schedule C, Part I If "Yes," complete Schedule C, Part II If "Yes," complete Schedule C, Part
Instrukcja obsługi. binding machine KRIS. instruction manual. 80-393 GDAŃSK ul. Krynicka 1 tel.: (058) 55 43 555 fax: (058) 55 43 500 ODDZIAŁ:
 55 43 555 fax: (058) 55 43 500 ODDZIAŁ:") Instrukcja obsługi instruction manual 80-393 GDAŃSK ul. Krynicka 1 tel.: (058) 55 43 555 fax: (058) 55 43 500 ODDZIAŁ: 02-784 WARSZAWA ul. Janowskiego 9 tel.: (022) 648 03 48..49 fax: (022) 648 03 50 bindownica
Instrukcja obsługi instruction manual 80-393 GDAŃSK ul. Krynicka 1 tel.: (058) 55 43 555 fax: (058) 55 43 500 ODDZIAŁ: 02-784 WARSZAWA ul. Janowskiego 9 tel.: (022) 648 03 48..49 fax: (022) 648 03 50 bindownica
How to translate Polygons
 How to translate Polygons Translation procedure. 1) Open polygons.img in Imagine 2) Press F4 to open Memory Window 3) Find and edit tlumacz class, edit all the procedures (listed below) 4) Invent a new
Wireless telephone ML0656
 Wireless telephone ML0656 Owner s manual EN Instrukcja obsługi PL 1. GETTING STARTED Owner s manual This user guide provides you with all the information you need to get the most from your phone. Before
IP Camera SVR201HD. Instrukcja Obsługi User s Manual
 IP Camera SVR201HD Instrukcja Obsługi User s Manual SVR201HD PL Podłączenie urządzeń z systemem Android Instrukcja obsługi Przed ustawieniem kamery internetowej należy pobrać i zainstalować aplikację Guard.
AJ-SYB007X AJ-SYB008X
 INSTRUKCJA OBSŁUGI XTR CARP SENSITIVE Zestaw sygnalizatorów z radiopowiadamianiem AJ-SYB007X AJ-SYB008X FUNKCJE KLAWISZY A Dioda B Regulacja tonu C Włącznik lampki D Dioda pamięci E Czujnik F Włącznik/Regulacja
Moduł odtwarzacza plików MP3 audio
 Gotronik PPHU Dane aktualne na dzień: 19-01-2017 09:19 Link do produktu: /modul-odtwarzacza-plikow-mp3-audio-p-2905.html Moduł odtwarzacza plików MP3 audio Cena Dostępność Numer katalogowy 35,00 zł Dostępny
Wireless telephone ML0657
 Wireless telephone ML0657 Owner s manual EN Instrukcja obsługi PL 1. GETTING STARTED Owner s manual Please read this manual carefully before using this device, and keep it for future use. Due to different
USB firmware changing guide. Zmiana oprogramowania za przy użyciu połączenia USB. Changelog / Lista Zmian
 1 / 8 Content list / Spis Treści 1. Hardware and software requirements, preparing device to upgrade Wymagania sprzętowe i programowe, przygotowanie urządzenia do aktualizacji 2. Installing drivers and
LED PAR 64 18x10W 4in1 CLASSIC F
 LED PAR 64 18x10W 4in1 CLASSIC F7100309 USER MANUAL / INSTRUKCJA OBSŁUGI LED PAR 64 18x10W 4in1 CLASSIC F7100309 Table of Contents 1 Introduction... 2 2 Safety information... 2 3 Product information...
Rev Źródło:
 KAmduino UNO Rev. 20190119182847 Źródło: http://wiki.kamamilabs.com/index.php/kamduino_uno Spis treści Basic features and parameters... 1 Standard equipment... 2 Electrical schematics... 3 AVR ATmega328P
Surname. Other Names. For Examiner s Use Centre Number. Candidate Number. Candidate Signature
 A Surname _ Other Names For Examiner s Use Centre Number Candidate Number Candidate Signature Polish Unit 1 PLSH1 General Certificate of Education Advanced Subsidiary Examination June 2014 Reading and
Zasady rejestracji i instrukcja zarządzania kontem użytkownika portalu
 Zasady rejestracji i instrukcja zarządzania kontem użytkownika portalu Rejestracja na Portalu Online Job Application jest całkowicie bezpłatna i składa się z 3 kroków: Krok 1 - Wypełnij poprawnie formularz
CONTENTS. Introduction 1 Your telephone 2. Base settings 19. Registration 22. Getting started 7. Appendix 24
 CONTENTS Introduction 1 Your telephone 2 Unpacking 2 Your base 2 Your handset 3 Connecting the base 4 Handset set-up 5 Telephone set turning on and off 5 Replacing the batteries 6 Getting started 7 Making
Zarządzanie sieciami telekomunikacyjnymi
 SNMP Protocol The Simple Network Management Protocol (SNMP) is an application layer protocol that facilitates the exchange of management information between network devices. It is part of the Transmission
Selfie Monopod MA426. Instrukcja obsługi User s Manual
 Selfie Monopod MA426 Instrukcja obsługi User s Manual PL Selfie Monopod Przeczytaj wszystkie instrukcje przed użyciem oraz zachowaj te informacje do wykorzystania w przyszłości. Zestaw: 1x mobile phone
LED PAR 18x10W RGBW 4in1 IP65 F
 LED PAR 18x10W RGBW 4in1 IP65 F7100310 USER MANUAL / INSTRUKCJA OBSŁUGI LED PAR 18x10W RGBW 4in1 IP65 F7100310 Table of contents 1 Introduction... 2 2 Safety information... 2 2.1 Specification... 2 3 Installation...
MM210. Instrukcja obsługi User s Manual
 Chilli Boombox Instrukcja obsługi User s Manual OPIS PRZYCISKÓW: PL ON-OFF/MODE: 1. Włącz on/off: Naciśnij przycisk, aby włączyć urządzenie. Przytrzymaj dłużej, aby wyłączyć. 2. MODE: Wybierz źródło sygnału:
1 10 9 2 3 8 7 4 A/a 6 5
 doro 740 1 2 3 10 9 8 4 5 A/a 7 6 English (see page 4-31) 1 Left menu button 2 Scroll up/redial/pause button 3 Talk button/hands free function 4 Recall button 5 Microphone Polski (patrz strony 32-63) 1
user s manual Applications client for mobile devices NVR-5000 series NVR s
 user s manual Applications client for mobile devices NVR-5000 series NVR s Applications client for mobile devices for 5000 series NVR s - user manual ver.1.0 IMPORTANT SAFEGUARDS AND WARNINGS ATTENTION!
CHRONOS COLOUR Quick Start Guide
 CHRONOS COLOUR REMOTE CAPTURE Model: GCWCHRC START 2 English GB 5 Polski PL 8 2/11 3/11 GB MOBILE APP www.goclever.com ANDROID APP ANDROID APP 1. Speaker 2. Sounds preset icon 3. Bluetooth connection indicator
LED PAR 18x10W RGBW 4in1 Aluminum single cast II ver. F
 LED PAR 18x10W RGBW 4in1 Aluminum single cast II ver. F71000269 USER MANUAL / INSTRUKCJA OBSŁUGI LED PAR 18x 10W RGBW 4in1 Aluminium single cast II ver. F71000269 Table of Contents 1 Introduction... 2
Przygotowanie modemu M20 terminal do pracy ze sterownikiem S7200
 Theme: Komunikacja ze sterownikiem poprzez modem M20 Teleserwis Date: 07.11.00 Author: Siemens AG, A&D AS MVM, Helmut Schindler, Michał Bereza Przygotowanie modemu M20 terminal do pracy ze sterownikiem
Instrukcja obsługi User s manual
 Instrukcja obsługi User s manual Konfigurator Lanberg Lanberg Configurator E-mail: support@lanberg.pl support@lanberg.eu www.lanberg.pl www.lanberg.eu Lanberg 2015-2018 WERSJA VERSION: 2018/11 Instrukcja
OpenPoland.net API Documentation
 OpenPoland.net API Documentation Release 1.0 Michał Gryczka July 11, 2014 Contents 1 REST API tokens: 3 1.1 How to get a token............................................ 3 2 REST API : search for assets
 www.irs.gov/form990. If "Yes," complete Schedule A Schedule B, Schedule of Contributors If "Yes," complete Schedule C, Part I If "Yes," complete Schedule C, Part II If "Yes," complete Schedule C, Part
Przeciwpożarowe sterowniki dla bram zwijanych, sekcyjnych i przesuwnych. Fire-proof controls for roller shutters, sectional doors and sliding gates
 Przeciwpożarowe napędy bram Charakterystyka Characteristics Fire-proof door drives 36 Przeciwpożarowe sterowniki dla bram zwijanych, sekcyjnych i przesuwnych Fire-proof controls for roller shutters, sectional