Introduction Proper Use...Page 7 Supply Scope...Page 8 Description of Parts...Page 8 Technical Data...Page 9
|
|
|
- Aniela Orłowska
- 8 lat temu
- Przeglądów:
Transkrypt
1 Table of Contents Introduction Proper Use...Page 7 Supply Scope...Page 8 Description of Parts...Page 8 Technical Data...Page 9 Safety Instructions...Page 10 Before you start...page 15 Set the time...page 16 Operation Connecting the electrical appliance to be tested...page 17 Current measurement...page 17 Maximum current...page 18 Measure power consumption...page 19 Maximum power consumption...page 19 Delete maximum values...page 20 Set the overload warning value...page 20 Measure mains voltage...page 21 Measure mains frequency...page 22 Show power factor...page 22 Set electricity rate 1 and 2...Page 23 Set electricity flat-rate...page 25 Total energy consumption...page 27 Time measurement function...page 28 Show energy costs...page 29 Set the Energy consumption / Time measurement function / Total cost display to 0...Page 30 Changing the batteries...page 30 Restore delivery condition...page 31 Cleaning and Care...Page 32 Disposal...Page 32 Warranty and Service Warranty Declaration...Page 34 Service Address...Page 34 Declaration of Conformity...Page 35 Manufacturer...Page 35 GB _Energiekostenmessgeraet_Content_GB-PL-CZ-SK.indd :12

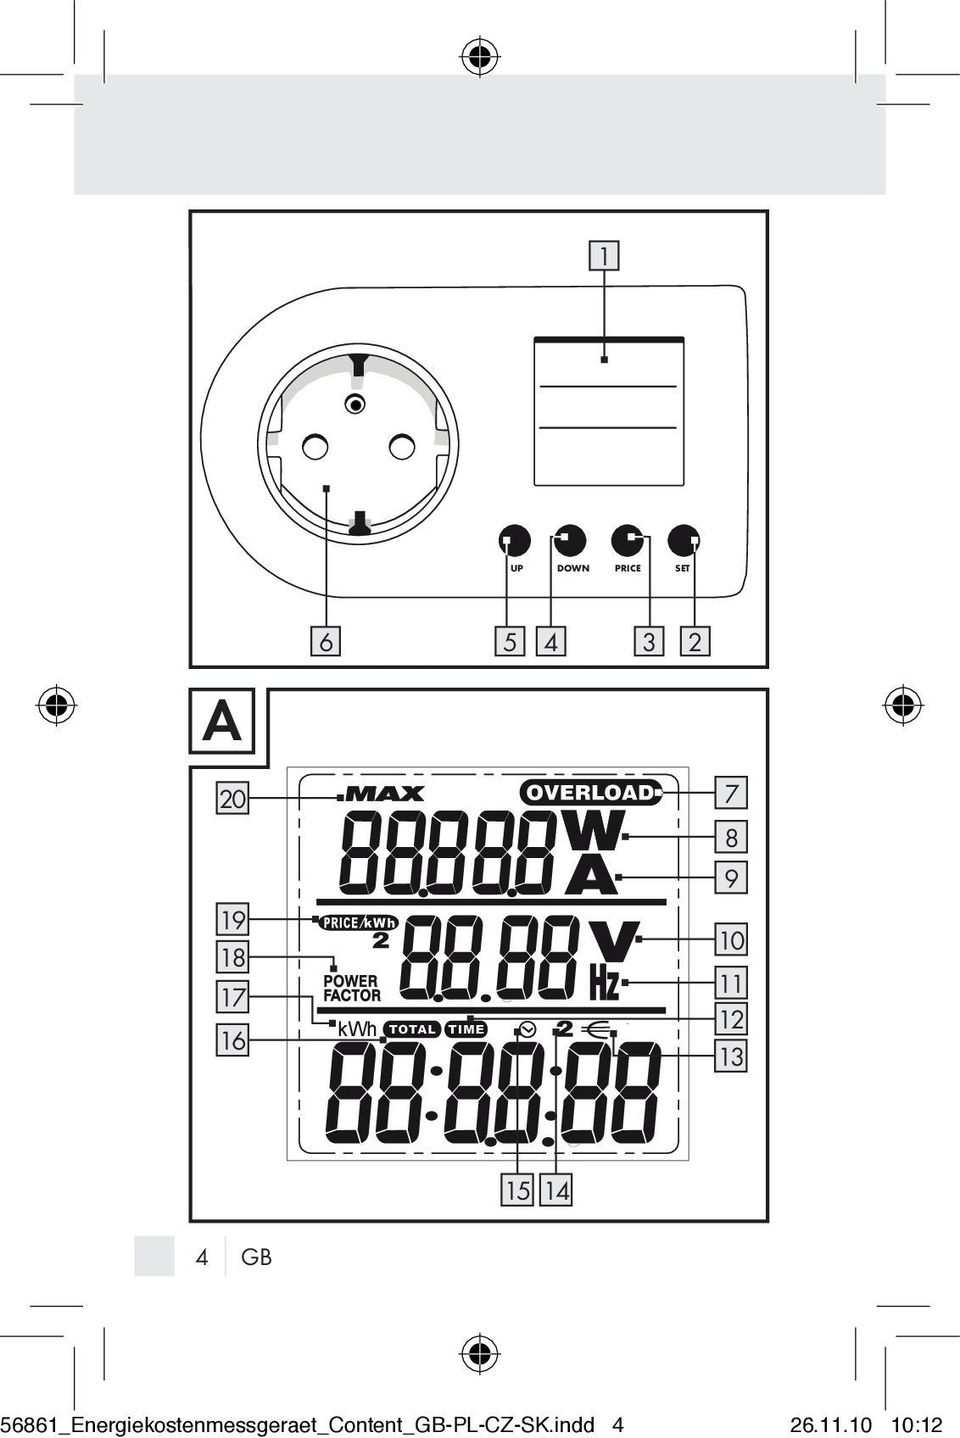
2 1 UP DOWN PRICE SET A kwh GB 56861_Energiekostenmessgeraet_Content_GB-PL-CZ-SK.indd :12
3 B GB _Energiekostenmessgeraet_Content_GB-PL-CZ-SK.indd :12
4 Introduction The following pictograms are used in these operating instructions / on the device: Read instruction manual! Observe caution and safety notes! Caution electric shock! Danger to life! Risk of explosion! Keep children away from electrical devices! For use in dry rooms only. V ~ W Hz A kwh Volt (AC) Watts (Effective power) Hertz (mains frequency) Amp Kilowatt hour Direct current (Type of current and voltage) Proper procedure and handling. Dispose packaging and appliance in an environmentally-friendly way! 6 GB 56861_Energiekostenmessgeraet_Content_GB-PL-CZ-SK.indd :12
 Watts (Effective power) Hertz (mains frequency) Amp Kilowatt hour Direct current (Type of current and voltage) Proper")
5 Introduction Energy Monitor Q Introduction Familiarise yourself with the product before using it for the first time. Please read the following operating manual and safety instructions carefully. Always use the instrument only as described and for the stated areas of use. Keep this manual in a safe place. Make sure that all documents accompany the instrument if you pass it on to anyone else. Q Proper Use The appliance is designed to measure the power consumption of electrical appliances and to calculate electricity and operating costs. Any other use or modification of the instrument constitute improper use and carry a serious risk of accident. The manufacturer is not liable for damage caused by improper use. The instrument is not intended for commercial use. GB _Energiekostenmessgeraet_Content_GB-PL-CZ-SK.indd :12

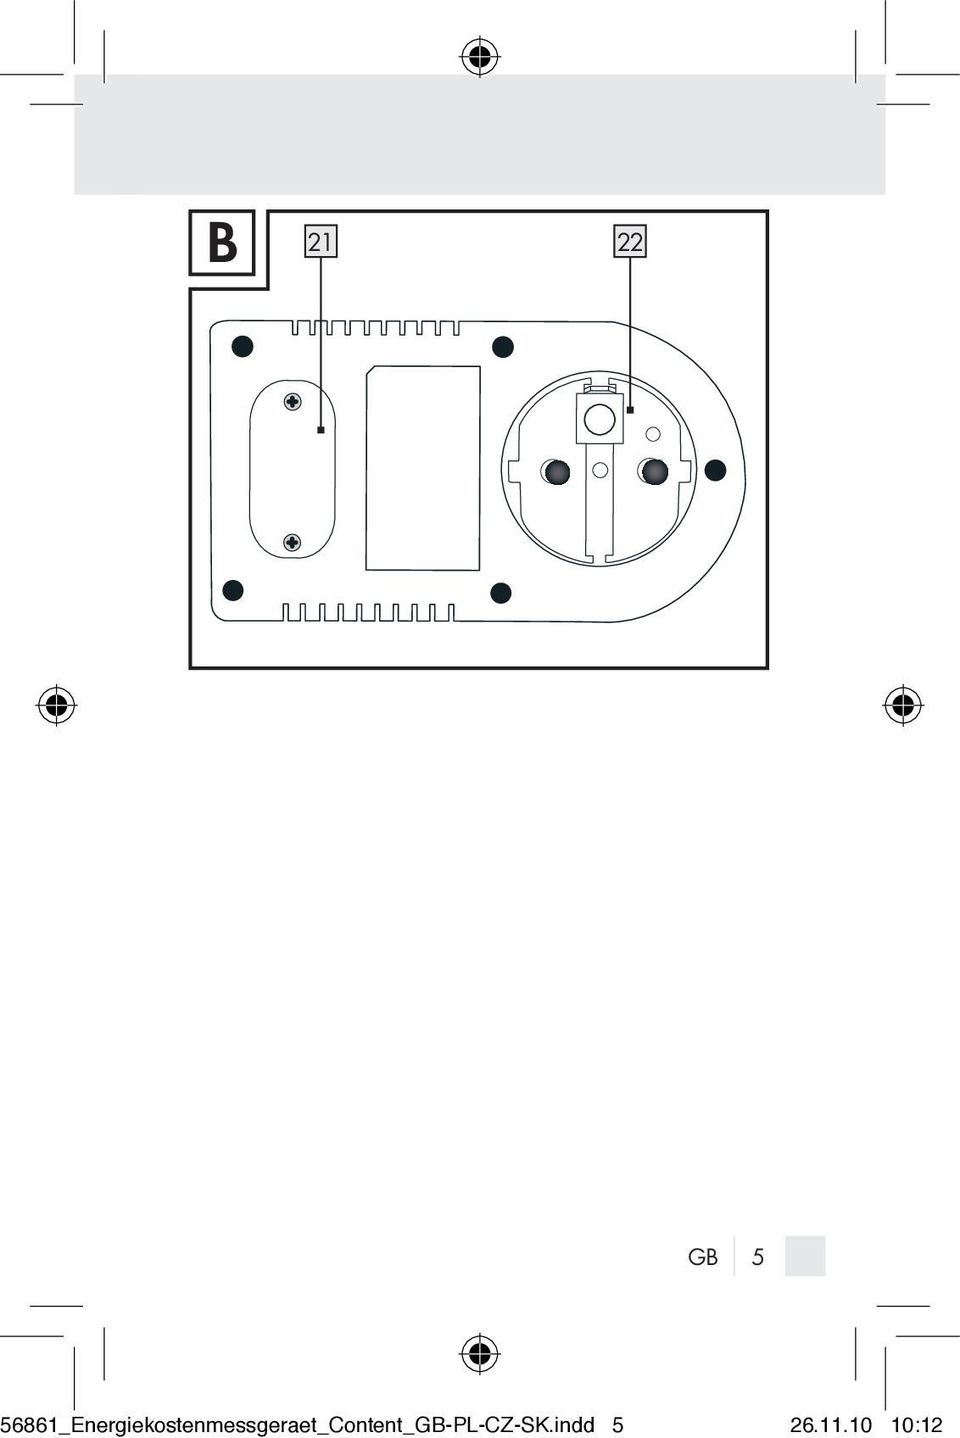
6 Introduction Q Supply Scope 1 x wattmeter 2 x round cell batteries (Alkaline LR44, 1.5 V ) 1 x operating manual 1 x warning labels for the battery compartment cover in other languages Q Description of Parts 1 LC display 2 SET button 3 PRICE button 4 DOWN button 5 UP button 6 Socket 7 OVERLOAD / overload symbol 8 Watt symbol / overload warning value power consumption (W) 9 Ampere symbol / overload warning value current consumption (A) 10 Volt symbol 11 Hz / mains frequency symbol 12 TIME / time symbol 8 GB 56861_Energiekostenmessgeraet_Content_GB-PL-CZ-SK.indd :12
 9 Ampere symbol / overload warning value current consumption (A) 10 Volt symbol 11 Hz / mains frequency symbol 12 TIME / time symbol 8 GB")
7 Introduction 13 / cost symbol 14 2nd electricity tariff 15 symbol (setting the time) 16 Total symbol 17 Kilowatt-hours symbol 18 Power factor / power factor symbol 19 PRICE kwh / price per kwh symbol 20 Max symbol 21 Battery compartment cover 22 Plug Q Technical Data Model: EM 240-A FR Input voltage: 230 V ~, 50 Hz Max. permissible load: 16 A ~, 3500 W Type of battery: 2 x LR.44 (Alkaline) 1.5 V Lower limit range for current measurements: A Ampere indicating range: A Volt indicating range: V ~ Watt indicating range: W Kilowatt hour indicating range: kwh GB _Energiekostenmessgeraet_Content_GB-PL-CZ-SK.indd :12

8 Introduction / Safety Instructions Mains frequency indicating range: Hz Resolution: 0.5 W Enviromental conditions: Altitude: max m Temperature: + 5 C C Relative humidity: max. 90 % Tolerance range: in volts: ± 3 % in amperes: ± 3 %, ± 0.01 A in watts: ± 3 %, ± 2 W Dimensions of LCD: 3.2 x 3.2 cm (W x H) Safety Instructions Warning! Please read all the safety information and instructions. Failure to observe the safety information and instructions can result in electric shock, fire and / or serious injury. PLEASE RETAIN ALL SAFETY INFORMATION AND INSTRUCTIONS FOR FUTURE REFERENCE. 10 GB 56861_Energiekostenmessgeraet_Content_GB-PL-CZ-SK.indd :12

9 Safety Instructions How to avoid fatal injury by electric shock! J Inspect the wattmeter, additional equipment and the electrical appliances you wish to test before every use to ensure that they are intact. Damaged electrical appliances and buckled / kinked mains leads or bare wires increase the risk of an electric shock. J Do not operate the wattmeter if mains leads or mains plugs on the electrical appliances you wish to test are damaged. CAUTION! Damaged mains leads pose a risk of fatal injury by electric shock. J The connector plug 22 of the wattmeter must fit into the outlet. The connector plug 22 must not be modified in any way. Do not use adapter plugs in conjunction with earthed electrical appliances. Using unmodified mains plugs and proper outlets reduces the risk of an electric shock. J Avoid physical contact with earthed surfaces such as those of pipes, heaters, ovens and fridges. There is an increased risk of an electric shock if your body is earthed. J Keep the wattmeter away from rain and moisture. If water enters the wattmeter there is an increased risk of an electric shock. GB _Energiekostenmessgeraet_Content_GB-PL-CZ-SK.indd :12

10 Safety Instructions J Only operate the wattmeter in dry clothing and preferably shoes with a rubber sole or standing on an insulating mat. J Only measure voltages of over 25 V ~ in compliance with the relevant safety instructions for the electrical appliance you wish to test. J Never under any circumstances open up the housing of the wattmeter. If the wattmeter does not work properly or is damaged, please have it repaired immediately by a specialist. J Do not operate the wattmeter outdoors. J Always remove the electrical appliances you are testing from the socket 6 directly by the mains plug and never using the mains lead. J Remove the wattmeter from the outlet when you have finished using it. 12 GB How to avoid personal injury and damage to the product! J RISK OF FATAL INJURY AND ACCIDENTS FOR INFANTS AND CHILDREN! Never leave children unattended with the packaging materials or the product. The packaging material carries a risk of suffocation and there is a risk of fatal injury by 56861_Energiekostenmessgeraet_Content_GB-PL-CZ-SK.indd :12

11 Safety Instructions electric shock. Children often underestimate dangers. Always keep children away from the product. J CAUTION! DANGER OF EXPLOSION! Never operate the wattmeter where there is any risk of explosion, i.e. close to inflammable liquids or gases. J Never exceed the stated maximum input voltage. J Avoid strong vibrations or shocks. J Never expose the wattmeter to extreme temperatures, extreme sunlight, humidity or moisture. J Never expose the wattmeter to extreme temperature fluctuations. Do not use the wattmeter until it has become adjusted to the ambient temperature. J Never operate the wattmeter close to strong magnetic fields such as motors, transformers or similar. J Do not place the wattmeter face down on workbenches or working surfaces. This helps to prevent damage to the operating elements and the LCD 1. J Remove the batteries from the wattmeter if you do not intend to use if for any length of time. J Do not connect after each other. J Use the power cost meter only in buildings equipped under Installation Category II (CAT II) according to IEC 664. The maximum peak voltage must not exceed 2500 V ~. GB _Energiekostenmessgeraet_Content_GB-PL-CZ-SK.indd :12

12 Safety Instructions The main electricity supply for residential buildings usually falls under Installation Category II. 14 GB Safety Instructions for Batteries! J Remove batteries that have not been used for any length of time from the instrument. J CAUTION! DANGER OF EXPLOSION! Never recharge batteries. J Make sure when inserting the batteries that the polarity is correct. This is indicated in the battery compartment. J If necessary, clean the battery and instrument contacts before inserting the batteries. J Remove spent batteries from the instrument immediately on account of the increased risk of leakage. J Batteries must not be disposed of in household waste. J Consumers are under a legal obligation to dispose of batteries properly. J Keep batteries out of the reach of children, do not dispose of them in fire, do not short-circuit them, and do not take them apart. J Failure to observe these instructions may result in the batteries discharging beyond their end voltage, which 56861_Energiekostenmessgeraet_Content_GB-PL-CZ-SK.indd :12

13 Safety Instructions / Before you start carries a risk of leakage. If the batteries in your instrument have leaked, remove them immediately to prevent damage to the instrument. J Avoid contact with skin, eyes and mucous membrane. In the event of contact with battery acid, rinse the affected area with plenty of water and / or consult a doctor. J Unplug the appliance before changing the batteries. J The battery compartment cover 21 must be completely inserted before bring into operation. Q Before you start Note: first stick the enclosed label onto the battery compartment cover 21. Note: two round cell batteries (Alkaline LR44, 1.5 V ) are already inserted in the wattmeter on delivery. j Remove the battery compartment cover 21 by unscrewing the two screws with a suitable screwdriver. j Remove the isolating strip from between the two round cell batteries (Alkaline LR44, 1.5 V ) on the back of the battery compartment cover 21. j Close the battery compartment by replacing the battery compartment cover 21. Please make sure that you GB _Energiekostenmessgeraet_Content_GB-PL-CZ-SK.indd :12
 are already inserted in the wattmeter on delivery.")
14 Before you start retighten the two screws firmly. Note: Make sure that you replace the battery compartment cover 21 the right way round. The rounded corners of the battery compartment cover 21 must fit into the rounded recesses in the battery compartment. j The wattmeter is now ready for operation. Q Set the time The time is displayed as soon as the isolating strip has been removed. The symbol 15 also appears. j Press the PRICE button 3 until the time appears in the bottom third of the LC display 1. j Press the SET button 2 for approx. 3 seconds. The time display flashes. j Press the UP button 5 to set the hours. j Press the DOWN button 4 to set the minutes. j Press the SET button 2 to switch between 12 and 24-hour format. j Press the PRICE button 3 to confirm your setting. 16 GB 56861_Energiekostenmessgeraet_Content_GB-PL-CZ-SK.indd :12

15 Operation Q Operation Q Connecting the electrical appliance to be tested c CAUTION! RISK OF FATAL INJURY BY ELECTRIC SHOCK! Only measure voltages of over 25 V ~ in compliance with the relevant safety instructions for the electrical appliance you wish to test. m CAUTION! RISK OF INJURY! Never exceed the stated maximum input voltage. j Plug the wattmeter into a suitable outlet. j Now plug the mains plug of the electrical appliance you wish to test into the socket 6 of the wattmeter. Q Current measurement j Press the UP button 5 until the Ampere symbol 9 appears in the top third of the LC display 1. Note: the Current measurement function is the standard setting for the wattmeter. As soon as the isolating strip between the two round cell batteries is removed, the wattmeter is automatically in this mode. GB _Energiekostenmessgeraet_Content_GB-PL-CZ-SK.indd :12

16 Operation j The LCD 1 now indicates the present current in A (Ampere) required for use of the electrical appliance. Note: you can also call up the current reading when the wattmeter has been removed from the outlet or when the electrical appliance you are testing is no longer connected to the wattmeter. As soon as you take a new measurement, the old current is overwritten. Q Maximum current j Press the UP button 5 until the Max symbol 20 and the Ampere symbol 9 appear in the top third of the LC display 1. j The LCD 1 now indicates the maximum required current in A (Ampere) measured with the wattmeter so far. Note: you can also call up the maximum current reading when the wattmeter has been removed from the outlet or when the electrical appliance you are testing is no longer connected to the wattmeter. Note: the maximum current value is saved until a higher value is measured. The old value is then overwritten by the new measurement. 18 GB 56861_Energiekostenmessgeraet_Content_GB-PL-CZ-SK.indd :12

17 Operation Q Measure power consumption j Press the UP button 5 until the Watt symbol 8 appears in the top third of the LC display 1. j The LCD 1 now indicates the present power consumption in W (Watt) required for use of the electrical appliance. Note: the power consumption is calculated according to the following formula: power = voltage x current x power factor. Q Maximum power consumption j Press the UP button 5 until the Max symbol 20 and the Watt symbol 8 appear in the top third of the LC display 1. j The LCD 1 now indicates the maximum power consumption in W (Watt) measured by the wattmeter so far. Note: you can also call up the maximum power consumption reading when the wattmeter has been removed from the outlet or when the electrical appliance you are testing is no longer connected to the wattmeter. Note: the maximum power consumption is saved until a higher value is measured. The old value is then overwritten by the new measurement. GB _Energiekostenmessgeraet_Content_GB-PL-CZ-SK.indd :12

18 Operation Q Delete maximum values j Use the UP button 5 to select one of the two maximum values (see Maximum current, Maximum power consumption ). j Keep the SET button 2 pressed for approx. 3 seconds to set the maximum value to 0. Q Set the overload warning value Note: in this mode you have a choice between two overload warning values. You can set an overload warning value for the current (A) and an overload warning value for the power consumption (W). Note: the overload warning value for power consumption (W) 8 is set by default to 0,0 W on delivery. Proceed as follows: 1. Press the UP button 5 until the overload symbol 7 ( OVERLOAD ) appears in the top third of the LC display Now press the SET button 2. The ampere symbol 9 starts to flash. 3. Press the UP 5 or DOWN button 4 to select either 20 GB 56861_Energiekostenmessgeraet_Content_GB-PL-CZ-SK.indd :12
 8 is set by default to 0,0 W on delivery. Proceed as follows: 1.")
19 Operation the overload warning value for power consumption (W) 8 or the overload warning value for current (A) Press the SET button 2. The first digit flashes. 5. Press the UP 5 or DOWN button 4 to set the required value. 6. Press the SET button 2 to move to the next digit. 7. Repeat steps 5 and 6 until you have set the required overload warning value. 8. When you have set the value for the last digit, press the PRICE button 3 to confirm your entry. Note: as soon as the entered overload warning values are exceeded by any connected electrical appliance you are testing, the overload symbol 7 flashes and a warning signal sounds. Q Measure mains voltage j Press the DOWN button 4 until the Volt symbol 10 appears in the centre of the LC display 1. Note: the Measure mains voltage function is the standard setting for the wattmeter. As soon as the isolating strip between the two round cell batteries is removed, the wattmeter is automatically in this mode. GB _Energiekostenmessgeraet_Content_GB-PL-CZ-SK.indd :12

20 Operation j The LCD 1 now indicates the present mains voltage in V (volts). Q Measure mains frequency j Press the DOWN button 4 until the power frequency symbol 11 (Hz) appears in the centre of the LC display 1. j The LCD 1 now indicates the present mains frequency in Hz (Hertz). Note: the wattmeter indicates mains frequencies in a range of 40 to 70 Hz. In Europe a frequency of 50 Hz is used for the general power supply system. Q Show power factor j Press the DOWN button 4 until the power factor symbol 18 ( Power Factor ) appears in the centre of the LC display 1. j The LC display 1 now indicates the power factor. note: the power factor expresses the ratio of real (active) to theoretical (apparent) power consumed by an electrical device. The power factor can be between 0 and 1. Ideally, the power factor is GB 56861_Energiekostenmessgeraet_Content_GB-PL-CZ-SK.indd :12

21 Operation Q Set electricity rate 1 and 2 Note: the price per kwh is set to 0 on delivery. Note: you can set two different electricity rates (e.g. daytime and night-time rate) for the power cost meter. In order to use this function, you must set the starting times for electricity rate 1 and 2. IMPORTANT! Electricity rate 1 is automatically the rate that was programmed first. Tip! You can obtain details of the current price per kwh from your electricity provider. Note: please make sure that the top third of the LC display 1 shows the standard display (see Display current ). Proceed as follows: 1. Press the DOWN button 4 until the price per kwh symbol 19 ( PRICE KWh ) appears in the centre of the LC display Press the UP button 5 so that four digits appear in the bottom third of the LC display 1. The symbol 15 also appears. 3. Now press the SET button 2. The first digit starts to flash. 4. Press the UP 5 or DOWN button 4 to set the units digit before the decimal point of the current price GB _Energiekostenmessgeraet_Content_GB-PL-CZ-SK.indd :12
22 Operation per kwh in Euro ( ) for electricity rate 1. Example: Press the SET button 2 to move to the next digit. 6. Press the UP 5 or DOWN button 4 to set the hundreds digit of the current price per kwh in Eurocent ( ) for electricity rate 1. Example: Press the SET button 2 to move to the next digit. 8. Repeat step 6 in order to set the tens and units digit. Example: Press the SET button 2. The time display starts to flash in the bottom third of the LC display Press the UP button 5 to set the starting time for electricity rate 1 in hours. 11. Press the DOWN button 4 to set the starting time for electricity rate 1 in minutes. 12. Press the PRICE button 3 to confirm your entry. The power cost meter begins measuring the cost of energy consumed in electricity rate 1 at the set starting time. 13. Press the PRICE button 3. The price per kwh symbol 19 ( PRICE KWh ) and 2 appear in the centre of the LC display 1. The display for the 2nd electricity tariff 14 appears in the bottom third of the LC display Press the SET button 2. The first digit starts to flash. 15. Press the UP 5 or DOWN button 4 to set the units digit before the decimal point of the current price per kwh in Euro ( ) for electricity rate 2. Example: GB 56861_Energiekostenmessgeraet_Content_GB-PL-CZ-SK.indd :12
23 Operation 16. Press the SET button 2 to move to the next digit. 17. Press the UP 5 or DOWN button 4 to set the hundreds digit of the current price per kwh in Eurocent ( ) for electricity rate 2. Example: Press the SET button 2 to move to the next digit. 19. Repeat step 17 to set the tens and units digit. Example: Press the SET button 2. The time display in the bottom third of the LC display 1 starts to flash. 21. Press the UP button 5 to set the starting time for electricity rate 2 in hours. 22. Press the DOWN button 4 to set the starting time for electricity rate 2 in minutes. 23. Press the PRICE button 3 to confirm your entry. The power cost meter begins measuring the cost of energy consumed in electricity rate 2 at the set starting time. Note: These settings affect the Display energy costs function. Q Set electricity flat-rate If your electricity provider does not offer different electricity rates (day / night), you can set a flat rate for electricity. The GB _Energiekostenmessgeraet_Content_GB-PL-CZ-SK.indd :12
24 Operation power cost meter then works on the basis of this flat rate round the clock. Note: make sure that the standard display (see Display current ) appears in the top third of the LC display Press the DOWN button 4 until the price per KWh symbol 19 ( PRICE KWh ) appears in the centre of the LC display Press the UP button 5 so that - -:- - appears in the bottom third of the LC display Press the SET button 2. The first digit begins to flash. 4. Press the UP 5 or DOWN button 4 to set the units digit before the decimal point of the current price per kwh in Euro ( ). Example: Press the SET button 2 to move to the next digit. 6. Press the UP 5 or DOWN button 4 to set the hundreds digit of the current price per kwh in Eurocent ( ). Example: Press the SET button 2 to move to the next digit. 8. Repeat step 6 to set the tens and units digit. Example: Press the PRICE button 3 to confirm your entry. Note: the setting made here affects the Display energy costs function. 26 GB 56861_Energiekostenmessgeraet_Content_GB-PL-CZ-SK.indd :12
25 Operation Q Total energy consumption Note: this mode displays the accumulated total energy in kwh consumed by connected electrical devices since the start of measurement. Note: Check that standard displays (see Measuring the current and Measuring the mains voltage ) appear in the top and middle thirds of the LC display 1. j Press the PRICE button 3 repeatedly until the kilowatthours symbol 17 and the total symbol 16 appear in the bottom third of the LC display 1. Note: the Total power consumption function is the standard setting for the wattmeter. As soon as the isolating strip between the two round cell batteries is removed, the wattmeter is automatically in this mode. j The LCD 1 now indicates the total amount of energy consumed in kwh (kilowatt hours). Note: the measuring range of the wattmeter is between 0.00 and kwh. GB _Energiekostenmessgeraet_Content_GB-PL-CZ-SK.indd :12
26 Operation Q Time measurement function Note: this mode displays the amount of time in hours / minutes / seconds or hours / minutes format during which all connected electrical devices consumed energy. The power cost meter and the devices you wish to monitor must all be switched on for time measurement. Note: Check that standard displays (see Measuring the current and Measuring the mains voltage ) appear in the top and middle thirds of the LC display 1. j Press the PRICE button 3 repeatedly until the time symbol 12 and the total symbol 16 appear in the bottom third of the LC display 1. j The LCD 1 now indicates the amount of time in which connected electrical appliances consumed energy. Note: as soon as the counter reaches 99:59:59, the display switches to hours/minutes format. The maximum time is 9999:59. Note: you can also call up the total time when the wattmeter has been removed from the outlet or when the electrical appliance you are testing is no longer connected to the wattmeter. 28 GB 56861_Energiekostenmessgeraet_Content_GB-PL-CZ-SK.indd :12
27 Operation Note: as soon as the wattmeter indicates that the current is too weak (0.00 A in Measure current mode), the time measurement function stops. Note: the time measurement function stops as soon as you unplug the electrical appliance you are testing from the socket 6 of the wattmeter. As soon as you plug another electrical appliance into the wattmeter, the time measurement function resumes. Q Show energy costs Note: the total cost of the consumed energy is shown in (Euro). Note: the total cost of the consumed energy is calculated on the basis of the set price per kwh (See Set electricity rate 1 and 2, Set electricity flat-rate ). Note: Check that standard displays (see Measuring the current and Measuring the mains voltage ) appear in the top and middle thirds of the LC display 1. j Press the PRICE button 3 until the cost symbol 13 ( TOTAL ) appears in the bottom third of the LC display 1. j The LCD 1 now indicates the energy costs incurred for use of the electrical appliance. GB _Energiekostenmessgeraet_Content_GB-PL-CZ-SK.indd :12
28 Operation Note: you can also call up the total cost when the wattmeter has been removed from the outlet or when the electrical appliance you are testing is no longer connected to the wattmeter. Note: the energy cost calculator stops as soon as you unplug the electrical appliance you are testing from the socket 6 of the wattmeter. As soon as you plug another electrical appliance into the wattmeter, the energy cost calculator resumes. Q Set the Energy consumption / Time measurement function / Total cost display to 0 j Keep the PRICE button 3 pressed for approx. 5 seconds to set the counter to 0. Q Changing the batteries Note: as soon as you remove the round cell batteries from the wattmeter, all the saved values are automatically deleted. 30 GB 56861_Energiekostenmessgeraet_Content_GB-PL-CZ-SK.indd :12
29 Operation Proceed as follows: j Remove the battery compartment cover 21 by unscrewing the two screws with a suitable screwdriver. j Remove the two round cell batteries from the holder on the back of the battery compartment cover 21. j Insert two new batteries (Alkaline LR44, 1.5 V ) in the holder on the back of the battery compartment cover 21. Note: make sure when inserting the batteries that the polarity is correct. This is indicated in the battery compartment. j Close the battery compartment by replacing the battery compartment cover 21. Please make sure that you retighten the two screws firmly. Note: make sure that you replace the battery compartment cover 21 the right way round. The rounded corners of the battery compartment cover 21 must fit into the rounded recesses in the battery compartment. Q Restore delivery condition Malfunctions may occur if the device is exposed to a strong electromagnetic, high-frequency field. If malfunctions occur, e.g. the buttons no longer respond or there are irregularities in the display, please return the device to delivery condition. To do this, remove the batteries for several minutes and then GB _Energiekostenmessgeraet_Content_GB-PL-CZ-SK.indd :12
30 Operation / Cleaning and Care / Disposal place them back in the device (see Changing the batteries ). If malfunctions persist, change the position of the device. IMPORTANT! Please note that all data will be deleted. Q Cleaning and Care Warning! RISK OF FATAL INJURY BY ELECTRIC SHOCK! Keep the wattmeter away from rain and moisture. If water enters the wattmeter there is an increased risk of an electric shock. Warning! RISK OF FATAL INJURY BY ELECTRIC SHOCK! Before carrying out any work on the product or on an electrical appliance connected to it, remove the wattmeter from the outlet. j Clean the wattmeter with a dry, non-fluffing cloth. Q Disposal The packaging is made entirely of recyclable materials, which you may dispose of at your local recycling facilities. 32 GB 56861_Energiekostenmessgeraet_Content_GB-PL-CZ-SK.indd :12
31 Disposal never dispose of electrical appliances in the household waste! In accordance with European Directive 2002 / 96 / EC on used electrical and electronic appliances and its implementation in national law, used electrical appliances must be collected separately and recycled in an ecologically compatible manner. Details of current options for disposing of electrical appliances after their useful life can be obtained from your local or city council. risk of environmental damage from improper disposal of batteries! Batteries shall not be disposed off in domestic waste. They may contain poisonous heavy metals and must be treated as hazardous waste. The chemical symbols of the heavy metals are as follows: Cd = Cadmium, Hg = Mercury, Pb = Lead. For this reason, take used batteries to a local collection point. GB _Energiekostenmessgeraet_Content_GB-PL-CZ-SK.indd :12
32 Warranty and Service Q Warranty and Service Q Warranty Declaration This instrument has a 3-year warranty from the date of purchase; the warranty is only valid for the original purchaser and is not transferable. Please retain your receipt as proof of purchase. The warranty applies to material or manufacturing defects only. It does not cover wear parts or damage caused by improper use. The warranty shall expire in the event of third-party intervention. This warranty shall not affect your statutory rights. Please contact the service centre by telephone in the event of any claims under the warranty. This is the only way to ensure that your instrument can be returned free of charge. Q Service Address BAT, Lindenstraße 35, D Tübingen exp@bat-tuebingen.com Service tel.: +49 (0) (14 cent / min from the German fixed line network, mobile phone max. 42 cent / min.) 34 GB 56861_Energiekostenmessgeraet_Content_GB-PL-CZ-SK.indd :12
33 Warranty and Service For further information we recommend that you consult the Customer Service / FAQ sections of our web site at Q Declaration of Conformity The CE symbol was applied in compliance with the following European Directives: 2006 / 95 / EC Low Voltage Directive 2004 / 108 / EC Electromagnetic Compatibility Directive The Declaration of Conformity is held by the manufacturer. Q Manufacturer BAT, Lindenstraße 35, D Tübingen GB _Energiekostenmessgeraet_Content_GB-PL-CZ-SK.indd :12
Instrukcja obsługi miernika zużycia energii. Operating Instructions for Power Meter
 POL SKI Instrukcja obsługi miernika zużycia energii Operating Instructions for Power Meter 406-074 PL EN Instrukcja obsługi w oryginale Operating instructions in original 20.06.2011 Jula AB POLSKI ZASADY
WYŁĄCZNIK CZASOWY OUTDOOR TIMER
 003-582 PL WYŁĄCZNIK CZASOWY Instrukcja obsługi (Tłumaczenie oryginalnej instrukcji) Ważny! Przed użyciem uważnie przeczytaj instrukcję obsługi! Zachowaj ją na przyszłość. EN OUTDOOR TIMER Operating instructions
BLACKLIGHT SPOT 400W F
 BLACKLIGHT SPOT 400W F2000339 USER MANUAL / INSTRUKCJA OBSŁUGI BLACKLIGHT SPOT 400W F2000339 Table of Contents 1 Introduction... 2 2 Safety information... 2 3 Product information... 2 3.1 Specification...
LED WASHER 30x3W WHITE IP65 F
 USER MANUAL / INSTRUKCJA OBSŁUGI LED WASHER 30x3W WHITE IP65 F7200171 LED WASHER 30x3W WHITE IP65 F7200171 Table of contents 1 Introduction... 2 2 Safety information... 2 3 Product information... 2 3.1
Licznik prądu EM 231 Nr produktu 000103693
 INSTRUKCJA OBSŁUGI Licznik prądu EM 231 Nr produktu 000103693 Strona 1 z 6 4.2 Widok z przodu Ekran 4.3 Lokalizacja elementów sterowania, funkcje i ekrany 1 Zasobnik baterii Zasobnik baterii znajduje się
INSTRUKCJA OBSŁUGI Dwutaryfowy miernik zużycia prądu Symbol:
 INSTRUKCJA OBSŁUGI Dwutaryfowy miernik zużycia prądu Symbol: 191010 Ta instrukcja jest częścią produktu i powinna być przechowywana w sposób umożliwiający zapoznanie się z jej treścią w przyszłości. Zawiera
INSTRUKCJA OBSŁUGI Dwutaryfowy miernik zużycia prądu Symbol:
 INSTRUKCJA OBSŁUGI Dwutaryfowy miernik zużycia prądu Symbol: 191010 Ta instrukcja jest częścią produktu i powinna być przechowywana w sposób umożliwiający zapoznanie się z jej treścią w przyszłości. Zawiera
Licznik prądu Nr produktu 000103696
 INSTRUKCJA OBSŁUGI Licznik prądu Nr produktu 000103696 Strona 1 z 8 3. Zawartość opakowania Tuż po rozpakowaniu sprawdź zawartość opakowania licznika prądu. Sprawdź tez czy sam licznik jest w dobrym stanie.
HAPPY ANIMALS L01 HAPPY ANIMALS L03 HAPPY ANIMALS L05 HAPPY ANIMALS L07
 HAPPY ANIMALS L0 HAPPY ANIMALS L0 HAPPY ANIMALS L0 HAPPY ANIMALS L07 INSTRUKCJA MONTAŻU ASSEMBLY INSTRUCTIONS Akcesoria / Fittings K ZW W8 W7 Ø x 6 szt. / pcs Ø7 x 70 Narzędzia / Tools DO MONTAŻU POTRZEBNE
HAPPY ANIMALS L02 HAPPY ANIMALS L04 HAPPY ANIMALS L06 HAPPY ANIMALS L08
 HAPPY ANIMALS L02 HAPPY ANIMALS L04 HAPPY ANIMALS L06 HAPPY ANIMALS L08 INSTRUKCJA MONTAŻU ASSEMBLY INSTRUCTIONS Akcesoria / Fittings K O G ZW W8 W4 20 szt. / pcs 4 szt. / pcs 4 szt. / pcs 4 szt. / pcs
Zasady bezpieczeństwa
 2 3 Zasady bezpieczeństwa GB The door and the feeding flap must be closed when operating the machine! PL Drzwiczki i klapka szczeliny podawczej muszą być zamknięte w trakcie używania urządzenia! GB Ensure
Środowisko użytkowania - Temperatura: 5 C do 40 C - Max. wilgotność 90% - Należy używać tylko w domu
 Koszty zużycia energii Przejdź przez następujące kroki, aby ustawić cenę energii. 1. Naciśnij klawisz PRICE zacznie migać pierwsza cyfra. 2. Naciśnij UP lub DOWN, aby ustawić pierwszą cyfrę. 3. Naciśnij
Mouse Tracer Fiorano RF
 Mysz Tracer Fiorano RF Instrukcja obsługi Mouse Tracer Fiorano RF User s Manual Mysz Tracer Fiorano RF 2 www.tracer.eu Mysz Tracer Fiorano RF www.tracer.eu 3 Mysz Tracer Fiorano RF Uwaga Uwaga: 4 www.tracer.eu
DO MONTAŻU POTRZEBNE SĄ DWIE OSOBY! INSTALLATION REQUIRES TWO PEOPLE!
 1 HAPPY ANIMALS B09 INSTRUKCJA MONTAŻU ASSEMBLY INSTRUCTIONS Akcesoria / Fittings K1 M M1 ZM1 Z T G1 17 szt. / pcs 13 szt. / pcs B1 13 szt. / pcs W4 13 szt. / pcs W6 14 szt. / pcs U1 1 szt. / pcs U N1
66149_silv_Energiekosten-Messgerät_Content_GB-PL-SK.indd 3 31.05.11 16:36
 A 1 6 5 2 3 4 3 66149_silv_Energiekosten-Messgerät_Content_GB-PL-SK.indd 3 31.05.11 16:36 B 8 7 4 66149_silv_Energiekosten-Messgerät_Content_GB-PL-SK.indd 4 31.05.11 16:36 Introduction Proper use...page
INSTRUCTION MANUAL. Strona 1
 INSTRUCTION MANUAL www.flash-butrym.pl Strona 1 LED SPOT LIGHT INSTRUCTION MANUAL Thank you for purchasing the LEDSPOT10W Spot light. It is a small and easy to carry unit that is simple to install. Features:
DC UPS. User Manual. Page 1
 DC UPS User Manual Page 1 1. Specyfikacja 1.1 Zasilacz PowerWalker DC UPS 12V jest innowacyjnym rozwiązaniem do zasilania prądem stałym o napięciu 12 VDC urządzeń do max 30W (2,5 A) obciążenia. W urządzeniu
Alkomat 4 w 1, AT 6389ET, 2 wyświetlacze LCD, zakres 0-1,9 promila
 INSTRUKCJA OBSŁUGI Alkomat 4 w 1, AT 6389ET, 2 wyświetlacze LCD, zakres 0-1,9 promila Nr produktu 856992 Strona 1 z 7 Przeznaczenie produktu Zastosowanie alkomatu obejmuje pomiar poziomu alkoholu w wydychanym
Listwa zasilająca ze wskaźnikiem kosztów energii Brennenstuhl EM 235
 Listwa zasilająca ze wskaźnikiem kosztów energii Brennenstuhl EM 235 Instrukcja obsługi Nr produktu: 125436 Listwa zasilająca ze wskaźnikiem kosztów energii Brennenstuhl EM 235... 1 Instrukcja obsługi...
Licznik kosztów energii Nr produktu
 INSTRUKCJA OBSŁUGI Licznik kosztów energii Nr produktu 000101649 Strona 1 z 12 Przeznaczenie do użycia Licznik kosztów energii przeznaczony jest do pomiarów i analiz danych zużycia energii przez urządzenia
HAPPY K04 INSTRUKCJA MONTAŻU ASSEMBLY INSTRUCTIONS DO MONTAŻU POTRZEBNE SĄ DWIE OSOBY! INSTALLATION REQUIRES TWO PEOPLE! W5 W6 G1 T2 U1 U2 TZ1
 HAPPY K0 INSTRUKCJA MONTAŻU ASSEMBLY INSTRUCTIONS W Akcesoria / Fittings W W G K szt. / pcs M Ø Ø 0 Ø, Ø Ø. 0 ø8 M 8 szt. / pcs 0 szt. / pcs szt. / pcs T U U szt. / pcs szt. / pcs szt. / pcs S TZ szt.
DO MONTAŻU POTRZEBNE SĄ DWIE OSOBY! INSTALLATION REQUIRES TWO PEOPLE!
 HAPPY ANIMALS RW08 INSTRUKCJA MONTAŻU ASSEMBLY INSTRUCTIONS Akcesoria / Fittings K M M ZM ZW G 0 szt. / pcs W szt. / pcs B szt. / pcs szt. / pcs W U 8 szt. / pcs 4 szt. / pcs U N szt. / pcs Ø3 x szt. /
DO MONTAŻU POTRZEBNE SĄ DWIE OSOBY! INSTALLATION REQUIRES TWO PEOPLE!
 1 HAPPY ANIMALS SZ11 A INSTRUKCJA MONTAŻU ASSEMBLY INSTRUCTIONS Akcesoria / Fittings K1 M M1 ZM1 Z G1 szt. / pcs 0 szt. / pcs B1 6 szt. / pcs 6 szt. / pcs W6 0 szt. / pcs U1 19 szt. / pcs U 50 szt. / pcs
LED MAGIC BALL MP3 F
 USER MANUAL / INSTRUKCJA OBSŁUGI LED MAGIC BALL MP3 F7000623 LED MAGIC BALL MP3 F7000623 Table of contents 1 Introduction... 2 2 Safety information... 2 3 Product information... 2 3.1 Specification...
EN Desktop Weather Station Instruction Manual
 V3067 EN Desktop Weather Station Instruction Manual Introduction This desktop weather station comes with weather prediction, clock, calendar, day, temperature and humidity display. It is battery powered
Céliane TM Vac 50-60Hz. 1 x 2.5 mm 2 2 x 1.5 mm 2. Max. 400 W 400 W 400 VA 400 VA. 240 Vac. Min. 40 W 40 W 40 VA 40 VA
 Céliane TM instrukcja Remotelycontrollable ściemniacza dimmer 067087 switch for all incandescent loads 670 87 ( *) 100240 Vac 5060Hz 1 x 2.5 mm 2 2 x 1.5 mm 2 240 Vac Max. 400 W 400 W 400 VA 400 VA Min.
LED PAR 56 7x10 4in1 RGBW F
 USER MANUAL / INSTRUKCJA OBSŁUGI LED PAR 56 7x10 4in1 RGBW F7100311 LED PAR 56 7x10W 4in1 RGBW F7100311 Table of Contents 1 Introduction... 2 2 Safety information... 2 3 Product information... 2 3.1 Specification...
099 Łóżko półpiętrowe 2080x1010(1109)x Bunk bed 2080x1010(1109)x1600 W15 INSTRUKCJA MONTAŻU ASSEMBLY INSTRUCTION
x Bunk bed 2080x1010(1109)x1600 W15 INSTRUKCJA MONTAŻU ASSEMBLY INSTRUCTION") INSTRUKCJA MONTAŻU ASSEMBLY INSTRUCTION 2 WAŻNE, ZACHOWAĆ DO PÓŹNIEJSZEGO STOSOWANIA- UWAŻNIE PRZECZYTAĆ IMPORTANT, SAVE FOR FURTHER USAGE- READ CAREFULLY INSTRUKCJA UZYTKOWANIA USER S MANUAL. Aby uniknąć
INSTRUKCJA MONTAŻU ASSEMBLY INSTRUCTION 2 WAŻNE, ZACHOWAĆ DO PÓŹNIEJSZEGO STOSOWANIA- UWAŻNIE PRZECZYTAĆ IMPORTANT, SAVE FOR FURTHER USAGE- READ CAREFULLY INSTRUKCJA UZYTKOWANIA USER S MANUAL. Aby uniknąć
POWER BANK KM0209-KM0211
 Bedienungsanleitung POWER BANK KM0209-KM0211 OWNER S MANUAL INSTRUKCJA OBSŁUGI PL EN Owner s manual SAFETY INFORMATION Before use, read this manual carefully and follow its instructions. Producer does
Installation of EuroCert software for qualified electronic signature
 Installation of EuroCert software for qualified electronic signature for Microsoft Windows systems Warsaw 28.08.2019 Content 1. Downloading and running the software for the e-signature... 3 a) Installer
INSTRUKCJA OBSŁUGI M9805G #02998 MULTIMETR CĘGOWY
 INSTRUKCJA OBSŁUGI M9805G #02998 MULTIMETR CĘGOWY! 1. INFORMACJE O BEZPIECZEŃSTWIE Przed przystąpieniem do pomiarów lub naprawy miernika należy zapoznać się z niniejszą instrukcją. Aby uniknąć zniszczenia
METHOD 2 -DIAGNOSTIC OUTSIDE
 VW MOTOMETER BOSCH METHOD 1 - OBD 2 METHOD 2 -DIAGNOSTIC OUTSIDE AFTER OPERATION YOU MUST DISCONECT ACU OR REMOVE FUSE FOR RESTART ODOMETER PO ZROBIENIU LICZNIKA ZDJĄĆ KLEMĘ LUB WYJĄĆ 2 BEZPIECZNIKI OD
Tuber radio BT MA407. Instrukcja obsługi User s Manual
 Tuber radio BT MA407 Instrukcja obsługi User s Manual User s Manual MA407 INSTRUCTIONS...4 BASIC...4 TROUBLESHOOTING...5 DATA TRANSFERRING / CHARGING VIA USB CABLE...5 INTERFACES...5 SPECIFICATIONS...6
Camspot 4.4 Camspot 4.5
 User manual (addition) Dodatek do instrukcji obsługi Camspot 4.4 Camspot 4.5 1. WiFi configuration 2. Configuration of sending pictures to e-mail/ftp after motion detection 1. Konfiguracja WiFi 2. Konfiguracja
Przyrząd do pomiarów kosztu energii COST CONTROL 3000 Nr produktu
 INSTRUKCJA OBSŁUGI Przyrząd do pomiarów kosztu energii COST CONTROL 3000 Nr produktu 125333 Strona 1 z 6 Instrukcja obsługi Przyrząd do pomiarów kosztu energii COST CONTROL 3000 Numer produktu 12 53 33
USB firmware changing guide. Zmiana oprogramowania za przy użyciu połączenia USB. Changelog / Lista Zmian
 1 / 9 Content list / Spis Treści 1. Hardware and software requirements, preparing device to upgrade Wymagania sprzętowe i programowe, przygotowanie urządzenia do aktualizacji 2. Installing drivers and
USB firmware changing guide. Zmiana oprogramowania za przy użyciu połączenia USB. Changelog / Lista Zmian
 1 / 12 Content list / Spis Treści 1. Hardware and software requirements, preparing device to upgrade Wymagania sprzętowe i programowe, przygotowanie urządzenia do aktualizacji 2. Installing drivers needed
TERMOMETR DWUKANAŁOWY AX Instrukcja obsługi
 TERMOMETR DWUKANAŁOWY AX-5003 Instrukcja obsługi 1.Wstęp Dziękujemy za zakup dwukanałowego miernika temperatury. Przeznacz kilka minut na przeczytanie instrukcji przed rozpoczęciem pracy, żeby jak najdokładniej
Wyłącznik czasowy GAO EMT757
 INSTRUKCJA OBSŁUGI Wyłącznik czasowy GAO EMT757 Produkt nr 552451 Instrukcja obsługi Strona 1 z 10 Cyfrowy programator czasowy Artykuł nr: EMT757 A. Funkcje 1. Cyfrowy programator czasowy (zwany dalej
 Podłączyć do gniazda Przykręcić nakrętkę radełkowaną Sposób montażu akcesoriów Wszystkie trzy akcesoria (tj. lusterko, haczyk i magnes) są mocowane do kamery ten sam sposób, co poniżej. Sposób montażu:
[ROBOKIDS MANUAL] ROBOROBO
![[ROBOKIDS MANUAL] ROBOROBO](/thumbs/24/4313056.jpg "[ROBOKIDS MANUAL] ROBOROBO") 1 2 When you plug in or unplug the cable, be sure to insert pressing the hook of the connection cable. If you want to input the program to your robot, you should first connect the Card reader with the
1 2 When you plug in or unplug the cable, be sure to insert pressing the hook of the connection cable. If you want to input the program to your robot, you should first connect the Card reader with the
Przeciwpożarowe sterowniki dla bram zwijanych, sekcyjnych i przesuwnych. Fire-proof controls for roller shutters, sectional doors and sliding gates
 Przeciwpożarowe napędy bram Charakterystyka Characteristics Fire-proof door drives 36 Przeciwpożarowe sterowniki dla bram zwijanych, sekcyjnych i przesuwnych Fire-proof controls for roller shutters, sectional
Hippo Boombox MM209N CD. Instrukcja obsługi User s Manual
 Hippo Boombox Instrukcja obsługi User s Manual OPIS PRZYCISKÓW: PL ON-OFF/MODE: 1. Włącz on/off: Naciśnij przycisk, aby włączyć urządzenie. Przytrzymaj dłużej, aby wyłączyć. 2. MODE: Wybierz źródło sygnału:
Instrukcja obsługi TOSTER MODEL: BH-8863
 Instrukcja obsługi TOSTER MODEL: BH-8863 3. Nie używaj do czyszczenia silnych środków czyszczących, acetonu, alkoholu, ostrych materiałów, itp. 4. Należy regularnie usuwać okruchy pieczywa wewnątrz tostera,
INSTRUKCJA OBSŁUGI ELEKTRONICZNA STACJA POGODY
 No 170601 INSTRUKCJA OBSŁUGI ELEKTRONICZNA STACJA POGODY Ta instrukcja jest częścią produktu i powinna być przechowywana w sposób umożliwiający zapoznanie się z jej treścią w przyszłości. Zawiera istotne
LED PAR 56 7*10W RGBW 4in1 SLIM
 LED PAR 56 7*10W RGBW 4in1 SLIM USER MANUAL Attention: www.flash-butrym.pl Strona 1 1. Please read this specification carefully before installment and operation. 2. Please do not transmit this specification
098 Łóżko piętrowe 2080x1010(1109)x Double bunk bed 2080x1010(1109)x1600 W15 MONTAGEANLEITUNG ASSEMBLY INSTRUCTION
x Double bunk bed 2080x1010(1109)x1600 W15 MONTAGEANLEITUNG ASSEMBLY INSTRUCTION") 098 Double bunk bed 2080x(9)x600 W5 MONTAGEANLEITUNG ASSEMBLY INSTRUCTION 2 WAŻNE, ZACHOWAĆ DO PÓŹNIEJSZEGO STOSOWANIA- UWAŻNIE PRZECZYTAĆ IMPORTANT, SAVE FOR FURTHER USAGE- READ CAREFULLY INSTRUKCJA UZYTKOWANIA
098 Double bunk bed 2080x(9)x600 W5 MONTAGEANLEITUNG ASSEMBLY INSTRUCTION 2 WAŻNE, ZACHOWAĆ DO PÓŹNIEJSZEGO STOSOWANIA- UWAŻNIE PRZECZYTAĆ IMPORTANT, SAVE FOR FURTHER USAGE- READ CAREFULLY INSTRUKCJA UZYTKOWANIA
POWER BANK. Owner s manual Instrukcja obsługi EN PL
 POWER BANK Owner s manual Instrukcja obsługi EN PL Safety instructions Owner s manual 1. Read this instruction manual before first use, and keep it for future reference. Producer is not responsible for
USER MANUAL - EN SPECIFICATION
 GWP-100 - legible LCD display with backlight - stainless steel platform - automatic switch off - capacity: 150kg - division: 100g - unit: kg, lb, st - overload indicator - low battery indicator - power:
Zegarek cyfrowy, pomiar temperatury/wilgotności, C -Budzik Kwarcowy TFA , Biały (SxWxG) 240 x 90 x 50 mm
 240 x 90 x 50 mm") INSTRUKCJA OBSŁUGI Nr produktu 000672765 Zegarek cyfrowy, pomiar temperatury/wilgotności, 0 - +50 C -Budzik Kwarcowy TFA 60.2011, Biały (SxWxG) 240 x 90 x 50 mm Strona 1 z 7 Rys 1. Rys 2. Strona 2 z 7
INSTRUKCJA OBSŁUGI Nr produktu 000672765 Zegarek cyfrowy, pomiar temperatury/wilgotności, 0 - +50 C -Budzik Kwarcowy TFA 60.2011, Biały (SxWxG) 240 x 90 x 50 mm Strona 1 z 7 Rys 1. Rys 2. Strona 2 z 7
TR18 INSTALATION MANUAL / INSTRUKCJA MONTAŻU. cart for flat displays
 INSTLTION NUL / INSTRUKCJ ONTŻU cart for flat displays WRNING: Please read this manual before the installation to ensure proper assembly. The assembly should be carried out in accordance with this manual
Pomoc do programu konfiguracyjnego RFID-CS27-Reader User Guide of setup software RFID-CS27-Reader
 2017-01-24 Pomoc do programu konfiguracyjnego RFID-CS27-Reader User Guide of setup software RFID-CS27-Reader Program CS27 Reader należy uruchomić przez wybór opcji CS27 i naciśnięcie przycisku START. Programme
FOREST DIAMOND Pilot radiowy X460
 FOREST DIAMOND Pilot radiowy - 520109X460 SPECYFIKACJA TECHNICZNA: 3V bateria typu: CR2450 zasięg nadajnika maks. 30 m żywotność baterii do 3 lat zakres temp. pracy:-10 C - +50 C częstotliwość 433.92MHz
LED PAR 64 18x10W 4in1 CLASSIC F
 LED PAR 64 18x10W 4in1 CLASSIC F7100309 USER MANUAL / INSTRUKCJA OBSŁUGI LED PAR 64 18x10W 4in1 CLASSIC F7100309 Table of Contents 1 Introduction... 2 2 Safety information... 2 3 Product information...
Wskaźnik temperatury LED Voltcraft TM-110
 INSTRUKCJA OBSŁUGI Wskaźnik temperatury LED Voltcraft TM-110 Nr produktu 108417 Strona 1 z 6 Wersja 10/11 Wskaźnik temperatury LED Voltcraft TM-110 Przeznaczenie Produkt jest przeznaczony do pomiaru temperatury
Cyfrowy miernik cęgowy AX-3550
 Cyfrowy miernik cęgowy AX-3550 Instrukcja obsługi 1. Informacje dotyczące bezpieczeństwa Aby uniknąć porażenia prądem elektrycznym lub obrażeń ciała, a także uniknąć uszkodzenia miernika lub testowanego
Licznik zużycia energii BaseTech 3000 (Wersja brytyjska)
") Licznik zużycia energii BaseTech 3000 (Wersja brytyjska) Instrukcja obsługi Numer produktu: 125414 Wersja: 10/09 Strona 1 z 13 Przeznaczenie Licznik kosztów energii jest przeznaczony do pomiaru i szczegółowego
Licznik zużycia energii BaseTech 3000 (Wersja brytyjska) Instrukcja obsługi Numer produktu: 125414 Wersja: 10/09 Strona 1 z 13 Przeznaczenie Licznik kosztów energii jest przeznaczony do pomiaru i szczegółowego
Instrukcja obsługi miernika uniwersalnego MU-02D
 Instrukcja obsługi miernika uniwersalnego MU-02D 1. Informacje ogólne Miernik MU-02D umożliwia pomiary napięć stałych (do 1000V) i przemiennych (do 750V), natężenia prądu stałego (do 10A), oporności (do
Miernik wilgotności materiałów Extech MO257, pomiar nieinwazyjny
 INSTRUKCJA OBSŁUGI Miernik wilgotności materiałów Extech MO257, pomiar nieinwazyjny Nr produktu 00103787 Strona 1 z 5 Wprowadzenie Gratulujemy zakupu bezdotykowego miernika wilgotności Extech MO257. Bezdotykowy
Instrukcja obsługi cyfrowego tygodniowego wyłącznika czasowego. Operating Instructions for Digital Weekly Timer
 Instrukcja obsługi cyfrowego tygodniowego wyłącznika czasowego Operating Instructions for Digital Weekly Timer 406-073 SV NO PL EN Bruksanvisning i original Bruksanvisning i original Instrukcja obsługi
Termohigrometr Voltcraft HT-100
 INSTRUKCJA OBSŁUGI Termohigrometr Voltcraft HT-100 Nr produktu 123488 Strona 1 z 7 Przeznaczenie Produkt jest przeznaczony do pomiaru temperatury i wilgotności, może dostarczać informacji o maksymalnej
USER MANUAL - EN SPECIFICATION
 GWK-100 1 2 3 4 5 6 7 8 9 1 LCD display with backlight panel with Soft-touch buttons stainless steel platform capacity: 5000g division: 1g unit: g, fl.oz, lb:oz, ml Tare function automatic switch off overload
Aktualizacja Oprogramowania Firmowego (Fleszowanie) Microprocessor Firmware Upgrade (Firmware downloading)
 Microprocessor Firmware Upgrade (Firmware downloading)") Aktualizacja Oprogramowania Firmowego (Fleszowanie) Microprocessor Firmware Upgrade (Firmware downloading) ROGER sp.j. Gościszewo 59 82-416 Gościszewo Poland tel. 055 2720132 fax 055 2720133 www.roger.pl
Aktualizacja Oprogramowania Firmowego (Fleszowanie) Microprocessor Firmware Upgrade (Firmware downloading) ROGER sp.j. Gościszewo 59 82-416 Gościszewo Poland tel. 055 2720132 fax 055 2720133 www.roger.pl
User Manual Instrukcja obsługi
 www.twistcar.eu User Manual Instrukcja obsługi KKS Jakub Sadowski Sp. J. Łowicka 51/23A 02-535 Warszawa, Poland biuro@twistcar.eu Pojazd dziecięcy Twist-ball Dziękujemy za zakup pojazdu dziecięcego Twist-ball.
INSTRUKCJA OBSŁUGI OPERATIONAL MANUAL KRZESEŁKO / HIGH CHAIR MINI WYPRODUKOWANO ZGODNIE Z NORMĄ PN-EN 14988
 PL INSTRUKCJA OBSŁUGI OPERATIONAL AL MANUAL KRZESEŁKO / HIGH CHAIR MINI WYPRODUKOWANO ZGODNIE Z NORMĄ PN-EN 14988 A B C D E F G PL WAŻNE! ZACHOWAĆ W CELU POWOŁANIA SIĘ W PRZYSZŁOŚCI! OSTRZEŻENIA Nieprzestrzeganie
Trener snu dla dzieci
 Trener snu dla dzieci pl Instrukcja obsługi Tchibo GmbH D-22290 Hamburg 97907HB66XVIII 2018-08 Drodzy Klienci! Trener snu dla dzieci pomaga dziecku nauczyć się, o której godzinie nadchodzi czas snu i wstawania.
Instrukcja obsługi kalibratora napięcia i prądu pętli
 Informacje dotyczące bezpieczeństwa Aby uniknąć porażenia prądem elektrycznym lub obrażeń: Nigdy nie podłączaj do dwóch gniazd wejściowych lub do dowolnego gniazda wejściowego i uziemionej masy napięcia
Termometr wewnętrzny / zewnętrzny z alarmem. Instrukcja obsługi. Środki bezpieczeństwa. Nr produkt:
 Termometr wewnętrzny / zewnętrzny z alarmem Instrukcja obsługi Nr produkt: 646222 Wersja 07/06 Termometr z alarmem przeznaczony jest do wyświetlania temperatury wewnętrznej i zewnętrznej. Zapisuje ekstremalne
LED WALL WASHER 36x3W RGBW 3SC IP65 F
 USER MANUAL / INSTRUKCJA OBSŁUGI LED WALL WASHER 36x3W RGBW 3SC IP65 F7200168 LED WALL WASHER 36x3W RGBW 3SC IP65 F7200168 Table of contents 1 Introduction... 2 2 Safety information... 2 3 Product information...
Instrukcja obsługi. ibind A8/A12/A15/A20. instruction manual. 80-393 GDAŃSK ul. Krynicka 1 tel.: (058) 55 43 555 fax: (058) 55 43 500
 55 43 555 fax: (058) 55 43 500") Instrukcja obsługi instruction manual 80-9 GDAŃSK ul. Krynicka tel.: (08) fax: (08) 00 ODDZIAŁ: 0-78 WARSZAWA ul. Janowskiego 9 tel.: (0) 8 0 8..9 fax: (0) 8 0 0 BindownicE ibind A8/A/A/A0 BINDING MACHINEs
Instrukcja obsługi instruction manual 80-9 GDAŃSK ul. Krynicka tel.: (08) fax: (08) 00 ODDZIAŁ: 0-78 WARSZAWA ul. Janowskiego 9 tel.: (0) 8 0 8..9 fax: (0) 8 0 0 BindownicE ibind A8/A/A/A0 BINDING MACHINEs
Instrukcja obsługi miernika uniwersalnego MU-07L
 1. Informacje ogólne Miernik MU-07L umożliwia pomiary napięć stałych (do 600V) i przemiennych (do 600V), natężenia prądu stałego (do 10A), oporności (do 2MΩ) oraz sprawdzanie diod półprzewodnikowych, ciągłości
Samurai SHARK SH903. RF Combo Wireless Mouse & Keyboard
 Samurai SHARK SH903 RF Combo Wireless Mouse & Keyboard Instrukcja obsługi Instalacja baterii SH903-Samurai Uwaga! Bezprzewodowa myszka optyczna używa baterii typu AAA. Żeby osiągnąć najlepszą wydajność
OT 180/ /700 P5
 OT 180/120 277/700 P5 OPTOTRONIC Outdoor Constant current LED drivers Obszar zastosowań _ Oświetlenie ulic i przestrzeni miejskich _ Przemysł _ Przeznaczony do opraw o klasie ochronności I Korzyści ze
Pęseta R/C do SMD AX-503. Instrukcja obsługi
 Pęseta R/C do SMD AX-503 Instrukcja obsługi 1. OPIS OGÓLNY Pęseta R/C do SMD umożliwia szybki i precyzyjny pomiar drobnych elementów układów. Żeby wykorzystać miernik w pełni, proszę przeczytać uważnie
LED PAR 18x10W RGBW 4in1 Aluminum single cast II ver. F
 LED PAR 18x10W RGBW 4in1 Aluminum single cast II ver. F71000269 USER MANUAL / INSTRUKCJA OBSŁUGI LED PAR 18x 10W RGBW 4in1 Aluminium single cast II ver. F71000269 Table of Contents 1 Introduction... 2
USB firmware changing guide. Zmiana oprogramowania za przy użyciu połączenia USB. Changelog / Lista Zmian
 1 / 14 Content list / Spis Treści 1. Hardware and software requirements, preparing device to upgrade Wymagania sprzętowe i programowe, przygotowanie urządzenia do aktualizacji 2. Installing drivers and
APARATURA POMIAROWA SERII V MEASURING INSTRUMENTS V-SERIES
 www.lumel.com.pl APARATURA POMIAROWA SERII V MEASURING INSTRUMENTS V-SERIES 1 VAE - AMPEROMIERZE I WOLTOMIERZE PRĄDU PRZEMIENNEGO / MOVING-IRON METERS VAGL - AMPEROMIERZE I WOLTOMIERZE PRĄDU PRZEMIENNEGO
Termometr pływający FIAP 2784
 INSTRUKCJA OBSŁUGI Nr produktu 001000252 Termometr pływający FIAP 2784 Strona 1 z 5 -20 C +50 C -4 F...+122 F C F ±1 C (±2 F) Dołączona bateria zapasowa 1 x LR44 1. Przed pierwszym użyciem - Prosimy uważnie
LED MINI DERBY 4x3W RGBW F
 USER MANUAL / INSTRUKCJA OBSŁUGI LED MINI DERBY 4x3W RGBW F7000598 LED MINI DERBY 4x3W RGBW F7000598 Table of contents 1 Introduction... 2 2 Safety information... 2 3 Product information... 2 3.1 Specification...
Instrukcja obsługi. Radio z zegarem CRL-330
 Instrukcja obsługi Radio z zegarem CRL-330 www.denver-electronics.com Przed korzystaniem z tego produktu proszę uważnie i w pełni przeczytać tę instrukcję obsługi. Informacje o produkcie EN PL Correctly
Selfie Monopod MA426. Instrukcja obsługi User s Manual
 Selfie Monopod MA426 Instrukcja obsługi User s Manual PL Selfie Monopod Przeczytaj wszystkie instrukcje przed użyciem oraz zachowaj te informacje do wykorzystania w przyszłości. Zestaw: 1x mobile phone
Budzik. Instrukcja obsługi. Tchibo GmbH D Hamburg 69380FV06XIII00GSAF
 Budzik Instrukcja obsługi Tchibo GmbH D-22290 Hamburg 69380FV06XIII00GSAF Drodzy Klienci! Ten kolorowy, wesoły budzik wyposażono w mechanizm kwarcowy, który pracuje wyjątkowo cicho. Dzięki temu Państwa
LED MOVING HEAD 60W F
 USER MANUAL / INSTRUKCJA OBSŁUGI LED MOVING HEAD 60W F1700044 LED MOVING HEAD 60W F1700044 Table of Contents 1 Introduction... 2 2 Safety information... 2 3 Product information... 2 3.1 Specification...
user s manual NV-002MIC
 user s manual NV-002MIC NV-002MIC - user's manual, ver. 1.0 INFORMATION EMC (2004/108/EC) and LVD (2006/95/EC ) Directives CE Marking Our products are manufactured to comply with requirements of following
MM210. Instrukcja obsługi User s Manual
 Chilli Boombox Instrukcja obsługi User s Manual OPIS PRZYCISKÓW: PL ON-OFF/MODE: 1. Włącz on/off: Naciśnij przycisk, aby włączyć urządzenie. Przytrzymaj dłużej, aby wyłączyć. 2. MODE: Wybierz źródło sygnału:
Instrukcja obsługi. binding machine KRIS. instruction manual. 80-393 GDAŃSK ul. Krynicka 1 tel.: (058) 55 43 555 fax: (058) 55 43 500 ODDZIAŁ:
 55 43 555 fax: (058) 55 43 500 ODDZIAŁ:") Instrukcja obsługi instruction manual 80-393 GDAŃSK ul. Krynicka 1 tel.: (058) 55 43 555 fax: (058) 55 43 500 ODDZIAŁ: 02-784 WARSZAWA ul. Janowskiego 9 tel.: (022) 648 03 48..49 fax: (022) 648 03 50 bindownica
Instrukcja obsługi instruction manual 80-393 GDAŃSK ul. Krynicka 1 tel.: (058) 55 43 555 fax: (058) 55 43 500 ODDZIAŁ: 02-784 WARSZAWA ul. Janowskiego 9 tel.: (022) 648 03 48..49 fax: (022) 648 03 50 bindownica
BX09 INSTRUKCJA OBSŁUGI MIERNIK KOSZTÓW ENERGII TRT-BA-BX09-TC-002-PL
 BX09 PL INSTRUKCJA OBSŁUGI MIERNIK KOSZTÓW ENERGII TRT-BA-BX09-TC-002-PL Spis treści Wskazówki dotyczące instrukcji obsługi... 1 Aktualna wersja instrukcji obsługi oraz odpowiednie deklaracje zgodności
Termohigrometr cyfrowy TFA
 INSTRUKCJA OBSŁUGI Nr produktu 001268315 Termohigrometr cyfrowy TFA 30.5033.02 Strona 1 z 7 Dziękujemy za zakup produktu firmy TFA 1. Przed pierwszym użyciem - Pamiętaj aby dokładnie zapoznać się z instrukcją
LED PAR 36 12x3W RGBW F
 USER MANUAL / INSTRUKCJA OBSŁUGI LED PAR 36 12x3W RGBW F7000251 LED PAR 36 12x3W RGBW F7000251 Table of contents 1 Introduction... 2 2 Safety information... 2 3 Product information... 2 3.1 Specification...
CL3D, CL3D-G. Cross-laser.
 EN www.nivelsystem.com Cross-laser CL3D, CL3D-G Thank you for purchasing a Nivel System CL3D, CL3D-G laser. To best use the purchased instrument, please read the instructions carefully and put in a convenient
LED PAR 18x10W RGBW 4in1 IP65 F
 LED PAR 18x10W RGBW 4in1 IP65 F7100310 USER MANUAL / INSTRUKCJA OBSŁUGI LED PAR 18x10W RGBW 4in1 IP65 F7100310 Table of contents 1 Introduction... 2 2 Safety information... 2 2.1 Specification... 2 3 Installation...
LED Spyder 8x10 CREE 4in1 F
 USER MANUAL / INSTRUKCJA OBSŁUGI LED Spyder 8x10 CREE 4in1 F7300215 LED Spyder 8x10 CREE 4in1 F7300215 Table of contents 1 Introduction... 2 2 Safety information... 2 3 Product information... 2 3.1 Specification...
PL CYFROWY ZEWNĘTRZNY WYŁĄCZNIK CZASOWY Instrukcja obsługi (Tłumaczenie oryginalnej instrukcji) Ważne! Przed użyciem uważnie przeczytaj instrukcję
 Ważne! Przed użyciem uważnie przeczytaj instrukcję") 006042 CYFROWY ZEWNĘTRZNY WYŁĄCZNIK CZASOWY Instrukcja obsługi (Tłumaczenie oryginalnej instrukcji) Ważne! Przed użyciem uważnie przeczytaj instrukcję obsługi! Zachowaj ją na przyszłość. Dbaj o środowisko!
006042 CYFROWY ZEWNĘTRZNY WYŁĄCZNIK CZASOWY Instrukcja obsługi (Tłumaczenie oryginalnej instrukcji) Ważne! Przed użyciem uważnie przeczytaj instrukcję obsługi! Zachowaj ją na przyszłość. Dbaj o środowisko!
Rejestrator danych Log 10, TFA, zakres -30 do +60 C
 INSTRUKCJA OBSŁUGI Nr produktu 000101838 Rejestrator danych Log 10, TFA, zakres -30 do +60 C Strona 1 z 6 Rys.1 Rys 2 1. Wprowadzenie Drogi kliencie, Dziękujemy za zakup jednego z naszych produktów. Przed
Termohigrometr TFA , zew. -40 do +70
 INSTRUKCJA OBSŁUGI Nr produktu 672433 Termohigrometr TFA 30.5024, zew. -40 do +70 Strona 1 z 6 Dziękujemy za zakup urządzenia marki TFA 1. Przed pierwszym użyciem - Pamiętaj aby dokładnie zapoznać się
MIERNIK MS-6511, 6512 MASTECH INSTRUKCJA OBSŁUGI
 MIERNIK MS-6511, 6512 MASTECH INSTRUKCJA OBSŁUGI Dokładnie zapoznaj się z instrukcją obsługi przed rozpoczęciem pracy. Niestosowanie się do zaleceń zawartych w instrukcji może spowodować zagrożenie zdrowia
PROVA 100 Kalibrator zadajnik
 INSTRUKCJA OBSŁUGI PROVA 100 Kalibrator zadajnik Spis treści I. OPIS PANELU... 3 II. INSTRUKCJA UŻYTKOWANIA... 9 1.Wyjście ma... 9 a. Praca w zakresie 4-20mA... 9 b. Zakres 0 20mA lub 0-24mA... 10 c. Wprowadzenie
LED PAR 64 18x10W RGBW 4in1 IP64 PFC F
 LED PAR 64 18x10W RGBW 4in1 IP64 PFC F7100305 USER MANUAL / INSTRUKCJA OBSŁUGI LED PAR 64 18x10W RGBW 4in1 IP65 PFC F7100305 Table of Contents 1 Introduction... 2 2 Safety information... 2 3 Product information...
LED PAR 18x 10W RGBW 4in1 Aluminium single cast v.iii F B
 LED PAR 18x 10W RGBW 4in1 Aluminium single cast v.iii F7000048B USER MANUAL / INSTRUKCJA OBSŁUGI LED PAR 18x 10W RGBW 4in1 Aluminium single cast v.iii F7000048B Table of Contents 1 Introduction... 2 2
Termometr tablicowy, panelowy Basetech BT-80, C, Dokładność: ±1 C
 INSTRUKCJA OBSŁUGI Nr produktu 000101712 Termometr tablicowy, panelowy Basetech BT-80, -50 +70 C, Dokładność: ±1 C Strona 1 z 5 1. Przeznaczenie produktu Produkt przeznaczony jest do pomiaru temperatur