English Polski Slovenščina Slovensky
|
|
|
- Mirosław Woźniak
- 8 lat temu
- Przeglądów:
Transkrypt
1
2
3 English... 2 Polski Slovenščina Slovensky V 1.3

4 Contents Contents... 2 Trademarks... 5 Introduction... 5 Intended use... 5 Package Contents... 6 Technical specifications... 7 Safety instructions... 8 Explanation of symbols... 8 Copyright Overview Controls and displays Buttons LED indicators Before you start Inserting/removing the memory card Car mount Charging the battery Charging the battery with a USB cable Charging with the car charger Getting started Turning on the Dashboard Camera Turning off the Dashboard Camera English

5 Setting the menu language Setting the date / time Turning on and selecting the operating mode Dashboard Camera is not being charged Dashboard Camera is connected to a PC with a USB cable Dashboard Camera is connected with the car charger Recording videos Video light Exposure compensation Protecting videos from being overwritten during loop recording Taking photos Exposure compensation Playback Video playback functions Photo playback functions Menus Main menu The recording menus The playback menus Connectors and sockets Viewing recordings on a television Transferring recordings to a computer Connecting the Dashboard Camera to a Computer English - 3

6 Using a card reader Encoding videos for ios Replacing the car charger fuse Troubleshooting After use Storage when not using the product for a longer time Repairs Cleaning Conformity notes Environmental regulations and disposal information Warranty and Service Information English

7 Trademarks CR 1.0 A1 HDMI, the HDMI logo and High-Definition Multimedia Interface are trademarks or registered trademarks of HDMI Licensing, LLC in the USA and other countries. Microsoft Windows is a registered trademark of Microsoft Corporation, USA. SD and SDHC are registered trademarks. USB is a registered trademark. Apple is a registered trademark of Apple, Inc. IOS is a trademark or registered trademark in the US and other countries of Cisco Systems. Other names and products may be the trademarks or registered trademarks of their respective owners. Introduction Thank you for purchasing this CR 1.0 A1 Dashboard Camera, hereinafter referred to as the Dashboard Camera. The Dashboard Camera is the ideal vehicle companion. Not only can it record your trips but thanks to the G-sensor, it can also capture details in the event of a crash. Intended use The Dashboard Camera is a Consumer Electronics device and is designed exclusively for recording video and photos. Any use other than that mentioned above does not correspond to the intended use. The device may only be used for private purposes, not for industrial or commercial ones. This device fulfils all relevant standards and directives relating to the European Conformity Declaration. If any changes are made to the device other than those endorsed by the manufacturer, compliance with these standards and directives can no longer be guaranteed. Only use accessories recommended by the manufacturer. Observe the regulations and laws in the country of use. English - 5

8 Package Contents Remove all devices and accessories from the packaging. Remove the packaging material and screen protector and check whether all the parts are complete and undamaged. If you find anything missing or damaged, please contact the manufacturer. Keep the packaging material away from children and dispose of appropriately. CR 1.0 A1 Car mount USB cable Car charger User manual (lineart illustration) 6 - English

9 Technical specifications Dashboard Camera Display 960 x 240 pixels, 2.7 inch (6.9 cm) TFT LCD Video resolution 1920x1080, 25 fps 1440x1080, 30 fps 1280x720*, 30fps 640x480, 30 fps 848x480, 30 fps 320x240, 30 fps Image resolution Aspect ratio Zoom Light Interfaces 12M 4032x M 3648x2736 8M 3264x2448 5M 2592x1944 JPG 4x digital zoom 4 white LEDs HDMI output USB port for PC 3M 2048x1536 2MHD 1920x M 1280x960 VGA 640x480* CR 1.0 A1 Operating modes Video Recording, Motion Detection, Photo, Playback, PC Camera Storage media MicroSD card, 2 to 32 GB, class 6 minimum Functions Loop recording (3, 5, 10 minutes, Off) Motion Detection G-sensor Built-in battery Rechargeable Li-Ion battery, 3.7 V / 330 mah Charging function via USB interface Typical run time (video recording) with fully charged battery: 45 minutes Charging time approx. 1.5 hours (when powered off) and approx. 2 hours (when powered on) Operating 0 to 35 ºC, max. 85% relative humidity environment Storage environment -10 to 55 ºC, max. 85% relative humidity Dimensions 85.5 x 62 x 32 mm (W x H x D) Weight 70 g * native Dashboard Camera resolution. All other resolutions are interpolated. English - 7
 Motion")
10 CR 1.0 A1 Car charger Manufacturer Model name Input Outputt Fuse Charger cable length Targa GmbH Car Charger CR 1.0 A1 12 to 24 V, 350 ma 5 V, 600 ma T2A L, 250 V 200 cm The technical specifications and design can be changed without prior notice. Safety instructions Before you use this device for the first time, please read the following notes and heed all warnings, even iff you are familiarr with handling electronic devices. Keep these operating instructions in a safe place for future reference. If you selll the device or give it away, pass on the user manual at the same time. The User Manual is part of the product. Explanation of symbols In this user manual, warnings are used as follows. DANGER! This icon and the word DANGER alert you to a potentially dangerous situation. Ignoring it can lead to severe injury or even death. WARNING! This symbol and the word WARNING denote important information required for the safe operation of the product and for the safety of its users. Caution! This symbol and the word Caution denote importantt information that can lead to legal l actions when ignored. This symbol denotes further information on the topic. WARNING! Always make sure that the device is not exposed to direct heat sources (e.g. radiators) the device is not exposed to direct sunlight or bright artificial light the Dashboard Camera may be used within the allowed operating temperature range from f 0 C to 35 C only 8 - English

11 contact with water sprays or drops and corrosive liquids is avoided and the device is never operated near water; in particular the device may never be immersed in liquids (do not place any objects containing liquids, such as vases or drinks, on or near the device) the device is never placed near magnetic fields (e.g. speakers) no naked flames (e.g. burning candles) are placed on or near the device no foreign bodies can penetrate the device the device is not exposed to any extreme temperature fluctuations as this can cause moisture through condensation and cause short-circuits. If the device has been exposed to strong temperature variations, wait for it to reach the ambient temperature before switching it on (about 2 hours). the device should not be subjected to excessive shocks and vibrations the device and its accessories are not damaged in order to avoid any further risks. Therefore you must inspect the device and its accessories regularly for any damage. If you find any component damaged, it must not be used. Never open the Dashboard Camera housing and have all repairs performed by qualified technical stuff only. Failure to heed the warnings above may result in damage to the device or injury. DANGER! Children and persons with disabilities Electrical devices are not suitable for children. Also persons with reduced physical, sensory or mental capabilities should only use electrical devices within the limits of their abilities. Do not allow children or persons with disabilities to use electrical devices unsupervised, unless they are instructed accordingly and supervised by a competent person responsible for their safety. Children should always be supervised to ensure that they do not play with the product. Small parts can represent choking hazards. DANGER! Risk of suffocation! Keep small parts and packaging material away from children. Packaging material is no toy. Danger of suffocation! English - 9

12 Warning! Recordings (Photo/Video) of persons and the right to one's own image Please note that when recording any persons, whether portraits or groups of persons, every person has the right to her/his own image/recording. Recording underage people is subject to the consent of the parents. In order to avoid any legal measures, make sure to respect the legislation of the country of use. Furthermore, in some jurisdictions it may not be allowed to film or photograph any people (including car drivers and passengers as well as pedestrians, etc.) without telling them first that you are doing so. Please make sure to respect the privacy legislation of the country of use. DANGER! Using on the road Please note that using the camera on the road, whether driving a car, riding a bicycle or as a pedestrian may distract you from the traffic resulting in severe accidents. This may harm your health and/or result in legal actions. Also, using the Dashboard Camera may incur legal action in some countries. Please make sure to respect the legislation of the country of use. DANGER! Installation / Use in the Car Road safety first! In the event of an accident there is an increased risk of injury from flying objects. Always secure the Dashboard Camera so that the vehicle can be operated safely at all times and so that the driver's visibility is not impaired. Always position all cables in your vehicle so that they do not impede operation of your vehicle. When positioning the cables, take care to ensure that the cables do not limit your field of vision. Under no circumstances must the Dashboard Camera, or parts thereof (interface or power cables), be installed within the airbag deployment area. This constitutes a risk of accident and injury. DANGER! Battery Do not throw the Dashboard Camera into a fire. Otherwise there is risk of explosion. The built-in rechargeable battery cannot be removed for disposal English

13 DANGER! Risk of Explosion Improper use could cause explosions or leaks. DANGER! Screen Do not apply any pressure to the screen and keep sharp objects away from the display. A broken display represents a risk of injury. Wear gloves when collecting the broken parts and contact the manufacturer if necessary. Collect the broken parts in a suitable container. In the case of scratches or other damage to the screen, take extreme care to ensure that no fluid escapes from the screen. If fluid does escape, proceed as follows: If the fluid comes into contact with the skin, wipe off with a clean cloth and rinse with plenty of water. Contact a doctor if necessary. If the fluid comes into contact with the eyes, rinse them under running water for at least 15 minutes and contact a doctor immediately. If the fluid is swallowed, first rinse the mouth out with water and then drink plenty of water. Contact a doctor immediately! WARNING! Cables Unplug all cables by holding the plugs and never pull on the cables themselves. Never place pieces of furniture or other heavy objects on the cables and take care that they do not become damaged, especially at the plugs and sockets. Never tie knots in a cable and do not tie them to other cables. All cables must be laid so that nobody can trip over them or be obstructed by them. Copyright All the contents of this user manual are protected by copyright and provided to the reader for information only. Copying data and information without the prior explicit written consent of the author is strictly forbidden. This also applies to any commercial use of the contents and information. All texts and diagrams are up-to-date at the time of printing. English - 11

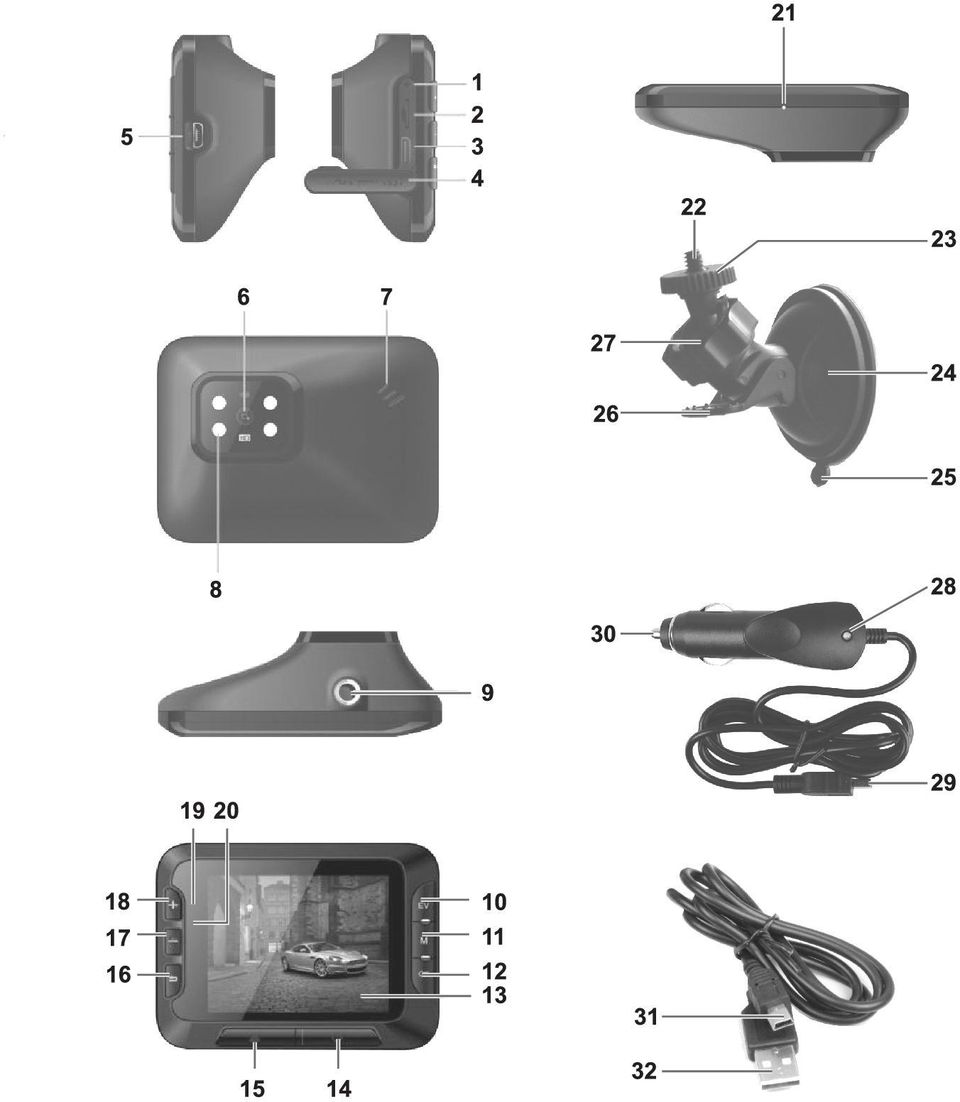
14 CR 1.0 A1 Overview An additional illustration of the items and controls and theirr corresponding numbers can be found on the inner page of the fold-out cover of this user manual. You can keep this page folded out whilst reading the different chapters of this user manual. This T allows you too refer to the relevant controls at any time. Left side 1. Reset switch 2. microsd card slot (labelled as "T-Flash" on the protective cover) 3. HDMI output 4. Protective cover Right side 5. USB/charging connector Front 6. Lens 7. Speaker 8. 4 white LEDs Top 9. Thread for car mount 12 - English
 3. HDMI output 4. Protective cover Right side 5. USB/charging connector Front 6.")
15 CR 1.0 A1 Back 10. EV button: adjusts the exposure value 11. Menu button: opens o the operating mode-specific settings 12. OK button 13. Display 14. On/Off button 15. Protect button: to protect the current video recording 16. Return button: opens o the main menu 17. button: decreases zoom / down navigation in the menu button: increases zoom / up navigation in the menu 19. Charge LED (orange) 20. Recording LED (blue) Bottom 21. Microphone Controls and displays Buttons Button EV button (10) Menu button (11) Function Press this button with video recording paused or in Photo mode to set the exposure value using the + (18) and (17) buttons and the OK button (12). Press this button with recording or playback paused and no menu displayed to open the settings menu associatedd with the current operating mode. English - 13
 Menu button (11) Function Press this button with video recording paused or in Photo mode to set the exposure value using the + (18) and")
16 OK button (12) On/Off button (14) Protect button (15) Return button (16) (17) and + (18) buttons LED indicators LED Charge LED (19) Recording LED (20) Press this button in Video mode to start or stop recording. Press this button in Photo mode to take a picture. Press this button while the menu is shown to select a menu item. Press and hold this button for at least 3 seconds to switch the Dashboard Camera on or off. Press this button during video recording to switch off the display. Video recording will continue. Press the button again to switch the display on again. Press this button in Photo mode to switch off the display. Press the button again to switch the display on again. Press this button during video recording to protect the current video and prevent it from being overwritten during loop recording. Press this button to display the main menu for operating mode selection. Press these buttons during video recording or photo capture to zoom in or out on the scene. Press these buttons with the Menu displayed to navigate between the various Menu options (up/down). Press these buttons with a value in the Menu selected to increase or decrease the value. Description Orange: charging battery Blue: device is being initialised (after switching on) Blue flashing: video recording in progress Blue flashing: Self-timer enabled in photo capture mode 14 - English

17 Before you start CR 1.0 A1 Inserting/removing the memory card You will need a microsd memory card (not included) to save your photos and videos. If a memory card is inserted, all the content recorded is saved onto it. If no memory card is inserted, recording will not be possible. In this case the message "PLEASE INSERT SD CARD" will appear. Confirm by pressing the OK button (12). Proceed as follows to insert a memory card: WARNING! Power the Dashboard Camera off before you insert or remove a memory card. Only use Speed Class 6 or faster memory cards. If you have not inserted a microsd memory card the message "PLEASE INSERT SD CARD" will appear when the device is switched on. 1. Open the protective cover (4) on the left--hand side of the Dashboard Camera. 2. Insert the memory card with the contacts facing towards the front of the device (towards the display (13)) into the microsd card slot (2) until it clicks in place. 3. Close the protective cover (4) on the left--hand side of the Dashboard Camera. To remove the memory card, gently press on the inserted card. The memory card will protrude a little so that you can get hold of it and remove it. Car mount The car mount allows the Dashboard Camera to be mounted on the windscreen of your vehicle. 1. Connect the Dashboard Camera to the car mount. To do this, screw the thread for the car mount (9) on to the car mount's threaded pin (22). You can use the knurled nut (23) to fix the Dashboard Camera in place. 2. Then press the suction pad (24) of the car mount against the windscreen and secure by pressing down the lever (26). English - 15

18 As the thread for the car mount (9) is located at the top of the Dashboard Camera, you should install the car mount such that the Dashboard Camera "hangs" off it (see adjacent image). Otherwise the controls (10 to 20) will be upside down. DANGER! Do not install the car mount (with or without the Dashboard Camera) within the operating area of the vehicle s airbag and install the car mount so that the driver s view is not obstructed. 3. Loosen the knurled screw (27) to line up the Dashboard Camera in the desired position with the help of the ball joint. Re-tighten the knurled screw (27). 4. To remove the car mount from the windscreen, flip the lever (26) up again and then pull on the release tab (25) on the suction pad. Charging the battery The Dashboard Camera battery can be charged via the USB port on a computer or with the car charger supplied. In addition to the options below, you can also connect the Dashboard Camera to an external USB power adapter (not supplied) and charge the Dashboard Camera that way. You can purchase a suitable 5V USB power adapter with at least 1A output current from any electronics retail outlet. WARNING! When using an external power adapter, it must be connected to an easily accessible wall outlet so that it can be disconnected quickly in case of an emergency English
 to line up the Dashboard Camera in the desired position with the help of the ball joint. Re-tighten the knurled screw (27). 4.")
19 Charging the battery with a USB cable 1. Use the USB cable to connect the Dashboard Camera to a USB port on your computer. Insert the small plug (30) of the supplied USB cable into the Dashboard Camera's USB/charge port (5) and the large plug (31) into a USB port on your computer. The Dashboard Camera will now turn on. Some computers do not supply USB power while they are turned off. If the Dashboard Camera does not charge, make sure your computer is switched on. 2. You will be asked to select the desired operating mode (Mass Storage or PC Camera). On first use we recommend you switch the device off initially, leave the battery to charge for a few hours and then define basic settings such as language, date and time etc. before performing further steps. To power the Dashboard Camera on, press and hold the On/Off button (14) for approx. 3 seconds. The charge LED (19) lights up orange while charging. Once charging is complete, the charge LED (19) goes out. Charging with the car charger WARNING! In order to protect your Dashboard Camera from any sudden voltage surges, connect the car charger after you have started your car engine. You can connect the car charger to a 12V or 24V cigarette lighter. 1. Plug the mini-usb connector (29) of the car charger into the USB/charge port (5) on the Dashboard Camera. 2. Then connect the car charger to a suitable cigarette lighter in your car. The Dashboard Camera will then switch on and loop recording will begin. If the cigarette lighter in your vehicle can be turned on with the ignition key, this will ensure that recording begins each time you start your vehicle's engine and thus all journeys will be recorded automatically. The charge LED (19) lights up orange while charging. Once charging is complete, the charge LED (19) goes out. If the charge LED (19) does not light up, you may need to replace the car charger fuse. For more on this, see "Replacing the car charger fuse" on page 41. WARNING! If your car's cigarette lighter does not switch off with the ignition key but supplies power all the time, the car battery discharges if you leave the Dashboard English - 17
.")
20 Camera turned on. Therefore, to avoid discharging the battery to a level where the engine cannot be started anymore, we recommend you to disconnect the car charger from the cigarette lighter of your car when leaving the car. Getting started Please charge the battery before first use of the device. Turning on the Dashboard Camera Press and hold the On/Off button (14) for at least 3 seconds to turn on the Dashboard Camera. Or, if you have connected the Dashboard Camera to your car's cigarette lighter using the car charger and this can be turned on and off with the ignition key, switch the ignition on to turn on the Dashboard Camera. In this case, loop recording will start automatically. Turning off the Dashboard Camera Press and hold the On/Off button (14) for at least three seconds to turn off the Dashboard Camera. Or, if you have connected the Dashboard Camera to your car's cigarette lighter using the car charger and this can be turned on and off with the ignition key, switch the ignition off to turn off the Dashboard Camera. The message "Shutting down..." will flash for approx. 30 seconds and the Dashboard Camera will turn off automatically. Setting the menu language The procedure described below only works when the Dashboard Camera is NOT connected to the computer with the USB cable. If necessary, first disconnect the USB cable from the USB/charge port (5) on the Dashboard Camera. 1. Power the device on by pressing and holding the On/Off button (14) for approx. 3 seconds. 2. Press the (17) or + (18) button several times until the "Setup" Menu is displayed. 3. Press the OK button (12) to open the "Setup" menu. 4. Press the (17) or + (18) button several times until the "Language" option is selected. 5. Press the OK button (12) to open the "Language" option English
 for at least 3 seconds to turn on the Dashboard Camera.")
21 6. Press the (17) or + (18) button several times to highlight the desired language and press OK (12) to confirm. 7. When finished, press the Return button (16) to show the main menu. Setting the date / time The procedure described below only works when the Dashboard Camera is NOT connected to the computer with the USB cable. If necessary, first disconnect the USB cable from the USB/charge port (5) on the Dashboard Camera. 1. Power the device on by pressing and holding the On/Off button (14) for approx. 3 seconds. 2. Press the (17) or + (18) button several times until the "Setup" Menu is displayed. 3. Press the OK button (12) to open the "Setup" menu. 4. Press the (17) or + (18) button several times until the "Date/Time" option is selected and press OK (12) to confirm. 5. Press the (17) or + (18) button several times to set the value currently selected and press the OK button (12) to apply it. The cursor skips to the next field where you can set the corresponding value. Repeat this procedure to set all values accordingly. 6. When finished, press the Menu button (11) to return to the Setup menu or press the Return button (16) to open the main menu. Turning on and selecting the operating mode Once you have switched the device on (hold down the On/Off button (14) for approx. 3 seconds), there are three scenarios depending on whether and how the Dashboard Camera battery is charged. Dashboard Camera is not being charged If the Dashboard Camera is not plugged in (USB or car charger) the "Loop recording" option from the main menu will appear after switching the device on. Select the "Loop recording" option in the main menu by pressing the OK button (12) to record video in loop recording mode. See also "Loop recording" on page 29. Video recording will now start immediately. Alternatively, using the (17) and + (18) buttons, select a different operating mode and confirm by pressing the OK button (12). English - 19
22 Dashboard Camera is connected to a PC with a USB cable If there is a USB cable connection from the PC to the Dashboard Camera, a selection menu appears after switching the device on for the "Mass Storage" and "PC Camera" options. When connected to a computer by cable, the Dashboard Camera can not be used as a video camera or digital (photo) camera, only as a mass storage device or webcam. Using the (17) and + (18) buttons, select the desired option and confirm by pressing the OK button (12). See also "Connecting the Dashboard Camera to a Computer" on page 40. Dashboard Camera is connected with the car charger If the Dashboard Camera is connected to the car charger and that in turn is connected to the live cigarette lighter in your vehicle, loop recording will start straight away after the device is switched on. Recording videos Once you have switched the device on and selected a video recording mode where applicable as described in the previous step, the Dashboard Camera can be used to record videos with or without the car mount while travelling. 1. If you are using the Dashboard Camera without the car mount, aim the Dashboard Camera at the desired subject with the help of the display (13). 2. Press the OK button (12) to start recording. The recording LED (20) will flash blue while recording. 3. If necessary, select a larger or smaller section of the image (zoom) using the + (18) and (17) buttons. Press the + (18) button to bring the subject closer or the button (17) to make the subject appear further away. 4. Press the OK button (12) to stop recording. The recording LED (20) will no longer flash. The video will be saved automatically under a unique name. During recording, different icons may appear on the display (13) informing you about the current settings English
23 CR 1.0 A1 A B C D E F G H 320x240 00:02:32 QVGA Video mode indicator Resolution in pixels: the possible values v are 320x240, 640x480, 848x480, 1280x720, 1440x1080, 1920x1080 Recording icon (flashes red while recording) This icon indicates that the current recording is protected and will not be overwritten. Recording time counter Resolution: the possible values aree QVGA, VGA, WVGA, 720P, 1080P and 1080FHD Audio icon: indicates whether or not n the video is being recorded with ( ) or without ( ) sound. Memory type: : an SD memory card is inserted and recordingss are being stored on it. : no SD memory card is inserted. English - 21
24 I Battery level : battery fully charged : battery 2/3 full : battery 1/3 full : battery almost empty J x4.0 Zoom indicator K 10:32:00 Current time L 12/12/2014 Current date Video light In dark environments you can enable the 4 built-in white LEDs (8). 1. During the video recording, press the OK button (12) to stop recording and then the Menu button (11) to bring up the menu for the current mode. 2. Using the (17) and + (18) buttons, select the "LED Light" option and confirm by pressing the OK button (12). 3. Using the (17) and + (18) buttons, select the "On" option and confirm by pressing the OK button (12) to turn on the video light. Alternatively, press the "Off" option and confirm by pressing the OK button (12) to switch off the video light. Once you have enabled the function, the video light will come on automatically when there is insufficient light. It will remain off in bright conditions to save the battery. Exposure compensation You can define an exposure compensation value for video recordings. 1. With video recording or photo capture paused, press the EV button (10) to bring up the exposure compensation menu. 2. Using the + (18) and (17) buttons, select the desired option and confirm by pressing the OK button (12). While making your selection the preview image on the display (13) will change in real time so that you can quickly see which exposure value is currently most suitable. You may choose an exposure value between 2 and + 2 in 1/3 exposure value increments. If the picture is too bright, select a negative value for exposure compensation. If the picture is too dark, select a positive value for exposure compensation English
25 Protecting videos from being overwritten during loop recording For the "Loop recording" mode, you can define a length of 3, 5 or 10 minutes for the video in the menu. After that recording time, a new video file is automatically created. As you record videos, the optional microsd memory card fills up. Once the storage space has been used up, the oldest video in the current recording is automatically overwritten. This ensures that recording is always possible, even when the storage space has actually all been used up. It may be however that you wish to keep a particular scene and prevent it from being overwritten. To do this, proceed as follows: During video recording, press the Protect current video button (15). Note that after the preset time of 3, 5 or 10 minutes, a new video will be recorded which will be treated as loop recording again (in other words open to being overwritten after the defined period of time). If you set the loop recording to "Off", videos can be recorded until the inserted microsd memory card is full. On the one hand, this guarantees that no existing recordings are overwritten, but on the other hand no new videos can be recorded. Taking photos Once you have switched the device on, as described in the "Turning on and selecting the operating mode" section on page 19, and selected photo capture mode, you can take photos with or without the car mount during your journey. 1. If you are using the Dashboard Camera without the car mount, aim the Dashboard Camera at the desired subject with the help of the display (13). 2. If necessary, select a larger or smaller section of the image (zoom) using the + (18) and (17) buttons. Press the + (18) button to bring the subject closer or the button (17) to make the subject appear further away. 3. Press the OK button (12) to take the photo. The image will be saved automatically under a unique name. During recording, different icons may appear on the display (13) informing you about the current settings. English - 23
26 CR 1.0 A1 A B C D E F G H I M x4.0 Photo mode indicator Self-timer indicator Continuous shooting indicator Remaining number of pictures Resolution: The possible values aree 12M, 10M, 8M, 5M, 3M, 2MHD, 1.3M and VGA Quality indicator Memory type: : an SD memory card is inserted and recordingss are being stored on it. : no SD memory card is inserted. Battery level : battery fully charged : battery 2/ /3 full : battery 1/ /3 full : battery almost empty Zoom indicator 24 - English
27 Exposure compensation You can define an exposure compensation value for photo capture. 1. With "Photo" mode selected, press the EV button (10) to bring up the exposure compensation menu. 2. Using the + (18) and (17) buttons, select the desired option and confirm by pressing the OK button (12). While making your selection the preview image on the display (13) will change in real time so that you can quickly see which exposure value is currently most suitable. You may choose an exposure value between 2 and + 2 in 1/3 exposure value increments. If the picture is too bright, select a negative value for exposure compensation. If the picture is too dark, select a positive value for exposure compensation. Playback You can play back your recorded videos and photos on the screen to check if the results are satisfactory. The recordings can also be played back on an HDMI-ready television (see also "Viewing recordings on a television" on page 39). To be able to play back the videos and photos, you must select the "Playback" option in the main menu: 1. Power the Dashboard Camera on by pressing and holding the On/Off button (14) for approx. 3 seconds. 2. Press the + (18) or (17) button several times until the "Playback" Menu is displayed. 3. Press the OK button (12) to enable Playback mode. The last recorded file (video or photo) will now appear. 4. Press the + (18) or (17) button several times until the recording you wish to play is selected. If the selected recording is a video, the icon will appear at the top left of the screen. If the selected recording is a photo, the icon will appear at the top left of the screen. 5. For video files, press the OK button (12) to start playback. Video playback functions The following functions are available while playing videos (a toolbar is shown at the bottom of the screen with a guide to the available functions): Pause: Press the OK button (12) to temporarily pause playback. Press the OK button (12) again to continue playback. English - 25
28 Fast forward/rewind: During playback, press the button (17) multiple times to rewind the video. Rewind speed will be increased as follows each time the button is pressed: -2x, -4x, -8x. To return to normal playback speed, press the + button (18) as many times as necessary. During playback, press the + button (18) multiple times to fast forward the video. Playback speed will be increased as follows each time the button is pressed: 2x, 4x, 8x. To return to normal playback speed, press the button (17) as many times as necessary. In playback mode you will see further information on the display: A B C D - + E F G A B Symbol Video playback H Description Protected video. This video will not be overwritten during loop recording. C First 3 numbers of the storage folder sequential number of the recording D 00:00:08 Current playback time E 14/12/20 Recording date F 09:21 Time of the recording 26 - English
29 G H Battery level : battery fully charged : battery 2/3 full : battery 1/3 full : battery almost empty Help bar for playback controls CR 1.0 A1 When video playback is paused, the following functions are available and can be shown via the Menu button (11) and selected using the (17) and + (18) buttons. Delete This option allows you to delete the video currently being displayed or all saved videos. See also "Delete" on page 37. Protect Here you can protect one or more videos to prevent accidental deletion or unprotect them. See also "Protect" on page 38. Slide Show This function allows you to play all captured photos in sequence like a slideshow. To do so, select the desired display time for each image (2, 5 or 8 seconds) in this menu. See also "Slide Show" on page 38. Photo playback functions During photo playback, the following functions are available and can be shown for a displayed image via the Menu button (11) and selected using the + (18) and (17) buttons. Delete This option allows you to delete the currently displayed image or all saved images. See also "Delete" on page 37. Protect Here you can protect one or more photos to prevent accidental deletion or unprotect them. See also "Protect" on page 38. Slide Show This function allows you to play all captured photos in sequence like a slideshow. To do so, select the desired display time for each image (2, 5 or 8 seconds) in this menu. See also "Slide Show" on page 38. During photo playback you will see further information on the display: English - 27
30 A B C D E F G A B Symbol Photo playback Description Protected image. This photo can not be deleted. C First 3 numbers of the storage folder sequential number of the recording D 3648x2736 Resolution E 14/12/20 Recording date F 09:25 Time of the recording G Battery level : battery fully charged : battery 2/3 full : battery 1/3 full : battery almost empty 28 - English
31 Menus CR 1.0 A1 The Dashboard Camera has various menus that provide various settings for the different modes. There is also a setup menu allowing you to set the preferences for your Dashboard Camera. Main menu In the main menu you can access the desired recording function, playback function and the Setup menu for your Dashboard Camera. There is also a flashlight function available here so that the Dashboard Camera can be used as a light in the dark. 1. Power the Dashboard Camera on by pressing and holding the On/Off button (14) for approx. 3 seconds. 2. If the Dashboard Camera is connected to the car charger, press the OK button (12) to stop recording and then the Return button (16) to show the main menu. Otherwise, continue with step Press the + (18) or (17) button several times to select the desired function. 4. Press the OK button (12) to enable the selected function. The available functions are described in the sections below. Loop recording Loop recording is a function in which video clips of a certain length (e.g. 5 minutes) are recorded. After that recording time, a new video file is automatically created. As you record videos, the optional microsd memory card fills up. Once the storage space has been used up, the oldest video in the current recording is automatically overwritten. This ensures that recording is always possible, even when the storage space has actually all been used up. In this mode, you should ensure that any recordings you wish to keep are either protected (see "Protecting videos from being overwritten during loop recording" on page 23) or transferred to a different storage medium (e.g. your PC, see "Transferring recordings to a computer" on page 39). 1. Power the Dashboard Camera on by pressing and holding the On/Off button (14) for approx. 3 seconds. 2. If the Dashboard Camera is connected using the car charger, press the Return button (16) to display the main menu. Otherwise, continue with step Press the + (18) or (17) button several times to select the "Loop recording" function. 4. Press the OK button (12) to enable loop recording. English - 29
32 Photo In this mode your Dashboard Camera acts like a conventional digital camera that you can take photos with. Further information can be found in the "Photo capture menu" section on page 35 and the "Taking photos" section on page Power the Dashboard Camera on by pressing and holding the On/Off button (14) for approx. 3 seconds. 2. If the Dashboard Camera is connected using the car charger, press the Return button (16) to display the main menu. Otherwise, continue with step Press the + (18) or (17) button several times to select the "Photo" function. 4. Press the OK button (12) to enable the camera function. Motion Detection Motion detection is a memory-saving alternative of having videos recorded automatically. This can be useful, e.g. when you have parked your vehicle but still want any parking cars to be filmed in case they dent your number plate with their tow bar while reversing. Videos recorded via motion detection will be saved in folders named "nnnneven" where nnnn is a 4-digit number. 1. Power the Dashboard Camera on by pressing and holding the On/Off button (14) for approx. 3 seconds. 2. If the Dashboard Camera is connected using the car charger, press the Return button (16) to display the main menu. Otherwise, continue with step Press the + (18) or (17) button several times to select the "Motion Detection" function. 4. Press the OK button (12) to enable motion detection. Playback You can play back your recorded videos and photos on the screen to check if the results are satisfactory. You can also play back the recorded videos on a computer or a television. See also "Transferring recordings to a computer" on page 39 and "Viewing recordings on a television" on page Power the Dashboard Camera on by pressing and holding the On/Off button (14) for approx. 3 seconds. 2. If the Dashboard Camera is connected using the car charger, press the Return button (16) to display the main menu. Otherwise, continue with step English
33 3. Press the + (18) or (17) button several times to select the "Playback" function. 4. Press the OK button (12) to enable the playback function. Further information can be found in the "Playback" section on page 25 and in "The playback menus" section on page 37. FlashLight Thanks to your Dashboard Camera's 4 white LEDs (8), the device can also be used as a flashlight. How to switch the 4 white LEDs (8) on or off: 1. Power the Dashboard Camera on by pressing and holding the On/Off button (14) for approx. 3 seconds. 2. If the Dashboard Camera is connected using the car charger, press the Return button (16) to display the main menu. Otherwise, continue with step Press the + (18) or (17) button several times to select the "FlashLight" function. 4. Press the OK button (12), select the desired option by pressing the button (17) and then press the OK button (12) to confirm: Off: Turns the flashlight function off. Always Bright: Turns the flashlight function on. One Second Flash: Turns the flashlight function on. The 4 white LEDs (8) then flash once a second. This mode saves the battery. If you have enabled the "Auto Power Off" option in the "Setup" menu, the flashlight will also power off after the set time. Setup The setup menu contains basic settings for your Dashboard Camera. These include date and time, idle time before automatic shutdown (power-saving function), key press confirmation sound, onscreen menu language, image rotation, formatting function for the inserted SD memory card, factory settings restore and firmware version information. Setting Description Date/Time Set the date and time (see also "Setting the date/time" on page 19). Auto Power Off You can set the device to power off automatically after a certain time to save power. If no buttons are pressed during the preset time, the device powers off automatically. The Dashboard Camera can then be switched on again using the On/Off button (14). English - 31
34 You can choose between the power-off times of 1 minute, 3 minutes or disable the automatic power-off function. Beep Sound Here you can set whether or not the device makes a sound every time you press a button. This option also enables or disables the power-on sound at the same time. Language Select the desired display menu language (see also "Setting the menu language" on page 18). Frequency Select the mains frequency to avoid any interference from fluorescent lighting. A mains frequency of 50 Hz is used across Europe; in America the mains uses a frequency of 60 Hz. Image rotation This function allows you to rotate the image by 180. Format This function lets you delete all contents from your memory card (optional accessory) and renew the file saving structure on your card (formatting). Warning! All saved videos and pictures will be erased and cannot be restored. This also applies to protected files. Make sure that all recordings you want to keep have been backed up to a different storage medium. Default Setting All device parameters will be reset to their factory-default values. This does not erase any data from your memory card. Version This function displays your Dashboard Camera's current firmware version. You might need this information when contacting customer services for example. The recording menus Video recording menu The video recording menu allows you to set the different video recording parameters. How to open the video recording menu: 1. Power the device on by pressing and holding the On/Off button (14) for approx. 3 seconds. 2. By default, the "Loop recording" option appears. Press the OK button (12) to select it or, if the Dashboard Camera is connected to the car charger, wait a few seconds for the "Loop recording" mode to be enabled automatically. 3. Press the OK button (12) to stop video recording. 4. Press the Menu button (11) to display the Video Recording menu English
35 5. Use the (17) and + (18) buttons to adjust the desired settings (see below) and press OK (12). 6. Press the Menu button (11) again to hide the menu. The following sections contain a description of the different parameters available in the video recording menu. Resolution The resolution determines the size of the recording in pixels. As a general rule: the higher the resolution, the more storage space is required. Your Dashboard Camera supports recording in modern wide-screen format. However, not all of the resolutions available offer a 16:9 aspect ratio. With the 1140x1080P, QVGA and VGA settings, the aspect ratio is 4:3. The following settings are available: Resolution Description QVGA 320x240 Low quality (recommended for Internet applications) VGA 640x480 VGA screen quality WVGA 848x480 Normal quality 1280x720P Average quality 1440x1080P High quality 1920x1080P Very high quality Loop recording The loop recording time can be defined here. After the preset time a new video file will be created. Loop recording Description Off Disables loop recording (i.e. recording stops when the memory card is full and no older files are overwritten). A new video file is automatically created after 10 minutes. To stop the recording, you must press the OK button (12) recording will not stop automatically after a certain time. 3 mins. A maximum of 3 minutes will only ever be recorded per video. After that a new video file is created automatically. 5 mins. A maximum of 5 minutes will only ever be recorded per video. After that a new video file is created automatically. 10 mins. A maximum of 10 minutes will only ever be recorded per video. After that a new video file is created automatically. English - 33
36 CR 1.0 A1 G-sensor Your Dashboard Camera features a G-sensor which reactss to vibrations or impacts. If a crash is detected, the Dashboard Camera automatically saves the current video sequence to a folder named "nnnneven" where nnnn is a 4-digit number. This video sequence is protected automatically. In other words, it will not be overwritten. You can define the sensitivity of the G-sensor here. Select "Low"" for a low sensitivity, "Middle"" for an average sensitivity and "High" for a higher sensitivity. Or select Off to disable the G-sensor. Make sure the Dashboard Camera is switched on and already in "Loop recording" mode so that t a video of any potential accident scene can be recorded. Whenever the G-sensor detectsts an impact, the current video recording is protected. This is represented by the icon on top of the display (13). Record Audio Use this option to define whether or not the video will be recorded with soundd or not. The available options are "On" or "Off". Date Stamp Use this option to define whether or not the date and time should be recordedd with the video. The available options are "On" or "Off". Auto display off Use this option to definee whether the display should be switched off automatically if no buttons are pressed for a certain amount of time. The available options are "On" or "Off". If this option is enabled, the display will switch off automatically after approx. 30 seconds. To turn it back on, briefly press the On/ /Off button (14) again. LED Light Enable the LED light to obtain properly exposed recordings even in dark environments. This improves the quality of any night recordings. The available options are "On" or "Off" English
37 When LED light is enabled, the light will switch on automatically when required (when the ambient light is insufficient). Photo capture menu The photo capture menu allows you to set the different still image recording parameters. How to open the photo capture menu: 1. Power the device on by pressing and holding the On/Off button (14) for approx. 3 seconds. 2. By default, the "Loop recording" option appears. Press the + (18) or (17) button several times, select the "Photo" menu option and press OK (12) to open it. 3. Press the Menu button (11) to open the still image recording menu. 4. Use the (17) and + (18) buttons to adjust the desired settings (see below) and press OK (12). 5. Press the Menu button (11) again to hide the menu. The following sections contain a description of the different parameters available in the still image capture menu. Capture Mode This allows you to define whether you wish to capture images with the Dashboard Camera normally or using the self-timer. The delay times of 2 seconds, 5 seconds or 10 seconds are available for the self-timer. When the self-timer is enabled, the, or icon will be shown at the top of the display (13) depending on the delay time selected Resolution The resolution determines the size of the recording in pixels. As a general rule: the higher the resolution, the more storage space is required. The following settings are available: Resolution Description 12M 4032x3024 Very high quality 10M 3648x2736 High quality 8M 3264x2448 Very good quality 5M 2592x1944 Good quality 3M 2048x1536 Average quality 2MHD 1920x1080 PC widescreen quality 1.3M 1280x960 Low quality VGA 640x480 VGA screen quality English - 35
38 Sequence When this function is enabled ("On" option), you can press the OK button (12) while capturing images to take 5 consecutive photos. Alternatively, select "Off" to only ever take a single image. Quality The Quality setting determines the compression ratio of the captured image when saved onto the memory card. The higher the compression, the more pictures can be stored. You can capture images using the quality presets Economy, Normal and High. Select the appropriate option. The selected setting will be shown on the right of the display (13) as follows during capture: Quality Description Fine Normal Economy Quick Review Quick Review allows you to check that capture was successful immediately after capturing a still image. When you enable the function the captured image will be shown on the display (13) for 2 or 5 seconds depending on the set value. Alternatively, select "Off" to return to the live view immediately after capture. Date Stamp This function allows you to mark each image with the current date. The following settings are available: Setting Description Off Images will not be given a date stamp. Date Images will be marked with the current date. Date/Time Images will be marked with the current date and time English
39 The playback menus The following sections contain a description of the different parameters available in the playback menu. In addition to display options, it also contains functions to protect and delete your videos and still images. 1. Power the Dashboard Camera on by pressing and holding the On/Off button (14) for approx. 3 seconds. 2. Press the + (18) or (17) button several times until the "Playback" Menu is displayed. 3. Press the OK button (12) to enable playback mode. The last recorded file (video or photo) will now appear. 4. Press the + (18) or (17) button several times until the recording you wish to play is selected. If the selected recording is a video, the icon will appear at the top left of the screen. If the selected recording is a photo, the icon will appear at the top left of the screen. 5. Press the Menu button (11) to show the playback menu. 6. Press the + (18) or (17) button several times to select the desired function and press the OK button (12) to execute it or display the available options. The available options are described in the sections below. The options in the playback menu are virtually identical for both videos and still images. To open the menu for videos, playback must be stopped (do not start video playback). Delete This option allows you to delete the currently displayed video or image or all saved videos and images. 1. Perform steps 1 to 5 under "The playback menus" (see page 37). 2. Press the + (18) or (17) button several times to select the "Delete" function and press the OK button (12) to display the available options. Delete Current: Use this option to delete the currently selected video or still image. After selecting this option, confirm with the OK button (12). A safety prompt appears. Select the "OK" option and confirm the deletion by pressing the OK button (12). Delete All: Use this option to delete all saved videos and still images at once. After selecting this option, confirm with the OK button (12). A safety prompt appears. Select the "OK" option and confirm the deletion by pressing the OK button (12). Protected recordings can not be deleted with this function. See also the "Protect" section below. English - 37
KOM0774. Owner s manual EN. Car DVR Instrukcja obsługi PL
 KOM0774 Owner s manual EN Car DVR Instrukcja obsługi PL Owner s manual Instruction to keys function 1 USB Interface 2 On/Off key 3.5V power input jack 4 SD/MMC card slot 5 Speaker 6 Bracket hole 7 MIC
High Definition Car Video Recorder Quer. Operation Manual KOM0474
 High Definition Car Video Recorder Quer Operation Manual KOM0474 EN Instruction to Keys Function 1 USB Interface 2 On/Off key 3.5V power input jack 4 SD/MMC card slot 5 Speaker 6 Bracket hole 7 MIC 8 Battery
Camspot 4.4 Camspot 4.5
 User manual (addition) Dodatek do instrukcji obsługi Camspot 4.4 Camspot 4.5 1. WiFi configuration 2. Configuration of sending pictures to e-mail/ftp after motion detection 1. Konfiguracja WiFi 2. Konfiguracja
Jazz EB207S is a slim, compact and outstanding looking SATA to USB 2.0 HDD enclosure. The case is
 1. Introduction Jazz EB207S is a slim, compact and outstanding looking SATA to USB 2.0 HDD enclosure. The case is made of aluminum and steel mesh as one of the coolest enclosures available. It s also small
DO MONTAŻU POTRZEBNE SĄ DWIE OSOBY! INSTALLATION REQUIRES TWO PEOPLE!
 1 HAPPY ANIMALS B09 INSTRUKCJA MONTAŻU ASSEMBLY INSTRUCTIONS Akcesoria / Fittings K1 M M1 ZM1 Z T G1 17 szt. / pcs 13 szt. / pcs B1 13 szt. / pcs W4 13 szt. / pcs W6 14 szt. / pcs U1 1 szt. / pcs U N1
USB firmware changing guide. Zmiana oprogramowania za przy użyciu połączenia USB. Changelog / Lista Zmian
 1 / 9 Content list / Spis Treści 1. Hardware and software requirements, preparing device to upgrade Wymagania sprzętowe i programowe, przygotowanie urządzenia do aktualizacji 2. Installing drivers and
USB firmware changing guide. Zmiana oprogramowania za przy użyciu połączenia USB. Changelog / Lista Zmian
 1 / 12 Content list / Spis Treści 1. Hardware and software requirements, preparing device to upgrade Wymagania sprzętowe i programowe, przygotowanie urządzenia do aktualizacji 2. Installing drivers needed
User s manual for icarwash
 User s manual for icarwash BKF Myjnie Bezdotykowe Sp. z o.o. Skarbimierzyce 22 72 002 Dołuje (k. Szczecina) Skarbimierzyce, 2014.11.14 Version v0.2 Table of Contents Table of Contents Settings Login Navigation
 www.irs.gov/form990. If "Yes," complete Schedule A Schedule B, Schedule of Contributors If "Yes," complete Schedule C, Part I If "Yes," complete Schedule C, Part II If "Yes," complete Schedule C, Part
LED WASHER 30x3W WHITE IP65 F
 USER MANUAL / INSTRUKCJA OBSŁUGI LED WASHER 30x3W WHITE IP65 F7200171 LED WASHER 30x3W WHITE IP65 F7200171 Table of contents 1 Introduction... 2 2 Safety information... 2 3 Product information... 2 3.1
USB firmware changing guide. Zmiana oprogramowania za przy użyciu połączenia USB. Changelog / Lista Zmian
 1 / 14 Content list / Spis Treści 1. Hardware and software requirements, preparing device to upgrade Wymagania sprzętowe i programowe, przygotowanie urządzenia do aktualizacji 2. Installing drivers and
BLACKLIGHT SPOT 400W F
 BLACKLIGHT SPOT 400W F2000339 USER MANUAL / INSTRUKCJA OBSŁUGI BLACKLIGHT SPOT 400W F2000339 Table of Contents 1 Introduction... 2 2 Safety information... 2 3 Product information... 2 3.1 Specification...
Rev Źródło:
 KamPROG for AVR Rev. 20190119192125 Źródło: http://wiki.kamamilabs.com/index.php/kamprog_for_avr Spis treści Introdcution... 1 Features... 2 Standard equipment... 4 Installation... 5 Software... 6 AVR
DO MONTAŻU POTRZEBNE SĄ DWIE OSOBY! INSTALLATION REQUIRES TWO PEOPLE!
 1 HAPPY ANIMALS SZ11 A INSTRUKCJA MONTAŻU ASSEMBLY INSTRUCTIONS Akcesoria / Fittings K1 M M1 ZM1 Z G1 szt. / pcs 0 szt. / pcs B1 6 szt. / pcs 6 szt. / pcs W6 0 szt. / pcs U1 19 szt. / pcs U 50 szt. / pcs
DO MONTAŻU POTRZEBNE SĄ DWIE OSOBY! INSTALLATION REQUIRES TWO PEOPLE!
 HAPPY ANIMALS RW08 INSTRUKCJA MONTAŻU ASSEMBLY INSTRUCTIONS Akcesoria / Fittings K M M ZM ZW G 0 szt. / pcs W szt. / pcs B szt. / pcs szt. / pcs W U 8 szt. / pcs 4 szt. / pcs U N szt. / pcs Ø3 x szt. /
INSTRUCTION MANUAL. Strona 1
 INSTRUCTION MANUAL www.flash-butrym.pl Strona 1 LED SPOT LIGHT INSTRUCTION MANUAL Thank you for purchasing the LEDSPOT10W Spot light. It is a small and easy to carry unit that is simple to install. Features:
HAPPY K04 INSTRUKCJA MONTAŻU ASSEMBLY INSTRUCTIONS DO MONTAŻU POTRZEBNE SĄ DWIE OSOBY! INSTALLATION REQUIRES TWO PEOPLE! W5 W6 G1 T2 U1 U2 TZ1
 HAPPY K0 INSTRUKCJA MONTAŻU ASSEMBLY INSTRUCTIONS W Akcesoria / Fittings W W G K szt. / pcs M Ø Ø 0 Ø, Ø Ø. 0 ø8 M 8 szt. / pcs 0 szt. / pcs szt. / pcs T U U szt. / pcs szt. / pcs szt. / pcs S TZ szt.
Installation of EuroCert software for qualified electronic signature
 Installation of EuroCert software for qualified electronic signature for Microsoft Windows systems Warsaw 28.08.2019 Content 1. Downloading and running the software for the e-signature... 3 a) Installer
Zakopane, plan miasta: Skala ok. 1: = City map (Polish Edition)
") Zakopane, plan miasta: Skala ok. 1:15 000 = City map (Polish Edition) Click here if your download doesn"t start automatically Zakopane, plan miasta: Skala ok. 1:15 000 = City map (Polish Edition) Zakopane,
Zakopane, plan miasta: Skala ok. 1:15 000 = City map (Polish Edition) Click here if your download doesn"t start automatically Zakopane, plan miasta: Skala ok. 1:15 000 = City map (Polish Edition) Zakopane,
Selfie Monopod MA426. Instrukcja obsługi User s Manual
 Selfie Monopod MA426 Instrukcja obsługi User s Manual PL Selfie Monopod Przeczytaj wszystkie instrukcje przed użyciem oraz zachowaj te informacje do wykorzystania w przyszłości. Zestaw: 1x mobile phone
HAPPY ANIMALS L01 HAPPY ANIMALS L03 HAPPY ANIMALS L05 HAPPY ANIMALS L07
 HAPPY ANIMALS L0 HAPPY ANIMALS L0 HAPPY ANIMALS L0 HAPPY ANIMALS L07 INSTRUKCJA MONTAŻU ASSEMBLY INSTRUCTIONS Akcesoria / Fittings K ZW W8 W7 Ø x 6 szt. / pcs Ø7 x 70 Narzędzia / Tools DO MONTAŻU POTRZEBNE
HAPPY ANIMALS L02 HAPPY ANIMALS L04 HAPPY ANIMALS L06 HAPPY ANIMALS L08
 HAPPY ANIMALS L02 HAPPY ANIMALS L04 HAPPY ANIMALS L06 HAPPY ANIMALS L08 INSTRUKCJA MONTAŻU ASSEMBLY INSTRUCTIONS Akcesoria / Fittings K O G ZW W8 W4 20 szt. / pcs 4 szt. / pcs 4 szt. / pcs 4 szt. / pcs
 www.irs.gov/form990. If "Yes," complete Schedule A Schedule B, Schedule of Contributors If "Yes," complete Schedule C, Part I If "Yes," complete Schedule C, Part II If "Yes," complete Schedule C, Part
Tuber radio BT MA407. Instrukcja obsługi User s Manual
 Tuber radio BT MA407 Instrukcja obsługi User s Manual User s Manual MA407 INSTRUCTIONS...4 BASIC...4 TROUBLESHOOTING...5 DATA TRANSFERRING / CHARGING VIA USB CABLE...5 INTERFACES...5 SPECIFICATIONS...6
LED MAGIC BALL MP3 F
 USER MANUAL / INSTRUKCJA OBSŁUGI LED MAGIC BALL MP3 F7000623 LED MAGIC BALL MP3 F7000623 Table of contents 1 Introduction... 2 2 Safety information... 2 3 Product information... 2 3.1 Specification...
SSW1.1, HFW Fry #20, Zeno #25 Benchmark: Qtr.1. Fry #65, Zeno #67. like
 SSW1.1, HFW Fry #20, Zeno #25 Benchmark: Qtr.1 I SSW1.1, HFW Fry #65, Zeno #67 Benchmark: Qtr.1 like SSW1.2, HFW Fry #47, Zeno #59 Benchmark: Qtr.1 do SSW1.2, HFW Fry #5, Zeno #4 Benchmark: Qtr.1 to SSW1.2,
Strona główna > Produkty > Systemy regulacji > System regulacji EASYLAB - LABCONTROL > Program konfiguracyjny > Typ EasyConnect.
 Typ EasyConnect FOR THE COMMISSIONING AND DIAGNOSIS OF EASYLAB COMPONENTS, FSE, AND FMS Software for the configuration and diagnosis of controllers Type TCU3, adapter modules TAM, automatic sash device
Tychy, plan miasta: Skala 1: (Polish Edition)
") Tychy, plan miasta: Skala 1:20 000 (Polish Edition) Poland) Przedsiebiorstwo Geodezyjno-Kartograficzne (Katowice Click here if your download doesn"t start automatically Tychy, plan miasta: Skala 1:20 000
Tychy, plan miasta: Skala 1:20 000 (Polish Edition) Poland) Przedsiebiorstwo Geodezyjno-Kartograficzne (Katowice Click here if your download doesn"t start automatically Tychy, plan miasta: Skala 1:20 000
USB 306/307 Modem. Quick Start Guide Pierwsze kroki. www.sierrawireless.com
 USB 306/307 Modem Quick Start Guide Pierwsze kroki www.sierrawireless.com Welcome to the USB 306/307 modem Your package contains: USB 306/307 modem with TRU-Install This Quick Start Guide USB extension
Aktualizacja Oprogramowania Firmowego (Fleszowanie) Microprocessor Firmware Upgrade (Firmware downloading)
 Microprocessor Firmware Upgrade (Firmware downloading)") Aktualizacja Oprogramowania Firmowego (Fleszowanie) Microprocessor Firmware Upgrade (Firmware downloading) ROGER sp.j. Gościszewo 59 82-416 Gościszewo Poland tel. 055 2720132 fax 055 2720133 www.roger.pl
Aktualizacja Oprogramowania Firmowego (Fleszowanie) Microprocessor Firmware Upgrade (Firmware downloading) ROGER sp.j. Gościszewo 59 82-416 Gościszewo Poland tel. 055 2720132 fax 055 2720133 www.roger.pl
Instrukcja konfiguracji usługi Wirtualnej Sieci Prywatnej w systemie Mac OSX
 UNIWERSYTETU BIBLIOTEKA IEGO UNIWERSYTETU IEGO Instrukcja konfiguracji usługi Wirtualnej Sieci Prywatnej w systemie Mac OSX 1. Make a new connection Open the System Preferences by going to the Apple menu
[ROBOKIDS MANUAL] ROBOROBO
![[ROBOKIDS MANUAL] ROBOROBO](/thumbs/24/4313056.jpg "[ROBOKIDS MANUAL] ROBOROBO") 1 2 When you plug in or unplug the cable, be sure to insert pressing the hook of the connection cable. If you want to input the program to your robot, you should first connect the Card reader with the
1 2 When you plug in or unplug the cable, be sure to insert pressing the hook of the connection cable. If you want to input the program to your robot, you should first connect the Card reader with the
Stargard Szczecinski i okolice (Polish Edition)
") Stargard Szczecinski i okolice (Polish Edition) Janusz Leszek Jurkiewicz Click here if your download doesn"t start automatically Stargard Szczecinski i okolice (Polish Edition) Janusz Leszek Jurkiewicz
Stargard Szczecinski i okolice (Polish Edition) Janusz Leszek Jurkiewicz Click here if your download doesn"t start automatically Stargard Szczecinski i okolice (Polish Edition) Janusz Leszek Jurkiewicz
Car MP3 Player MM211. Aby zapewnić prawidłową obsługę sprzętu zapoznaj się dokładnie z instrukcją i zachowaj ją na przyszłość.
 Car MP3 Player MM211 Aby zapewnić prawidłową obsługę sprzętu zapoznaj się dokładnie z instrukcją i zachowaj ją na przyszłość. To ensure proper use of this product please read this User s Manual carefully
DI-514 2.4GHz Wireless Router
 This product can be set up using any current web browser, i.e., Internet Explorer 6 or Netscape Navigator 6.2.3. DI-514 2.4GHz Wireless Router Before You Begin 1. If you purchased this router to share
USB 2.0 cable Tool package (Screwdriver*1+ Screw for aluminum body*3 + Screws for HDD and the PCB board*5) User s manual Carry Bag
 User s manual Carry Bag") User s Manual Page 1 A. Package Content Brick EB208S HDD Enclosure USB 2.0 cable Tool package (Screwdriver*1+ Screw for aluminum body*3 + Screws for HDD and the PCB board*5) User s manual Carry Bag B.
User s Manual Page 1 A. Package Content Brick EB208S HDD Enclosure USB 2.0 cable Tool package (Screwdriver*1+ Screw for aluminum body*3 + Screws for HDD and the PCB board*5) User s manual Carry Bag B.
Zasady bezpieczeństwa
 2 3 Zasady bezpieczeństwa GB The door and the feeding flap must be closed when operating the machine! PL Drzwiczki i klapka szczeliny podawczej muszą być zamknięte w trakcie używania urządzenia! GB Ensure
LED PAR 56 7x10 4in1 RGBW F
 USER MANUAL / INSTRUKCJA OBSŁUGI LED PAR 56 7x10 4in1 RGBW F7100311 LED PAR 56 7x10W 4in1 RGBW F7100311 Table of Contents 1 Introduction... 2 2 Safety information... 2 3 Product information... 2 3.1 Specification...
 !850016! www.irs.gov/form8879eo. e-file www.irs.gov/form990. If "Yes," complete Schedule A Schedule B, Schedule of Contributors If "Yes," complete Schedule C, Part I If "Yes," complete Schedule C,
ORIGINAL USER MANUAL. Remote Control Z-Wave NC 896-GB IU/ZRH12/ /F
 WARRANTY The manufacturer guarantees correct device functioning. It also undertakes to repair or replace faulty device if damage is a result of material or structural faults. The warranty period is 2 months
Karpacz, plan miasta 1:10 000: Panorama Karkonoszy, mapa szlakow turystycznych (Polish Edition)
") Karpacz, plan miasta 1:10 000: Panorama Karkonoszy, mapa szlakow turystycznych (Polish Edition) J Krupski Click here if your download doesn"t start automatically Karpacz, plan miasta 1:10 000: Panorama
Karpacz, plan miasta 1:10 000: Panorama Karkonoszy, mapa szlakow turystycznych (Polish Edition) J Krupski Click here if your download doesn"t start automatically Karpacz, plan miasta 1:10 000: Panorama
POWER BANK KM0209-KM0211
 Bedienungsanleitung POWER BANK KM0209-KM0211 OWNER S MANUAL INSTRUKCJA OBSŁUGI PL EN Owner s manual SAFETY INFORMATION Before use, read this manual carefully and follow its instructions. Producer does
user s manual Applications client for mobile devices NVR-5000 series NVR s
 user s manual Applications client for mobile devices NVR-5000 series NVR s Applications client for mobile devices for 5000 series NVR s - user manual ver.1.0 IMPORTANT SAFEGUARDS AND WARNINGS ATTENTION!
LED PAR 18x10W RGBW 4in1 IP65 F
 LED PAR 18x10W RGBW 4in1 IP65 F7100310 USER MANUAL / INSTRUKCJA OBSŁUGI LED PAR 18x10W RGBW 4in1 IP65 F7100310 Table of contents 1 Introduction... 2 2 Safety information... 2 2.1 Specification... 2 3 Installation...
 www.irs.gov/form990. If "Yes," complete Schedule A Schedule B, Schedule of Contributors If "Yes," complete Schedule C, Part I If "Yes," complete Schedule C, Part II If "Yes," complete Schedule C, Part
Rainbow Eye Bluetooth Speaker MA417 User s Manual
 Rainbow Eye Bluetooth Speaker MA417 User s Manual Opis funkcji: INSTRUKCJA OBSŁUGI Wbudowany Bluetooth 2.1 + bezprzewodowy moduł EDR Dzwięk audio przez Bluetooth, perfekcyjna jakość dzwięku oraz efekt
METHOD 2 -DIAGNOSTIC OUTSIDE
 VW MOTOMETER BOSCH METHOD 1 - OBD 2 METHOD 2 -DIAGNOSTIC OUTSIDE AFTER OPERATION YOU MUST DISCONECT ACU OR REMOVE FUSE FOR RESTART ODOMETER PO ZROBIENIU LICZNIKA ZDJĄĆ KLEMĘ LUB WYJĄĆ 2 BEZPIECZNIKI OD
Xblitz Professional P100
 Kamera samochodowa Xblitz Professional P100 Instrukcja obsługi Wstęp Dziękujemy za zakup naszego wideorejestratora Xblitz Professional P100. Proszę przeczytać uważnie instrukcję obsługi przed użyciem sprzętu
ARNOLD. EDUKACJA KULTURYSTY (POLSKA WERSJA JEZYKOWA) BY DOUGLAS KENT HALL
 BY DOUGLAS KENT HALL") Read Online and Download Ebook ARNOLD. EDUKACJA KULTURYSTY (POLSKA WERSJA JEZYKOWA) BY DOUGLAS KENT HALL DOWNLOAD EBOOK : ARNOLD. EDUKACJA KULTURYSTY (POLSKA WERSJA Click link bellow and free register
Read Online and Download Ebook ARNOLD. EDUKACJA KULTURYSTY (POLSKA WERSJA JEZYKOWA) BY DOUGLAS KENT HALL DOWNLOAD EBOOK : ARNOLD. EDUKACJA KULTURYSTY (POLSKA WERSJA Click link bellow and free register
TACHOGRAPH SIMULATOR DTCOSIM
 TACHOGRAPH SIMULATOR DTCOSIM Service Manual USB-KSIM interface General description The simulator is a device that is used as a replacement for tachograph in the vehicle where the tachograph is not mandatory,
WYŁĄCZNIK CZASOWY OUTDOOR TIMER
 003-582 PL WYŁĄCZNIK CZASOWY Instrukcja obsługi (Tłumaczenie oryginalnej instrukcji) Ważny! Przed użyciem uważnie przeczytaj instrukcję obsługi! Zachowaj ją na przyszłość. EN OUTDOOR TIMER Operating instructions
MaPlan Sp. z O.O. Click here if your download doesn"t start automatically
 Mierzeja Wislana, mapa turystyczna 1:50 000: Mikoszewo, Jantar, Stegna, Sztutowo, Katy Rybackie, Przebrno, Krynica Morska, Piaski, Frombork =... = Carte touristique (Polish Edition) MaPlan Sp. z O.O Click
Volcano MC-GM4 OPTICAL MOUSE USER S MANUAL MODECOM
 Volcano MC-GM4 OPTICAL MOUSE USER S MANUAL MODECOM Volcano MC-GM4 OPTICAL MOUSE PL Wymagania systemowe Komputer zgodny z systemem operacyjnym Windows Port USB Zawartość opakowania Myszka instrukcja obsługi
LED WALL WASHER 36x3W RGBW 3SC IP65 F
 USER MANUAL / INSTRUKCJA OBSŁUGI LED WALL WASHER 36x3W RGBW 3SC IP65 F7200168 LED WALL WASHER 36x3W RGBW 3SC IP65 F7200168 Table of contents 1 Introduction... 2 2 Safety information... 2 3 Product information...
Wojewodztwo Koszalinskie: Obiekty i walory krajoznawcze (Inwentaryzacja krajoznawcza Polski) (Polish Edition)
 (Polish Edition)") Wojewodztwo Koszalinskie: Obiekty i walory krajoznawcze (Inwentaryzacja krajoznawcza Polski) (Polish Edition) Robert Respondowski Click here if your download doesn"t start automatically Wojewodztwo Koszalinskie:
Wojewodztwo Koszalinskie: Obiekty i walory krajoznawcze (Inwentaryzacja krajoznawcza Polski) (Polish Edition) Robert Respondowski Click here if your download doesn"t start automatically Wojewodztwo Koszalinskie:
OpenPoland.net API Documentation
 OpenPoland.net API Documentation Release 1.0 Michał Gryczka July 11, 2014 Contents 1 REST API tokens: 3 1.1 How to get a token............................................ 3 2 REST API : search for assets
Zasady rejestracji i instrukcja zarządzania kontem użytkownika portalu
 Zasady rejestracji i instrukcja zarządzania kontem użytkownika portalu Rejestracja na Portalu Online Job Application jest całkowicie bezpłatna i składa się z 3 kroków: Krok 1 - Wypełnij poprawnie formularz
PL - GENESIS HX55 - INSTRUKCJA OBSŁUGI
 PL - GENESIS HX55 - INSTRUKCJA OBSŁUGI 1) INSTALACJA: Instalacja sprzętu: Znajdź wolny port USB, Podłącz słuchawki do komputera Słuchawki powinny być gotowe do pracy Instalacja oprogramowania. Umieść dołączoną
LED PAR 64 18x10W 4in1 CLASSIC F
 LED PAR 64 18x10W 4in1 CLASSIC F7100309 USER MANUAL / INSTRUKCJA OBSŁUGI LED PAR 64 18x10W 4in1 CLASSIC F7100309 Table of Contents 1 Introduction... 2 2 Safety information... 2 3 Product information...
SLU0056. Multifunctional Wireless Stereo Headphone
 SLU0056 Multifunctional Wireless Stereo Headphone Owner s manual Instrukcja obsługi EN PL Owner s manual 1. Technical parameter Bluetooth Protocol Frequency range Effective distance FM frequency range
LED PAR 18x10W RGBW 4in1 Aluminum single cast II ver. F
 LED PAR 18x10W RGBW 4in1 Aluminum single cast II ver. F71000269 USER MANUAL / INSTRUKCJA OBSŁUGI LED PAR 18x 10W RGBW 4in1 Aluminium single cast II ver. F71000269 Table of Contents 1 Introduction... 2
USB firmware changing guide. Zmiana oprogramowania za przy użyciu połączenia USB. Changelog / Lista Zmian
 1 / 8 Content list / Spis Treści 1. Hardware and software requirements, preparing device to upgrade Wymagania sprzętowe i programowe, przygotowanie urządzenia do aktualizacji 2. Installing drivers and
Volcano MC-GMX4 OPTICAL MOUSE USER S MANUAL MODECOM
 Volcano MC-GMX4 OPTICAL MOUSE USER S MANUAL MODECOM Volcano MC-GMX4 OPTICAL MOUSE Wymagania systemowe Komputer zgodny z systemem operacyjnym Windows Port USB Zawartość opakowania Myszka instrukcja obsługi
LED PAR 18x 10W RGBW 4in1 Aluminium single cast v.iii F B
 LED PAR 18x 10W RGBW 4in1 Aluminium single cast v.iii F7000048B USER MANUAL / INSTRUKCJA OBSŁUGI LED PAR 18x 10W RGBW 4in1 Aluminium single cast v.iii F7000048B Table of Contents 1 Introduction... 2 2
LED PAR 64 18x12W RGBW 4in1 ZOOM IP65 F
 LED PAR 64 18x12W RGBW 4in1 ZOOM IP65 F7100250 USER MANUAL / INSTRUKCJA OBSŁUGI LED PAR 64 18x12W RGBW 4in1 ZOOM IP65 F7100250 Table of contents 1 Introduction... 2 2 Safety information... 2 2.1 Specification...
2,5 HDD External Enclosure
 Exclusive Zewnętrzna kieszeń do dysku HDD 2,5 Instrukcja obsługi 2,5 HDD External Enclosure User Manual Kieszeń do dysku 2,5 Wprowadzenie Dziękujemy za zakup produktów z serii kieszenie HDD naszej firmy.
Universal Bluetooth speaker
 Universal Bluetooth speaker Owner s manual Instrukcja obsługi EN PL Safety instructions Owner s manual 1. Read this instruction manual before first use, and keep it for future reference. Producer is not
LED PAR 64 18x10W RGBW 4in1 IP64 PFC F
 LED PAR 64 18x10W RGBW 4in1 IP64 PFC F7100305 USER MANUAL / INSTRUKCJA OBSŁUGI LED PAR 64 18x10W RGBW 4in1 IP65 PFC F7100305 Table of Contents 1 Introduction... 2 2 Safety information... 2 3 Product information...
Rev Źródło:
 KAmduino UNO Rev. 20190119182847 Źródło: http://wiki.kamamilabs.com/index.php/kamduino_uno Spis treści Basic features and parameters... 1 Standard equipment... 2 Electrical schematics... 3 AVR ATmega328P
 www.irs.gov/form990. If "Yes," complete Schedule A Schedule B, Schedule of Contributors If "Yes," complete Schedule C, Part I If "Yes," complete Schedule C, Part II If "Yes," complete Schedule C, Part
Samurai SHARK SH903. RF Combo Wireless Mouse & Keyboard
 Samurai SHARK SH903 RF Combo Wireless Mouse & Keyboard Instrukcja obsługi Instalacja baterii SH903-Samurai Uwaga! Bezprzewodowa myszka optyczna używa baterii typu AAA. Żeby osiągnąć najlepszą wydajność
 Podłączyć do gniazda Przykręcić nakrętkę radełkowaną Sposób montażu akcesoriów Wszystkie trzy akcesoria (tj. lusterko, haczyk i magnes) są mocowane do kamery ten sam sposób, co poniżej. Sposób montażu:
Pomoc do programu konfiguracyjnego RFID-CS27-Reader User Guide of setup software RFID-CS27-Reader
 2017-01-24 Pomoc do programu konfiguracyjnego RFID-CS27-Reader User Guide of setup software RFID-CS27-Reader Program CS27 Reader należy uruchomić przez wybór opcji CS27 i naciśnięcie przycisku START. Programme
Compatible cameras for NVR-5000 series Main Stream Sub stream Support Firmware ver. 0,2-1Mbit yes yes yes n/d
 NOVUS IP CAMERAS CLASSIC CAMERAS Compatible cameras for NVR-5000 series Main Stream Sub stream Support Firmware ver. Resolution Bitrate FPS GOP Resolution Bitrate FPS GOP Audio Motion detection NVIP 5000
LED Spyder 8x10 CREE 4in1 F
 USER MANUAL / INSTRUKCJA OBSŁUGI LED Spyder 8x10 CREE 4in1 F7300215 LED Spyder 8x10 CREE 4in1 F7300215 Table of contents 1 Introduction... 2 2 Safety information... 2 3 Product information... 2 3.1 Specification...
OSTC GLOBAL TRADING CHALLENGE MANUAL
 OSTC GLOBAL TRADING CHALLENGE MANUAL Wrzesień 2014 www.ostc.com/game Po zarejestrowaniu się w grze OSTC Global Trading Challenge, zaakceptowaniu oraz uzyskaniu dostępu to produktów, użytkownik gry będzie
POWER BANK. Owner s manual Instrukcja obsługi EN PL
 POWER BANK Owner s manual Instrukcja obsługi EN PL Safety instructions Owner s manual 1. Read this instruction manual before first use, and keep it for future reference. Producer is not responsible for
 www.irs.gov/form990. If "Yes," complete Schedule A Schedule B, Schedule of Contributors If "Yes," complete Schedule C, Part I If "Yes," complete Schedule C, Part II If "Yes," complete Schedule C, Part
Wojewodztwo Koszalinskie: Obiekty i walory krajoznawcze (Inwentaryzacja krajoznawcza Polski) (Polish Edition)
 (Polish Edition)") Wojewodztwo Koszalinskie: Obiekty i walory krajoznawcze (Inwentaryzacja krajoznawcza Polski) (Polish Edition) Robert Respondowski Click here if your download doesn"t start automatically Wojewodztwo Koszalinskie:
Wojewodztwo Koszalinskie: Obiekty i walory krajoznawcze (Inwentaryzacja krajoznawcza Polski) (Polish Edition) Robert Respondowski Click here if your download doesn"t start automatically Wojewodztwo Koszalinskie:
LED MOVING HEAD 60W F
 USER MANUAL / INSTRUKCJA OBSŁUGI LED MOVING HEAD 60W F1700044 LED MOVING HEAD 60W F1700044 Table of Contents 1 Introduction... 2 2 Safety information... 2 3 Product information... 2 3.1 Specification...
099 Łóżko półpiętrowe 2080x1010(1109)x Bunk bed 2080x1010(1109)x1600 W15 INSTRUKCJA MONTAŻU ASSEMBLY INSTRUCTION
x Bunk bed 2080x1010(1109)x1600 W15 INSTRUKCJA MONTAŻU ASSEMBLY INSTRUCTION") INSTRUKCJA MONTAŻU ASSEMBLY INSTRUCTION 2 WAŻNE, ZACHOWAĆ DO PÓŹNIEJSZEGO STOSOWANIA- UWAŻNIE PRZECZYTAĆ IMPORTANT, SAVE FOR FURTHER USAGE- READ CAREFULLY INSTRUKCJA UZYTKOWANIA USER S MANUAL. Aby uniknąć
INSTRUKCJA MONTAŻU ASSEMBLY INSTRUCTION 2 WAŻNE, ZACHOWAĆ DO PÓŹNIEJSZEGO STOSOWANIA- UWAŻNIE PRZECZYTAĆ IMPORTANT, SAVE FOR FURTHER USAGE- READ CAREFULLY INSTRUKCJA UZYTKOWANIA USER S MANUAL. Aby uniknąć
Katowice, plan miasta: Skala 1: = City map = Stadtplan (Polish Edition)
") Katowice, plan miasta: Skala 1:20 000 = City map = Stadtplan (Polish Edition) Polskie Przedsiebiorstwo Wydawnictw Kartograficznych im. Eugeniusza Romera Click here if your download doesn"t start automatically
Katowice, plan miasta: Skala 1:20 000 = City map = Stadtplan (Polish Edition) Polskie Przedsiebiorstwo Wydawnictw Kartograficznych im. Eugeniusza Romera Click here if your download doesn"t start automatically
Instrukcja obsługi miernika zużycia energii. Operating Instructions for Power Meter
 POL SKI Instrukcja obsługi miernika zużycia energii Operating Instructions for Power Meter 406-074 PL EN Instrukcja obsługi w oryginale Operating instructions in original 20.06.2011 Jula AB POLSKI ZASADY
Trzymać z dala od źródeł ciepła takich jak kaloryfer, piec, kominek itp. Uszkodzenia mechaniczne nie podlegają reklamacji.
 Ostrzeżenie Trzymać poza zasięgiem dzieci i zwierząt. Połknięcie lub wykorzystanie w inny niewłaściwy sposób może spowodować uduszenie lub inne obrażenia. Jeśli podejrzewasz, że dziecko połknęło produkt,
AJ-SYB007X AJ-SYB008X
 INSTRUKCJA OBSŁUGI XTR CARP SENSITIVE Zestaw sygnalizatorów z radiopowiadamianiem AJ-SYB007X AJ-SYB008X FUNKCJE KLAWISZY A Dioda B Regulacja tonu C Włącznik lampki D Dioda pamięci E Czujnik F Włącznik/Regulacja
LED PAR 64 7x10W RGBW 4in1 ABS Remote Control F
 LED PAR 64 7x10W RGBW 4in1 ABS Remote Control F7100303 USER MANUAL / INSTRUKCJA OBSŁUGI LED PAR 64 7x10W RGBW 4in1 ABS Remote Control F7100303 Table of Contents 1 Introduction... 2 2 Safety information...
MV505A Digital camera for car Cyfrowa kamera samochodowa
 MV505A Digital camera for car Cyfrowa kamera samochodowa Instruction Manual Instrukcja obsługi 2 9 Vakomtek S.A. Vakomtek S.A. 1 Vakomtek S.A. Vakomtek S.A. ENG Introduction of the vehicle-mounted camera
LED WALL WASHER 9x10W RGBW 4in1 DMX WIFI + ACU IP65 F a
 LED WALL WASHER 9x10W RGBW 4in1 DMX WIFI + ACU IP65 F7001013a USER MANUAL / INSTRUKCJA OBSŁUGI LED WALL WASHER 9x10W RGBW 4in1 DMX WIFI + ACU IP65 F7001013a Table of contents 1 Introduction... 2 2 Safety
EN Desktop Weather Station Instruction Manual
 V3067 EN Desktop Weather Station Instruction Manual Introduction This desktop weather station comes with weather prediction, clock, calendar, day, temperature and humidity display. It is battery powered
Hippo Boombox MM209N CD. Instrukcja obsługi User s Manual
 Hippo Boombox Instrukcja obsługi User s Manual OPIS PRZYCISKÓW: PL ON-OFF/MODE: 1. Włącz on/off: Naciśnij przycisk, aby włączyć urządzenie. Przytrzymaj dłużej, aby wyłączyć. 2. MODE: Wybierz źródło sygnału:
LED WASHER RGB IP34 F
 USER MANUAL / INSTRUKCJA OBSŁUGI LED WASHER RGB IP34 F7200182 LED WASHER RGB IP34 F7200182 Table of contents 1 Introduction... 2 2 Safety information... 2 3 Product information... 2 3.1 Specification...
LED MINI DERBY 4x3W RGBW F
 USER MANUAL / INSTRUKCJA OBSŁUGI LED MINI DERBY 4x3W RGBW F7000598 LED MINI DERBY 4x3W RGBW F7000598 Table of contents 1 Introduction... 2 2 Safety information... 2 3 Product information... 2 3.1 Specification...
Moduł odtwarzacza plików MP3 audio
 Gotronik PPHU Dane aktualne na dzień: 19-01-2017 09:19 Link do produktu: /modul-odtwarzacza-plikow-mp3-audio-p-2905.html Moduł odtwarzacza plików MP3 audio Cena Dostępność Numer katalogowy 35,00 zł Dostępny
DM-ML, DM-FL. Auxiliary Equipment and Accessories. Damper Drives. Dimensions. Descritpion
 DM-ML, DM-FL Descritpion DM-ML and DM-FL actuators are designed for driving round dampers and square multi-blade dampers. Example identification Product code: DM-FL-5-2 voltage Dimensions DM-ML-6 DM-ML-8
Revenue Maximization. Sept. 25, 2018
 Revenue Maximization Sept. 25, 2018 Goal So Far: Ideal Auctions Dominant-Strategy Incentive Compatible (DSIC) b i = v i is a dominant strategy u i 0 x is welfare-maximizing x and p run in polynomial time
Mp3 Player MM285. Instrukcja obsługi User s Manual
 Mp3 Player MM285 Instrukcja obsługi User s Manual User s Manual MA402 User Manual... 3 Key Functions... 4 Handling TF/SD Card... 5 Handling LINE-IN... 5 Handling Bluetooth... 5 Charging... 6 Warnings...
Pielgrzymka do Ojczyzny: Przemowienia i homilie Ojca Swietego Jana Pawla II (Jan Pawel II-- pierwszy Polak na Stolicy Piotrowej) (Polish Edition)
 (Polish Edition)") Pielgrzymka do Ojczyzny: Przemowienia i homilie Ojca Swietego Jana Pawla II (Jan Pawel II-- pierwszy Polak na Stolicy Piotrowej) (Polish Edition) Click here if your download doesn"t start automatically
Pielgrzymka do Ojczyzny: Przemowienia i homilie Ojca Swietego Jana Pawla II (Jan Pawel II-- pierwszy Polak na Stolicy Piotrowej) (Polish Edition) Click here if your download doesn"t start automatically
LED PAR 36 12x3W RGBW F
 USER MANUAL / INSTRUKCJA OBSŁUGI LED PAR 36 12x3W RGBW F7000251 LED PAR 36 12x3W RGBW F7000251 Table of contents 1 Introduction... 2 2 Safety information... 2 3 Product information... 2 3.1 Specification...